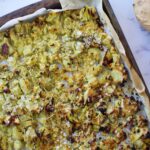
If you have a corn allergy then you need this Corn Free Sweet Potato Cornbread in your life! It’s also gluten free and dairy free, so it’s the perfect allergy friendly option for Thanksgiving.
gluten free and corn free sweet potato cornbread
Did you know you can make corn-free cornbread? It’s true! As someone who can’t eat corn, I sure miss it. Corn is delicious, but this corn-free cornbread tastes eerily similar to the Jiffy corn muffins I grew up on. And now I’ve eaten way too many slices.
This cornbread uses tigernut flour to get the consistency and taste we’re going for, but you can also use almond flour. I added mashed sweet potato to amp up the nutrient content and play into the flavor. You can’t even taste the sweet potato, so if you’ve got picky eaters in your house, this is a great recipe for sneaking veggies in.
1/4 cup melted butter (butter, vegan or otherwise, works best in this recipe, but you can get away with using a neutral oil, as well)
2 eggs
3 Tbsp of honey
1/2 cup milk of choice
What’s Tigernut Flour?
Tigernut is not a nut, it’s a tuber. I use tigernut flour in a lot of my recipes because it’s a great alternative to almond flour for those with allergies (like me!). Tigernut also have a slight sweetness to them, which allows me to use less added sweetener in my recipes. It’s a win-win! If you can’t access tigernut flour though, you can use almond flour instead.
How to serve gluten free cornbread
What’s cornbread without a thick slather of (dairy free) butter and generous drizzle of honey? This cornbread tastes best warm, so if you make this cornbread ahead of time, I suggest warming it in the oven at 300F for about 20 minutes before serving. You can warm it up wrapped in tinfoil or in a glass dish.
This corn-free cornbread has a similar taste and texture to regular cornbread, but without the corn! It’s also completely gluten and dairy free and made nutrient dense with the addition of sweet potato.
1/4cupmelted butter(butter, vegan or otherwise, works best in this recipe, but you can get away with using a neutral oil, as well)
2eggs
3Tbspof honey
1/2cupmilk of choice
Instructions
Preheat oven to 350F.
Sift the tigernut flour and whisk in the gluten free flour, baking powder, baking soda, and salt. Set aside.
In a large bowl, add the sweet potato, eggs, butter, honey, and milk in a bowl. Use a hand mixer to beat all the ingredients together on medium speed until well combined.
Add the dry ingredients to the wet and mix on low until combined. Let batter sit while you prepare the baking dish.
Grease a 9×9 inch glass baking dish.
Pour the batter into the baking dish. Bake for 32-35 minutes, until a toothpick comes out clean. Let cool before slicing.
Serve warmed with a slather of butter or coconut oil and a drizzle of honey!
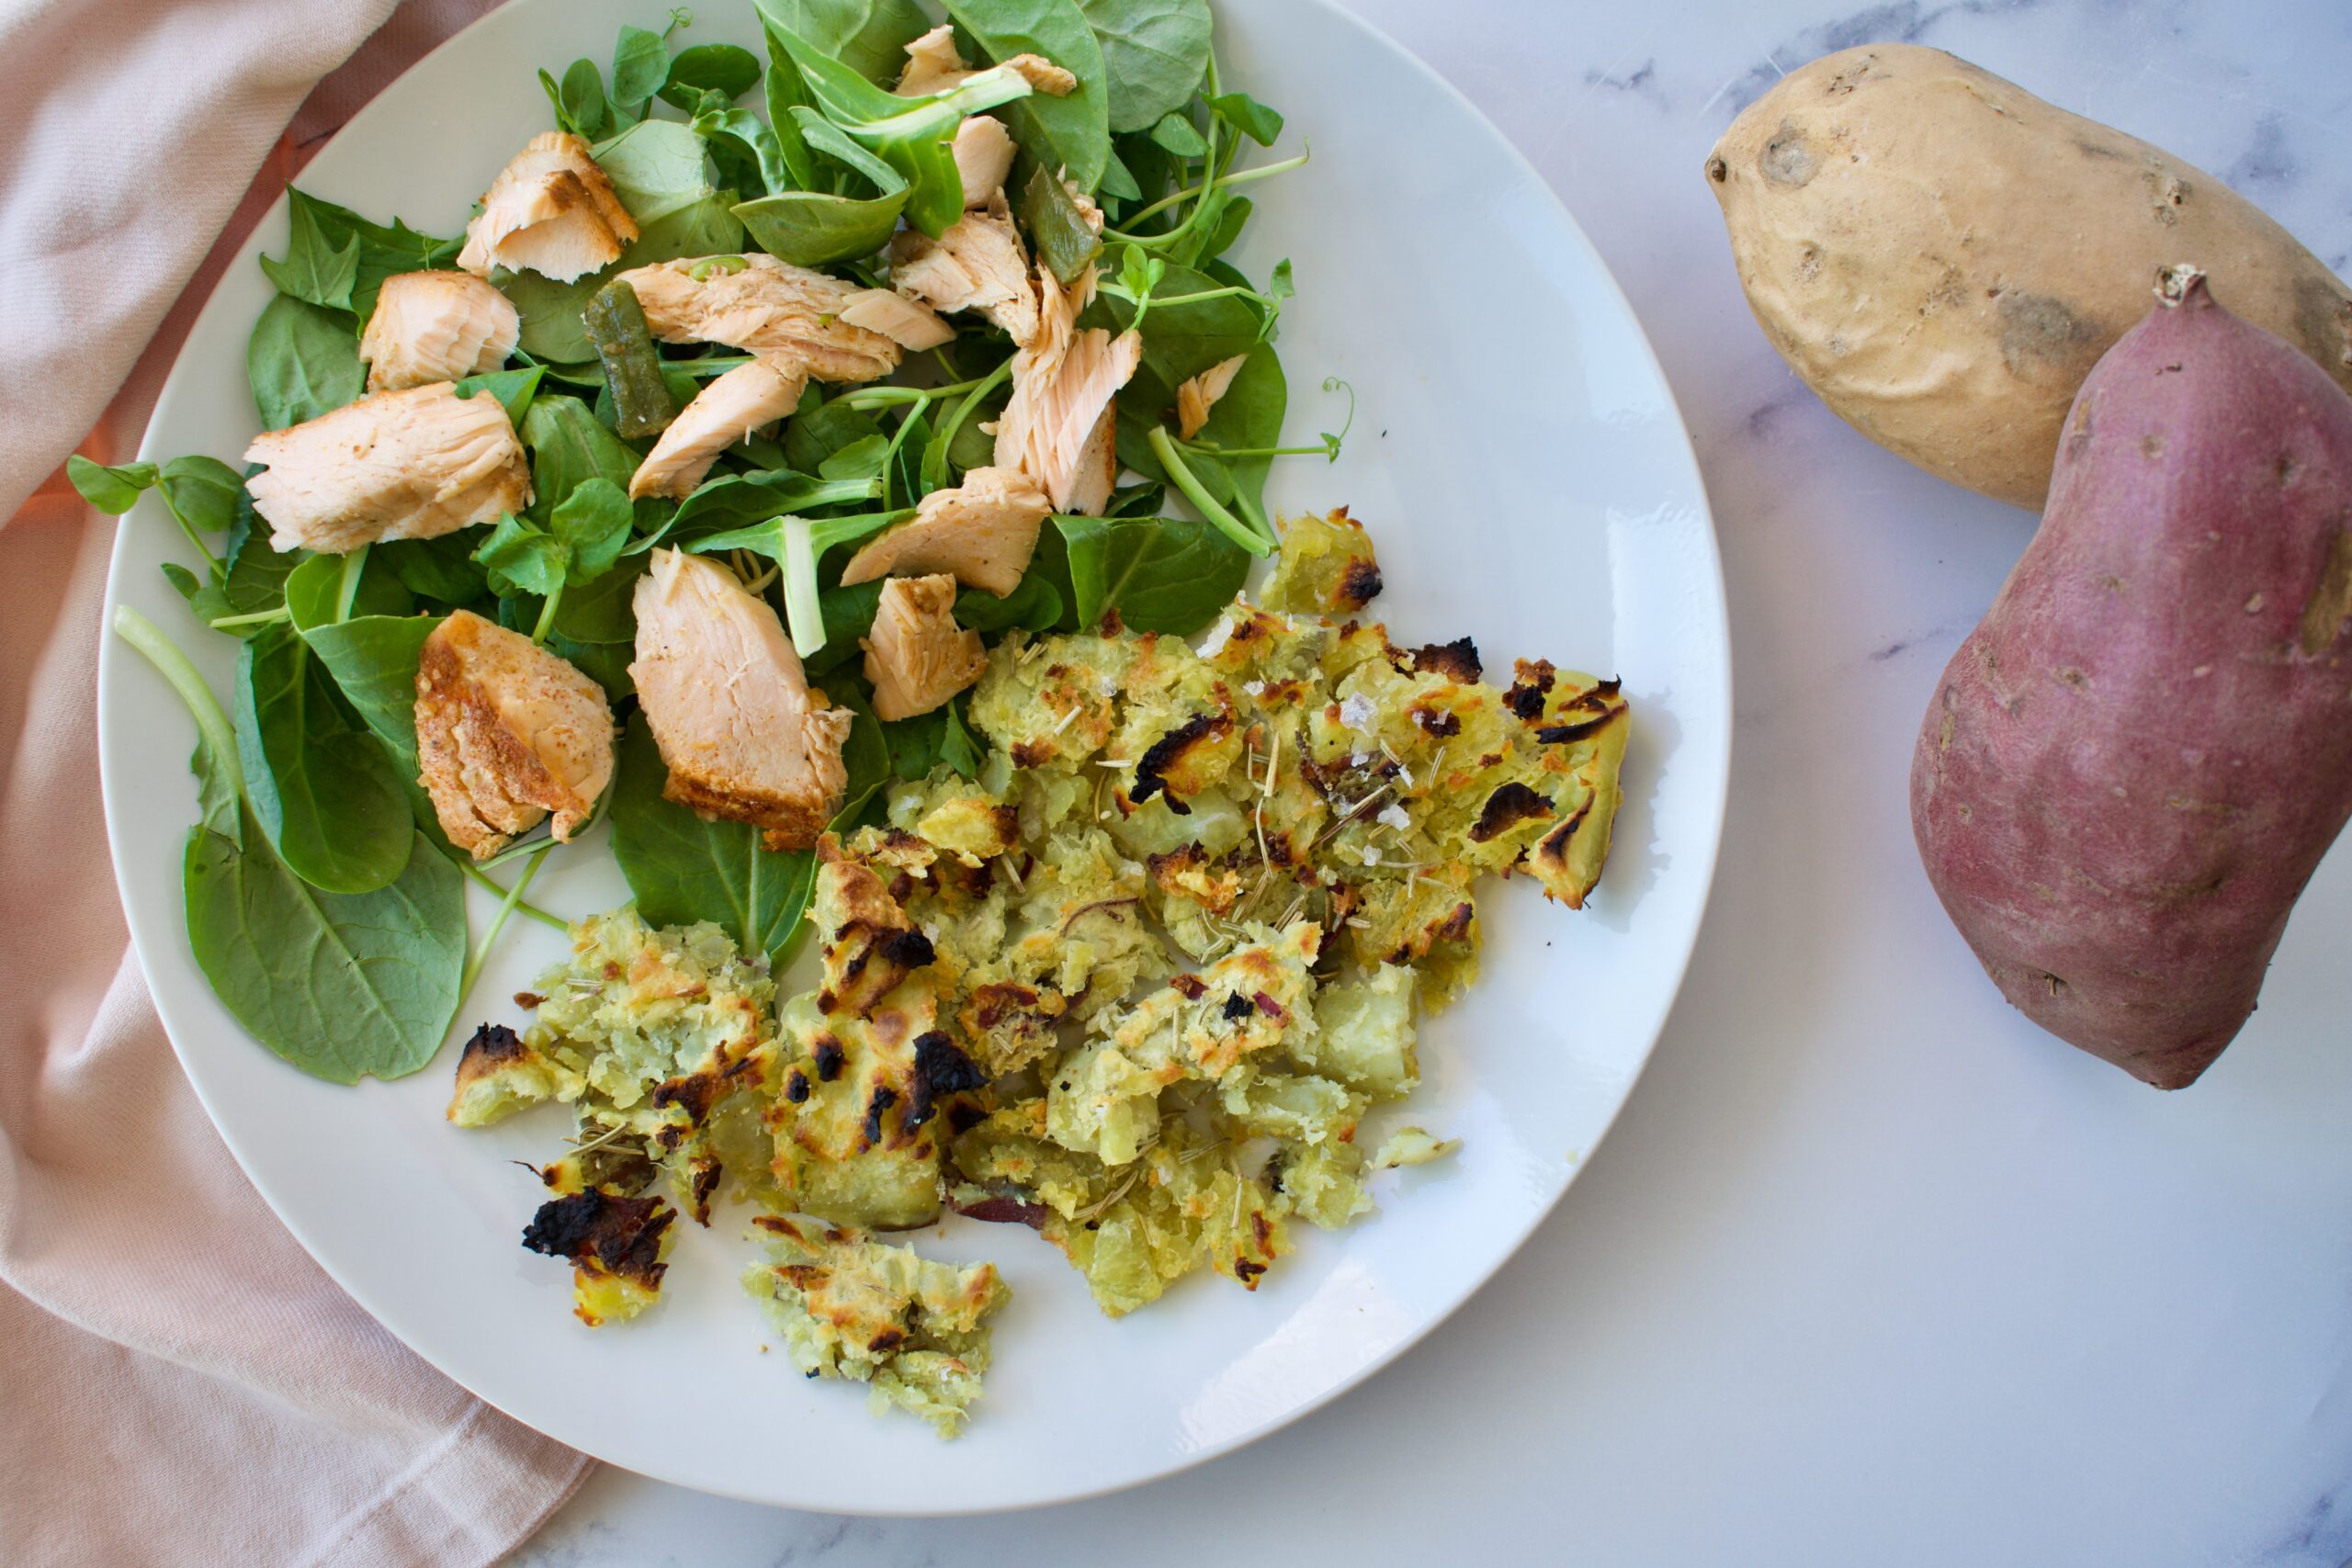
Japanese sweet potatoes are the superior sweet potato. They are so sweet and delicious! They pair well with almost anything and take on flavors in a lovely way. I eat them all the time, but wanted to find a new way to cook them. This crispy smashed version is fantastic.
After steaming the sweet potatoes, we’ll smash and broil them to get a crispy top. Of course, lots of oil and butter to keep them moist and delicious, plus some herbs for a little pop of flavor. This is a delicious, allergy friendly side dish that will please everyone!
This side dish is sure to please with it’s sweet and salty, soft and crunchy combo. We’re using my favorite sweet potatoes combined with aromatic herbs for a delicious potato dish!
Ingredients
2-3Japanese sweet potatoes
2-3tbspolive oilI prefer the garlic infused kind
1tbspdried thyme
1tbspdried rosemary
1tbspflakey sea salt
Butter of choiceI used a vegan variety
Instructions
Chop your sweet potatoes into large chunks and steam until fork tender.
Preheat oven to broil as you prep the potatoes.
Spread steamed potatoes on a parchment baking sheet and use the bottom of a glass to smash them down slightly. They may stick, just smash and scrape off the bottom of the glass. This doesn’t have to look any type of way.
Once smashed, make sure the sweet potatoes are evenly spread out.
Drizzle with olive oil, enough to cover them generously. Then sprinkle the thyme, rosemary, and salt evenly over top.
Broil for 8-15 minutes. The time will depend on your oven. You want a light crisp on the top without burning them.
I made this at Thanksgiving this year and I essentially just winged it (okay, when do I not?). It still turned out delicious, of course, and was a must share with all of you. Japanese sweet potatoes are by far my favorite sweet potatoes. They are the sweetest variety and I knew mixing them with the slightly more tart turnip would make for a good combo. The turnip balances the sweetness of the sweet potato and the creamy coconut milk sauce brings it all together.
Japanese Sweet Potato and Turnip Gratin
Serves 4-6
Ingredients:
-2 large Japanese sweet potatoes
-3 turnips
-1 can full fat coconut milk
-1/2 cup water
-2 tbs. coconut butter (alternatively you can use maple syrup, the sauce just won’t be as thick)
-1 tsp lemon juice
-2 tbs fresh thyme, finely chopped
-1 tbs dried sage
-1 tbs fresh rosemary,
-1 tsp cinnamon
-1/4 tsp. salt
-1-2 tbs. tapioca or arrowroot starch
Preheat the oven to 375 F.
Peel your sweet potatoes and turnips. Using a mandolin (this is the easiest way), slice both vegetables 1/4 inch thick.
Place a layer of sweet potato slices on the bottom of a glass baking dish (9×9 or larger). Next, place a layer of turnip slices. Repeat until you use up all the veggies so you have layers of sweet potato then turnip.
In a medium saucepan, heat the coconut milk, water, and coconut butter (or maple syrup) over low heat until everything is liquid. Add in the lemon juice, herbs and spices, salt and mix to combine. Add in the starch 1/2 tbs. at a time, whisking continuously until the sauce thickens, should take about 3-5 minutes. You should have something slightly more watery than gravy but close to a gravy-like consistency.
Pour the sauce evenly over the vegetables and tip the baking dish from side to side to make sure the sauce seeps down between the layers.
Bake in the oven for about 45-50 minutes or until vegetables are fork tender. Keeps well in the fridge for up to 5 days.
Honestly, I wasn’t sure what to call this recipe and my title isn’t very creative. I think it gets the point across, though, right? This recipe was inspired by Samantha’s Beef Bulgogi Pan recipe mixed with my Allergy Friendly Steak and Potatoes. I’ve taken the inspiration from Samantha’s recipe and made this version completely low-FODMAP friendly.
I wasn’t sure it was going to turn out all that fantastic, but I was a bit blown away by how delicious it ended up being. I immediately knew I was going to have to share the recipe! So here we are. I used sliced fennel instead of onion and OMG, have you ever had roasted fennel? It’s freaking delicious! I had never had it before, but I think it’s going to be a staple in my diet now.
One-Pan Baked Steak and Veggies
Serves 3-4
Ingredients:
-1 lbs. flap meat steak, sliced against the grain into strips
-1 large fennel bulb, thinly sliced
-6 baby bok choy
-4 zucchini, spiralized
-1 tbs. olive oil
Marinade:
1/3 cup coconut aminos
1 tbs. olive oil
1 tsp. molasses
1 tbs. dried or fresh oregano
1 tbs. dried or fresh thyme
1/8 tsp. salt plus more for seasoning
Mix all marinade ingredients together and toss with steak strips in a bowl. Set aside at room temperature to marinate.
Preheat oven to 450F.
Toss your fennel bulb with a about a teaspoon of the olive oil (just enough of a drizzle to lightly coat the fennel) and a sprinkle of salt. Spread onto a large baking sheet (I always line mine with parchment paper for easy clean up, but you don’t have to) and place in the oven while it is preheating and you are preparing everything else.
While oven is preheating, thinly slice your bok choy and spiralize your zucchini. If you don’t have a spiralizer, you can use a vegetable peeler to get strips or noodles of zucchini.
Once oven is preheated, remove the baking sheet with the fennel and add the rest of the veggies to the fennel. Toss everything together with the rest of the olive oil and salt to taste. Spread half the veggies on one side of the pan and half on the other. Lay the steak strips down the middle then drizzle the remaining marinade sauce from the bowl over everything.
Bake for 20 minutes then broil for 5 minutes at the end to gently brown the steak and veggies (trust me, so delicious!).
Scoop veggies onto a plate or into a bowl then top with some steak and enjoy!
The other week I made Nourished Wellness’s AIP Chicken Flautas (so good, I highly recommend). I wanted some sort of relish to serve over them and that is how this recipe came to be. This relish works well in these winter months while citrus is still in season. There is a sweetness and saltiness plus creaminess from the avocado that makes this relish super fun and hits so many areas of your palate.
This is a great substitute for a corn-based relish (often used in many Mexican dishes). It would be great on top of tacos, fish, or alongside a basic chicken dish. There are so many ways to use this recipe!
Yellow Squash, Citrus, and Avocado Relish
Ingredients:
1-2 tbs. olive oil or avocado oil
2 yellow squash/zucchini, diced
1 orange (most citrus varieties will work, I like mandarin oranges or even half a grapefruit)
1 avocado
1/4 tsp. himalayan pink salt
Optional: 1/4 cup chopped cilantro
Heat your oil over medium heat in a large frying pan. Add the diced yellow squash and sauté until soft, about 7-10 minutes. If at any point the squash begins to stick, add more oil.
While squash is sautéing, peel and separate the orange slices. Using a sharp knife (this is key so that you don’t end up squishing the citrus), gently cut the citrus slices into about 6-8 pieces (they should be small, not quite diced).
Slice your avocado in half, scoop out the flesh with a spoon, and cut the avocado into chunks (again, not quite diced but small chunks).
Once your squash has cooked, let cool completely. Once cooled, combine all ingredients in a bowl and lightly toss.
Serve immediately (tastes best fresh, but it can be kept refrigerated for a couple days).
What do you want to serve this relish with?! Let me know in the comments! I love hearing all your cooking ideas 🙂
Thanksgiving is coming up in America, which means holiday recipes! But this time of year can be stressful and many are burnt out by the end of the year, so easy holiday recipes means more time to enjoy family, friends, and the actual holidays themselves. This recipe is only four ingredients (okay five if you count the salt) and very simple to make.
allergy friendly cinnamon and ginger roasted carrots
I utilize ginger and cinnamon not only because they go fantastic with the sweetness from the carrots and are two of my favorite spices, but also for their health benefits. Check it out:
Did you know cinnamon is great for balancing blood sugar? The perfect spice to include on a day where you’ll be eating a lot. It’s also great for fighting infections and lowering inflammation.
I’ve talked about ginger quite a bit because it’s my all time favorite, but it’s also a great anti-inflammatory, fantastic for digestion, and has been shown to help balance blood sugar and cholesterol.
Utilizing these two spices during the holiday season is fantastic with all the heavy food this time of year!
This simple, easy side dish will make holiday or weeknight cooking easier! This recipe is only five ingredients, but packed with flavor, fiber, and gut healthy benefits.
Servings 4people
Author Victoria Faling
Ingredients
2lbs.rainbow carrots
2Tbspcoconut oil
1tspground ginger
1tspground cinnamon
1/2tsppink himalayan salt
Instructions
Preheat the oven to 425F
Line 2 baking sheets with parchment paper.
Trim your carrots then cut in half lengthwise and lay in one even layer on the baking sheets.
Toss carrots in oil to fully coat.
Mix the ginger, cinnamon, and salt in a small bowl then sprinkle the carrots with the mixture.
Roast for about 35-45 minutes, flipping half way, until the carrots are fork tender and just beginning to crisp.
Hi! I'm Victoria. I was diagnosed with Lyme in 2012 and have been on a healing journey ever since. I love helping others on their road to healing through allergy friendly recipes, exercise, and overall well-being.