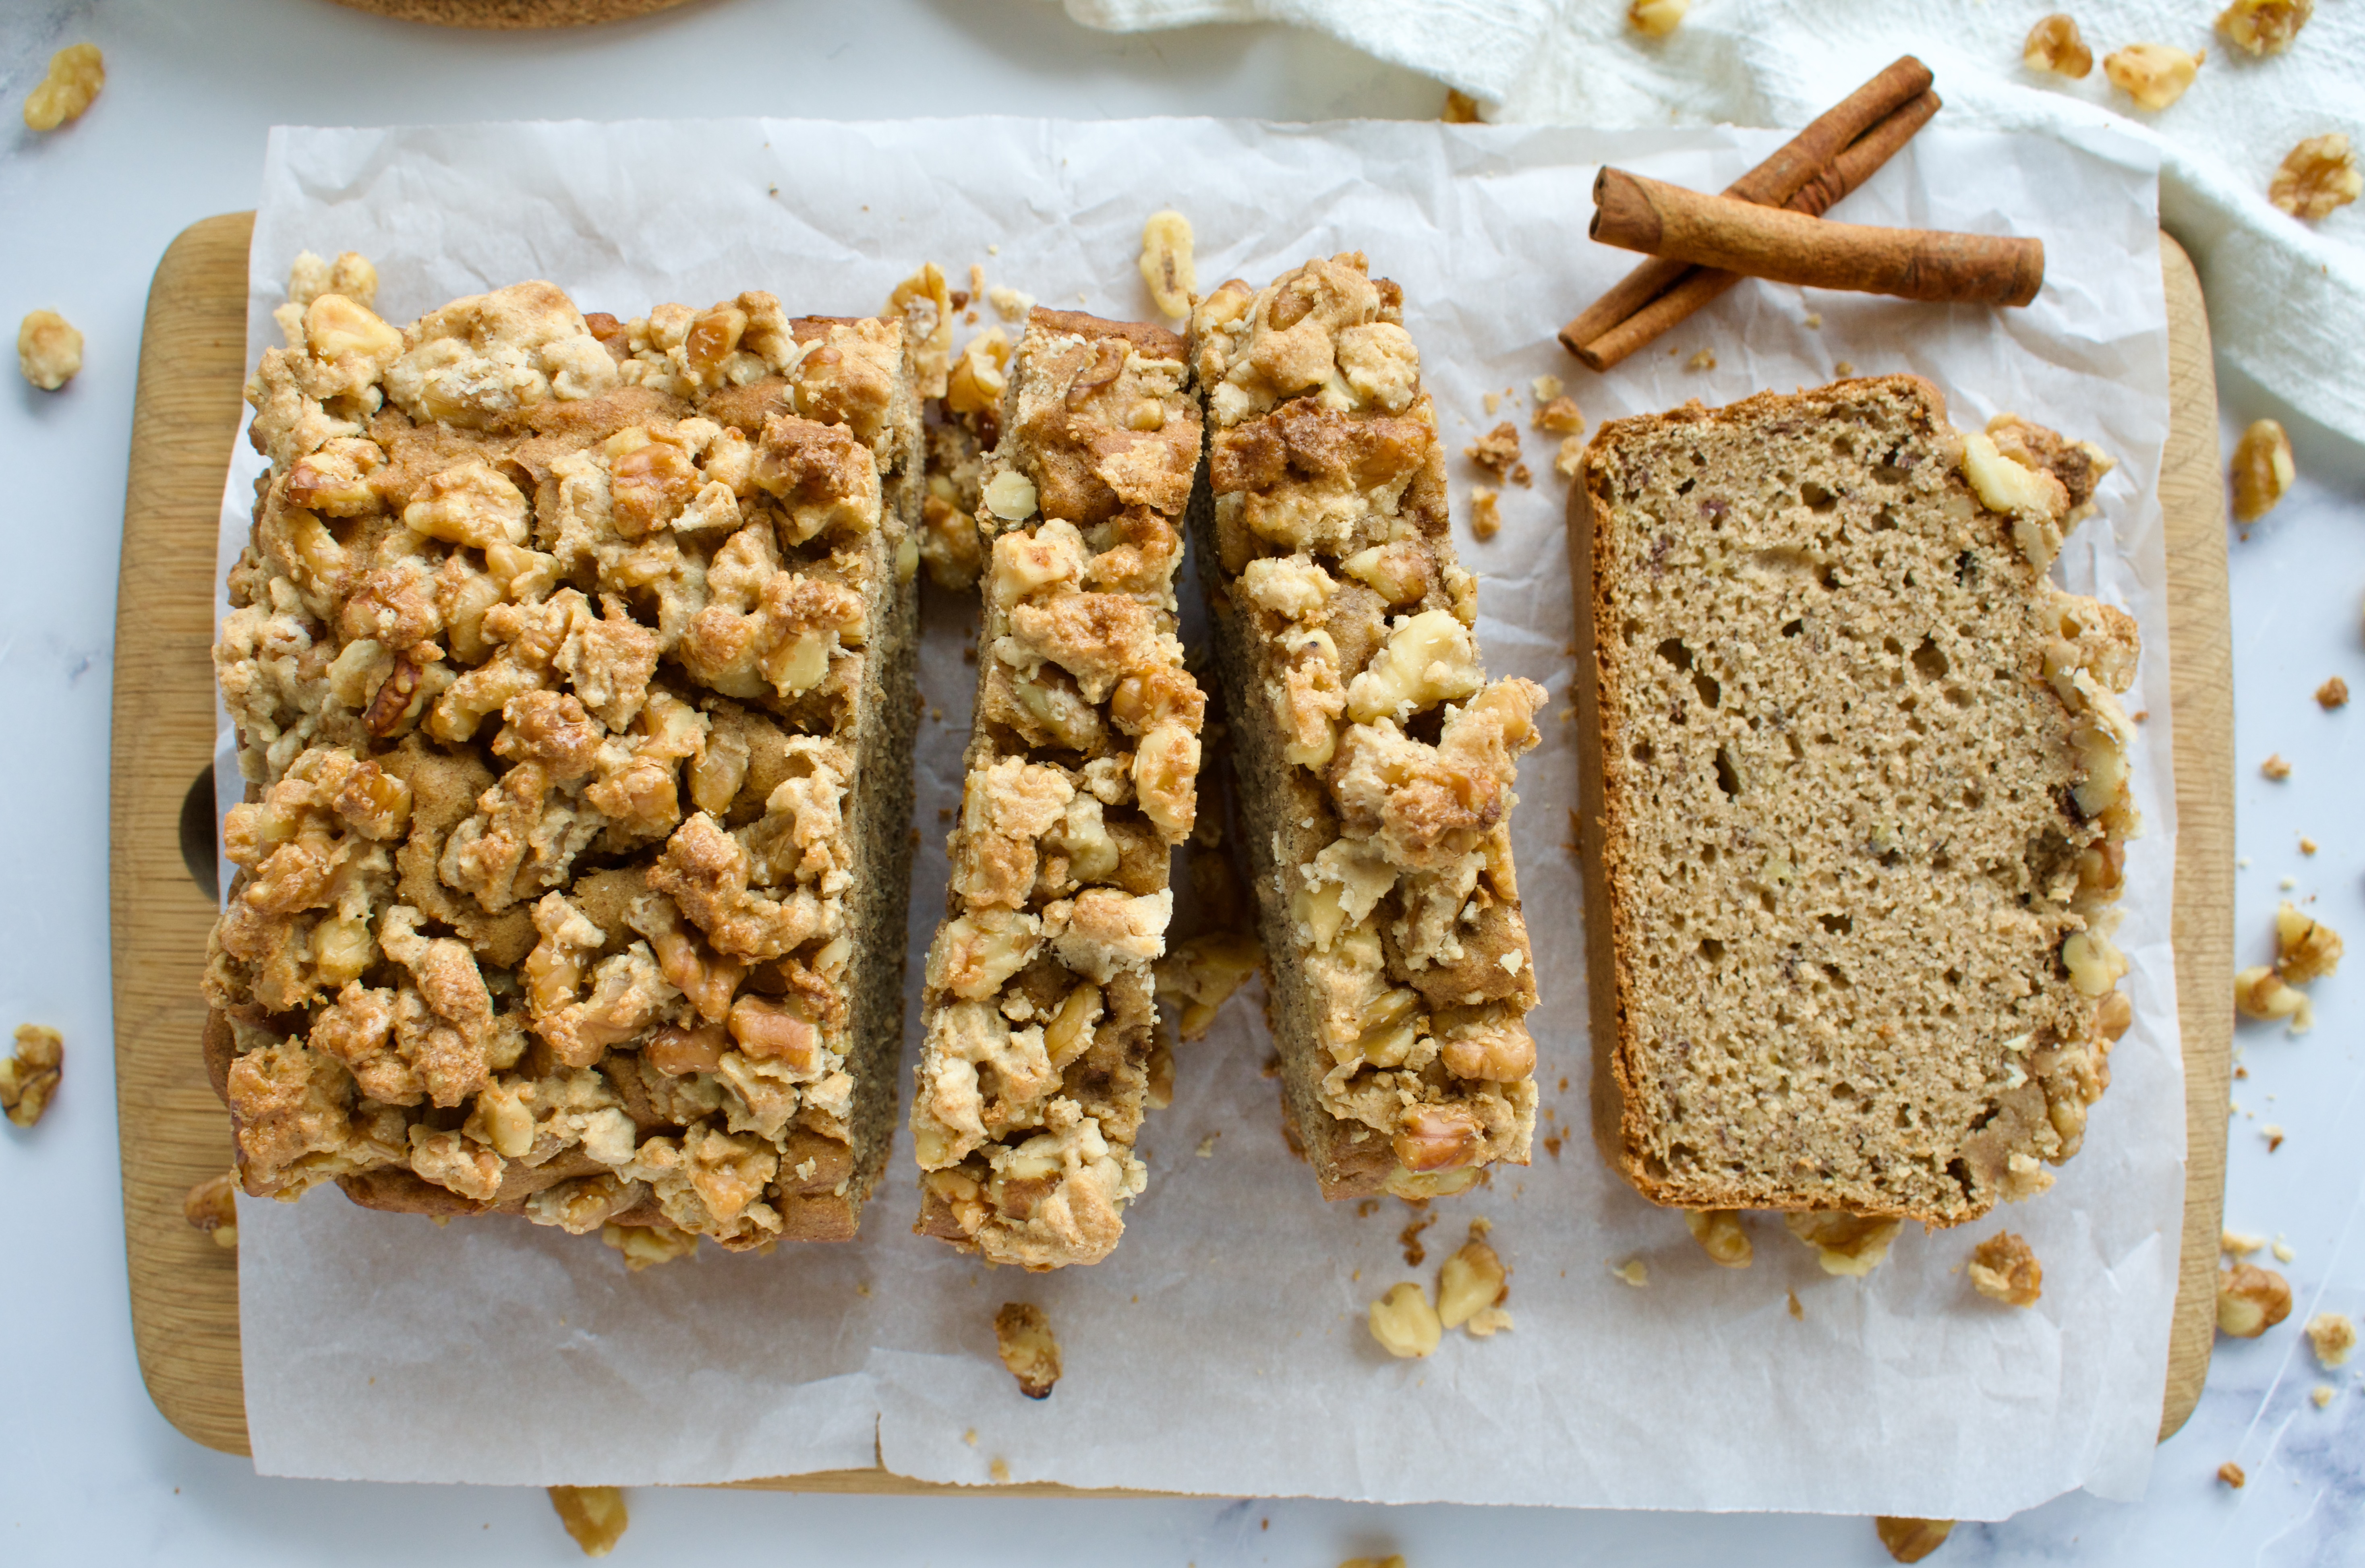
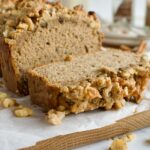
Soft and moist gluten free banana bread is topped with a sweet and crunchy walnut crumble to make this delicious Gluten Free Walnut Crumble Banana Bread.
gluten free walnut crumble banana bread
This gluten free banana bread is also dairy free and refined sugar free! She truly is a masterpiece. I love making banana bread with ripe bananas and if you’ve got some laying around, you definitely need to try this recipe.
Ingredients for Gluten Free Walnut Crumble Banana Bread
Gluten Free Banana Bread
Bananas
Eggs
Olive oil: melted coconut oil or butter should also work!
Applesauce or yogurt: either one will work in this recipe.
Maple syrup: we’re keep this banana bread refined sugar free by using maple syrup as the sweetener. There’s not too much, just enough to compliment the natural sweetness of the bananas. Low sugar, healthy, and tasty banana bread? Yes please!
gluten free and dairy free walnut crumble banana bread
How to Store This Gluten Free Banana Bread
You can store this walnut crumble banana bread in an airtight container at room temperature for 3 days or pop it in the fridge for up to 5. This bread also freezes nicely. Just slice and wrap each slice individually with plastic wrap. Place in a freezer safe bag and freeze! This bread tastes amazing warmed up, so de-thaw a slice then warm in the oven or microwave.
gluten free and dairy free walnut crumble banana bread
Soft and moist gluten free banana bread is topped with a sweet and crunchy walnut crumble to make this delicious Gluten Free Walnut Crumble Banana Bread. This bread is also completely dairy free and refined sugar free.
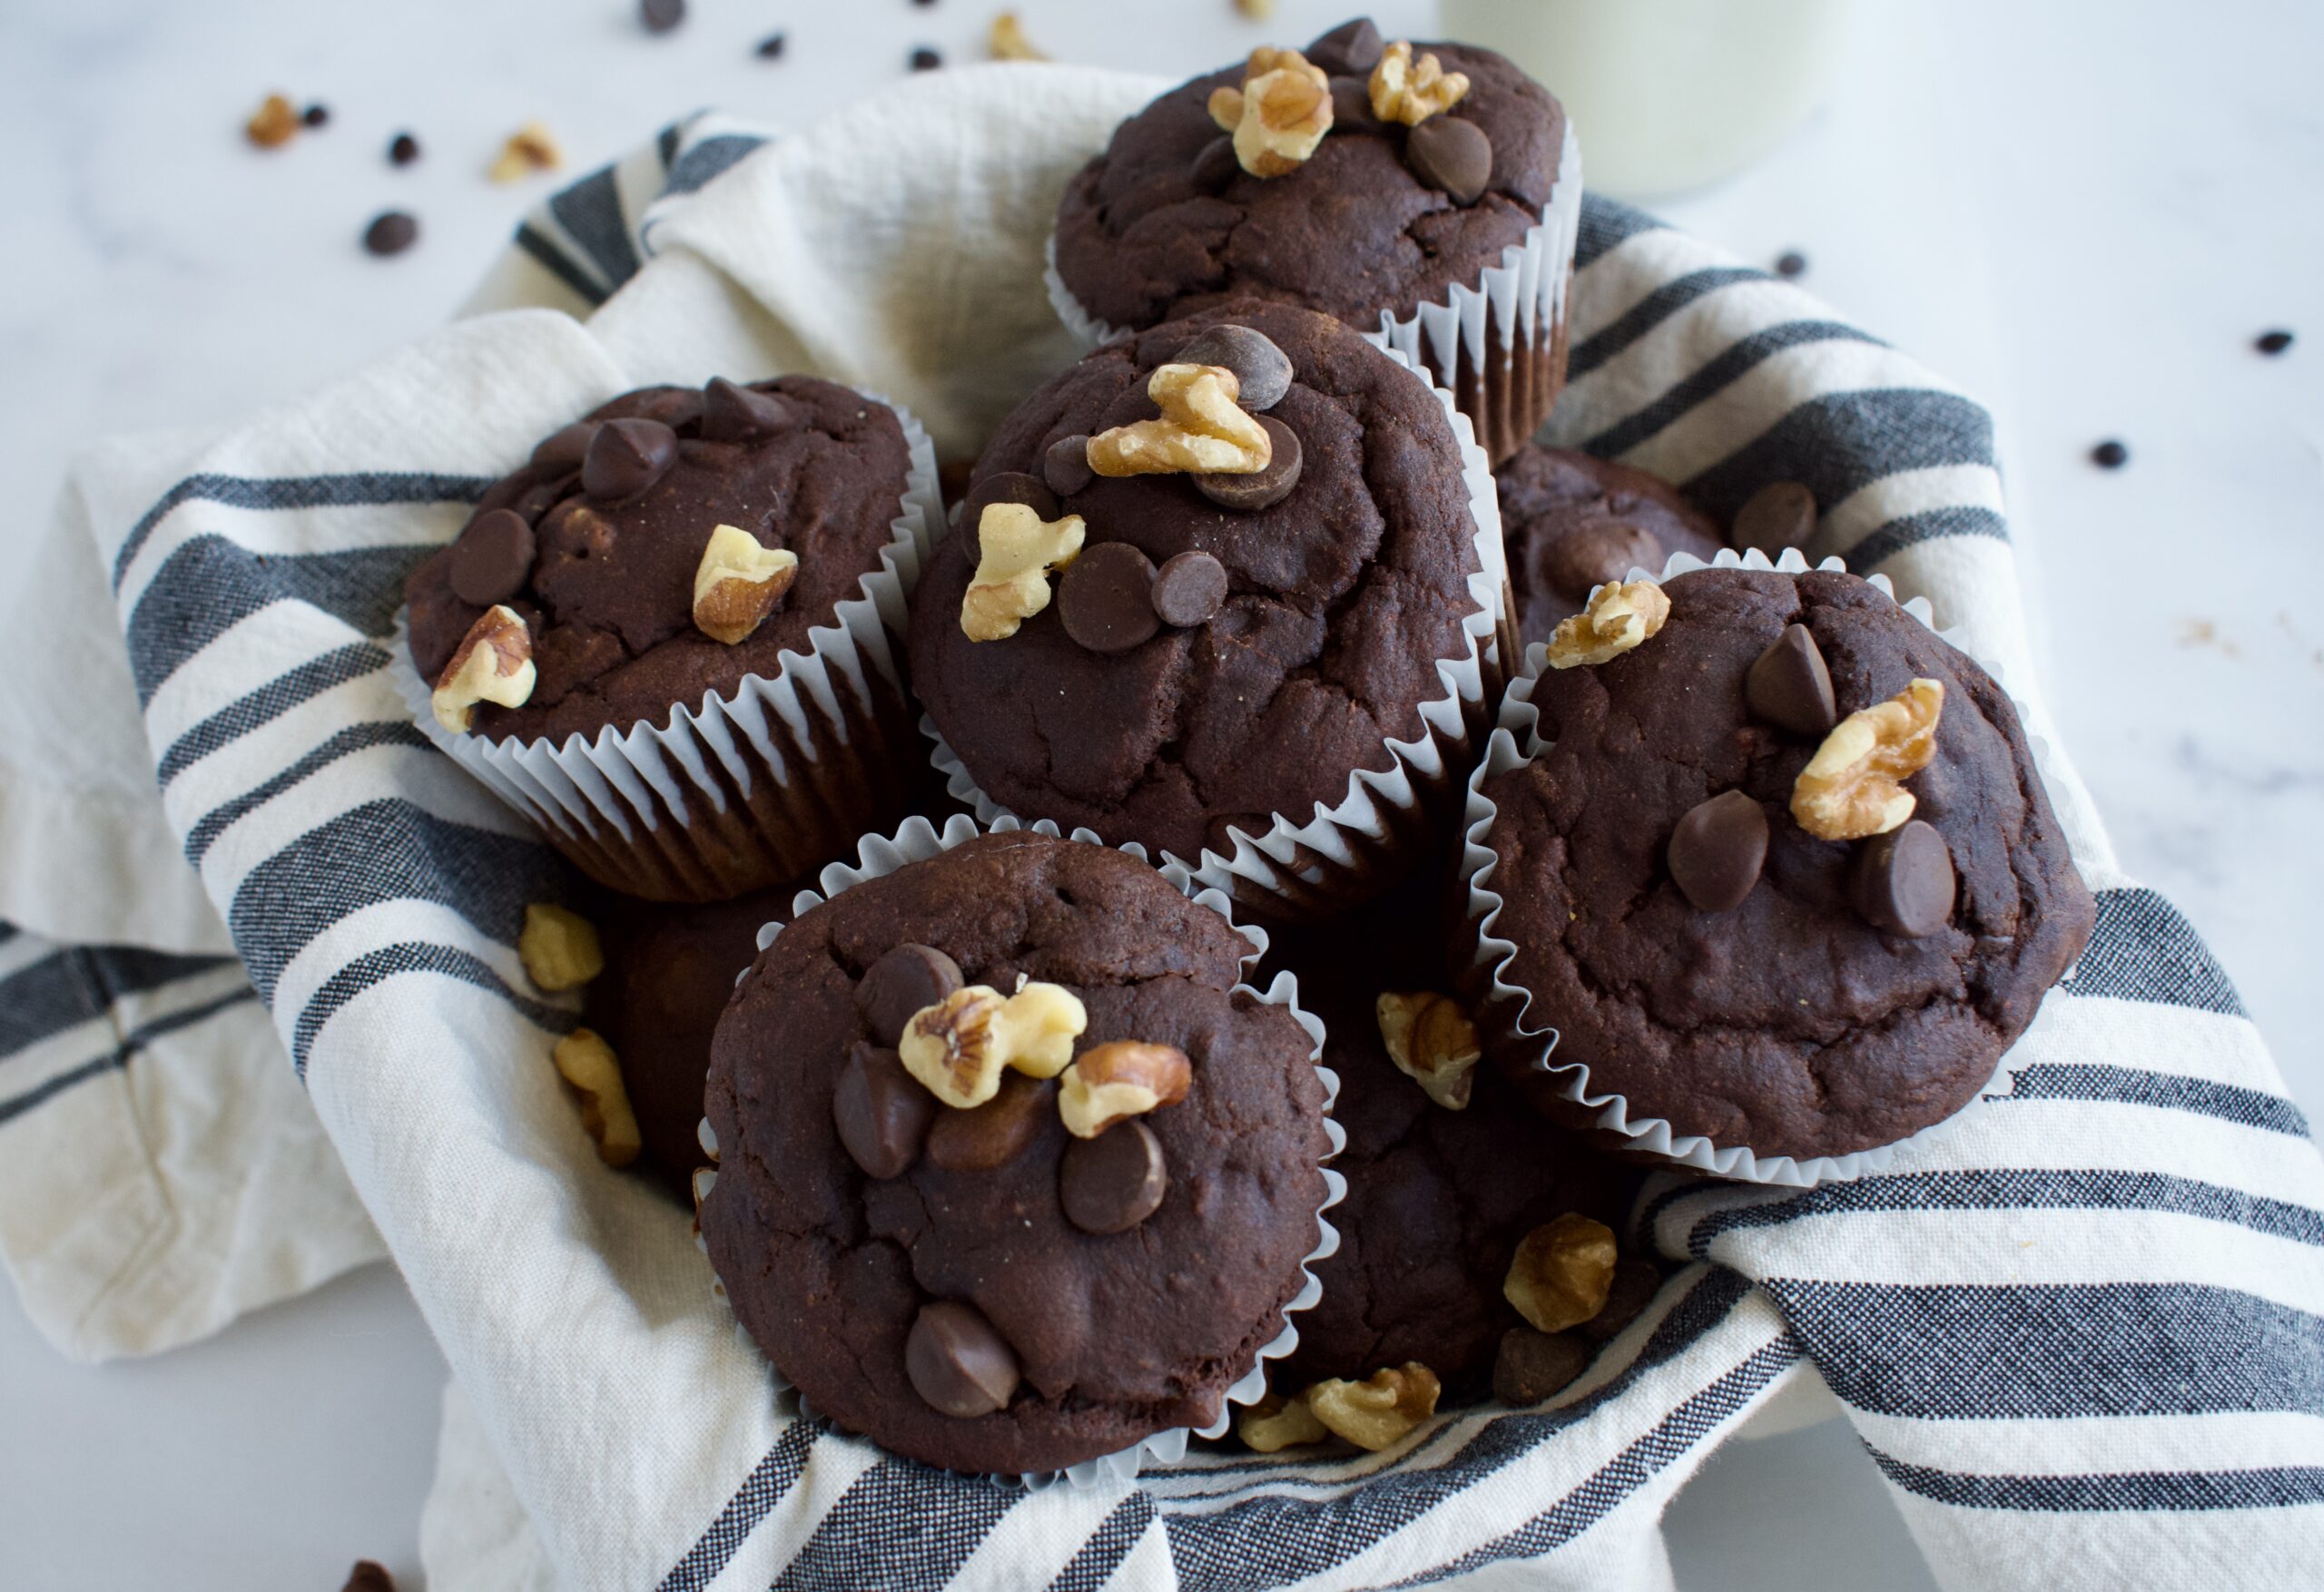
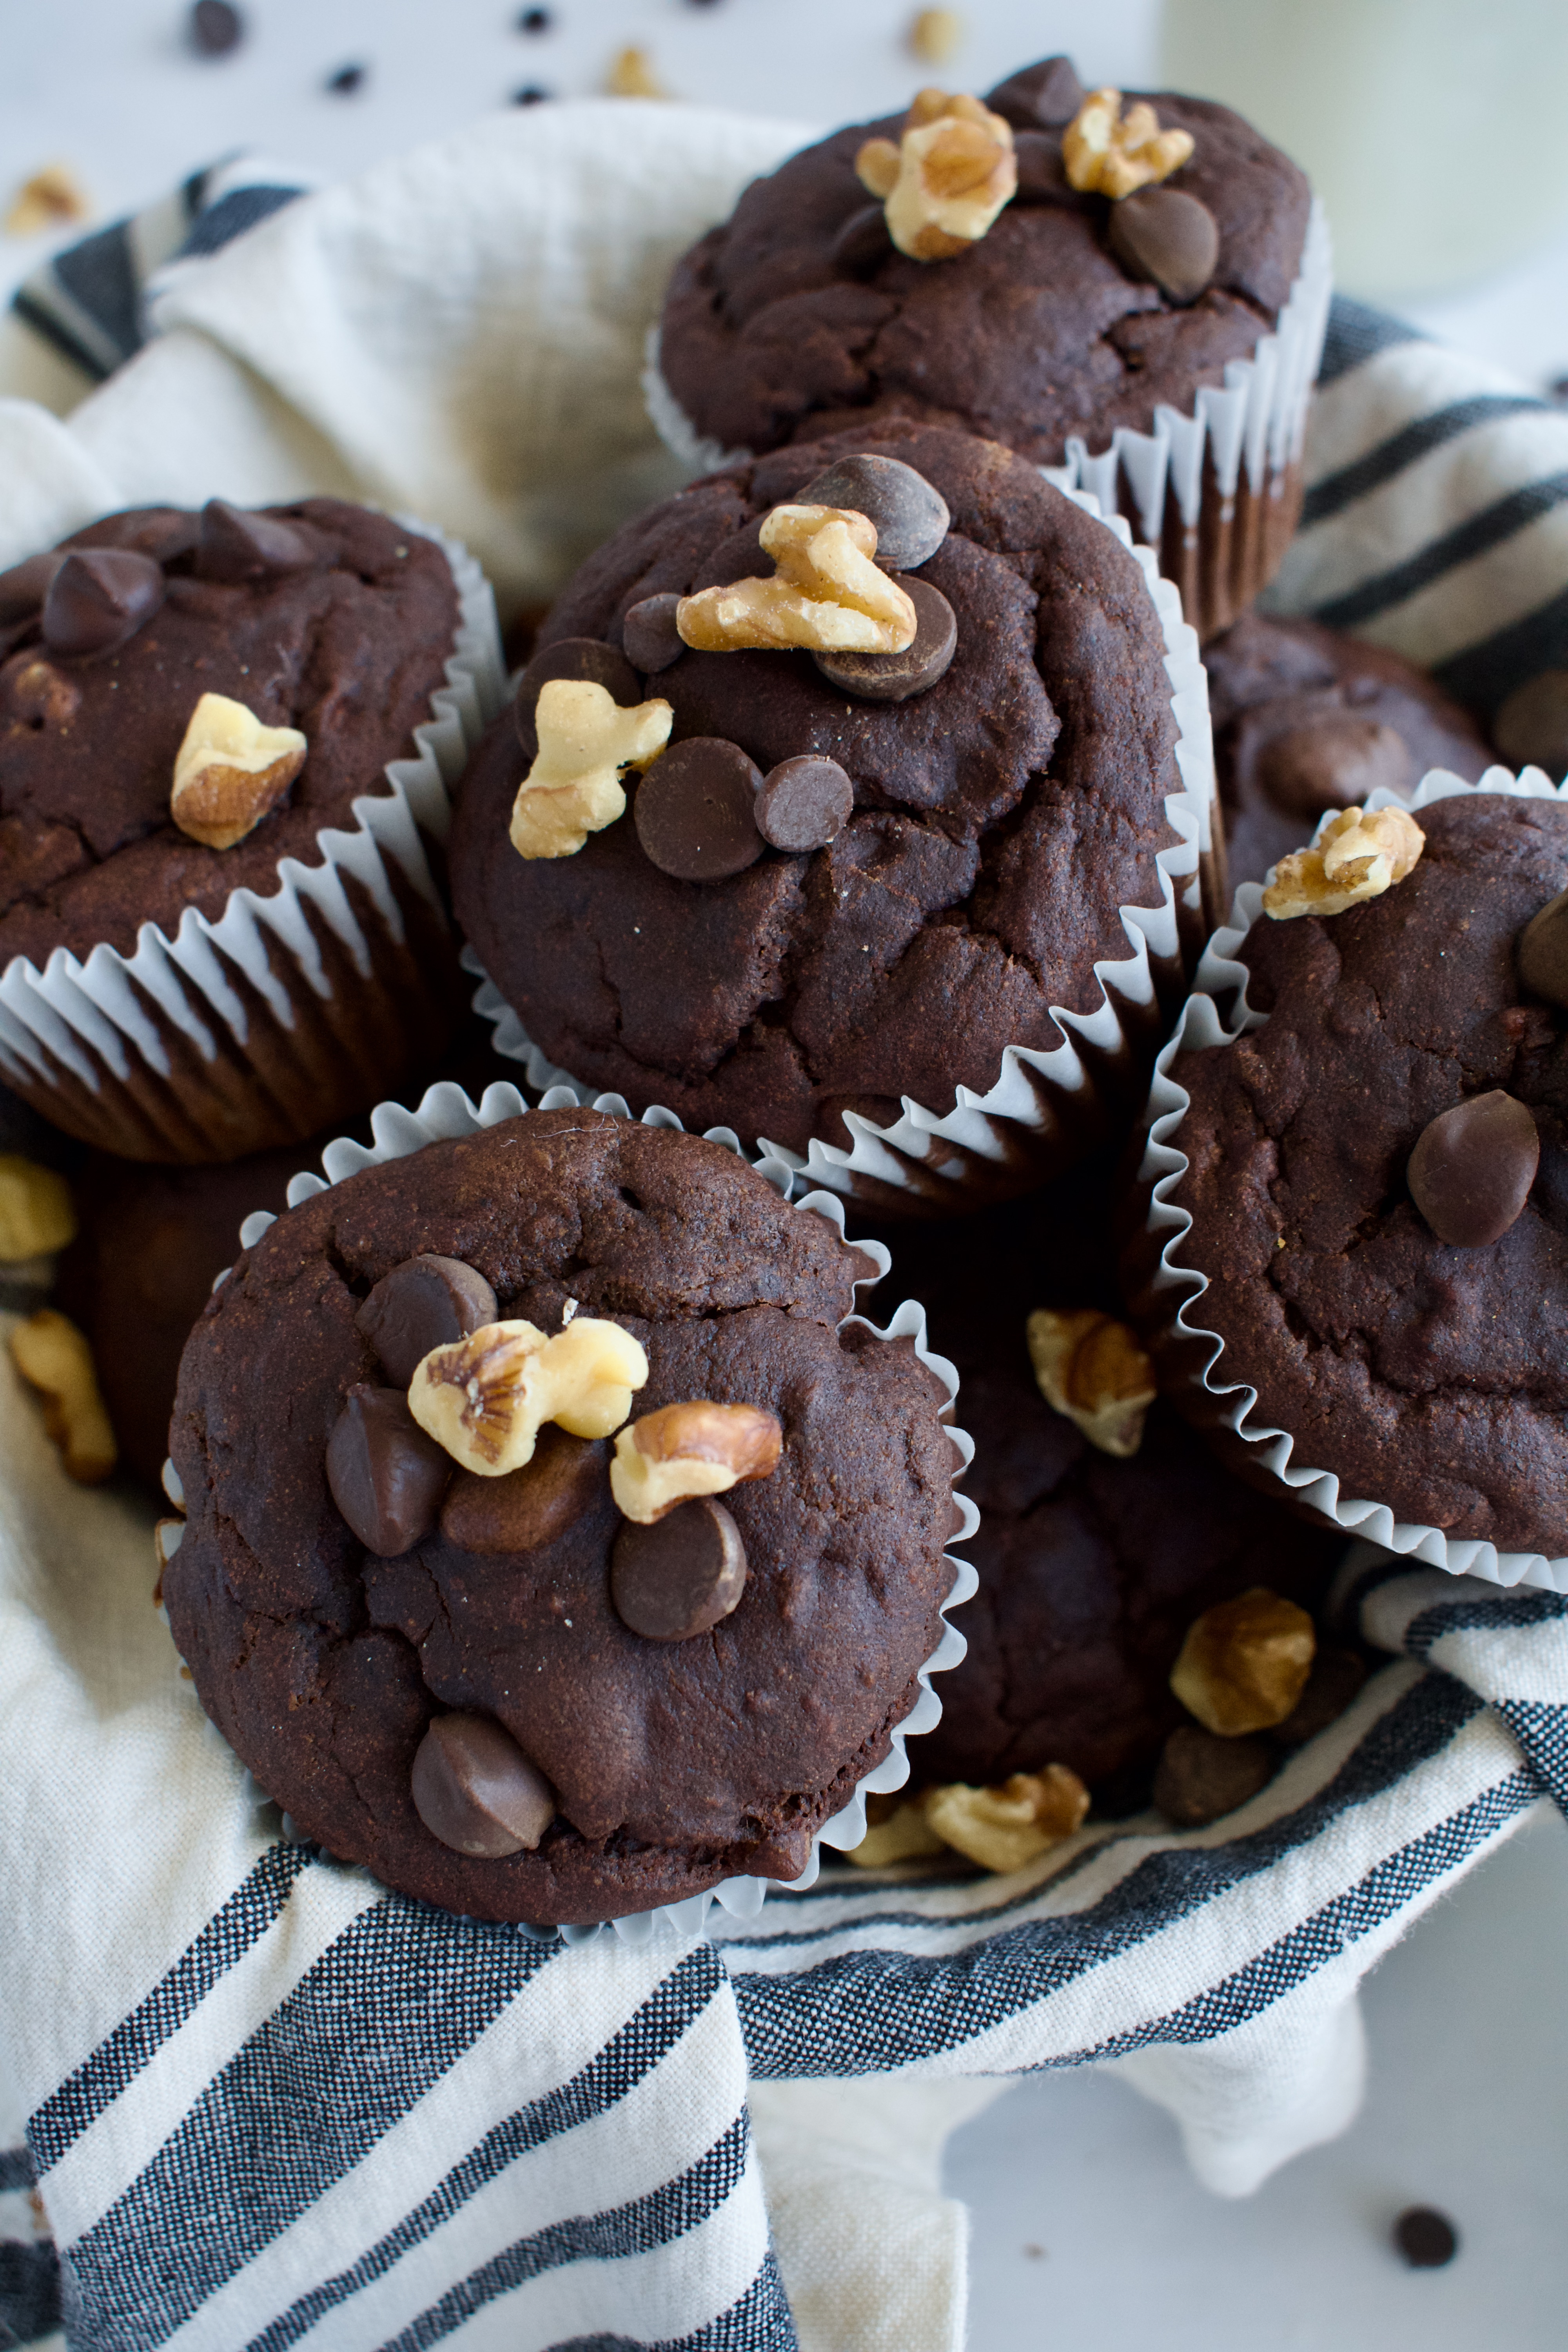
These 1-bowl Gluten Free Chocolate Walnut Banana Muffins are loaded with chocolate chips and walnuts for a delicious bite!
gluten free chocolate walnut banana muffins
I had to amp up the classic banana bread muffin with chocolate and walnuts. These delicious chocolate banana muffins are gluten free, dairy free, and can be made refined sugar free depending on the chocolate chips you use. You can also leave out the walnuts if you are allergic, but the chocolate-walnut combo is divine if you can have them.
gluten free and dairy free chocolate walnut banana muffins
What’s in These Chocolate Walnut Banana Muffins?
Bananas
Maple syrup
Melted oil or butter: you can use olive oil, melted coconut oil, or melted (vegan) butter. Any and all will work in this recipe!
Oil/butter: I have not tried this, but I think using applesauce would work if you want to keep this recipe fat free.
Walnuts: If you have a nut allergy, feel free to leave this out.
Eggs: I have not tested a vegan version of this recipe. If you try this gluten free banana muffin recipe with an egg substitute, share how it goes in the comments.
gluten free and dairy free chocolate banana muffins
More Banana Goodness
Looking for more banana-based recipes? Check these out…
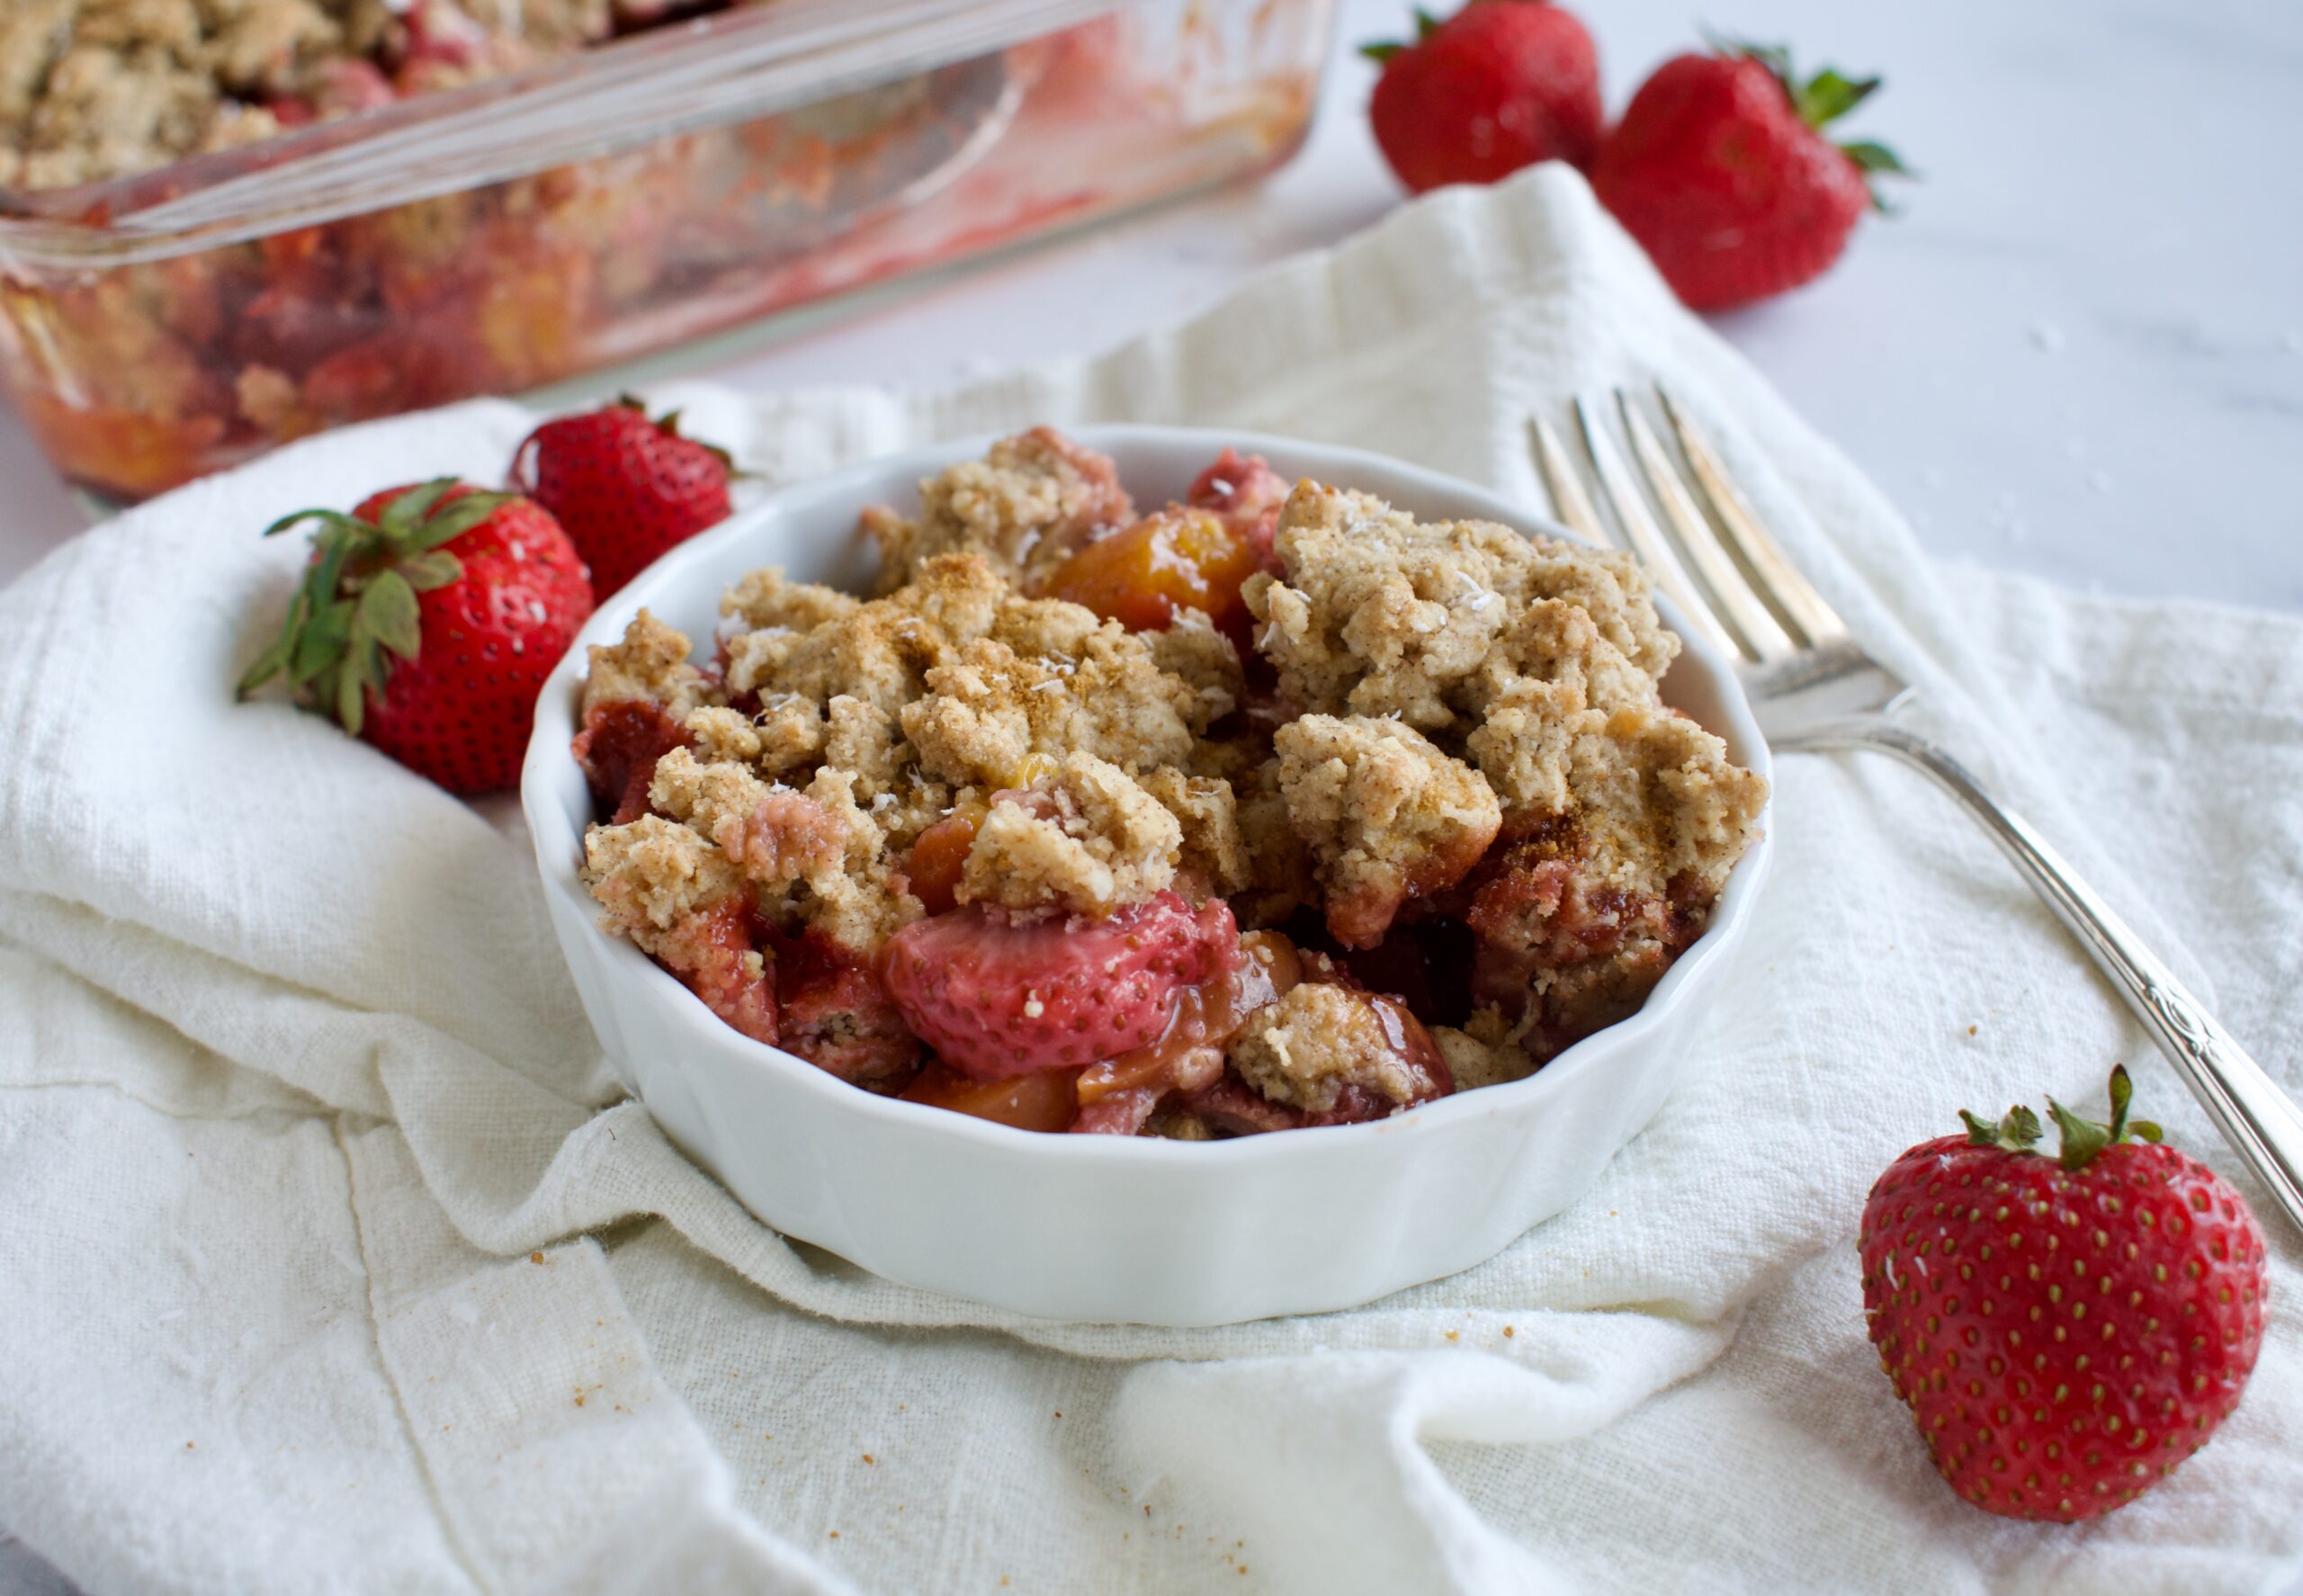
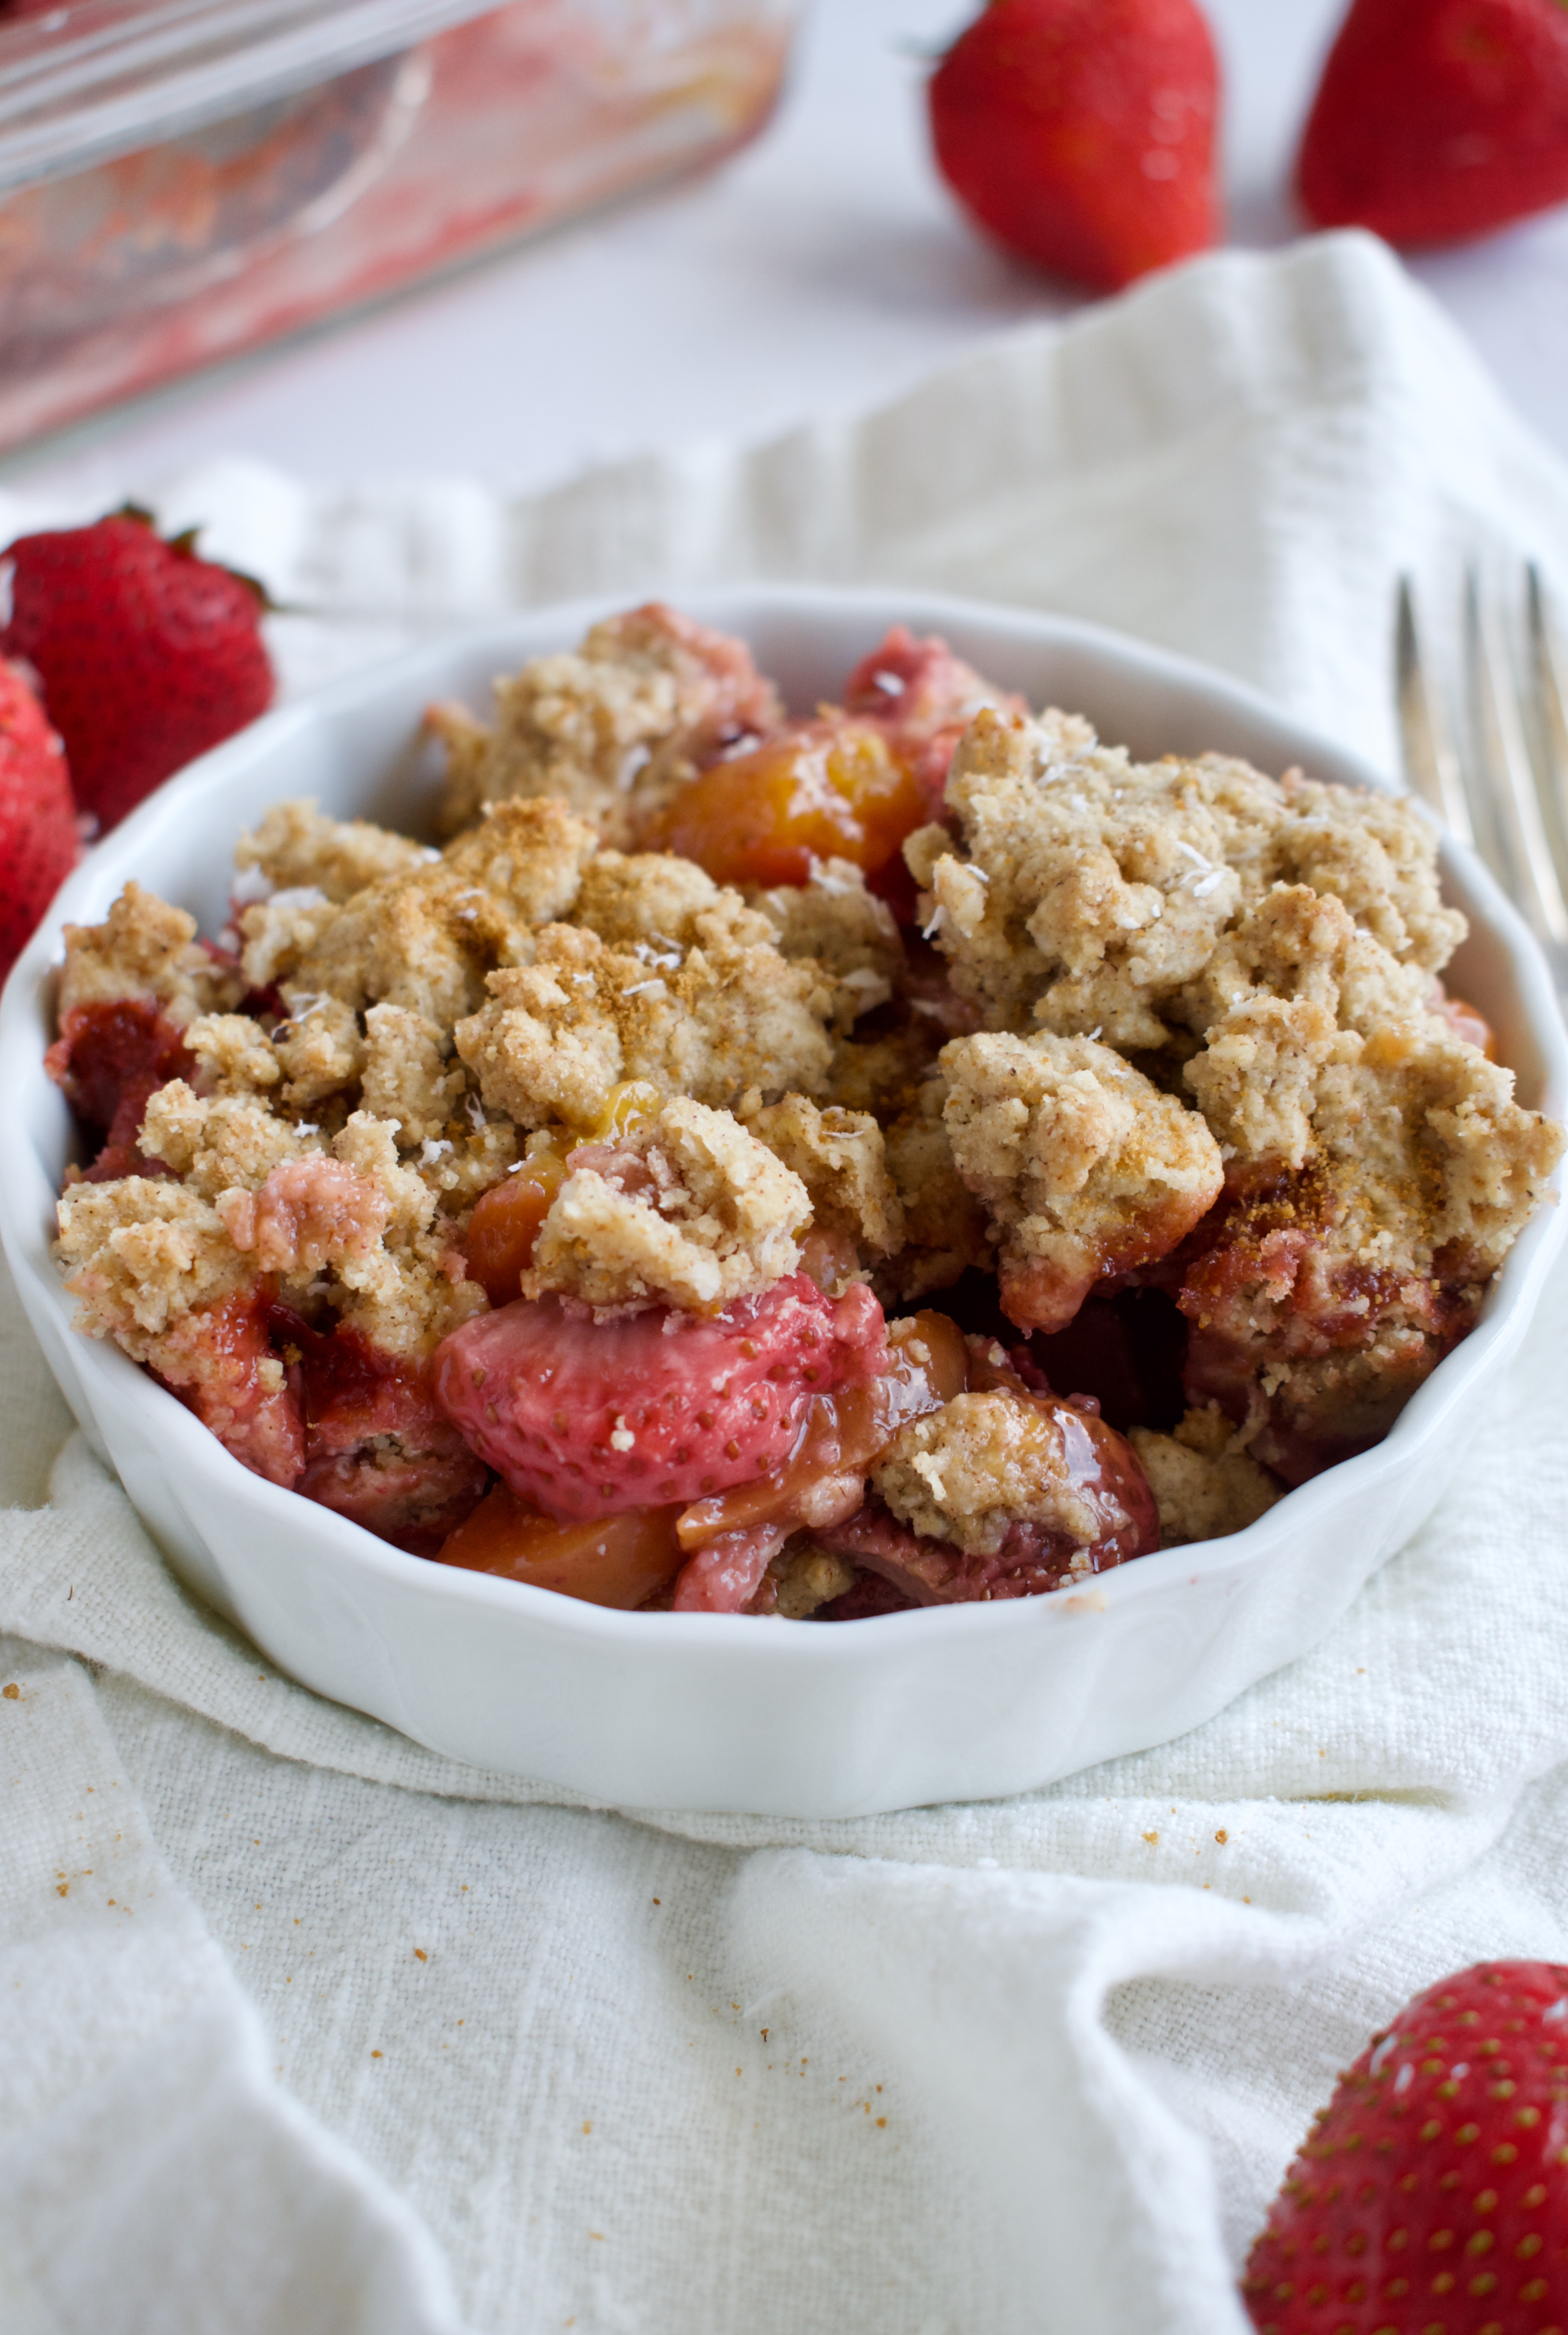
Fresh fruit is topped with a completely gluten free crumble topping to make the easiest and yummiest summer Paleo Crumble dessert!
paleo fruit crumble
I’ve been making this crumble for years and after sharing the recipe with my mom, she’s now made it more than me. You could say this is a go-to dessert recipe in our house. We love making it with fresh summer fruit. It truly highlights the natural sweetness of fruit and has the perfect amount of doughy crumble topping.
Besides being an easy dessert recipe, the second best part about this fruit crumble is that is allergy friendly. It is completely gluten free, vegan, Paleo and Autoimmune Paleo friendly!
gluten free strawberry peach crumble
How to Make Paleo Fruit Crumble
This fruit crumble is super easy to make and the perfect dessert to whip up when you’re craving something sweet or need a last minute dessert for a get together.
Tigernut flour or almond flour (to keep this recipe nut free and AIP, use tigernut flour)
Coconut flakes or oats
Cinnamon
Salt
Maple Syrup
Coconut Oil
Vanilla
Instructions
Preheat oven to 350F.
Stir all the fruit filling ingredients together and pour into a 9×9 inch baking dish. Set aside while you make the topping.
For the topping, whisk together the dry ingredients.
Add the maple syrup, 2 Tbsp of oil, and vanilla extract. Mix to combine. If the dough is too crumbly, add more oil. The dough should be somewhat whet and hold together.
Sprinkle the topping evenly over the fruit and bake for ~30 minutes until golden.
Let cool slightly before serving.
gluten free and paleo strawberry peach crumble
Fruit Crumble Ingredient Notes
Can I use other fruit?
Yes! You can truly use whatever combination of fruit you want. You’ll need about 6-8 cups of fruit. I also love making this with rhubarb. The only change you need to make if using rhubarb, is that you’ll first want to sauté the rhubarb with the filling ingredients over low heat to soften it slightly. Peach and rhubarb, strawberry and rhubarb… it’s all delicious!
Can I use frozen fruit?
Technically you can. I suggest de-frosting the fruit first and pouring off some of the juice. This crumble truly tastes best with fresh fruit, though!
What if I’m not Paleo?
If you just want to make a gluten free crumble and don’t care about it being completely grain free, feel free to use gluten free oats instead of the coconut and gluten free flour instead of the starch. You’ll still want to use tigernut or almond flour, though.
This easy crumble can be made year round with almost any fruit, but it's a go-to summer dessert with all the fresh berries! Topped with a fully paleo, gluten free, and vegan crumble, you'll love this simple dessert recipe.
Stir all the fruit filling ingredients together and pour into a 9×9 inch baking dish. Set aside while you make the topping.
For the topping, whisk together the dry ingredients.
Add the maple syrup, 2 Tbsp of oil, and vanilla extract. Mix to combine. If the dough is too crumbly, add more oil. The dough should be somewhat whet and hold together.
Sprinkle the topping evenly over the fruit and bake for ~30 minutes until golden.
Let cool slightly before serving. Keep stored in the fridge.
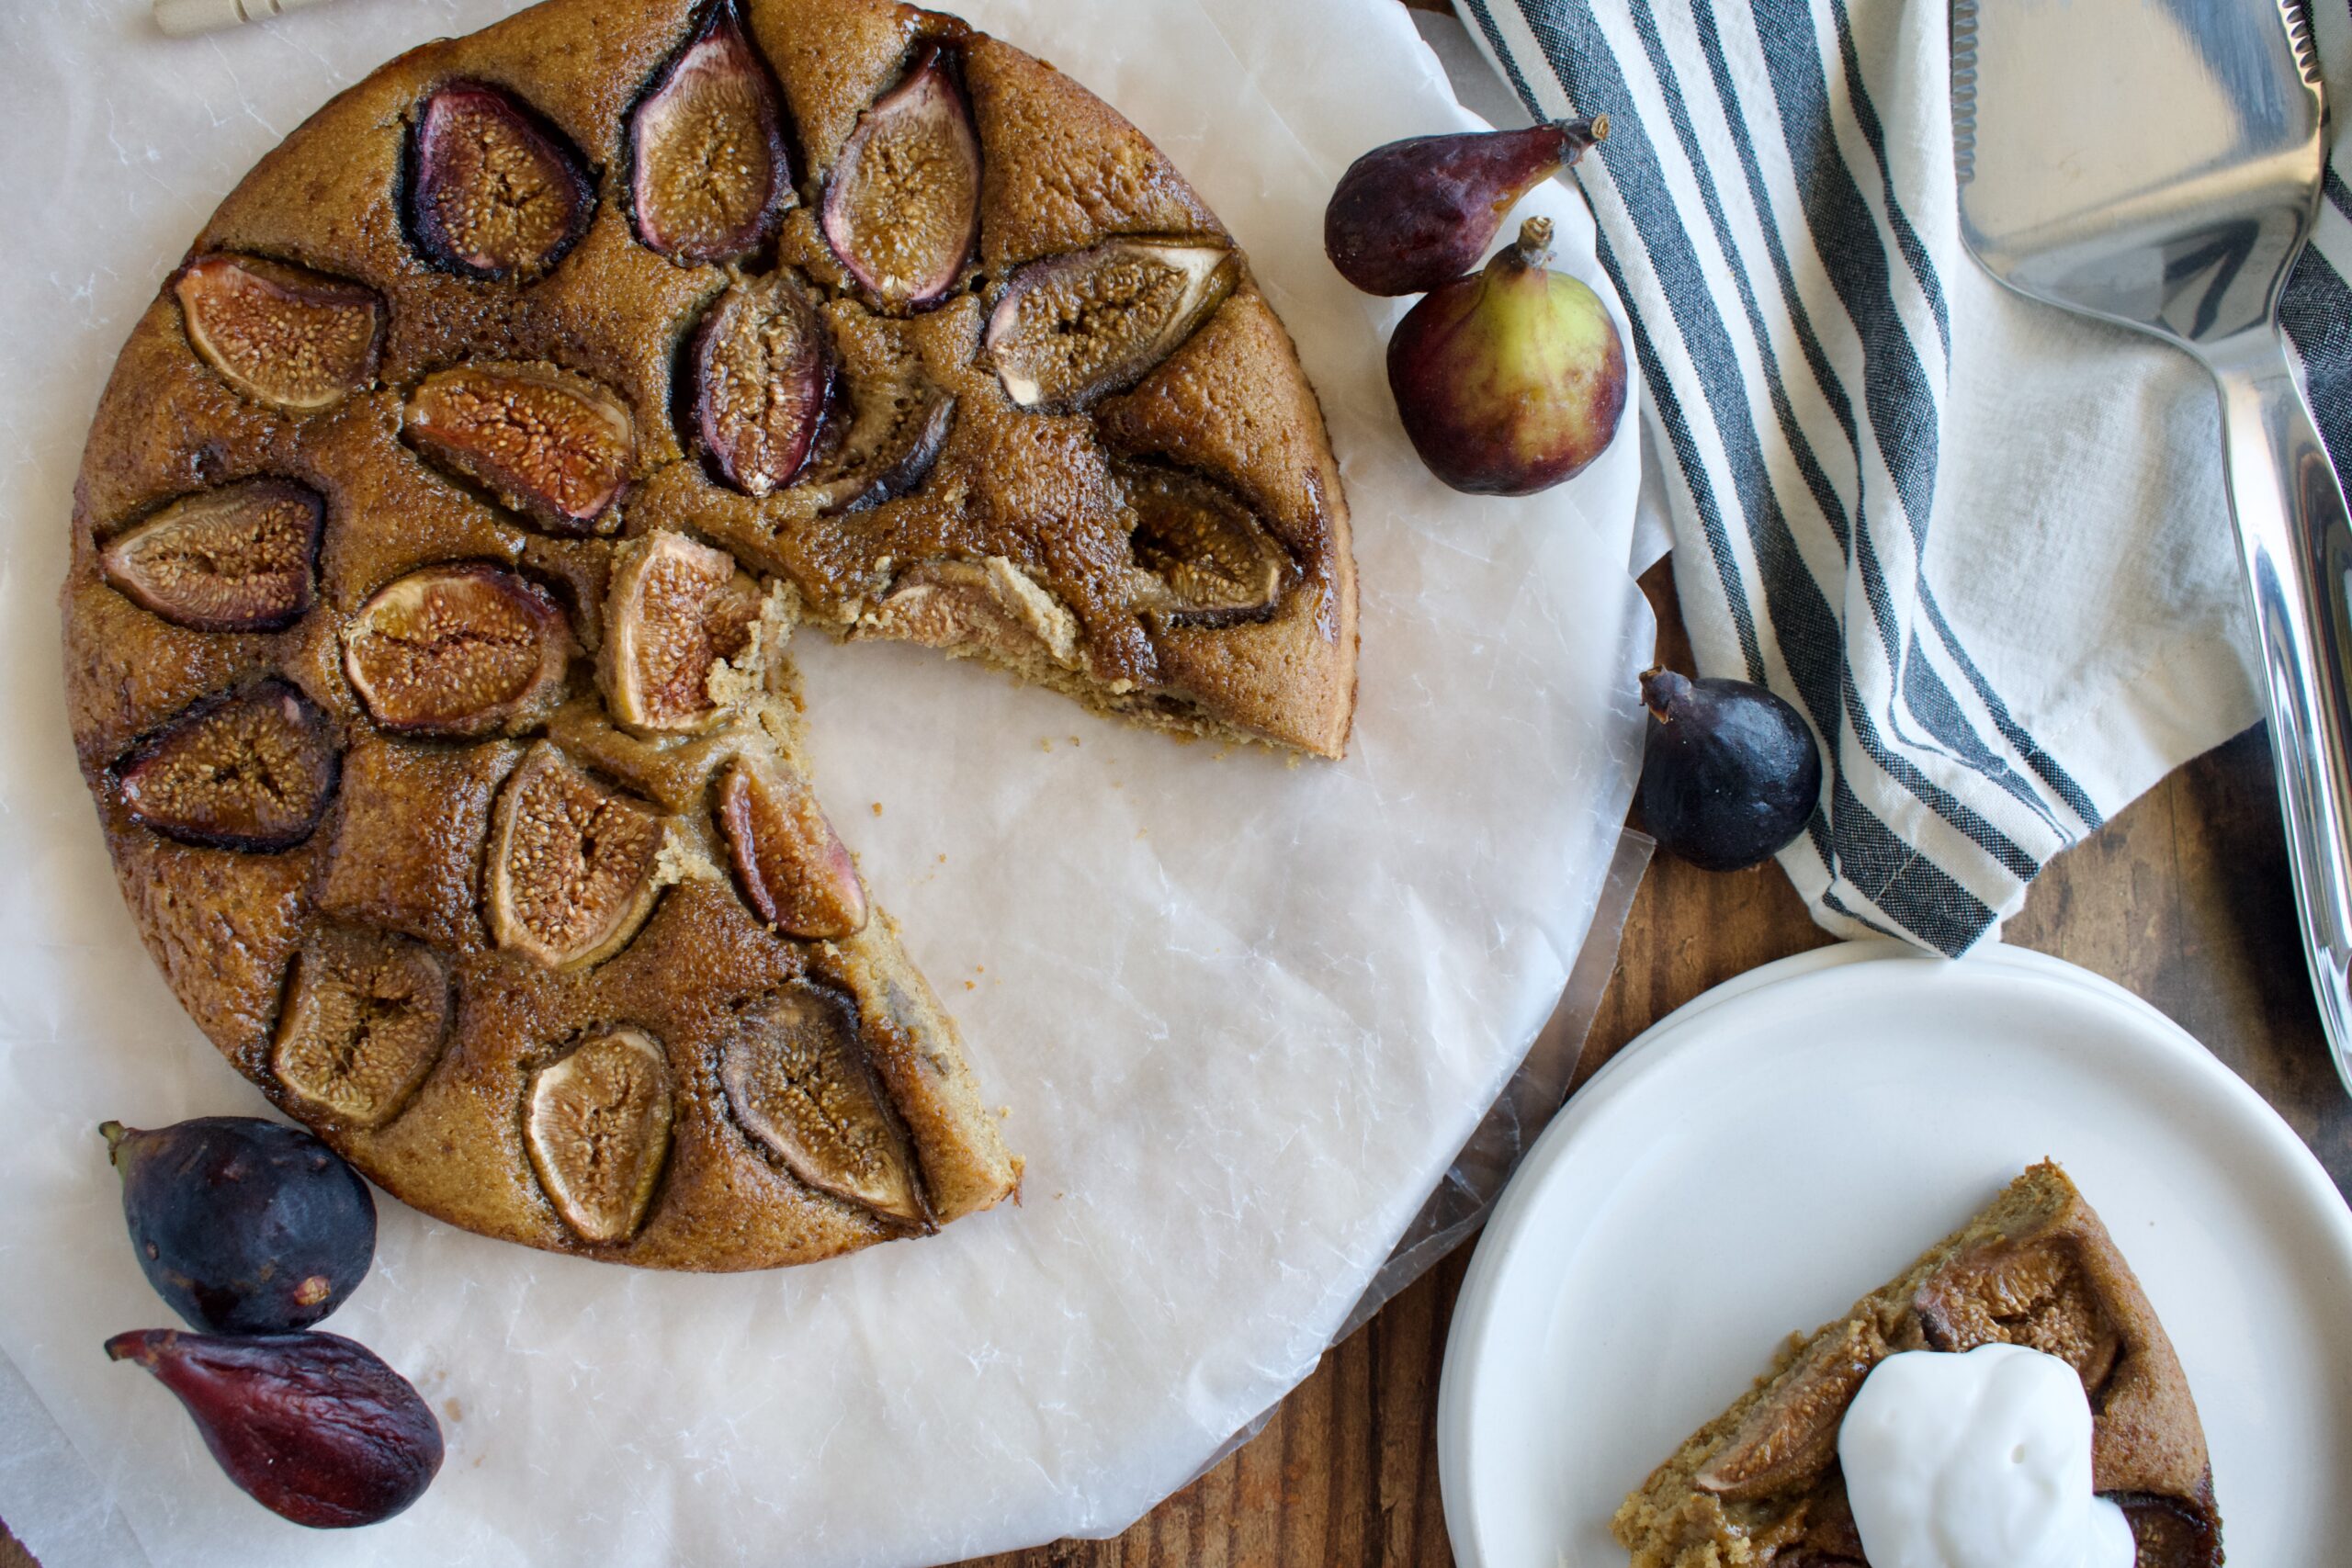
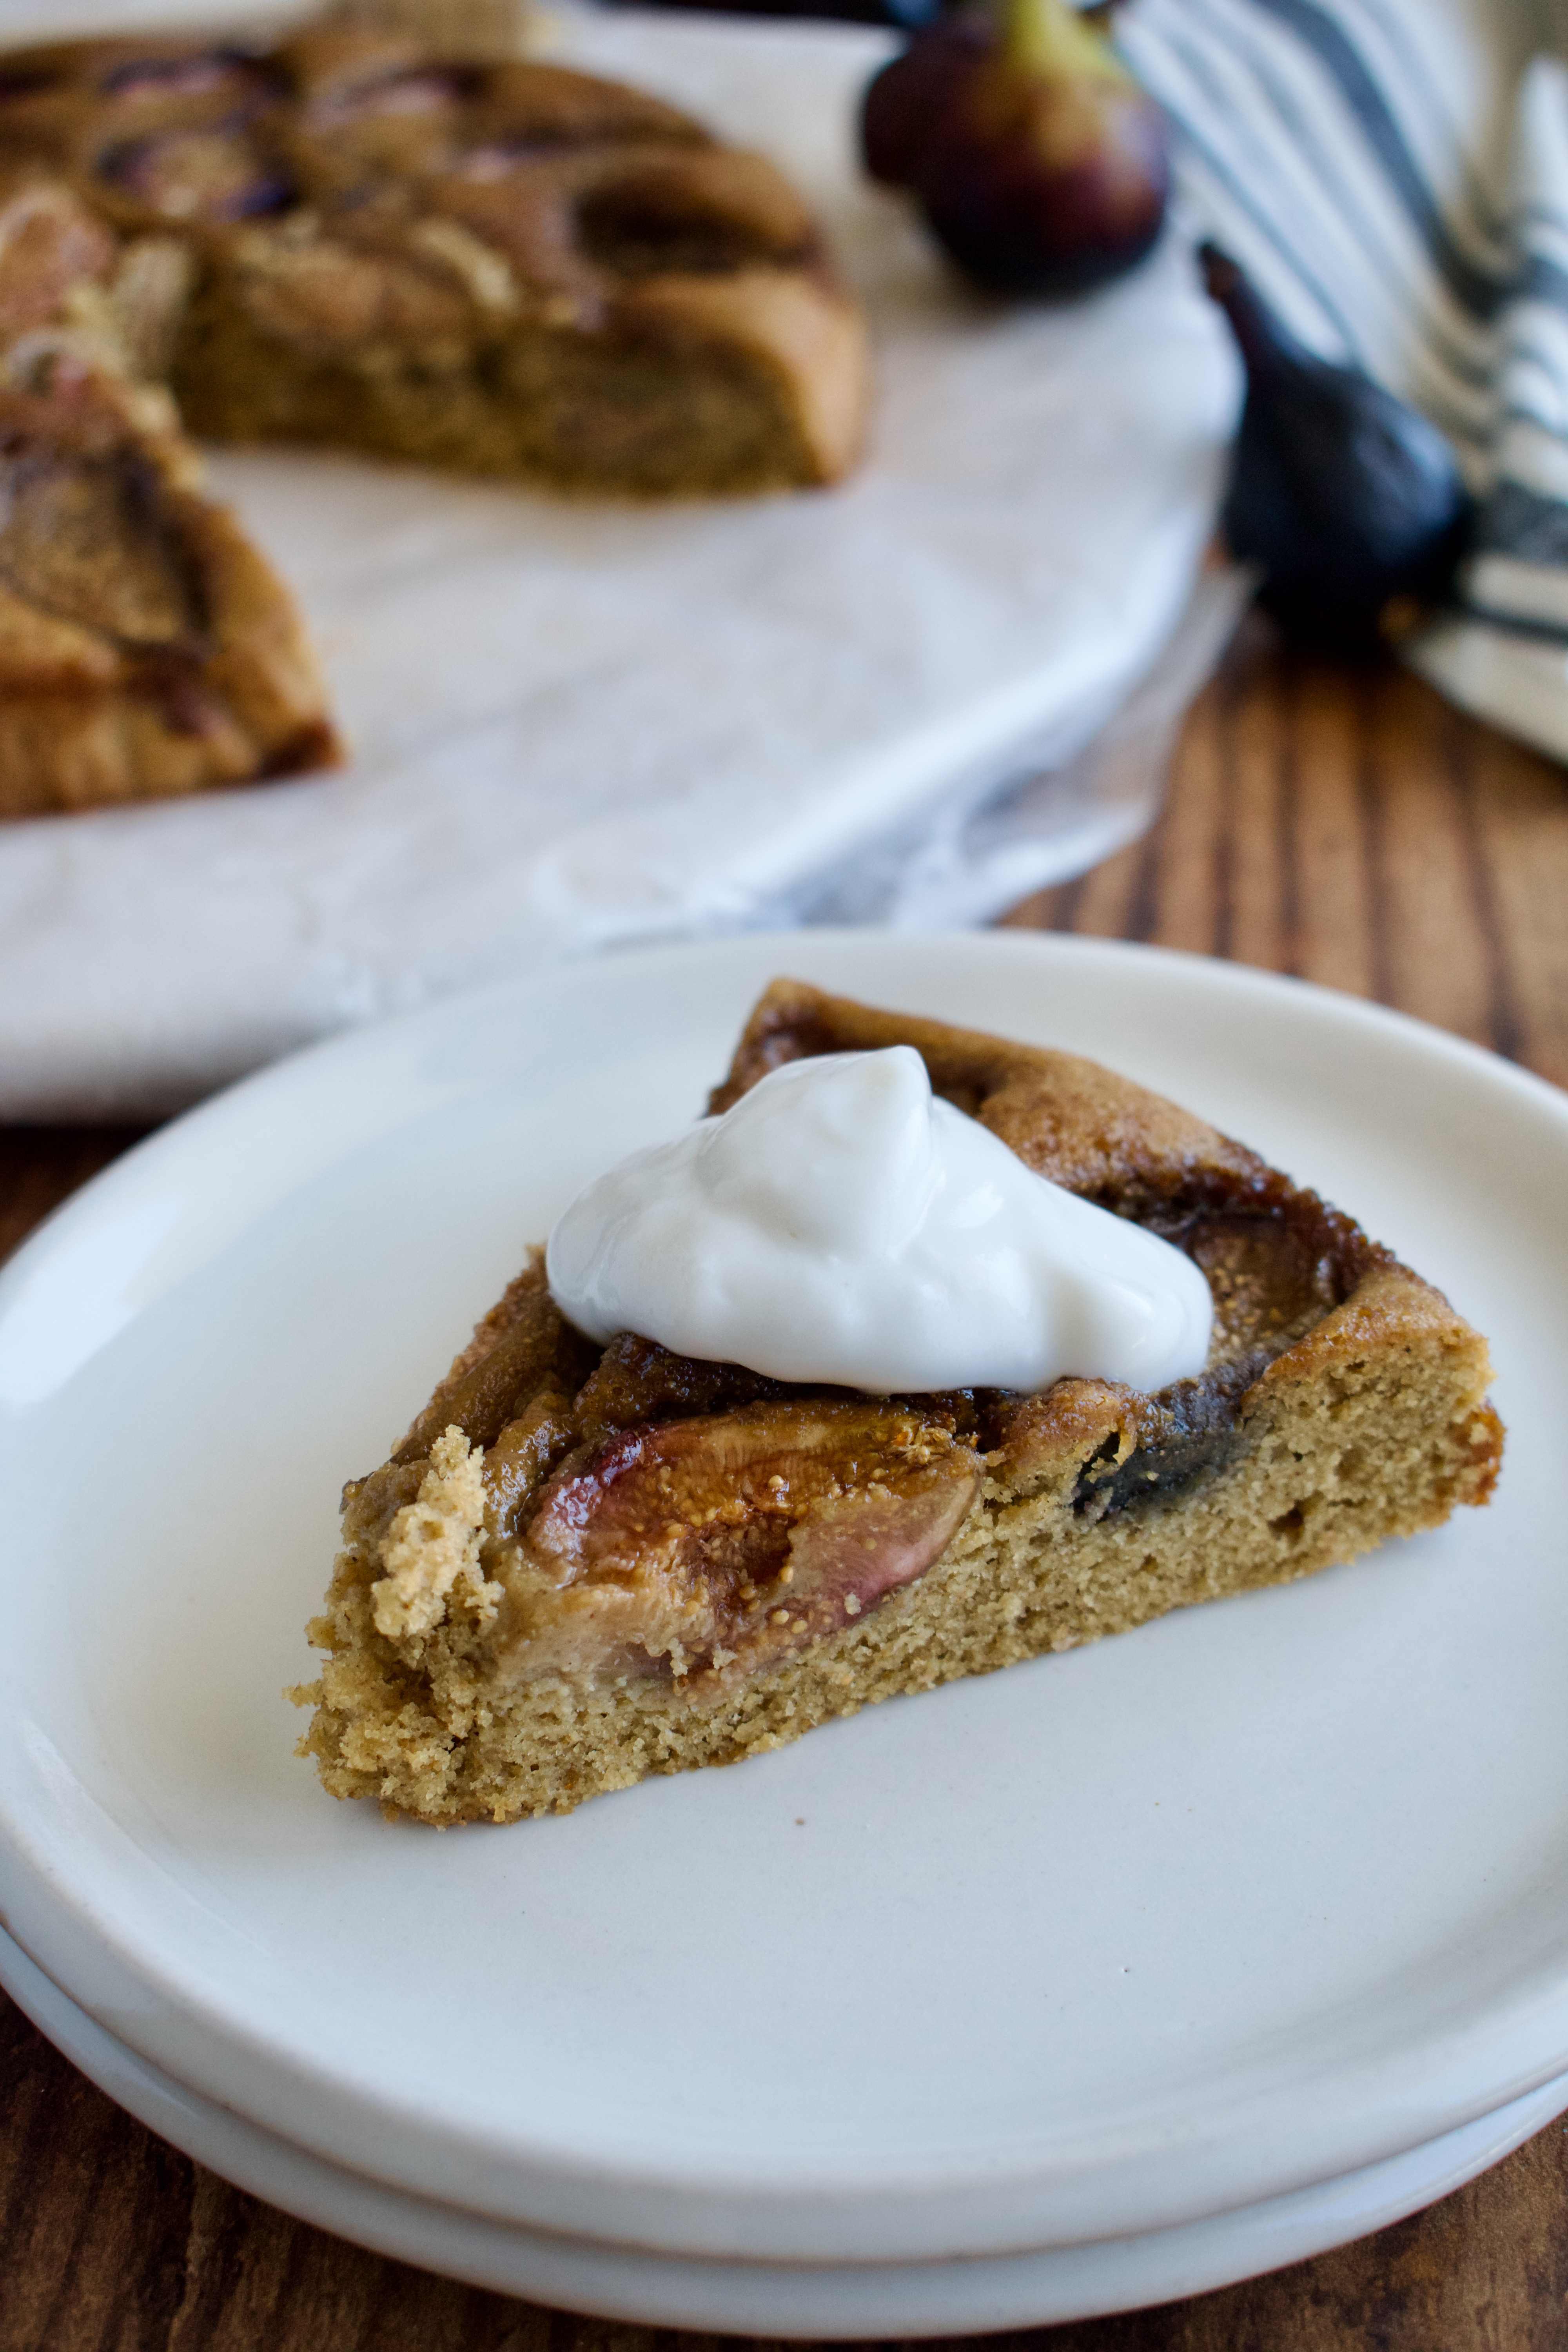
Use fresh summer figs in this delicious Gluten Free Fig Cake that is also dairy free, nut free, and refined sugar free. This super easy cake can be whipped up quickly and with little effort.
gluten free fig cake
This Fig Cake recipe is originally an old recipe from a newspaper that my mom has been making for years. The original recipe contains gluten and almonds, so I thought it would be fun to recreate a gluten free, nut free, and allergy friendly version of this cake. It’s quite a simple cake, but it’s delicious and the perfect summer dessert.
gluten free, dairy free, and nut free fig cake
To make this cake gluten free, I used a combination of 1:1 gluten free flour and tigernut flour. Tigernut flour is my favorite almond flour substitute. Tiger nuts are tubers, not nuts, but they have the same sweet-nutty flavor, making them the perfect almond flour sub.
I also made this cake completely dairy free by using vegan butter or coconut oil instead of regular butter. I’ve tested the recipe with both vegan butter and coconut oil and it works with either. I’m sure it would even work with olive oil!
Grease a tart pan or line a springform pan with parchment paper and set aside.
De-stem and slice your figs in half, set aside.
Whisk together the dry ingredients.
Beat together the wet ingredients.
Add dry to wet and combine.
Pour the batter into your prepared pan and then arrange the figs cut side up.
Sprinkle with coconut sugar.
Bake for about 40 minutes.
Let cool then serve with ice cream or whipped cream.
Can I use dried figs?
This cake is designed to be made with fresh figs and I have never tested it with dried figs. If you have no other option, I suggest soaking the dried figs in hot water for 10-20 minutes to rehydrate them before using. You do want the moisture from the fruit for this cake.
The best way to use fresh summer figs is in this gluten free fig cake that is also dairy free, nut free, and refined sugar free. This is the perfect summer dessert that you must try!
Grease a tart pan or line a springform pan with parchment paper and set aside.
De-stem and slice your figs in half, set aside.
Whisk together the flours, 1/4 cup coconut sugar, baking powder, cinnamon, and salt and set aside.
In a large bowl, beat together the melted butter/oil, eggs, maple syrup or honey, and vanilla until combined. Add the dry ingredients and mix on low until just combined.
Pour the batter into your prepared pan and then arrange the figs cut side up. I like to do this in concentric circles.
Sprinkle the extra tablespoon of coconut sugar on top.
Bake for about 40 minutes, until a toothpick comes out just clean.
Let cool before removing from the springform pan or slicing if in the tart pan.
Serve with your favorite ice cream or whipped cream and enjoy!
In this series, I’m teaching you how to make healthier and allergy friendly ice cream sandwiches this summer. I promise you don’t want to miss out! Make sure you are subscribed to my newsletter or following me on Instagram, TikTok, and/or Pinterest so that you don’t miss a flavor. I can’t wait for you to make some of these healthy ice cream sandwiches. Make sure to share a photo on social media and tag me if you do make these!
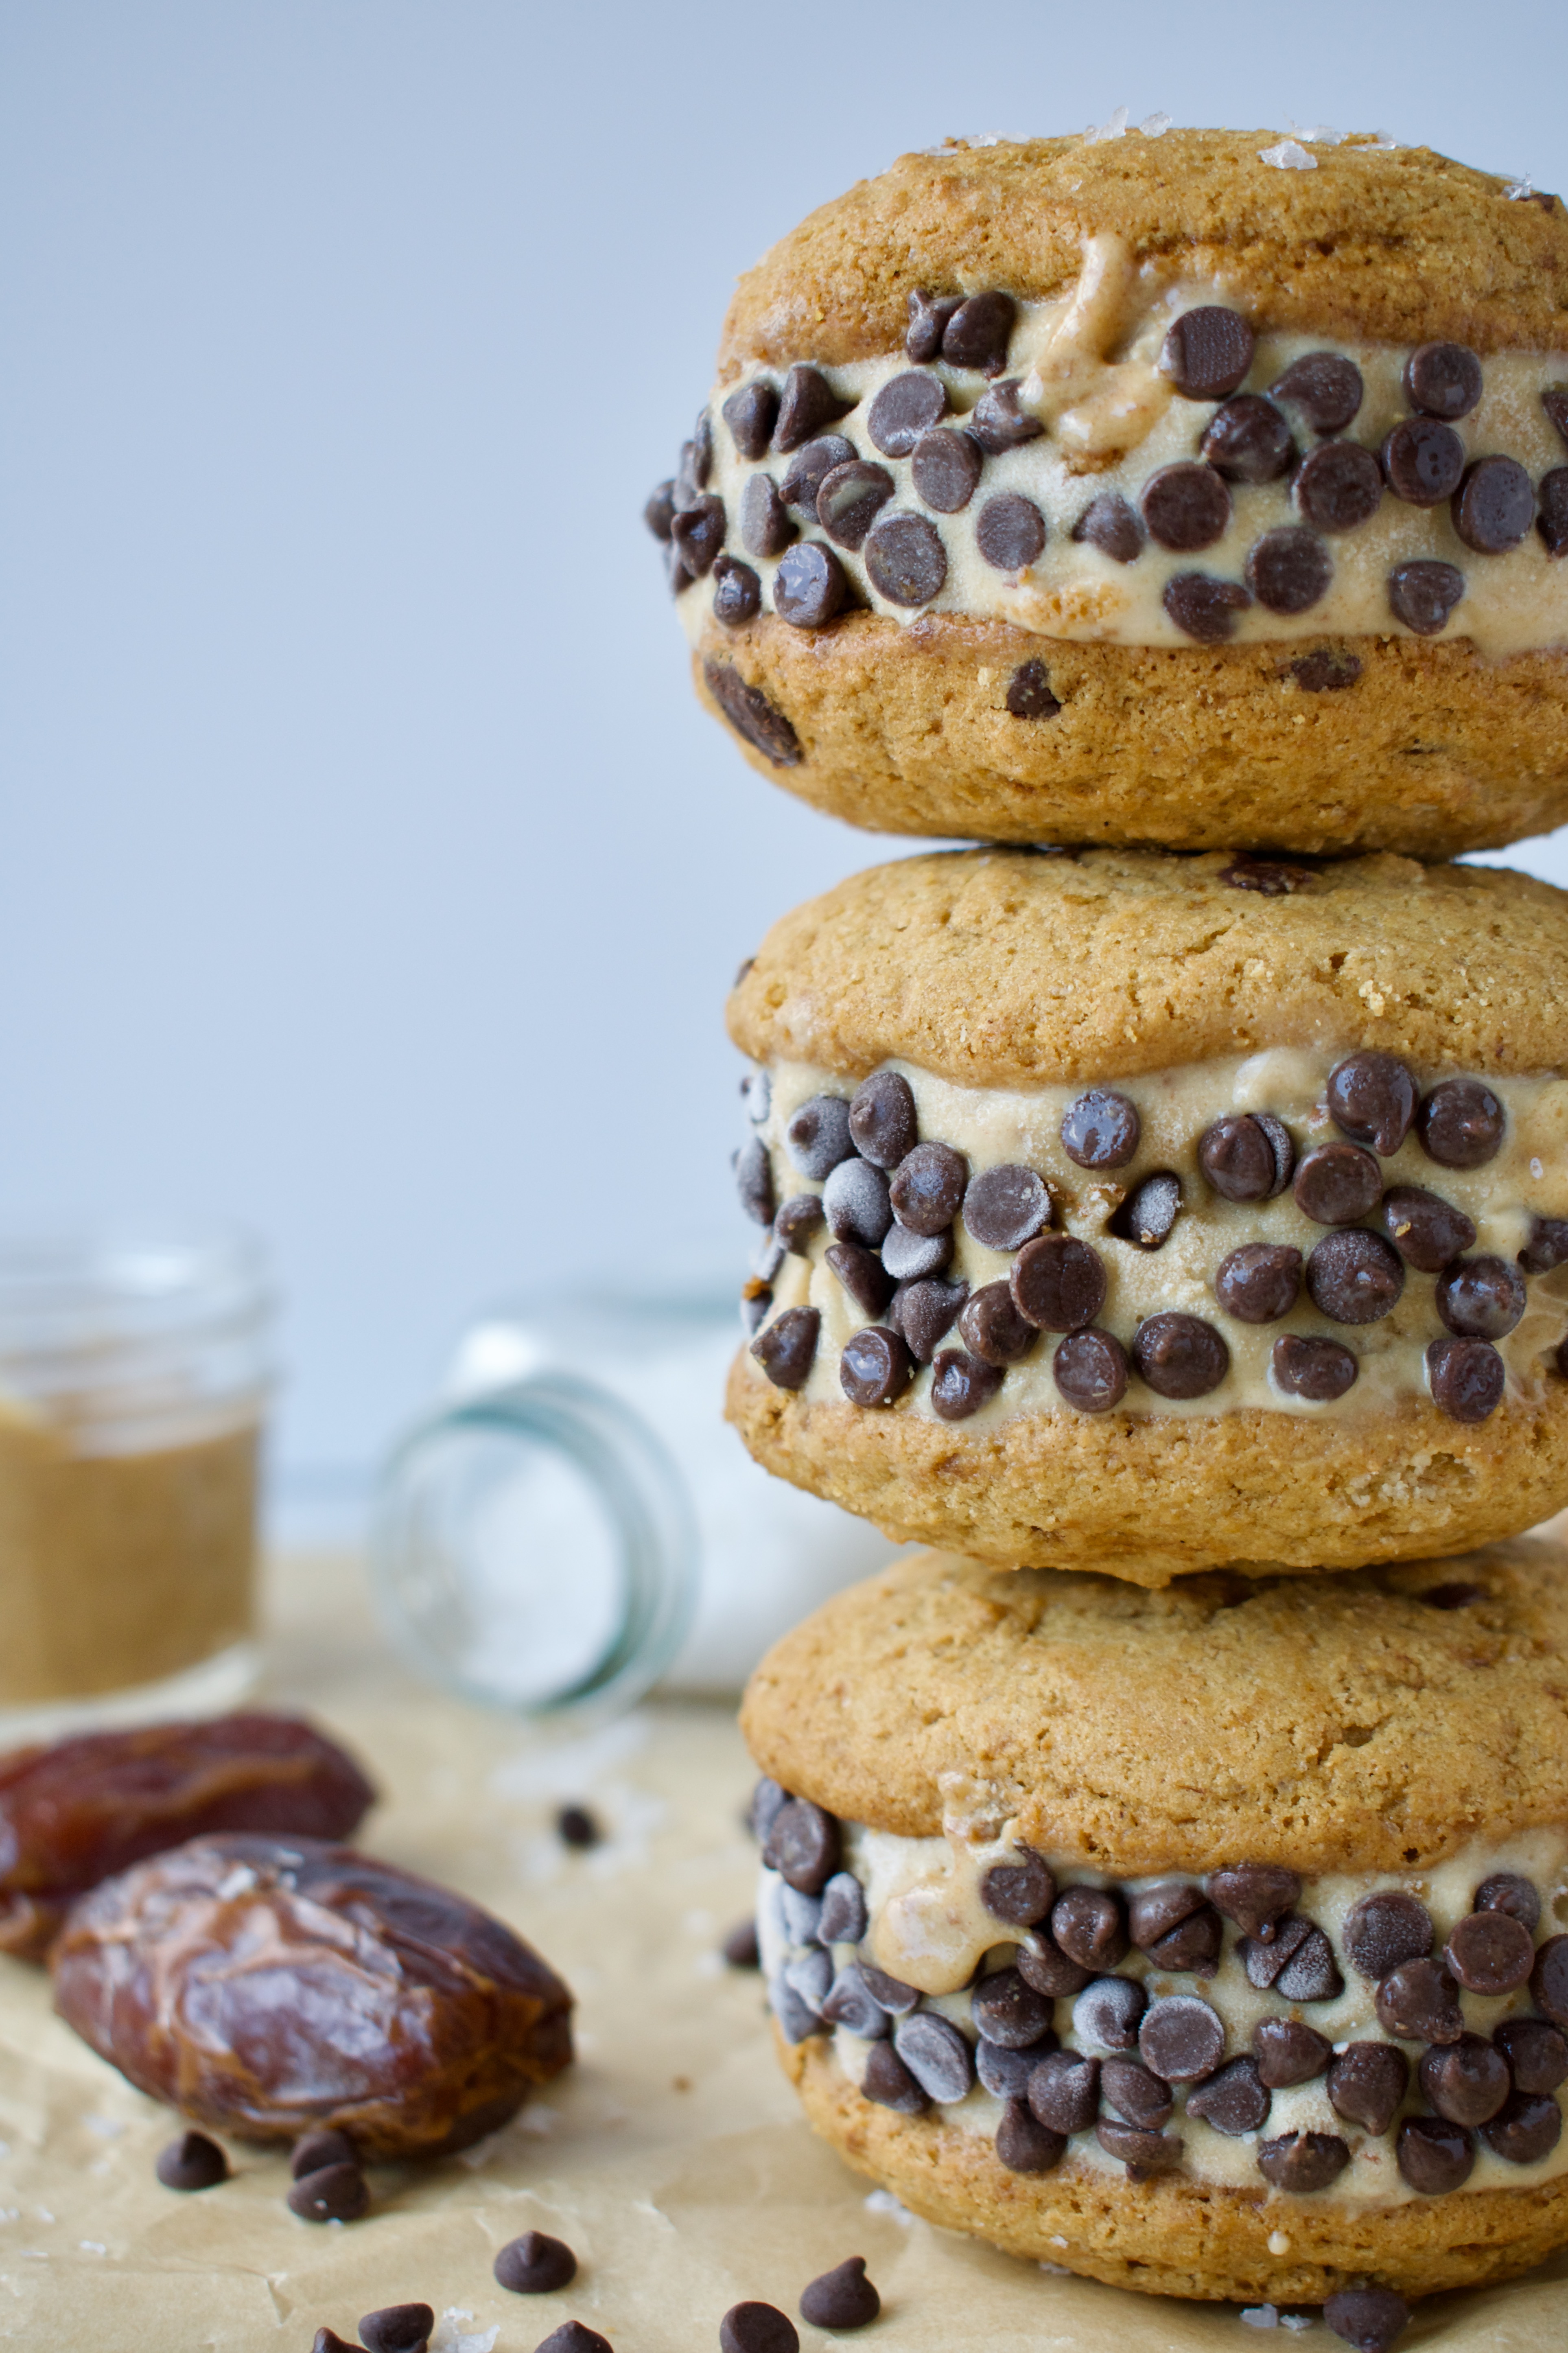
Besides the classic brownie ice cream sandwich, the chocolate chip cookie ice cream sandwich is another summer staple, so I knew I had to make an allergy friendly and upgraded version. I absolutely love salted caramel and I thought it would go perfectly with chocolate chip cookies. Thus, this homemade ice cream sandwich recipe was developed.
These ice cream sandwiches are made of a dairy free and healthier salted caramel ice cream sandwiched between gluten free chocolate chip cookies and rolled in plenty of chocolate chips. These dairy free ice cream sandwiches can be made completely refined sugar free depending on the chocolate chips you use.
Combine the dates, coconut milk, and salt in a blender and blend until you have a smooth caramel.
If you are making my homemade ice cream, at the end of churning, add the caramel to mix in with the ice cream. Then transfer the ice cream to a freezer safe container and freezer until ready to use.
If you are using a store-bought vanilla ice cream, soften it until you can swirl in the caramel. Then place back in the freezer to set before using.
Cookies
Preheat oven to 350F.
Whisk together the melted butter/oil and sugar until combined.
Add the egg and vanilla.
Add the flour, baking soda, and salt and whisk until combined.
Fold in the chocolate chips.
Scoop cookies onto prepared baking sheet.
Bake on the middle rack for 10-12 minutes, until edges are golden.
Let cookies cool for 5-10 minutes on the pan before removing to a wire rack to finish cooling.
Assembly
Scoop several scoops of ice cream onto one cookie then top with another cookie and press down to spread ice cream evenly.
Roll the cookies in mini chocolate chips then place on a freezer safe cutting board or plate.
Let the ice cream sandwiches set in the freezer for at least 3 hours before eating.
The base for these dairy free ice cream sandwiches is a vanilla ice cream. I utilize my homemade version for this recipe, but you don’t have to make your own ice cream. If you want, you can just use a store-bought vanilla ice cream of your choice. You’ll soften it enough to swirl in the homemade date salted caramel before assembling the ice cream sandwiches.
Can I Make These Vegan?
Although the salted caramel ice cream can be made vegan, I have not tested a vegan chocolate chip cookie. You can certainly try replacing the egg in the cookies with a flax egg or egg replacer. Or, use your favorite vegan chocolate chip cookie recipe! You can certainly use whatever cookies you like and then sandwich the salted caramel ice cream between them.
The cookies use butter or coconut oil. I use a vegan butter and highly suggest using either butter or vegan butter. Coconut oil hardens a lot when cold, so the cookies become quite firm in the freezer. Butter tends to hold a bit of a chew, even when frozen.
Summer isn't complete without a chocolate chip ice cream sandwich, but let's make it more fun by adding salted caramel! This recipe is completely gluten free and dairy free and we're making an easy and healthy homemade salted caramel.
Combine the dates, coconut milk, and salt in a blender and blend until you have a smooth caramel. Start with 1/2 cup of milk and add more if needed.
If you are making my homemade ice cream, at the end of churning, add the caramel to mix in with the ice cream. Then transfer the ice cream to a freezer safe container and freezer until ready to use.
If you are using a store-bought vanilla ice cream, soften it until you can swirl in the caramel. Then place back in the freezer to set before using.
Cookies
Preheat oven to 350F.
Whisk together the melted butter/oil and sugar until combined.
Add the egg and vanilla and whisk to combine.
Add the flour, baking soda, and salt and whisk until combined.
Fold in the chocolate chips.
Let dough sit for a few minutes while you line 2 baking sheets with parchment paper.
Using a large 1.5-2 Tbsp sized scoop, scoop batter onto cookie sheets. Make sure cookies are at least 2 inches apart as they will spread. Sprinkle some extra salt on top (just a pinch).
Bake on the middle rack for 10-12 minutes, until edges are golden. You will probably have to bake in batches.
Let cookies cool for 5-10 minutes on the pan before removing to a wire rack to finish cooling.
Assembly
When cookies are completely cooled and ice cream is set, but soft enough to scoop and work with, you can begin assembly.
Scoop several scoops of ice cream onto one cookie then top with another cookie and press down to spread ice cream evenly.
Roll the cookies in mini chocolate chips then place on a freezer safe cutting board or plate.
Let the ice cream sandwiches set in the freezer for at least 3 hours before eating.
You’ll never believe this Blueberry Crumble Cheesecake is completely gluten free, dairy free, and refined sugar free. Healthier than the traditional, but absolutely delicious!
gluten free and dairy free blueberry crumble cheesecake
I have a list of different cheesecakes I want to create recipes for and when I asked my Instagram audience which one they wanted to see a recipe for first, blueberry crumble won. So, here we are! I think this is an excellent summer cheesecake to kick things off, if I do say so myself.
gluten free and dairy free blueberry crumble cheesecake
My goal with this cheesecake was to make a healthier version of the classic, then amp it up with a blueberry crumble on top. This blueberry cheesecake is completely gluten free, dairy free, and refined sugar free. Plus, we are including yogurt to keep it a bit healthier and more gut friendly!
gluten free and dairy free blueberry crumble cheesecake
How to Make Gluten & Dairy Free Blueberry Crumble Cheesecake
Although this gluten free cheesecake isn’t that complicated to make, it does have several components and cheesecakes do take some time. They have a longer bake and need a setting time, so be sure to plan accordingly before baking. I suggest making this at least a day before your desired serving time.
Ingredients for Blueberry Cheesecake
This blueberry crumble cheesecake is made up of 3 main components: the gluten free crust/crumble, the dairy free cheesecake filling, and the blueberry compote.
The crust: is made up of a mix of gluten free flours, coconut oil or butter, and maple syrup. It’s that simple!
The cheesecake filling: is made of dairy free cream cheese, dairy free yogurt, starch and flour, maple syrup, vanilla extract, and eggs. It is also quite simple. I love using a combination of cream cheese and yogurt to keep things healthier. I find this combo yields a near similar texture to traditional cheesecake, without all that heavy cream cheese. My taste testers agree ;).
The blueberry compote: is a combination of blueberries, lemon juice, coconut sugar, and starch. The best part of this recipe is that you can use frozen blueberries for the compote. It’s also extremely easy, but making a compote really adds depth and flavor to this homemade cheesecake. It’s an absolute must and makes the cake!
Process for Making This Healthy Cheesecake
You will start by making the blueberry compote. You just cook the berries down with the other ingredients, then set it aside to cool while you make the rest of the components.
Next is the crust/crumble. Just mix everything together and then use half of the mixture for the crust. The crust is baked before adding the cheesecake filling.
Lastly, the cheesecake filling is made. You will beat together the cream cheese, yogurt, syrup, and flours then add the eggs one at a time.
To assemble, pour the cheesecake filling over the crust, top with some fresh berries then the compote, crumble the remaining crust on top and bake!
We will use a water bath in this recipe to help prevent cracking and slowly cool the cheesecake to help with this too. Trust me, water baths are much easier than you think!
What Cream Cheese and Yogurt Should I Use?
I love the Miyokos brand vegan cream cheese, but any dairy free cream cheese will do (or dairy filled if you can have it!).
I use a full fat coconut yogurt and suggest a thicker vegan yogurt that is coconut based (if you can have that). Many almond based vegan yogurts aren’t as thick, but will still work. If you can have dairy, I suggest using Greek yogurt. Plus, that will boost the protein content, as well.
gluten free and dairy free blueberry crumble cheesecake
More Cheesecake Recipes…
If you love this blueberry cheesecake, you will absolutely adore my Peach Crumble Cheesecake. In similar fashion, a dairy free cheesecake base is topped with ginger and cinnamon peaches and a gluten free crumble. Both recipes are a must make in summer!
This Blueberry Crumble Cheesecake is luscious and delicious, all while being gluten, dairy, and refined sugar free. A healthier, creamy cheesecake filling is topped with a blueberry compote and sweet crumble topping. Everyone will love this dessert!
Combine the blueberries, lemon juice, and sugar in a saucepan over medium low heat.
Cook until berries have released their juice and the mixture is looking jam-like. This can take 5-10 minutes.
Add the starch and stir to combine on low heat for about a minute, until the mixture thickens. Remove from heat and let cool while you make the rest of the cheesecake.
Crust/Crumble
We will be making a water bath for this cheesecake so make sure you have a rack on the bottom and one in the middle.
Preheat oven to 350F.
Line a springform pan with parchment paper or grease it very well.
Whisk together the flours then add the maple syrup and oil. Use a fork to combine until you have a crumbly texture.
Press about 1/3-1/2 the mixture into the bottom of the springform pan and up the sides a little- just enough to cover the transition from the bottom of the pan to the sides. Poke a few holes in the bottom of the crust.
Bake for 15 minutes then remove and let cool for a few minutes.
Cheesecake Filling
While the crust is baking, you can begin making your cheesecake filling.
Beat together the cream cheese and yogurt until smooth.
Add the flours, maple syrup, and vanilla and beat on medium speed to combine.
Add your eggs one at a time, beating to incorporate after each addition.
When the crust is ready, pour the filling over the crust.
Sprinkle the fresh blueberries evenly over the top of the cheesecake, then scoop the compote evenly over top, as well.
Next, crumble the remaining crust mixture evenly over the top of the cheesecake.
When ready to bake, boil 2 cups of water and pour into a glass baking dish or onto a baking sheet on the bottom rack of the oven.
Place the cheesecake on the middle rack and bake for 60-70 minutes, until edges are set and middle is still slightly jiggly (it will seem not quite done, but don't over bake it!).
When cheesecake is done, turn the oven off and crack the door to let the cake cool for 30 minutes in the oven. Then remove it and let it cool to room temperature before placing it in the fridge to set overnight.
When cheesecake is set, remove the springform pan, slice, serve, and enjoy!
gluten free and dairy free blueberry crumble cheesecake
Hi! I'm Victoria. I was diagnosed with Lyme in 2012 and have been on a healing journey ever since. I love helping others on their road to healing through allergy friendly recipes, exercise, and overall well-being.