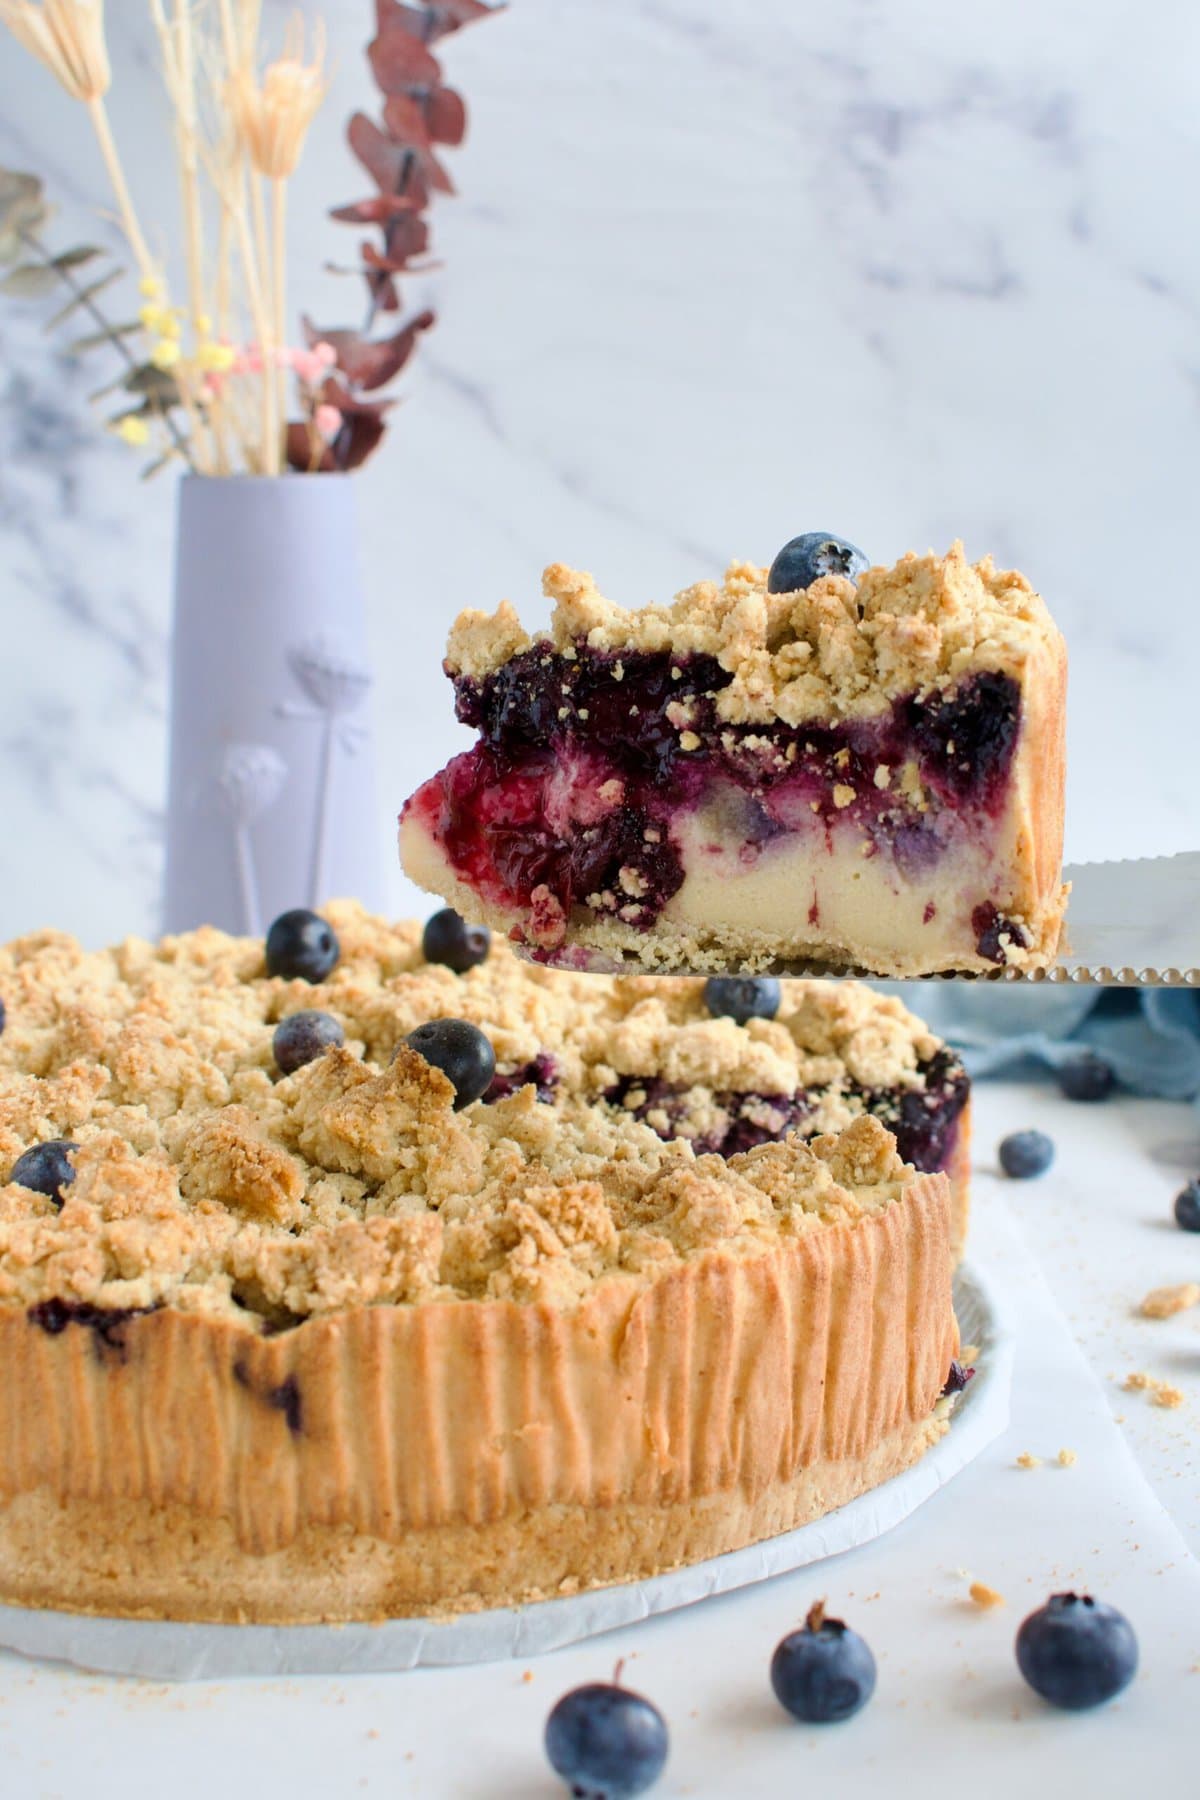
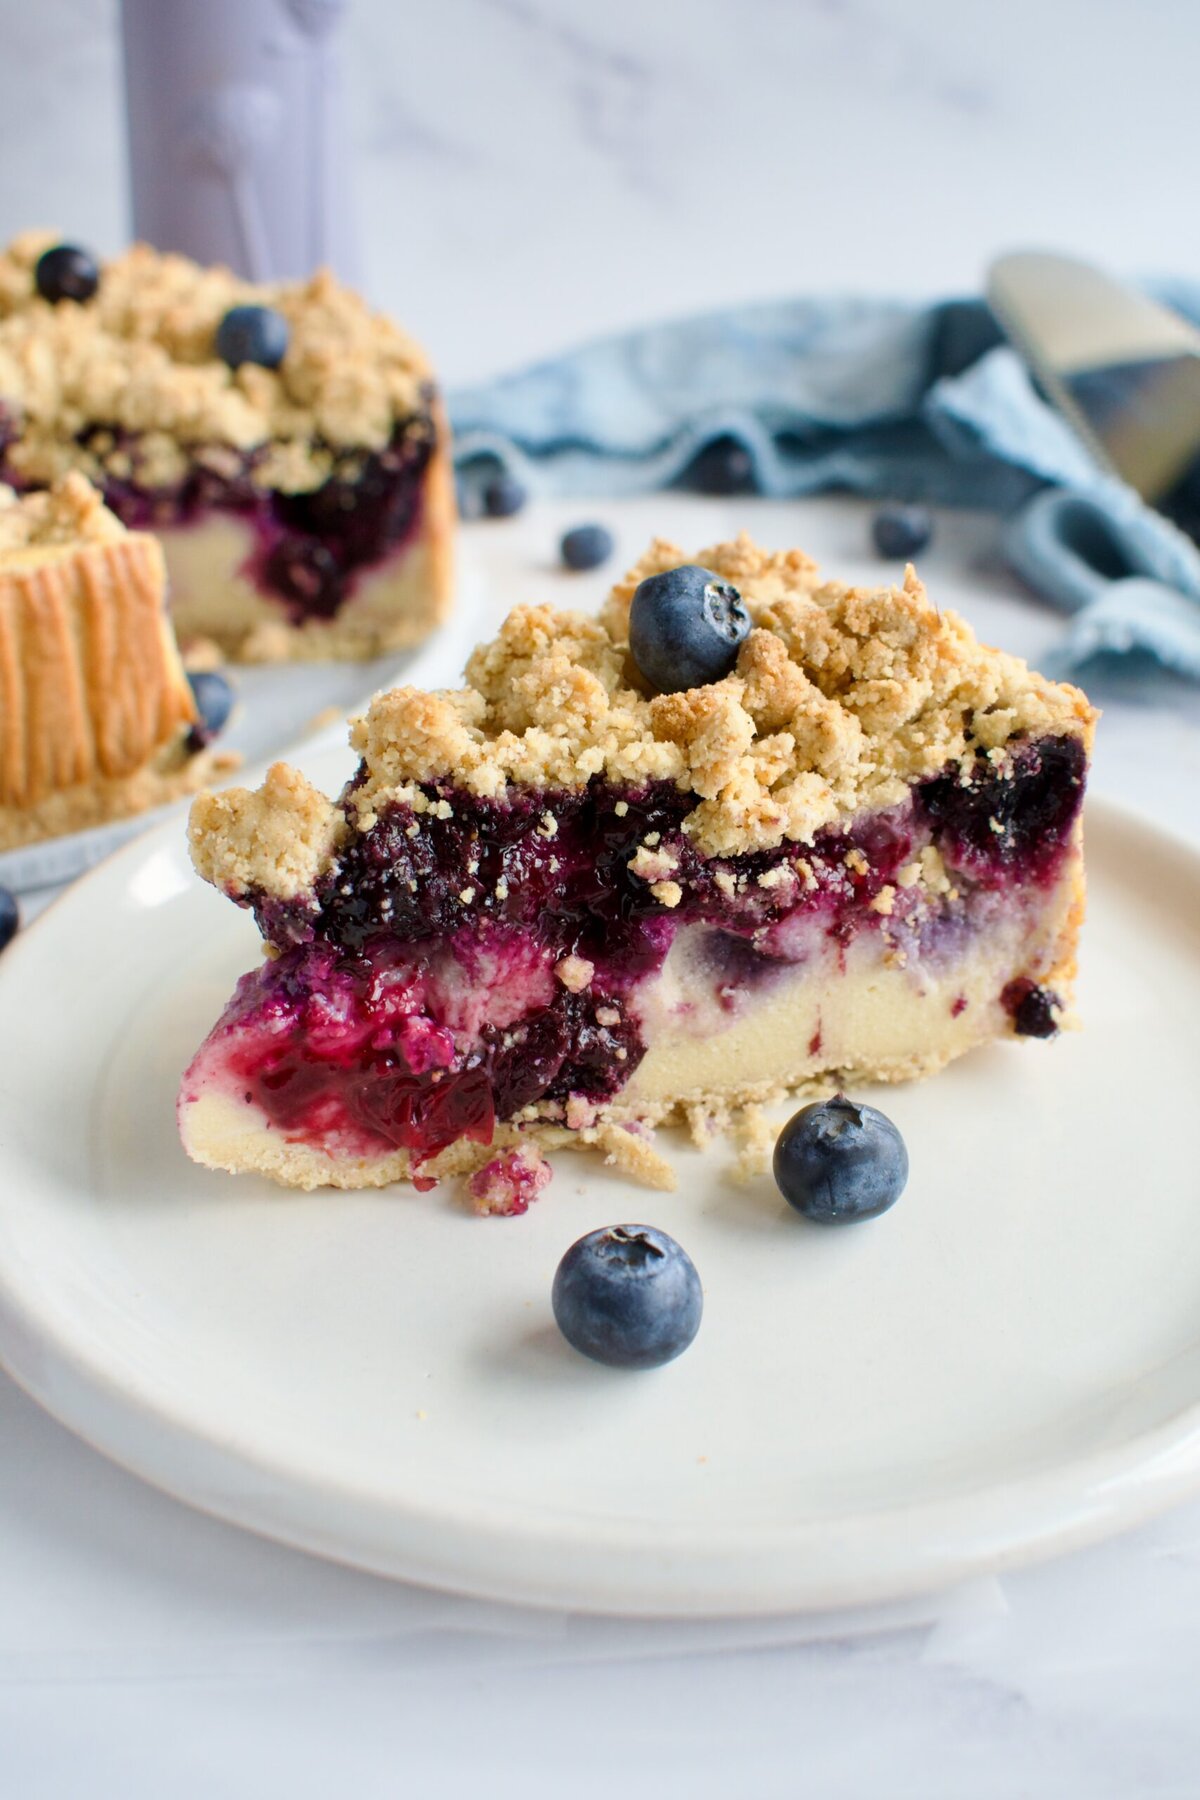
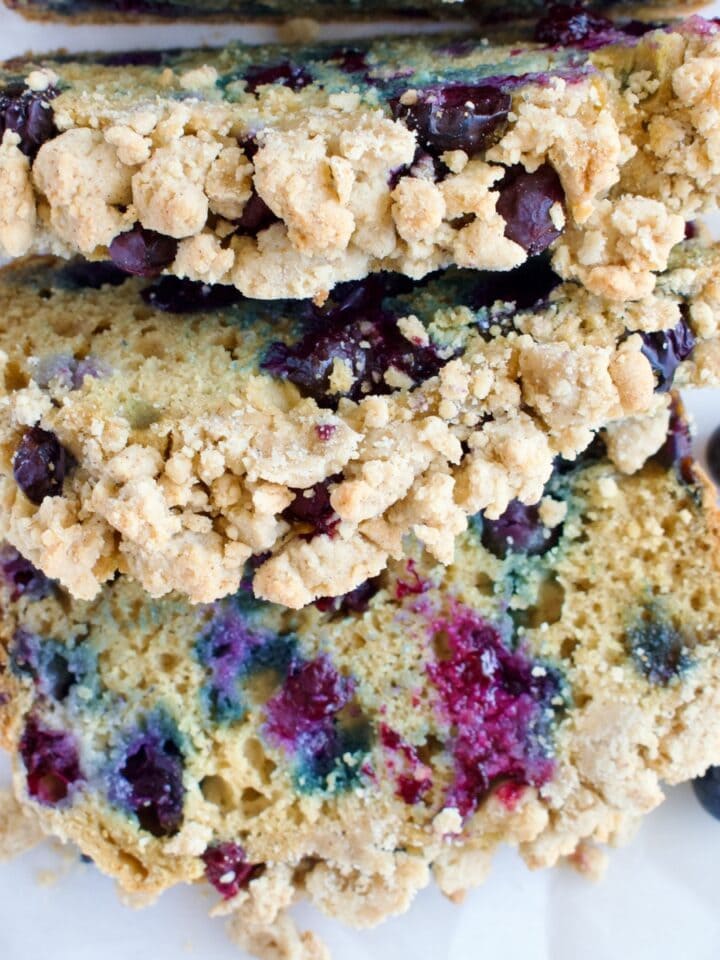
This Gluten Free Blueberry Crumble Cheesecake is what happens when a classic baked cheesecake and a blueberry crumble have a dessert baby. A creamy dairy free cheesecake filling is layered with fresh blueberries and homemade blueberry compote, then topped with a golden crumble and the whole thing is also refined sugar free. This is THE dessert to impress this summer.

I have a list of different cheesecakes I want to create recipes for and when I asked my Instagram audience which one they wanted to see a recipe for first, blueberry crumble won. So, here we are! I think this is an excellent summer cheesecake to kick things off, if I do say so myself, and it's the perfect dessert for blueberry season. Leave a comment letting me know what flavor cheesecake you want to see next!
Why You'll Love This Blueberry Crumble Cheesecake
- Allergy friendly: this blueberry cheesecake is completely gluten free, dairy free, corn free, and soy free. It can be made nut free too depending on the type of dairy free cream cheese you use.
- Refined sugar free: can you even believe it? This entire cheesecake is made without any refined sugar! We rely on the natural sweetness of blueberries plus a little coconut sugar and maple syrup.
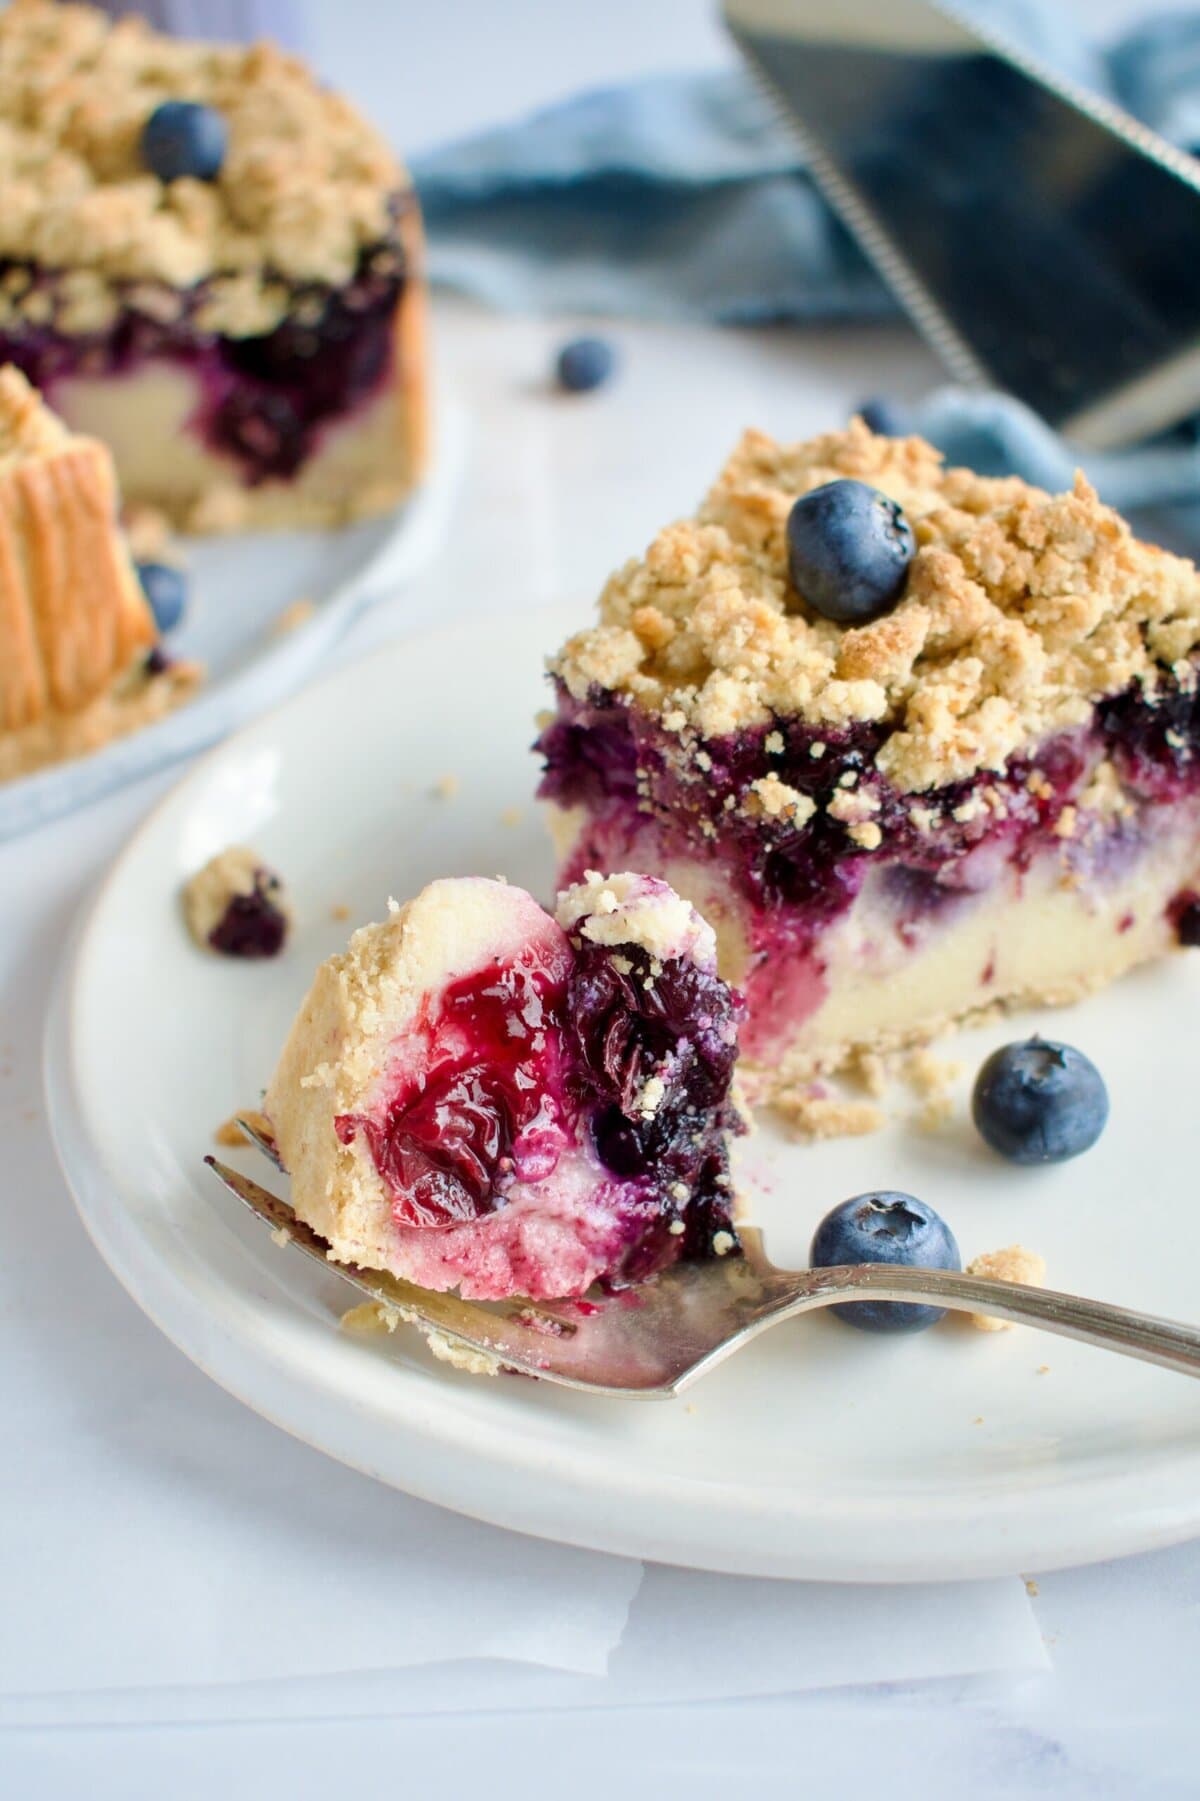
- Double blueberry: fresh blueberries and homemade blueberry compote are used in this summer dessert. Maximum blueberry flavor in every single bite!
- One dough, two purposes: the crust and crumble topping are made from the same dough. You press half in the pan for the crust, crumble the rest on top. One mix, maximum efficiency, minimum cleanup.
- Lighter and healthier cheesecake: we use half yogurt and half cream cheese for a lighter, gut-friendlier filling than a traditional cheesecake without sacrificing creaminess.
Ingredients for Gluten Free Dairy Free Blueberry Crumble Cheesecake
This blueberry crumble cheesecake is made up of 3 main components: the gluten free crust/crumble, the dairy free cheesecake filling, and the blueberry compote.
- Blueberries: used in both the cheesecake filling and blueberry compote, opt for in-season, juicy blueberries when you can!
- Coconut sugar and maple syrup: the two unrefined sweeteners used in this blueberry cheesecake recipe.
- Gluten free flour: be sure to use a gluten free all purpose flour blend.
- Tigernut flour or almond flour: tigernut flour is a nut free alternative, but you can use almond flour if you tolerate it.
- Arrowroot or tapioca starch: starch is used in several components of this recipe and is used to help thicken the cheesecake batter.
- Coconut oil or butter: either will work for the crust/crumble.
- Cream cheese: opt for a dairy-free cream cheese to keep this recipe dairy free. The Miyoko's brand is one of my favorites!
- Yogurt: I use a dairy-free coconut yogurt. The thicker the yogurt, the better.
- Eggs: you'll need 3 large eggs for the cheesecake filling.
- Vanilla extract, lemon juice
How to Make Gluten Free Blueberry Crumble Cheesecake
Although this gluten free cheesecake isn't that complicated to make, it does have several components. Cheesecakes have a longer bake time and need a setting time, so be sure to plan accordingly before baking. I suggest making this at least a day before your desired serving time.
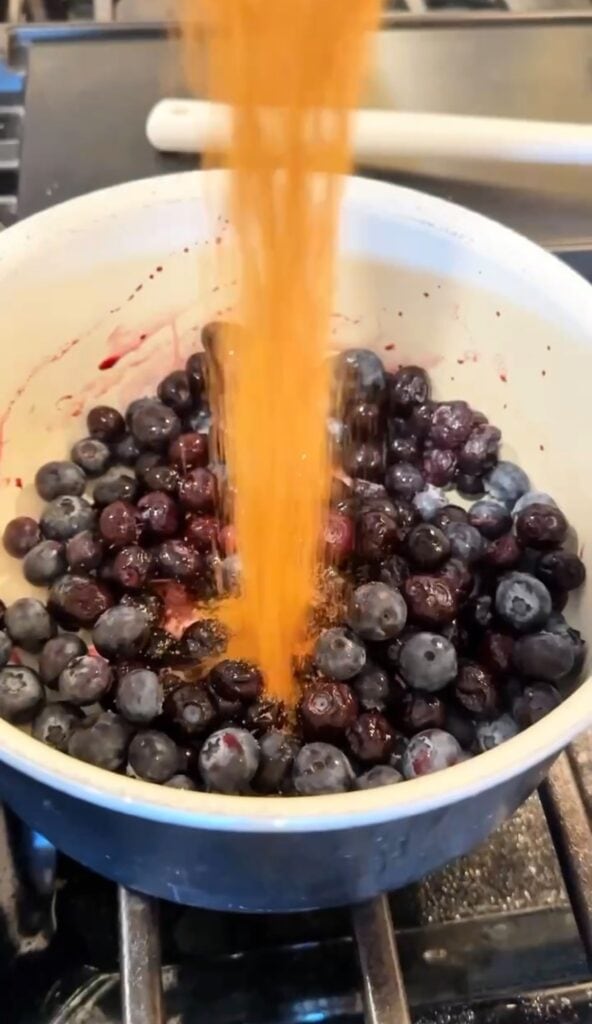
- Make the the blueberry compote first. Add all compote ingredients to a saucepan and cook the berries down until you have jammy blueberries. Set aside to cool.
- Line a springform pan with parchment paper and preheat the oven to 350F.
- Next make the crust/crumble. In a medium bowl, whisk the dry ingredients together then add the wet ingredients until it holds together.
- Press half of the dough into the bottom of the cheesecake pan and up the sides a ½ inch. Bake for 15 minutes.
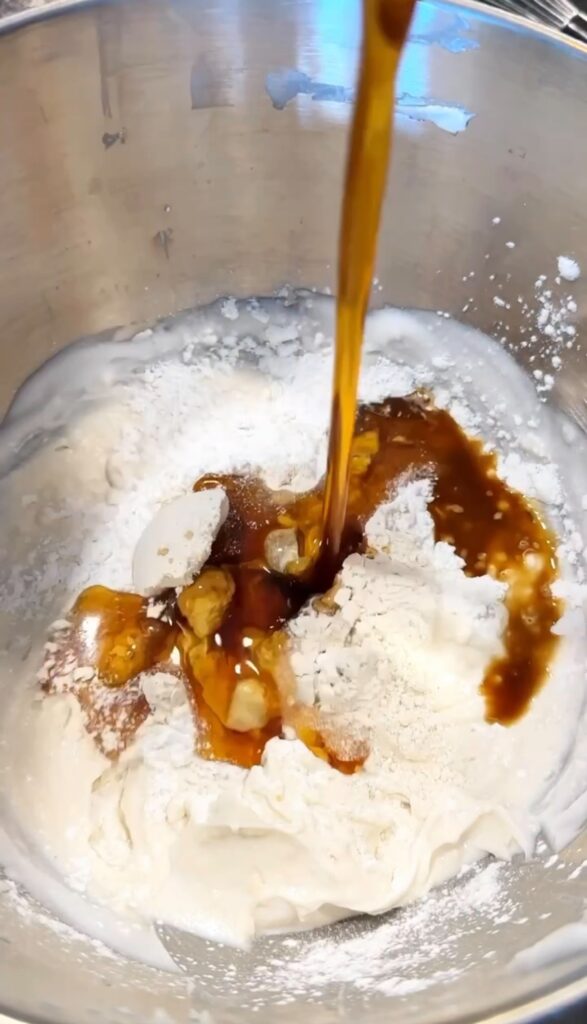
- Make the cheesecake filling by beating together the softened cream cheese and yogurt on medium speed in a large bowl until smooth (you can use can electric hand mixer, although a stand mixer is easier). Add the maple syrup, vanilla, and flours and beat to combine. Add the eggs one at a time, beating after each addition. Scrape down the sides of the bowl as needed.
- Prepare a water bath then assemble the cheesecake.
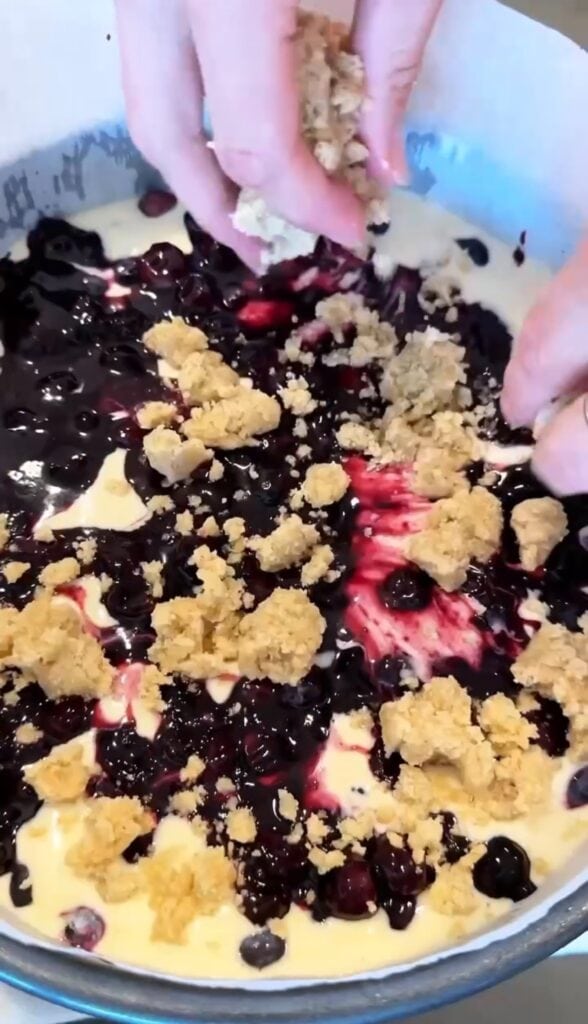
- Pour the cheesecake filling over the crust, then top the cheesecake layer with some fresh blueberries before adding the compote. Crumble the remaining crumble topping in an even layer on top.
- Place the cheesecake on a baking sheet on the middle rack and bake for 60-70 minutes, until edges are set, the middle is still slightly jiggly (it will seem not quite done, but don't over bake it!), and the crumble is golden brown.
- When cheesecake is done, turn the oven off and crack the oven door to let the cake cool for 30 minutes in the oven. Then remove it and let it cool to room temperature before placing it in the fridge to set overnight.
- When cheesecake is set, remove the springform pan, slice, serve, and enjoy!
Substitutions and Variations
- Flours: tigernut flour and almond flour are interchangeable. You can use either, tigernut is just a nut free alternative for those with almond allergies.
- Blueberry compote: although I think making your own blueberry compote is best for this recipe, you can use blueberry jam in a pinch.
- Dairy products: this recipe uses dairy free butter, cream cheese, and yogurt. You can feel free to use dairy-full ingredients if you tolerate them. Opt for Greek yogurt if you can have dairy- it will add a protein boost to this cheesecake recipe.
- Berries: if you aren't a blueberry fan or want to try another option, you can substitute the blueberries for any berry you like making a delicious berry crumble cheesecake of your choosing!
- Variations: if you are a fan of the lemon-blueberry combo, you could add some lemon zest to both the cheesecake and compote to amp up the lemon flavor. Or even make a lemon drizzle glaze for a lemon blueberry cheesecake.
Storage
Keep leftover blueberry crumb cheesecake in the fridge for up to 5 days. I generally leave it on the bottom of the springform pan or serving dish and cover with aluminum foil or you can transfer it to an airtight container.
This cheesecake tastes best fresh due to the textures of the different layers. You can tightly wrap individual slices in plastic wrap and freeze in a freezer safe container for up to 2 months, though. Thaw in the fridge overnight before eating, just be aware that the crumble will be much softer and the cheesecake won't hold together as well after de-frosting. A reader noted that she thought it tasted pretty good frozen, similar to an ice cream bar.
Make-Ahead Tips
This cheesecake is actually better made ahead as it needs overnight in the fridge to set properly which means you HAVE to make it in advance. The compote can be made up to 3 days ahead and stored in the fridge. The crust/crumble dough can be made a day ahead. The full assembled cheesecake can be made up to 2 days before serving.
Tips for the Best Gluten Free Dairy Free Blueberry Cheesecake
- Use room temperature ingredients: cold cream cheese or eggs can cause lumps in the filling. Take everything out of the fridge at least 30 minutes before making the filling.
- Thick yogurt: stick to a thicker yogurt variety for best results. Runny yogurts, like some almond-based yogurts, won't yield the best results. Use something like Greek yogurt or coconut yogurt (I love Harmless Harvest brand).
- Be gentle: cheesecakes can be sensitive. Don't over beat the batter on too high of a speed. You want a smooth batter that results in a creamy filling. If you beat too much air into the cheesecake batter, it will fall after baking.
- Water bath: water baths can seem intimidating, but they aren't! They help the cheesecake to not crack when baking. All you have to do is place a pan of hot water on the bottom rack of the oven before adding the cheesecake to the middle rack.
- Don't open the oven door while baking: temperature fluctuations are a major cause of cheesecake cracking. Resist the urge to peek!
- Let the cheesecake cool properly: cracking the oven to let the cheesecake cool after baking for a little helps it to not crack, as the drastic change in temperatures is part of what can trigger cracking. So, cool the cheesecake in the oven for 30 minutes before removing it to finish cooling at room temperature.
- How to know the cheesecake is done: this can always feel like an art when it comes to baking homemade cheesecake. ESPECIALLY when we have a topping, making it harder to see the cheesecake. You will know it's done because the center will be jiggly and seem not quite done, but the edges should seem set and the crumble topping should be golden brown. Don't worry, it will cook more as it cools so the center won't be raw.
- Slicing the cheesecake: run a sharp knife under hot water then tip dry before slicing. These helps you get clean cuts.

FAQ
Yes, it's gluten free as written. Make sure to check your ingredient labels, especially the dairy free cream cheese. Some dairy free cream cheese brands are made with oats that are not certified gluten free. Oats have a high risk of cross contamination, so for this recipe to be Celiac safe, you'll need to use a certified gluten free cream cheese.
Yes, it's dairy free as written as long as you use dairy free yogurt and cream cheese.
No, this is not a vegan cheesecake recipe and I have not tested any substitutions for the 3 eggs needed. Stick to a recipe specifically written to be vegan if that's what you are looking for.
Cheesecakes are sensitive little desserts and there are a few reason it could have cracked. Just remember, you do have the crumble topping which can hide imperfections. Anyway, your blueberry cheesecake may have cracked because you over beat the batter, didn't use a water bath, or there were too extreme of temperature fluctuations (you opened the oven door during baking, you didn't cool it in the oven after baking, you put it straight into the fridge instead of fully cooling at room temperature). See the TIPS section above for more detailed tips to prevent cracking.
You don't have to do anything, but I highly suggest using a water bath. Water baths help prevent cracking by providing even heat and moisture during the baking process.
You can use frozen blueberries for the blueberry compote, but you will want to use fresh berries for the mix-in. If you are making this blueberry cheesecake at a time when fresh berries aren't accessible, skip the fresh blueberry part and just make the compote!
See the tips section above for a detailed answer! The center should be jiggly and seem not quite done.
I haven't tried it, but I think you could certainly make gluten free blueberry crumble cheesecake bars. Press the crust into the bottom of a 9x9 or larger baking pan then follow the same instructions to make the rest of the cheesecake. Slice into bars when done instead of removing a springform pan.
Technically yes (see storage section above), although I think this cheesecake tastes best fresh. Freezing this blueberry crumb cheesecake will change the textures a bit, but it will still taste good.
You can make this blueberry crumble cheesecake up 2 days ahead for the best taste and texture. Cheesecakes need to be made at least a day before as they require extensive cooling time. See the make ahead tips in above post for how far ahead you can make the different components.
More Cheesecake Recipes...
Caramel Apple Crumble Cheesecake
Raspberry Cheesecake Bars with Brownie Crust
If you try this recipe, leave a review. I'd love to hear how you enjoyed this blueberry cheesecake recipe! If you have any questions, comment below.
Gluten Free Blueberry Crumble Cheesecake (Dairy Free, Refined Sugar Free)
Equipment
- stand mixer or
Ingredients
Blueberry compote/jam
- 2 cups blueberries fresh or frozen
- 2 teaspoon lemon juice
- 2 tablespoon coconut sugar
- 1 tablespoon tapioca or arrowroot starch
Crust/Crumble
- 1 ½ cups 1:1 gluten free flour
- 1 ½ cups tigernut flour or almond flour
- ¾ cup softened coconut oil or butter
- ⅓ cup maple syrup
Cheesecake
- 8 oz vegan cream cheese
- 2 cups vegan yogurt I like to use a thick coconut yogurt
- ¼ cup tapioca or arrowroot starch
- 2 tablespoon 1:1 gluten free flour
- ⅓ cup maple syrup
- 1 tablespoon vanilla extract
- 3 eggs
- 1 cup fresh blueberries
Instructions
Blueberry Compote
- Combine the blueberries, lemon juice, and sugar in a saucepan over medium low heat.
- Cook until berries have released their juice and the mixture is looking jam-like. This can take 5-10 minutes.
- Add the starch and stir to combine on low heat for about a minute, until the mixture thickens. Remove from heat and let cool while you make the rest of the cheesecake.
Crust/Crumble
- We will be making a water bath for this cheesecake so make sure you have a rack on the bottom and one in the middle.
- Preheat oven to 350F.
- Line a springform pan with parchment paper or grease it very well.
- Whisk together the flours then add the maple syrup and oil. Use a fork to combine until you have a crumbly texture.
- Press about ⅓-1/2 the mixture into the bottom of the springform pan and up the sides a little- just enough to cover the transition from the bottom of the pan to the sides. Poke a few holes in the bottom of the crust.
- Bake for 15 minutes then remove and let cool for a few minutes.
Cheesecake Filling
- While the crust is baking, you can begin making your cheesecake filling.
- Beat together the cream cheese and yogurt until smooth.
- Add the flours, maple syrup, and vanilla and beat on medium speed to combine.
- Add your eggs one at a time, beating to incorporate after each addition.
- When the crust is ready, pour the filling over the crust.
- Sprinkle the fresh blueberries evenly over the top of the cheesecake, then scoop the compote evenly over top, as well.
- Next, crumble the remaining crust mixture evenly over the top of the cheesecake.
- When ready to bake, boil 2 cups of water and pour into a glass baking dish or onto a baking sheet on the bottom rack of the oven.
- Place the cheesecake on the middle rack and bake for 60-70 minutes, until edges are set and middle is still slightly jiggly (it will seem not quite done, but don't over bake it!).
- When cheesecake is done, turn the oven off and crack the door to let the cake cool for 30 minutes in the oven. Then remove it and let it cool to room temperature before placing it in the fridge to set overnight.
- When cheesecake is set, remove the springform pan, slice, serve, and enjoy!
Stacey says
This cheesecake is absolutely delicious and wasn’t hard to make at all! I did freeze some (against your guidance lol) and it was actually really tasty, similar to an ice cream bar. Thanks for a fabulous recipe 😊
Victoria Faling says
I'm so glad to hear you loved it and it worked out freezing it!