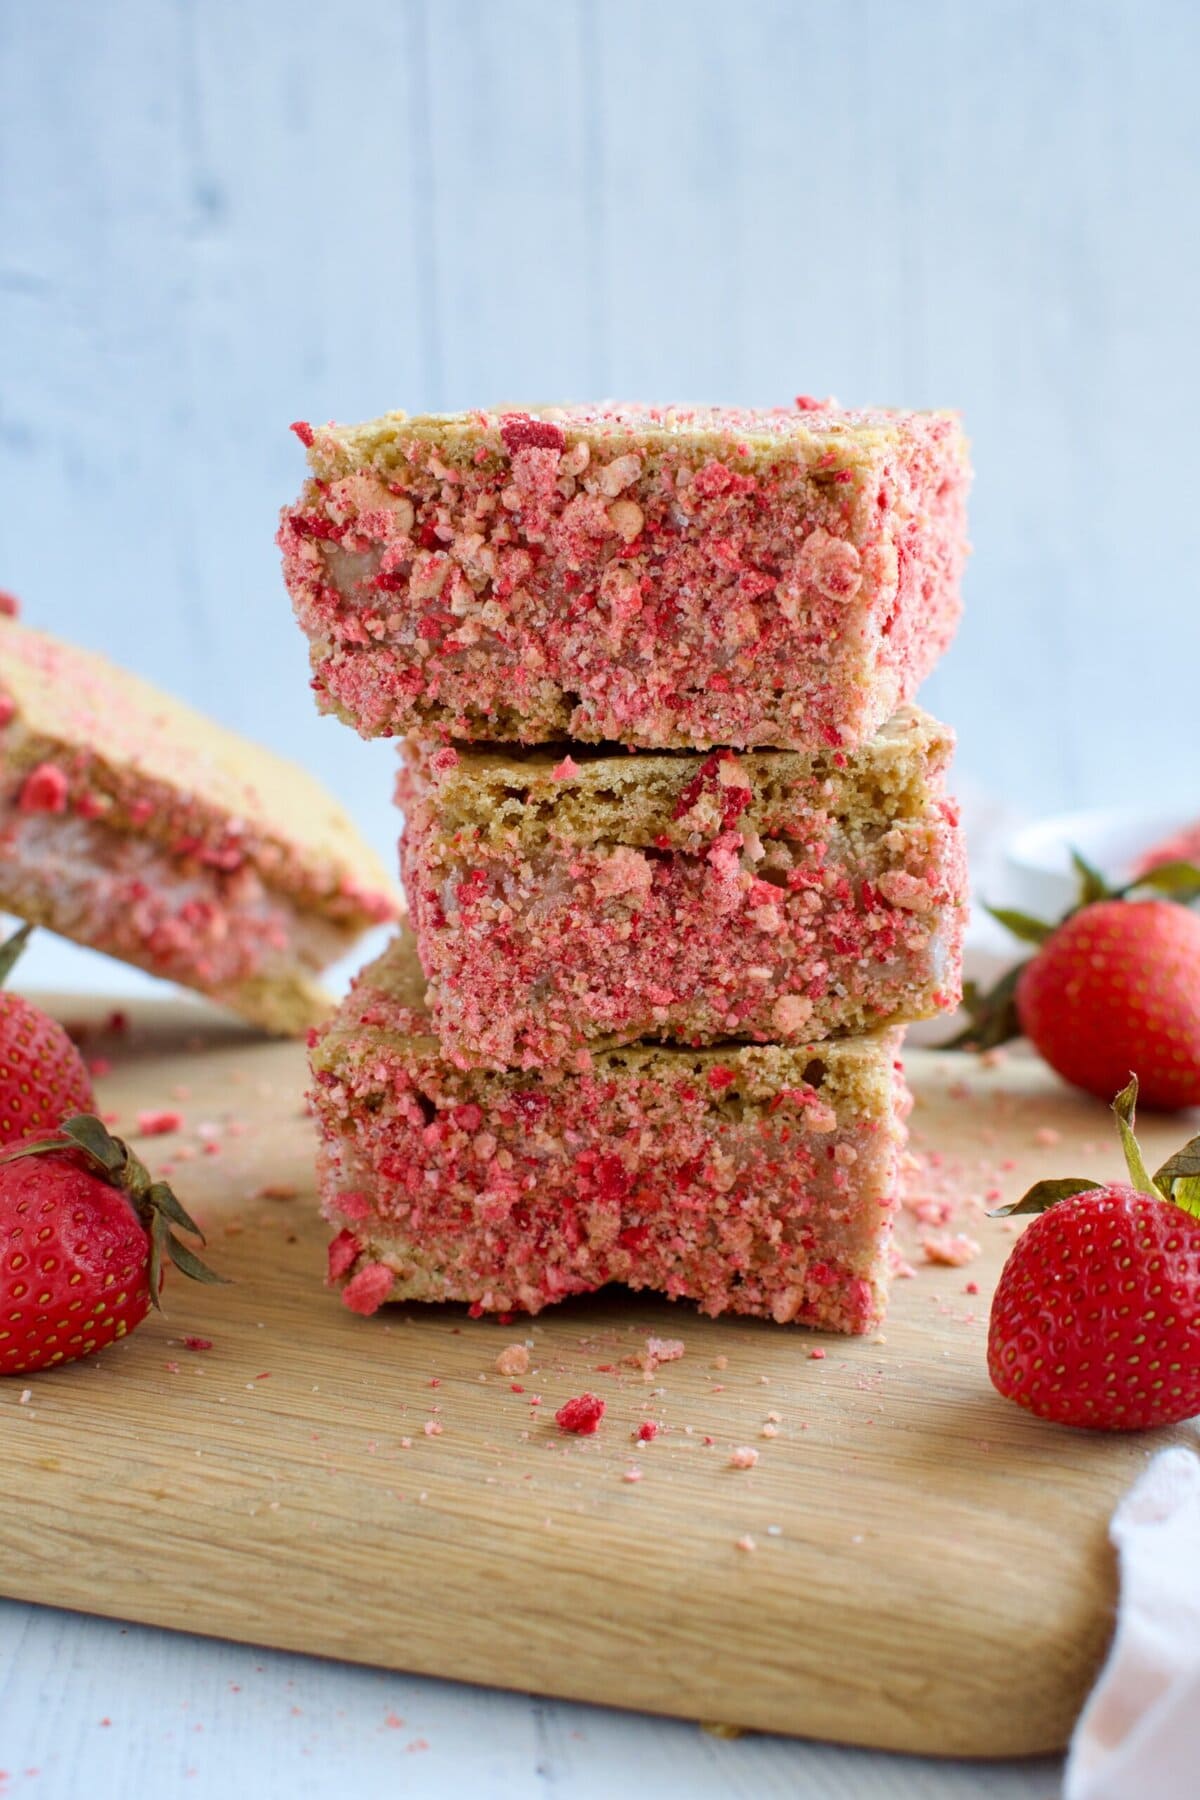
These Gluten Free Strawberry Shortcake Ice Cream Sandwiches are the Good Humor bar you grew up loving, but completely reimagined as a homemade ice cream sandwich. A gluten free sugar cookie base is filled with homemade dairy free strawberry ice cream and rolled in a strawberry crunch coating made from rice crisps and freeze dried strawberries. No gluten, no dairy, no refined sugar, just pure strawberry shortcake nostalgia in every single bite.

Welcome to my healthy ice cream sandwich series where I'm taking ice-cream truck classics and making healthier ice cream sandwich versions! Along with a few unique flavors along the way. I have lots of delicious flavors (linked at the end of this post), with more to come.
Strawberry shortcake ice cream bars were one of my favorites. I loved the sweet strawberry ice cream and crunchy strawberry coating. The contrast in textures was always delicious. I knew I had to make an ice cream sandwich version for this series. These strawberry ice cream sandwiches are the perfect treat for strawberry season, bringing back all the nostalgic vibes.
Love strawberry shortcake? Try my Gluten Free Strawberry Shortcake Recipe with Peaches or Gluten Free Strawberry Crunch Donuts.

Why You'll Love These Gluten Free Strawberry Shortcake Ice Cream Sandwiches
- Allergy friendly: gluten free, dairy free, soy free, corn free, and refined sugar free so everyone can have a sandwich
- Homemade everything: baked sugar cookie base, churned strawberry ice cream, and from-scratch strawberry crunch.
- Nut free: unlike most GF/DF strawberry shortcake recipes that rely on cashews or almond flour, this one is completely nut free.
- Real strawberry ice cream: made with fresh macerated strawberries, no artificial flavor or food coloring. You can taste the difference!
- The strawberry crunch coating: rice crisps + freeze dried strawberries rolled on the outside for that iconic shortcake bar texture without Golden Oreos.

Strawberry Shortcake Ice Cream Sandwich Ingredients
Strawberry Ice Cream
- Coconut milk: be sure to use full fat canned coconut milk for the best dairy-free ice cream texture.
- Strawberries: I love using fresh strawberries, but you can also use frozen.
- Coconut sugar: the unrefined sweetener used in the ice cream base
- Tapioca starch or arrowroot: this helps thicken dairy-free ice cream without eggs.
- Honey, lemon juice: used to bring out the flavor of the strawberries.
- Vanilla extract, salt
Sugar Cookie Base
- Dairy free butter: stick to a plant based butter to keep this recipe dairy free.
- Coconut sugar: an unrefined sweetener.
- Eggs: 1 egg and 1 egg yolk.
- Gluten free flour: be sure to use a 1:1 gluten free flour blend.
- Tapioca starch or arrowroot: this helps achieve a base of chewy cookies.
- Baking powder, vanilla extract, salt
Strawberry crunch
- Rice puffs: try to find unsweetened ones if you can.
- Freeze-dried strawberries: this is mixed with the rice puffs to create that classic strawberry crunch.
- Sugar: stick to coconut sugar for an unrefined option.
How to Make Dairy Free and Gluten Free Strawberry Shortcake Ice Cream Sandwiches
Ice Cream
- Combine some of the strawberries, milk, sugar, and salt in a blender until you have a creamy strawberry base.
- Gently heat the base over low heat until warm then add the starch slurry. Cook on low until the base has thickened. Whisk in the vanilla extract, let cool completely (you can even leave it in the fridge overnight).
- When ready to churn the ice cream, macerate the leftover strawberries with the honey. When the ice cream is almost done churning in your ice cream maker, add the macerated strawberries to mix in. You should have a perfectly pink ice cream color with some strawberry chunks.
Cookie base
- Beat together the melted butter and sugar until combined. Add the eggs and vanilla and mix until just combined.
- Add the dry ingredients to the wet and mix until just combined.
- Spread the batter out evenly over the prepared baking sheet and bake cookies for 10 minutes at 350F.
- Let the base completely cool before assembling the sandwiches.
Assembly
- Line a cutting board with plastic wrap and place half of the cookie base on top. Spread the strawberry ice cream evenly over the base.
- Flip the other cookie half on top of the ice cream. Wrap tightly in plastic wrap.
- Place the sandwiches in the freezer for AT LEAST 3 hours, preferably overnight, to allow the ice cream to fully set.
- While freezing, pulse the rice puffs, dried strawberries, and sugar together and pour into a small bowl.
- When ready, slice into 8 sandwiches and dip each side in the strawberry-rice mixture. Enjoy!
- PRO TIP: Use a knife run under hot water for a couple seconds for easy and clean slices.
Substitutions and Variations:
- Ice cream: you can try using a different dairy-free milk, but the results won't be as creamy. Use half full fat coconut milk with another variety of plant-based milk for a slightly lower fat version.
- Strawberry ice cream options: Skip the fresh strawberries at the end and swirl in some strawberry jam if you prefer not to have the strawberry chunks or use vanilla ice cream and swirl in the strawberries. You can also use store bought strawberry ice cream for a short cut.
- Tapioca starch: this is important with churned vegan ice cream for a creamier texture without egg yolks. Skip if using the Ninja Creami, but you'll need it for classic churned ice cream.
- Cookie base: regular or dairy free butter will work. I haven't tested coconut oil, but I think that should work.
- Cookie base variations: don't feel like baking cookies or it's too hot to turn the oven on? Try using gluten free graham crackers instead and skip all the baking!
- Strawberries: If you aren't a big strawberry fan, I think raspberries would be a fantastic option! Raspberry shortcake ice cream... that sounds pretty good.
- Variations: add some white chocolate chips to the ice cream base or crumb coating for something different! Add a layer of strawberry sauce or jam between the layers of cookie and ice cream for even more strawberry flavor!
How To Serve and Store These Strawberry Shortcake Ice Cream Sandwiches
Serve: Let these homemade ice cream sandwiches sit for a couple of minutes at room temperature for the best texture. Homemade dairy free ice cream can freeze quite hard. Just don't let them sit out too long or they'll melt!
Make ahead: these gluten free ice cream sandwiches are fantastic for summer holidays, BBQ's, or celebrations. Make a batch (or two) up to a 3 days ahead of time for best taste and texture, then pull them out 5 minutes before serving. Optionally, you can make the ice cream a week ahead, the cookies the day before, and assemble day of.
Store: Once you have sliced the ice cream sandwiches, wrap each individually in plastic wrap, parchment paper, or wax paper. You can then place all of the sandwiches into a large ziplock bag or freezer safe container and store in the freezer until ready to eat. You can store them for up to 2 months.
Tips for The Best Strawberry Shortcake Ice Cream Sandwiches
- Make the ice cream the day before. The ice cream needs minimum 24 hours total between making the ice cream and letting it set, so plan to make it in advance. You could even make it up to a week in advance and keep it in the freezer until ready to assemble.
- Cool the cookie base completely before assembling. A warm cookie will melt your ice cream immediately and you'll have a pink mess!
- Work quickly during assembly. Make sure to have everything prepped and ready before you start. Once the ice cream softens, it moves fast.
- The cookie base is fragile until frozen. Handle with care during assembly, but once frozen you'll be good to go!
- Use a hot knife for cutting. Run your knife under hot water, wipe dry, and slice in one smooth motion. Repeat between cuts for clean edges.
- Dip in crunch immediately. Roll each slice in the strawberry crunch right after cutting while the ice cream is still slightly soft so the crunch actually sticks. Then pop in the freezer to set or serve immediately.
FAQ
Yes, they are fully gluten free as written. Just be sure to check your ingredient labels.
Yes, they are also dairy free as written. Stick to using dairy free milk and butter.
Frozen strawberries will work fine for making the ice cream, but I suggest letting them thaw first. If you don't, it will take longer to heat up the ice cream base.
No, you can use your favorite store-bought strawberry ice cream if desired. You'll need about 1.5 pints. Stick to a dairy free or vegan strawberry ice cream to keep this recipe fully dairy free.
Although an ice cream maker helps with consistency, you can always put the base into a freezer safe dish and whisk it every 30 minutes until it freezes. It won’t be quite as smooth, but it works in a pinch. This method is a little more time intensive as you do want to keep stirring the ice cream. If you have a Ninja Creami, you can also make the ice cream in that. Using the Creami always results in a dreamy ice cream texture!
You can make these strawberry shortcake ice cream sandwiches no more than a week in advance for best taste and presentation, but as mentioned above, they are best if made 1-3 days ahead. If making them that far out, I suggest not adding the strawberry crunch until the day of, as it can soften as it absorbs moisture from the ice cream while in the freezer.
It's a large slab of thin cookie, so this is normal. You want to work carefully, but even if it cracks, that's okay! These are homemade, imperfections are to be expected and they'll still taste delicious.
Sure, but then these will be basic gluten free dairy free strawberry ice cream sandwiches. Not quite as exciting, but still a delicious sweet treat!

More Ice Cream Sandwich Recipes
Banana Pudding Ice Cream Sandwiches
Golden Milk Ice Cream Sandwiches
Blackberry Ice Cream Sandwiches
If you try this recipe, leave a rating and review below. If you have any questions, don't hesitate to comment.

Gluten Strawberry Shortcake Ice Cream Sandwiches (Dairy Free, Refined Sugar Free)
Equipment
Ingredients
Strawberry Ice Cream*
- 3 cups strawberries, divided
- 2 cans full fat coconut milk
- ¾ cup coconut sugar or regular sugar
- ¼ teaspoon salt
- 1 teaspoon vanilla extract
- ¼ cup tapioca starch
- 2 Tbsp. honey
- 1 teaspoon lemon juice
Sugar Cookie Base
- ½ cup melted (vegan) butter or coconut oil
- ½ cup coconut sugar
- 1 egg
- 1 egg yolk
- 1 teaspoon vanilla extract
- 1 ¼ cup 1:1 gluten free flour
- 2 tablespoon tapioca starch or arrowroot
- ¾ teaspoon baking powder
- ¼ teaspoon salt
Strawberry Shortcake Crumb
- 1 cup rice crispies
- 1 cup freeze dried strawberries
- 1-2 teaspoon sugar
Instructions
Ice Cream
- You need to make the ice cream ahead of time, preferably the day before.
- Blend 2 cups of strawberries, the milk, and coconut sugar together in a high speed blender until combined.
- Heat the ice cream base on medium-low until warm to the touch.
- Whisk a half cup of the ice cream base with the ¼ cup of tapioca starch until there are no lumps. Add this back to the base and continue to heat and whisk the base regularly until it begins to thicken (about 10 minutes).
- Let the base cool then place in the fridge for at least 4 hours, preferably overnight.
- When ready, churn your ice cream according to your ice cream makers directions.
- While ice cream is churning, macerate the remaining strawberries with the honey and lemon juice. Mash them up until lightly chunky and blended with the honey.
- When the ice cream is almost done, add your macerated strawberries to mix in.
- Transfer the ice cream to a freezer safe container and freezer for a couple of hours until ready to use.
Sugar Cookie Base:
- Beat together the melted butter and sugar until smooth.
- Add the egg, egg yolk, and vanilla and mix until combined.
- In a small bowl, whisk together the flour, starch, baking powder, and salt then add to the wet ingredients and mix until just combined.
- Line a 9x13 or 10x15 baking tray with parchment paper then spread the sugar cookie base on the lined tray.
- Bake for 10 minutes (do not over bake, it should seem not quite done).
- Let cool completely before assembling the sandwiches.
Assembly
- Make sure your ice cream is quite soft and pliable, but not totally melted when ready to assemble.
- When ready to assemble, take a cutting board (that will fit in your fridge) and place 2 long pieces of plastic wrap in a cross over the cutting board.
- Cut the cookie base in half and GENTLY transfer one half to the center of the cutting board (the base is fragile until frozen, so work carefully).
- Scoop your ice cream onto the cookie base and spread evenly. Gently transfer the other half of the cookie base on top. Wrap the giant sandwich tightly with plastic wrap and place in the fridge for 4-6 hours, preferably overnight.
- When ready, smash or pulse the freeze dried strawberries, rice crisps, and sugar together until you have a rough texture.
- Slice your ice cream sandwiches and then dip each side in the rice crisp mixture. Serve immediately or wrap individually and keep frozen until ready to eat.

Leave a Reply