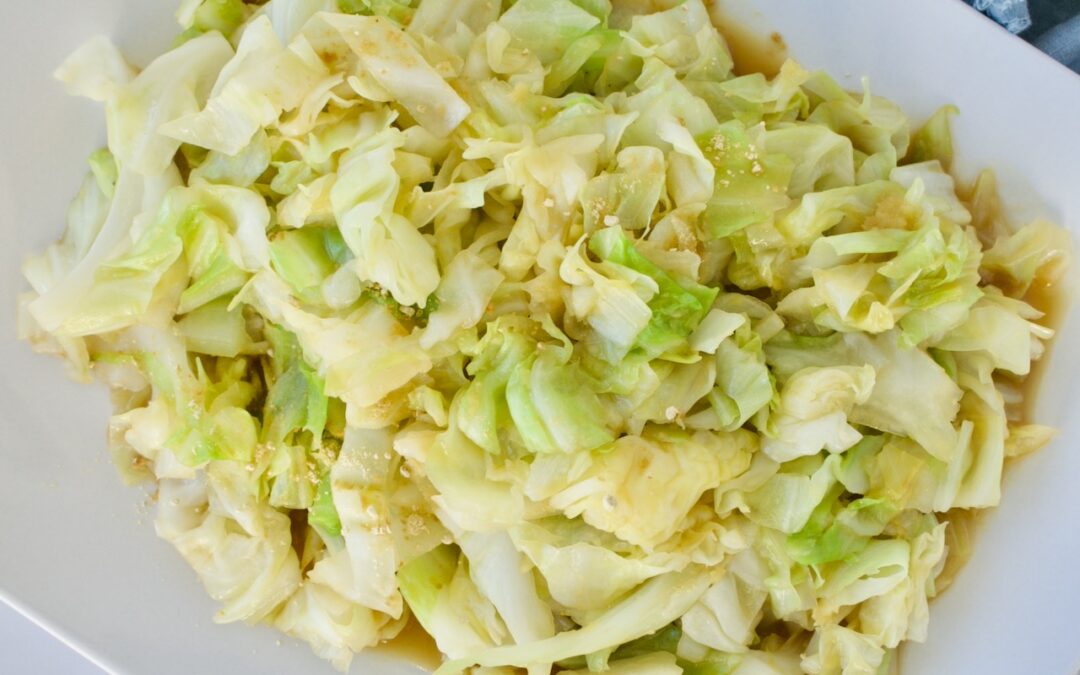
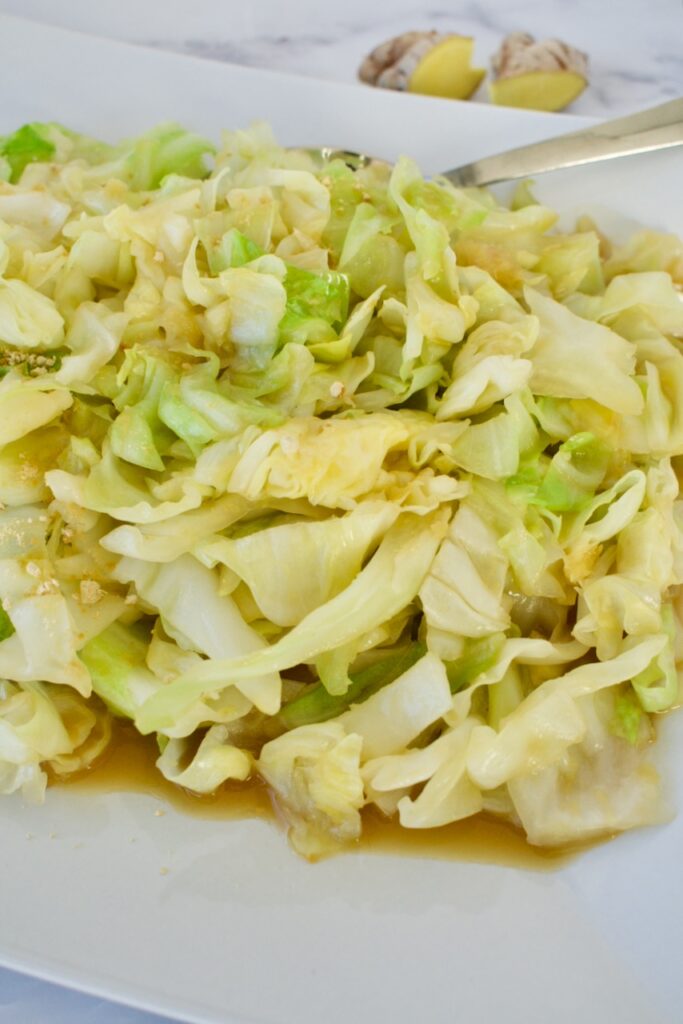
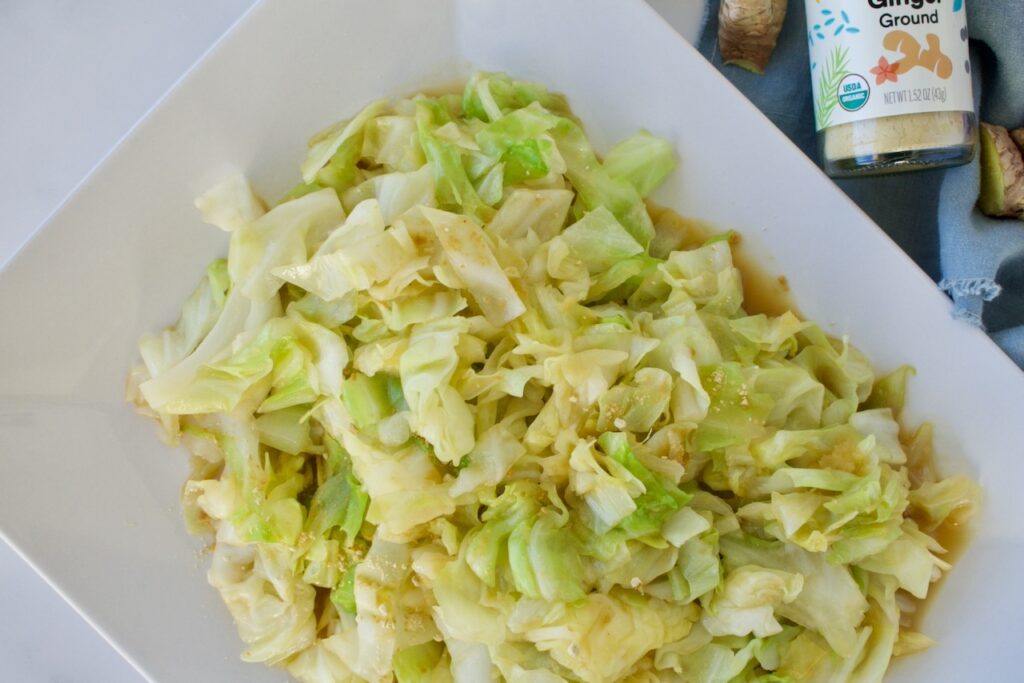
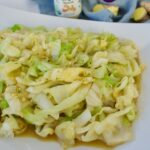
This ginger cabbage recipe is super easy to make and it’s the perfect quick side dish for a weeknight meal or even a larger dinner affair. This cabbage is made on the stove, so it’s a sautéed cabbage with bold ginger flavor. All you have to do is sauté the cabbage with ginger, then add in some broth and coconut aminos. It really is that easy.
AIP gingered cabbage
I’m obsessed with ginger… ginger anything and I’m happy! The more ginger the better. If you also love ginger, then you’ll love this recipe, too. Ginger is a fantastic spice with some amazing anti-inflammatory benefits. It’s also great for stomach upset and GI distress as well as improving nutrient absorption. Ginger stimulates circulation and can help support the immune system. It’s delicious and amazing for you!
1/4cupbroth of choicebone broth, chicken broth, or vegetable broth works!
1/2Tbspground ginger
2Tbspcoconut aminos
Instructions
Slice your cabbage in quarters and de-core, then slice into thin strips.
Heat coconut oil over medium heat in a large skillet until melted. Add the grated ginger ginger and sauté for about 1 minute.
Add cabbage and cook stirring frequently for 3-4 minutes, until cabbage starts to soften.
While cabbage is cooking, whisk together the broth, ground ginger (you can leave this out if you prefer a more mild taste, this adds the last super kick of spice and ginger), and coconut aminos. Add this mixture to the cabbage and cook another 3-4 minutes until cabbage is soft.
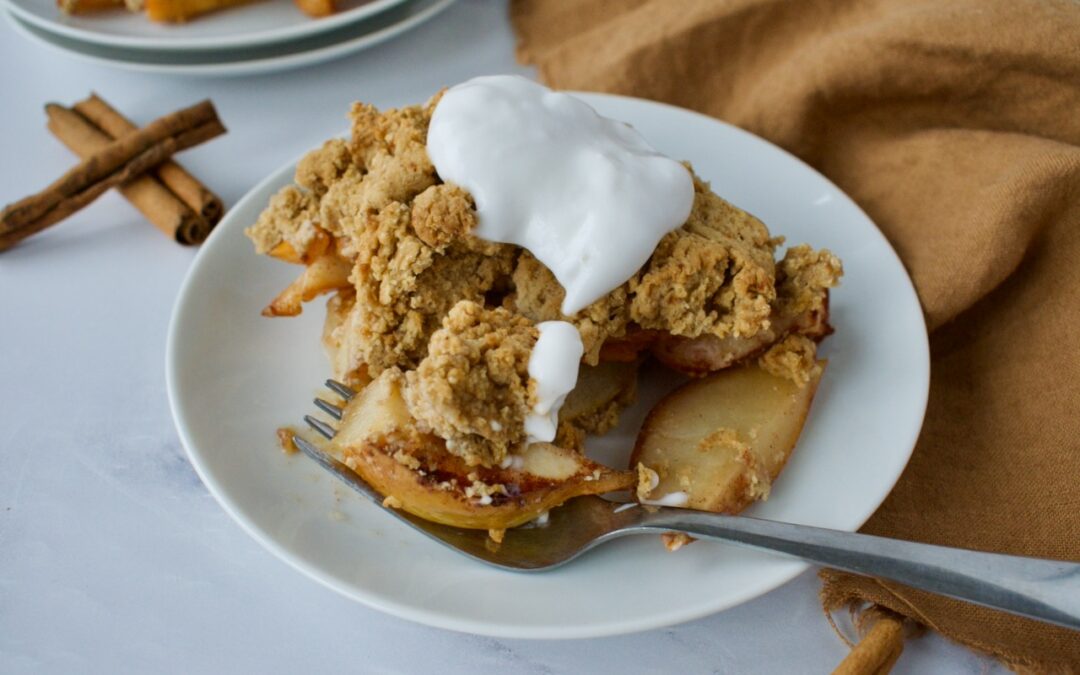
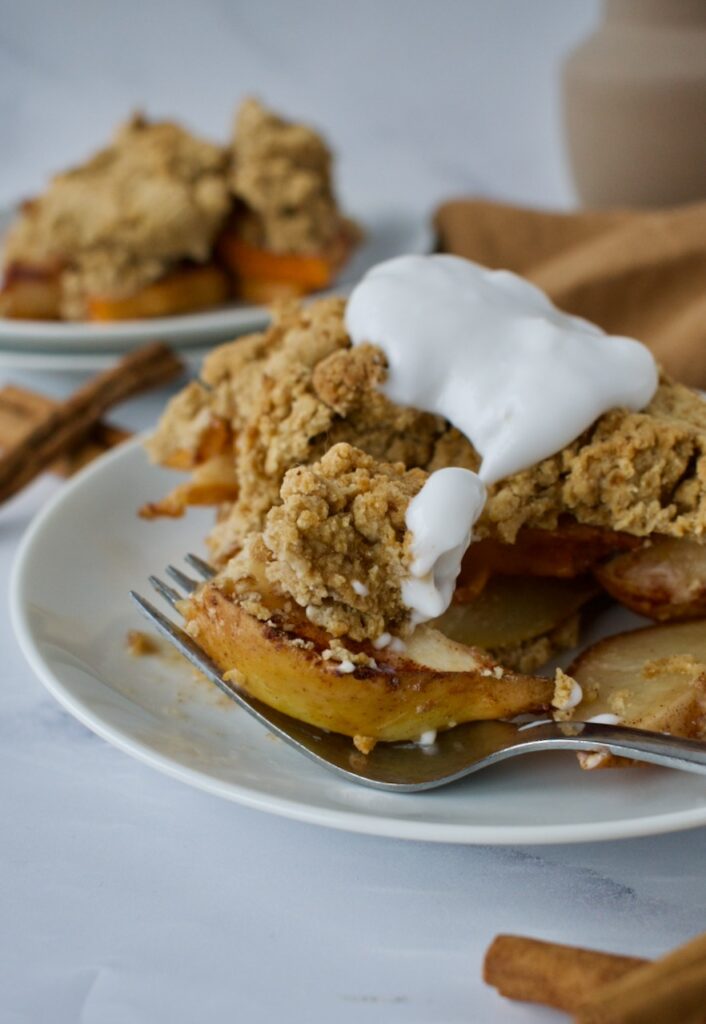
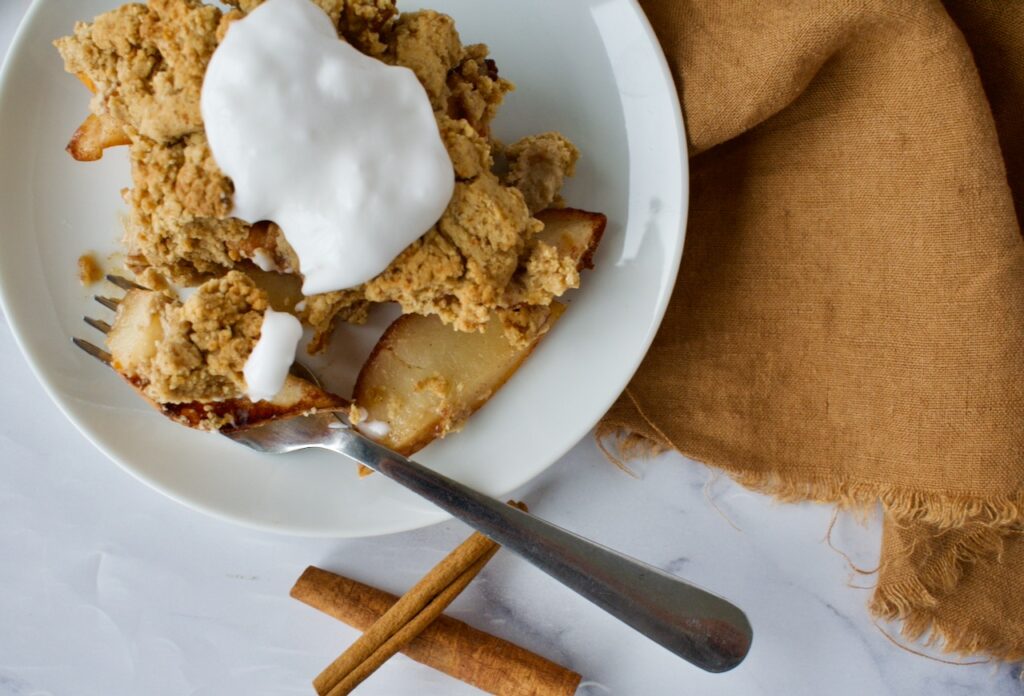
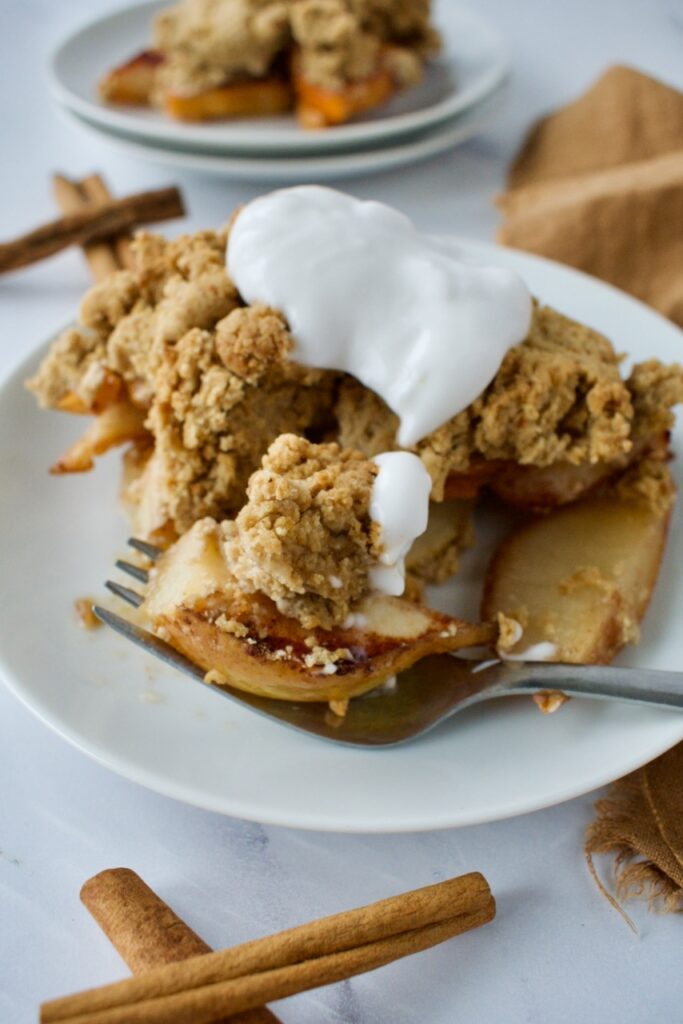
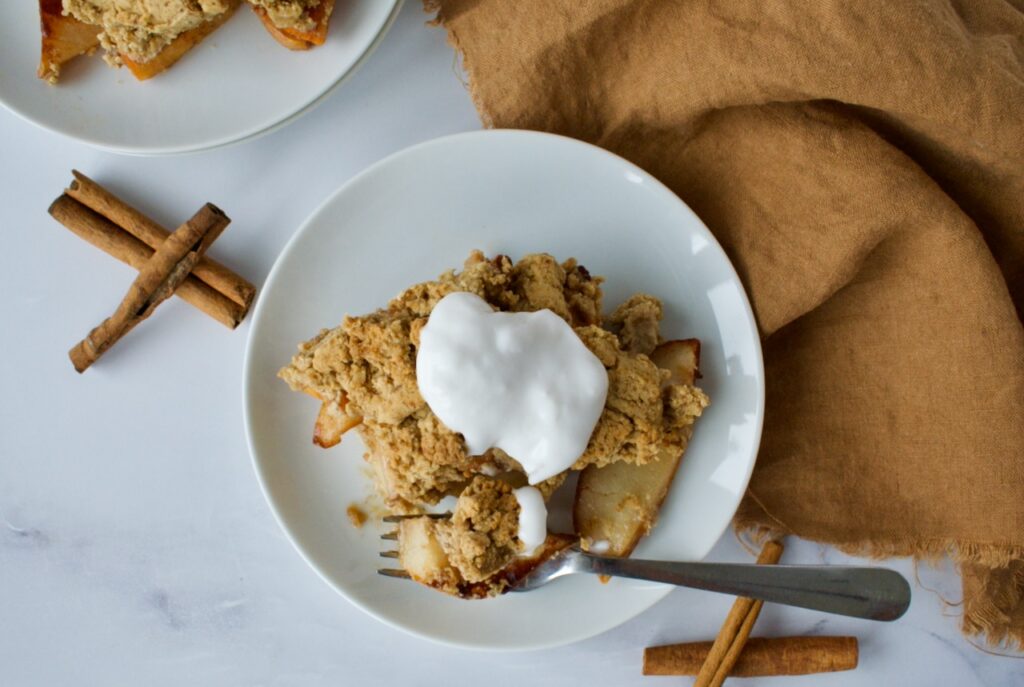
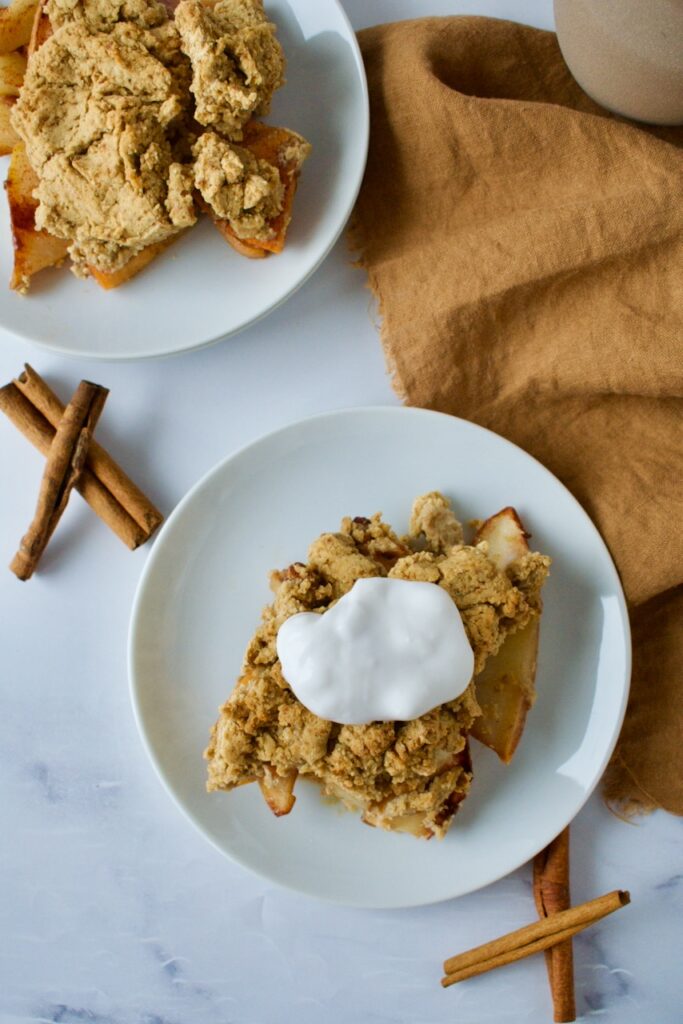
Gluten free cobbler is one of my favorite desserts. Delicious fruit with a sweet, doughy topping? Yes please! This pear and persimmon cobbler is the perfect winter dessert. It utilizes in season pears and persimmons mixed with warming cinnamon and topped with a gluten free dough.
gluten free fruit cobbler
My mom and I love a cobbler or crisp and she makes some fruit variation of one for me almost every time I am home. Gluten free cobbler is one of my favorite desserts because it’s easy, versatile and who doesn’t love a crumble topping on almost anything?! Including delicious fruit!
This healthy fruit cobbler is also completely vegan and nut free! Although you can use butter and regular milk in the dough, I opt for coconut oil (or vegan butter) and a plant-based milk to keep this recipe dairy free. It’s the perfect allergy friendly dessert for the winter. I like making this to have for the week or even for a dinner party.
gluten free cobbler
Gluten free pear and persimmon cobbler ingredients
This is very much a mix and dump recipe! You’ll combine the fruit filling ingredients in a baking dish, the mix all the topping ingredients together. Spread the topping over the fruit and bake.
How to store this fruit cobbler
You can keep this gluten free cobbler at room temperature for a couple days, but I prefer to store it in the fridge to keep it fresh. This also keeps the cobbler topping from absorbing all the liquid from the fruit and becoming soggy. Either way, keep the cobbler covered. And you can store it in the fridge for up to 5 days! This doesn’t freeze well, so I don’t suggest doing that.
How to serve pear and persimmon cobbler
This gluten free cobbler tastes amazing topped with fresh whipped coconut cream or even some vanilla ice cream. The smooth vanilla pairs lovely with the warm cinnamon of the cobbler.
This gluten free cobbler is the ultimate way to use seasonal pears and persimmons! Fresh fruit is topped with a sweet, gluten free dough and baked to perfection. Serve with fresh whipped cream and a cup of tea and your cold winter evenings will be warm in no time.
Toss fruit with cinnamon, coconut sugar and tapioca starch.
Pour fruit into a 9×9 glass baking dish and set aside.
In a bowl, combine the gluten free flour, tigernut flour, baking powder, and salt. Whisk to combine.
Cut in the coconut oil or butter with a fork or pastry cutter until evenly distributed. Add the remaining wet ingredients and use a fork to combine until the dough comes together.
Scoop large spoonfuls of dough evenly over the fruit. Bake for 40-45 minutes until golden and set.
Let cool for at least 10 minutes. Serve with fresh whipped cream or ice cream!
gluten free and vegan fruit cobblergluten free and vegan fruit crisp
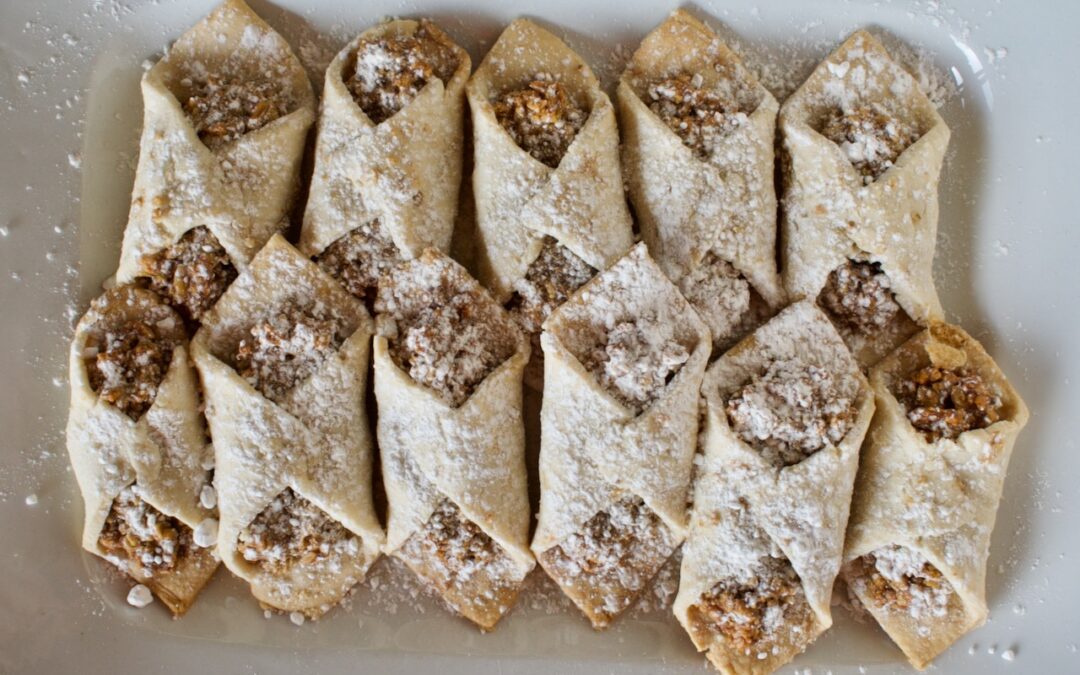
These Gluten Free Kolachi are a Polish cookie made healthier and allergy friendly. A savory dough surrounds a sweet walnut filling for a gluten and dairy free version of a classic Polish treat!
gluten free kolachi
Kolachi cookies (Kolachy) are a Polish cookie made of a flour, butter, and cream cheese dough that are filled with jam or a walnut filling. They are basically a light pastry dough wrapped around a sweet filling and dusted with powdered sugar. My mom and I remade these cookies into a gluten free and dairy free version!
My mother’s side of the family is Polish, so I grew up with poppyseed and nut roll during the holidays. These rolls are a bit more intensive and time consuming to make, but Kolachi have similar flavors with half the work. This gluten free cookie version is simple to make. The hardest part is assembling which really isn’t difficult at all once you get your technique down.
Coconut sugar: used in both the dough and filling to keep this cookies refined sugar free
Egg whites: used to hold the filling together
Vanilla extract
Walnuts: for the filling!
Powdered sugar: a must for dusting these cookies
Recipe Notes
Traditional Kolachi are made with butter and cream cheese. It’s quite easy to make these cookies dairy free, you’ll just vegan butter and cream cheese. I like to use the Miyoko’s brand as it is gluten free and palm oil free.
These gluten free kolachi cookies are mostly refined sugar free, using coconut sugar instead of refined white sugar. They are dusted in confectioners sugar (this is a must, you can’t skip it!), but you could always make your own with coconut or maple sugar if desired.
gluten free polish cookies
Forming the cookies
The hardest part of this recipe is forming the cookies. Take about 1-2 Tbsp of the walnut filling and roll it into a little log that you’ll place diagonally along the cut pastry. Gently fold opposite corners together over the top of the filling and seal the dough. You can wet your finger to seal the dough on top. It takes a cookie or two to get your personal technique down, but once you do, things will move quicker.
Kolachi are a traditional Polish cookie. This version is made completely gluten and dairy free, filled with a sweet walnut filling. These are a favorite holiday cookie in my family and I hope you love them too!
Course Dessert
Cuisine Polish
Keyword christmas cookies, dairy free, gluten free, polish, traditional
1/3cupcoconut sugaryou can increase this to 1/2 cup sugar if desired
2cupsground walnutsmeasure the walnuts after grinding them
Powdered sugar
Instructions
Cream together the butter and cream cheese on medium until light and fluffy.
Add the coconut sugar and half the flour at a time and beat on low to combine.
Shape the dough into a disk and wrap in plastic wrap. Refrigerate for 1 hour.
While dough is in the fridge, make the filling.
Beat the egg whites and vanilla on medium high until fluffy and frothy. Add the sugar 1 Tbsp at a time and beat until combined after each addition.
Mix in your walnuts until well combined.
Preheat oven to 350F.
Let dough sit at room temperature for 5-10 minutes. You'll know it's ready because you can work it without it immediately cracking. If it starts cracking, wait a few more minutes.
Lightly dust a work surface with a mix of powdered sugar and flour. Roll out your dough to about 1/8-1/4 inch thick.
Trim dough then cut into 2inch squares. Roll scraps of dough back into a ball and place in the fridge.
Place about 1-2 Tbsp. of walnut filling diagonally along one square. Overlap the opposite corners of the dough over the filling, sealing tightly. Place cookies 2 inches apart on a parchment lined baking sheet. Repeat with remaining dough on a second baking sheet.
Bake cookies for 18-22 minutes (start checking at 15 minutes), rotating the cookie sheets halfway through, until the bottoms are golden, the tops are lightly golden, and cookies are firm.
Let cool for 10 minutes on the tray before transferring to a wire rack to finish cooling.
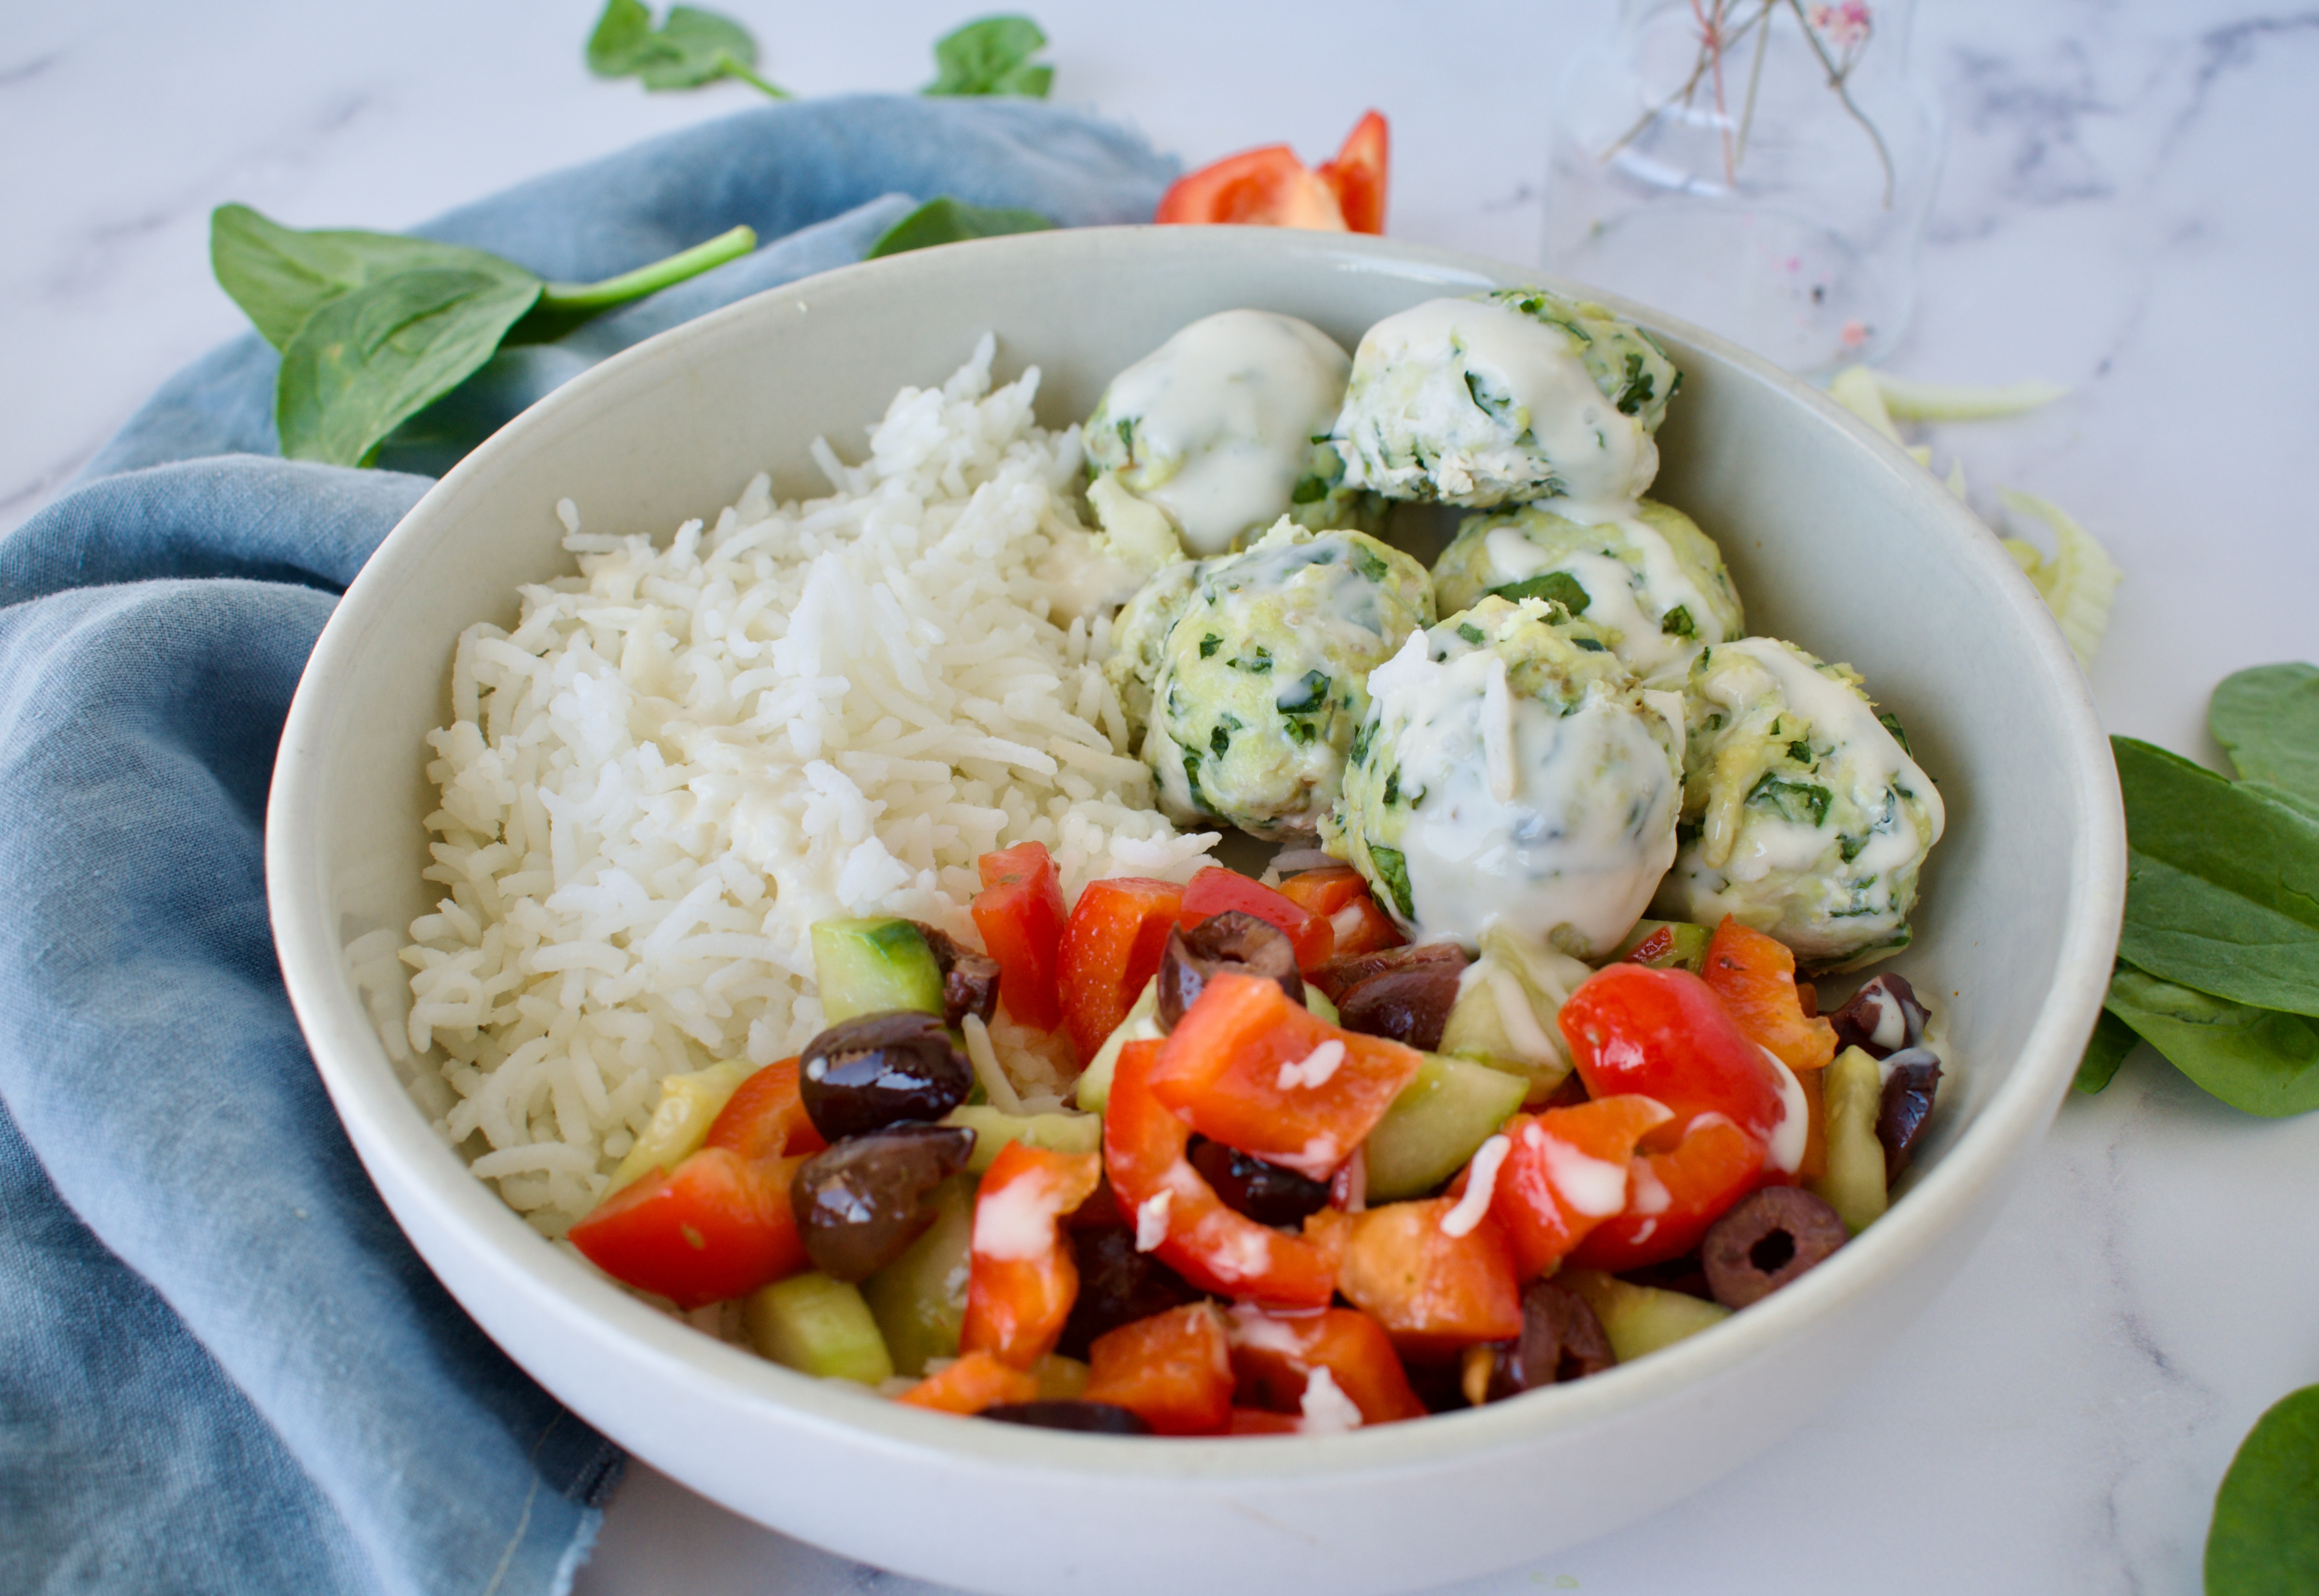
These Spinach and Feta Chicken Meatballs are a delicious and flavorful meal that can be made completely dairy free. Packed with protein, fiber, and micro-nutrients, this will be your new favorite dinner!
spinach and feta chicken meatballs
These Greek inspired chicken meatballs are easy to make and filled with flavor. They are also great for food allergies or restrictions because they are naturally gluten free and you can use plant based feta if needed (like I did). I also keep them low FODMAP by using fennel and garlic infused olive oil. It’s one of my favorite ways to add flavor without stomach discomfort. This dish packs a flavor and nutrient punch!
These spinach and feta meatballs are perfect for meal prep. I love to make a batch at the beginning of the week and use them for dinners or lunches.
spinach and feta chicken meatballs
Spinach and Feta Chicken Meatballs Ingredients
Ground chickenbreast: the base protein in this recipe
To make these Greek-inspired meatballs, all you have to do is chop your veggies and mix all the ingredients together. Then bake at 400F for about 25 minutes. It’s that simple!
Variations and Substitutions
Chicken: ground turkey would also work. I’m not a fan of dark meat, so I always use chicken breast, but these meatballs should work well with either!
Cilantro: if you’re not a cilantro fan, parsley would also work!
Feta: feta has a unique flavor and tastes best in these meatballs. I don’t suggest using another variety of cheese.
Fennel: fennel is a great low FODMAP alternative to onion. If you tolerate onion okay, feel free to use that instead.
Garlic infused olive oil: this is a great low FODMAP alternative to garlic. You can find oils like this at your local olive oil store or click the link to order from my favorite store. If you tolerate garlic, you can just use regular olive oil and some chopped garlic cloves.
Greek inspired chicken meatballs
Storage
Keep leftover chicken meatballs stored in an airtight container in the fridge for up to 3 days.
You can also freeze these meatballs in an airtight container in the fridge for up to 3 months.
How to Serve Chicken Meatballs
I love serving these over rice and with some sort of Greek salad. I often make a cucumber, bell pepper, and olive salad drizzled with olive oil and oregano. It pairs perfectly with these spinach meatballs.
For a paleo option, serve with cauliflower rice.
These would also taste great with a roasted beet salad.
These Spinach & Feta Meatballs are filled with nutrients and flavor! They are super easy to whip up and perfect for family dinner or meal prep.
Course Main Course
Cuisine American
Keyword allergy friendly, Easy, Simple
Servings 4servings
Author Victoria Faling
Ingredients
1lbsground chicken
2handfuls of spinach
1/4cupcilantro
1/2cupfetavegan or regular (if using a block, be sure to crumble it)
1/2cupdiced fennel or onion
1/2tspsalt
1tsporegano
1Tbspgarlic olive oil
Instructions
Preheat oven to 400F.
Dice the spinach and cilantro, then add everything to a bowl and mix well. This is done best with your hands to make sure all the ingredients come together evenly.
Form into 16 meatballs and place on parchment lined baking sheet.
Bake for 25-28 minutes, until slightly golden and cooked through.
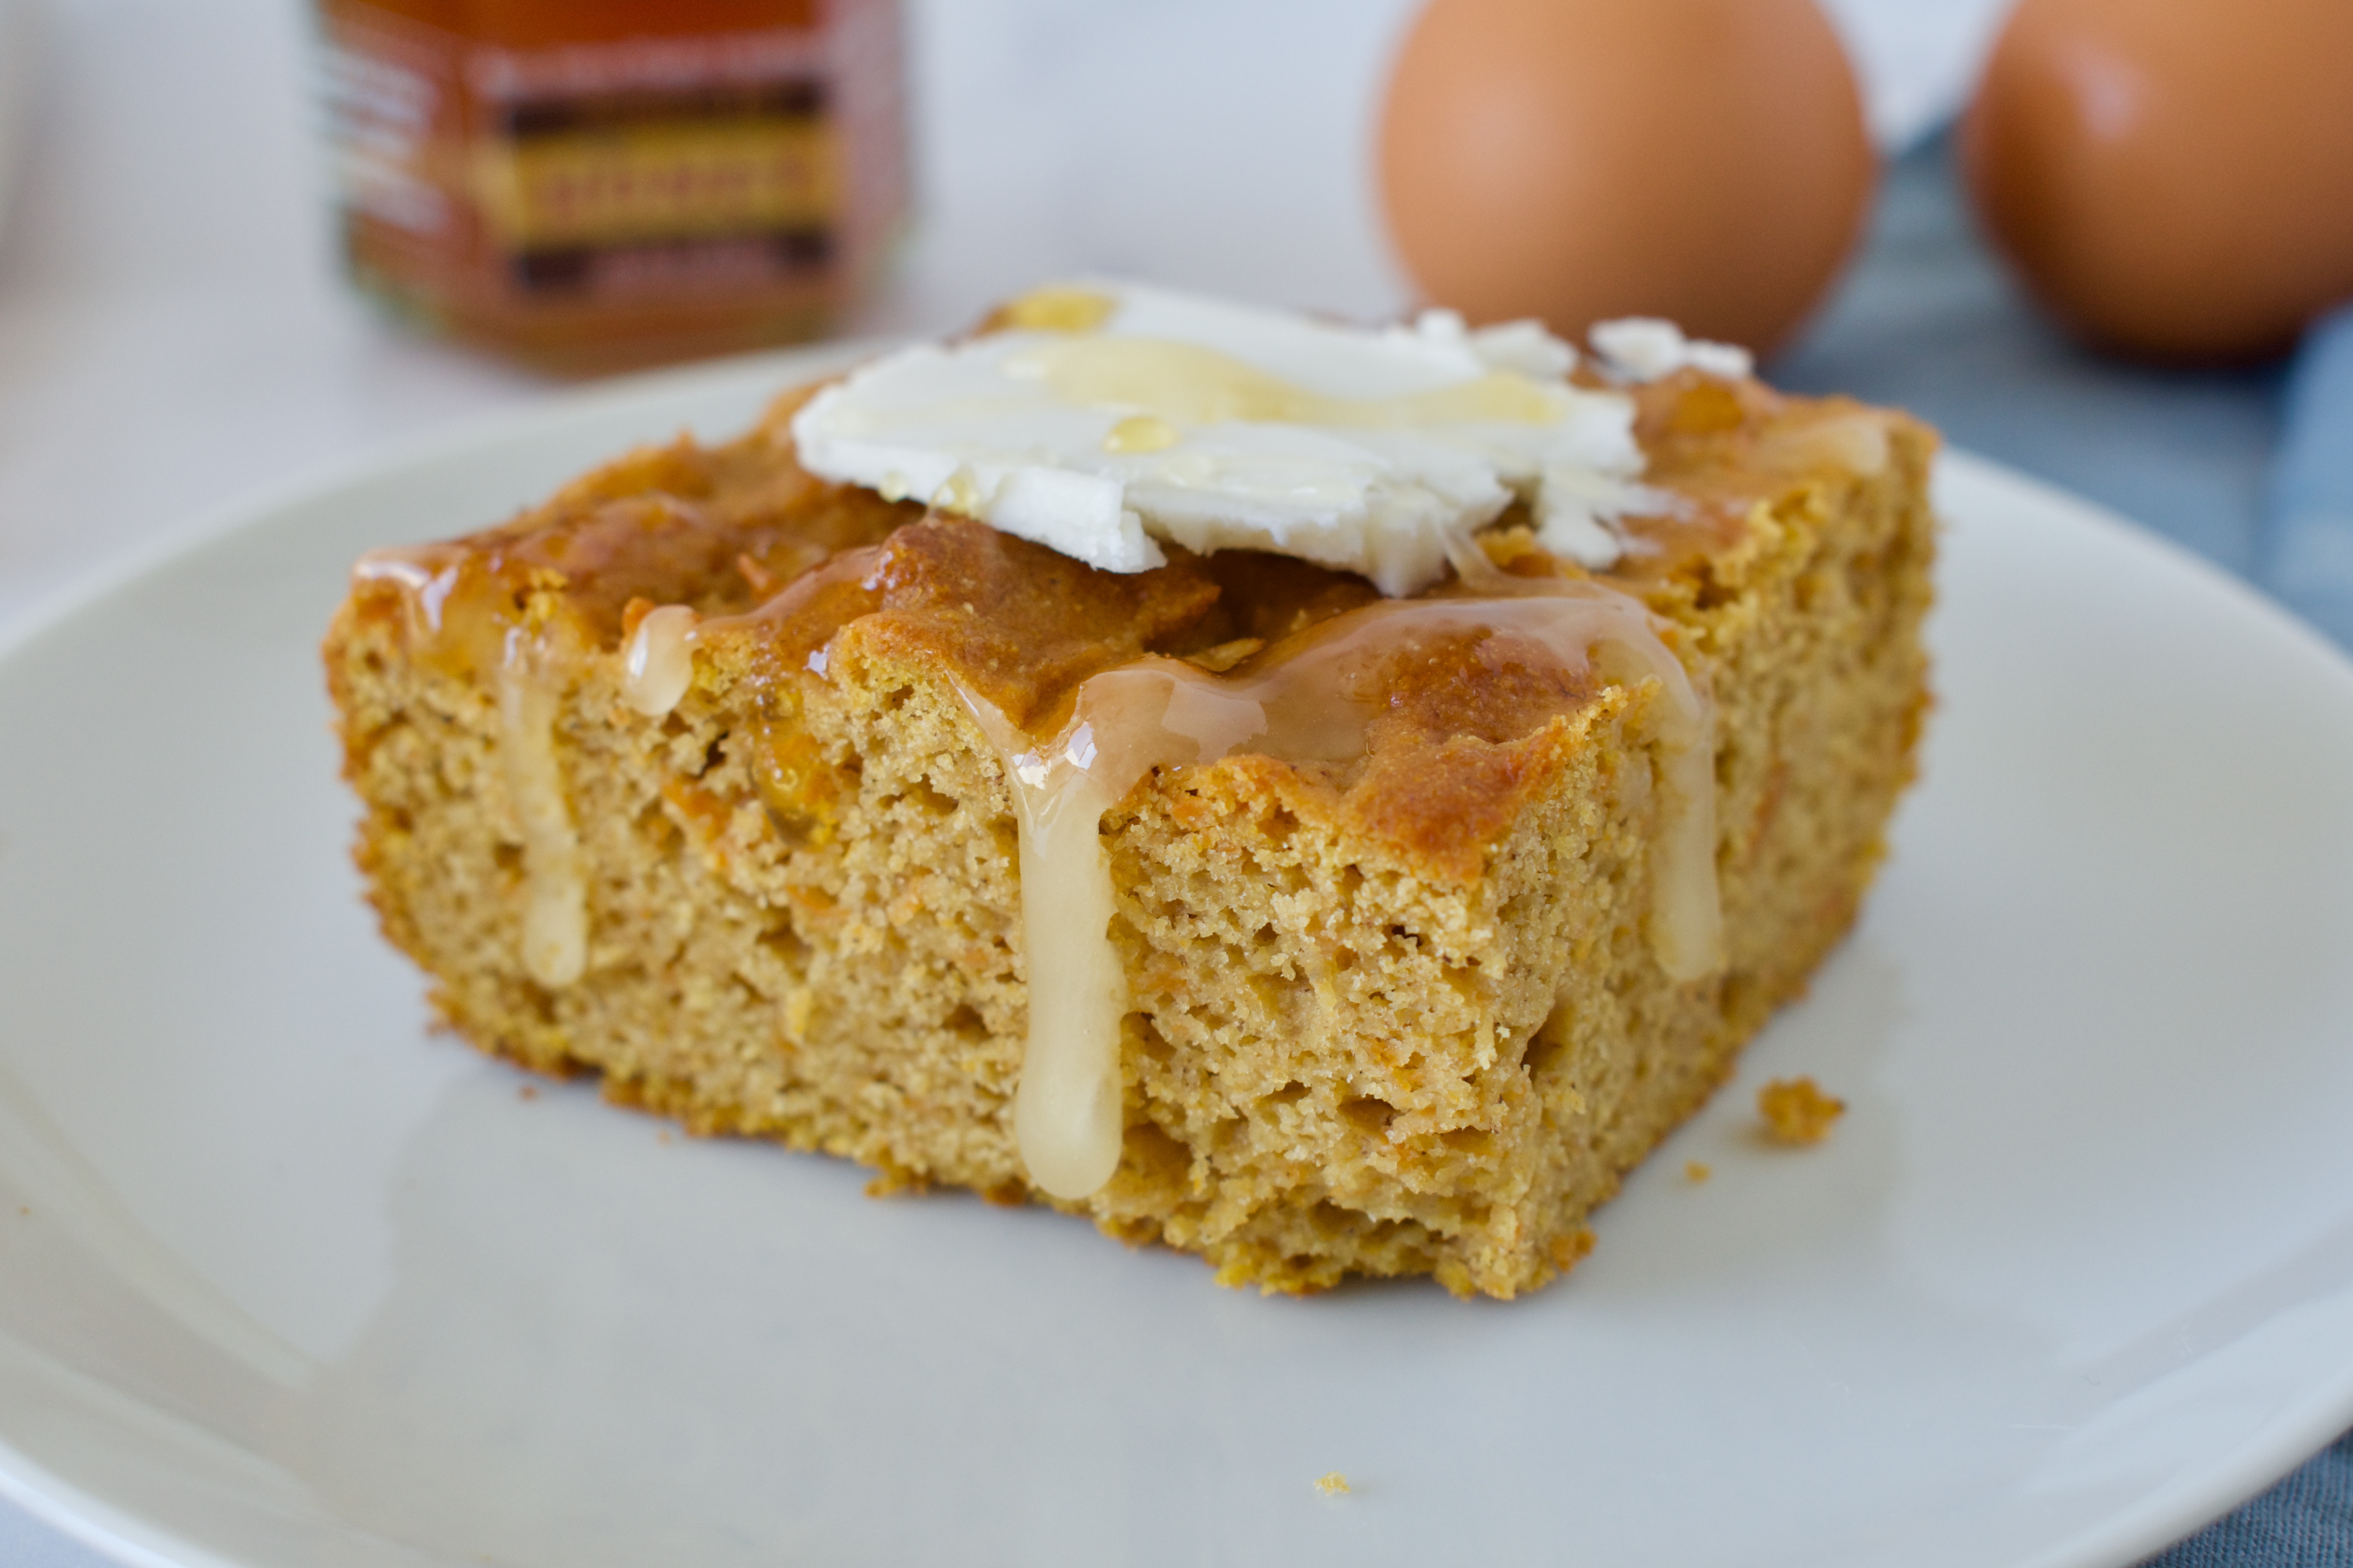
If you have a corn allergy then you need this Corn Free Sweet Potato Cornbread in your life! It’s also gluten free and dairy free, so it’s the perfect allergy friendly option for Thanksgiving.
gluten free and corn free sweet potato cornbread
Did you know you can make corn-free cornbread? It’s true! As someone who can’t eat corn, I sure miss it. Corn is delicious, but this corn-free cornbread tastes eerily similar to the Jiffy corn muffins I grew up on. And now I’ve eaten way too many slices.
This cornbread uses tigernut flour to get the consistency and taste we’re going for, but you can also use almond flour. I added mashed sweet potato to amp up the nutrient content and play into the flavor. You can’t even taste the sweet potato, so if you’ve got picky eaters in your house, this is a great recipe for sneaking veggies in.
1/4 cup melted butter (butter, vegan or otherwise, works best in this recipe, but you can get away with using a neutral oil, as well)
2 eggs
3 Tbsp of honey
1/2 cup milk of choice
What’s Tigernut Flour?
Tigernut is not a nut, it’s a tuber. I use tigernut flour in a lot of my recipes because it’s a great alternative to almond flour for those with allergies (like me!). Tigernut also have a slight sweetness to them, which allows me to use less added sweetener in my recipes. It’s a win-win! If you can’t access tigernut flour though, you can use almond flour instead.
How to serve gluten free cornbread
What’s cornbread without a thick slather of (dairy free) butter and generous drizzle of honey? This cornbread tastes best warm, so if you make this cornbread ahead of time, I suggest warming it in the oven at 300F for about 20 minutes before serving. You can warm it up wrapped in tinfoil or in a glass dish.
This corn-free cornbread has a similar taste and texture to regular cornbread, but without the corn! It’s also completely gluten and dairy free and made nutrient dense with the addition of sweet potato.
1/4cupmelted butter(butter, vegan or otherwise, works best in this recipe, but you can get away with using a neutral oil, as well)
2eggs
3Tbspof honey
1/2cupmilk of choice
Instructions
Preheat oven to 350F.
Sift the tigernut flour and whisk in the gluten free flour, baking powder, baking soda, and salt. Set aside.
In a large bowl, add the sweet potato, eggs, butter, honey, and milk in a bowl. Use a hand mixer to beat all the ingredients together on medium speed until well combined.
Add the dry ingredients to the wet and mix on low until combined. Let batter sit while you prepare the baking dish.
Grease a 9×9 inch glass baking dish.
Pour the batter into the baking dish. Bake for 32-35 minutes, until a toothpick comes out clean. Let cool before slicing.
Serve warmed with a slather of butter or coconut oil and a drizzle of honey!
These Gluten Free Maple Walnut Cookies have just the right amount of softness, sweetness, and crunch. They’re perfect for fall and also completely dairy free and refined sugar free.
gluten free and dairy free allergy friendly maple walnut cookies
These maple walnut cookies are the perfect fall/winter cookie. It took me about 7 tries to nail this recipe, but along the way I learned about what substitutions would work. The ideal cookie recipe is listed below, but I provide tons of subs to make these cookies work for you depending on the ingredients you have available and dietary preferences.
gluten free and dairy free healthier maple walnut cookies
This recipe calls for a combination of gluten free and tigernut flour. This is the best combo for this recipes as the tigernut adds some sweetness and complements the maple nicely. If you don’t have tigernut flour or can’t access it, you can use almond flour or more gluten free flour. Using another 1/2 cup of gluten free flour will result in more puffy cookies that do not spread as much. They will also be much lighter in color (you can see this in the photos).
Fat
This recipe calls for 1/2 cup of softened coconut oil. You can substitute this for butter of your choice, but again, the cookies may come out a bit puffier. If you’d like to reduce the fat content, you can use 1/4 cup of oil/butter and 1/4 cup of applesauce. This results in fluffier, softer cookies that do not spread as much, but are still delicious.
Sugar
This recipe calls for maple sugar to get that maple flavor. Unfortunately, maple sugar can be hard to find and is often expensive. You can use coconut sugar as a substitute or 1/4 cup of coconut sugar and 1/4 cup of maple syrup to get some of that maple flavor in the cookies. The combo of sugar and maple syrup also may result in a lighter, fluffier cookie. Again, still delicious! If you do want to use maple sugar, I usually buy it on Amazon.
gluten free and dairy free lower sugar maple walnut cookies
More Walnut Recipes
Love walnuts? Then you need to try these other great recipes that incorporate walnuts!
These gluten free cookies are lower in sugar, but still maintain all the delicious flavor and texture! Don’t forget the dairy free icing to top them off.
1/2cupcoconut oilsoftened (see substitutions above)
1eggroom temperature
1egg yolkroom temperature
1tspvanilla extract
1/2cupchopped walnuts
Icing
1/2cuppowdered sugar
2tspmelted coconut oil or butter
2tspmaple syruproom temperature (zap in microwave at 5 second intervals if needed)
Milk of choice
Instructions
Preheat oven to 350F.
Whisk together the flours, baking soda, cinnamon, and salt in a bowl and set aside.
Beat together the sugar and coconut oil until light and fluffy (30-60 seconds).
Beat in the egg until combined. Beat in the egg yolk and vanilla until combined.
Add the dry ingredients to the wet and mix on low to just combine.
Fold in the walnuts.
Let batter sit while you line two baking sheets with parchment paper.
Scoop tablespoon sized drops of dough onto one baking sheet, leaving 1.5-2 inches between each cookie.
Bake one cookie sheet on the middle rack for 10-12 minutes until golden and just firm around the edges.
Let cool on the baking sheet for 5-8 minutes, before transferring to a wire rack to finish cooling. While one sheet of cookies bakes, prepare the next sheet. Repeat until all cookies are baked.
Let cookies completely cool before icing.
To make the icing, mix together the sugar, oil, and maple syrup until you get a thick icing consistency. Add a tiny splash of milk if needed.
Hi! I'm Victoria. I was diagnosed with Lyme in 2012 and have been on a healing journey ever since. I love helping others on their road to healing through allergy friendly recipes, exercise, and overall well-being.