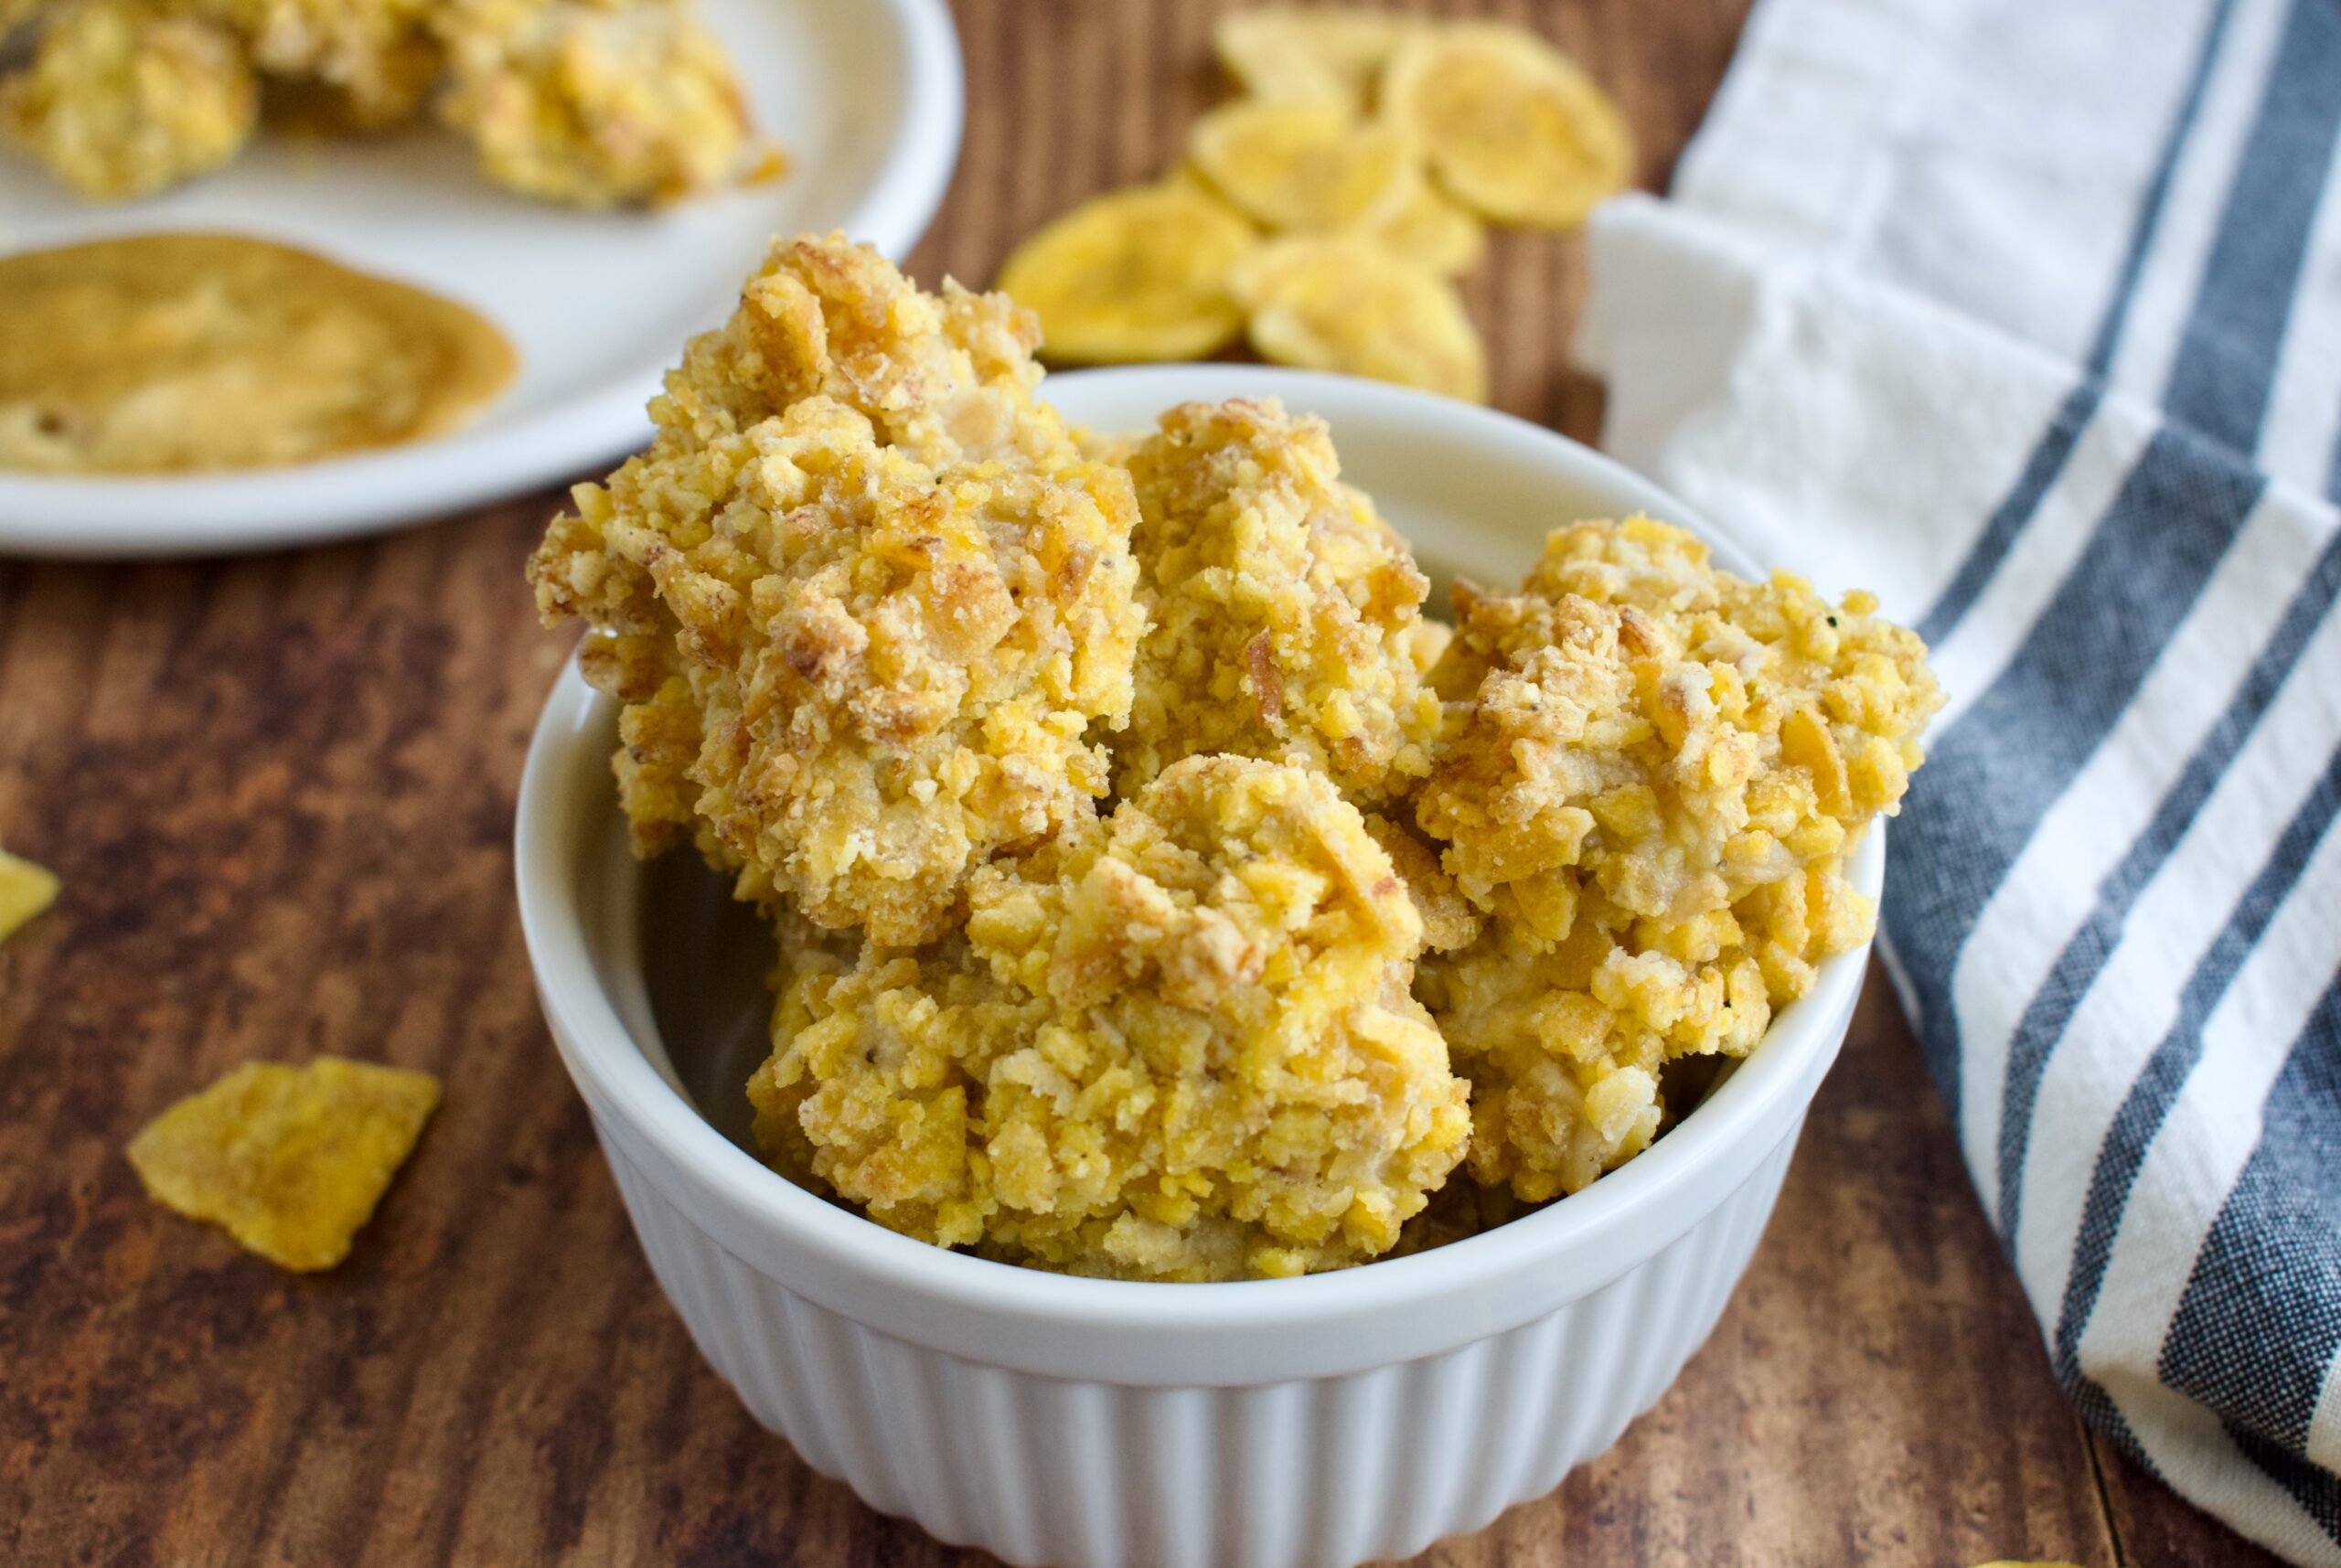
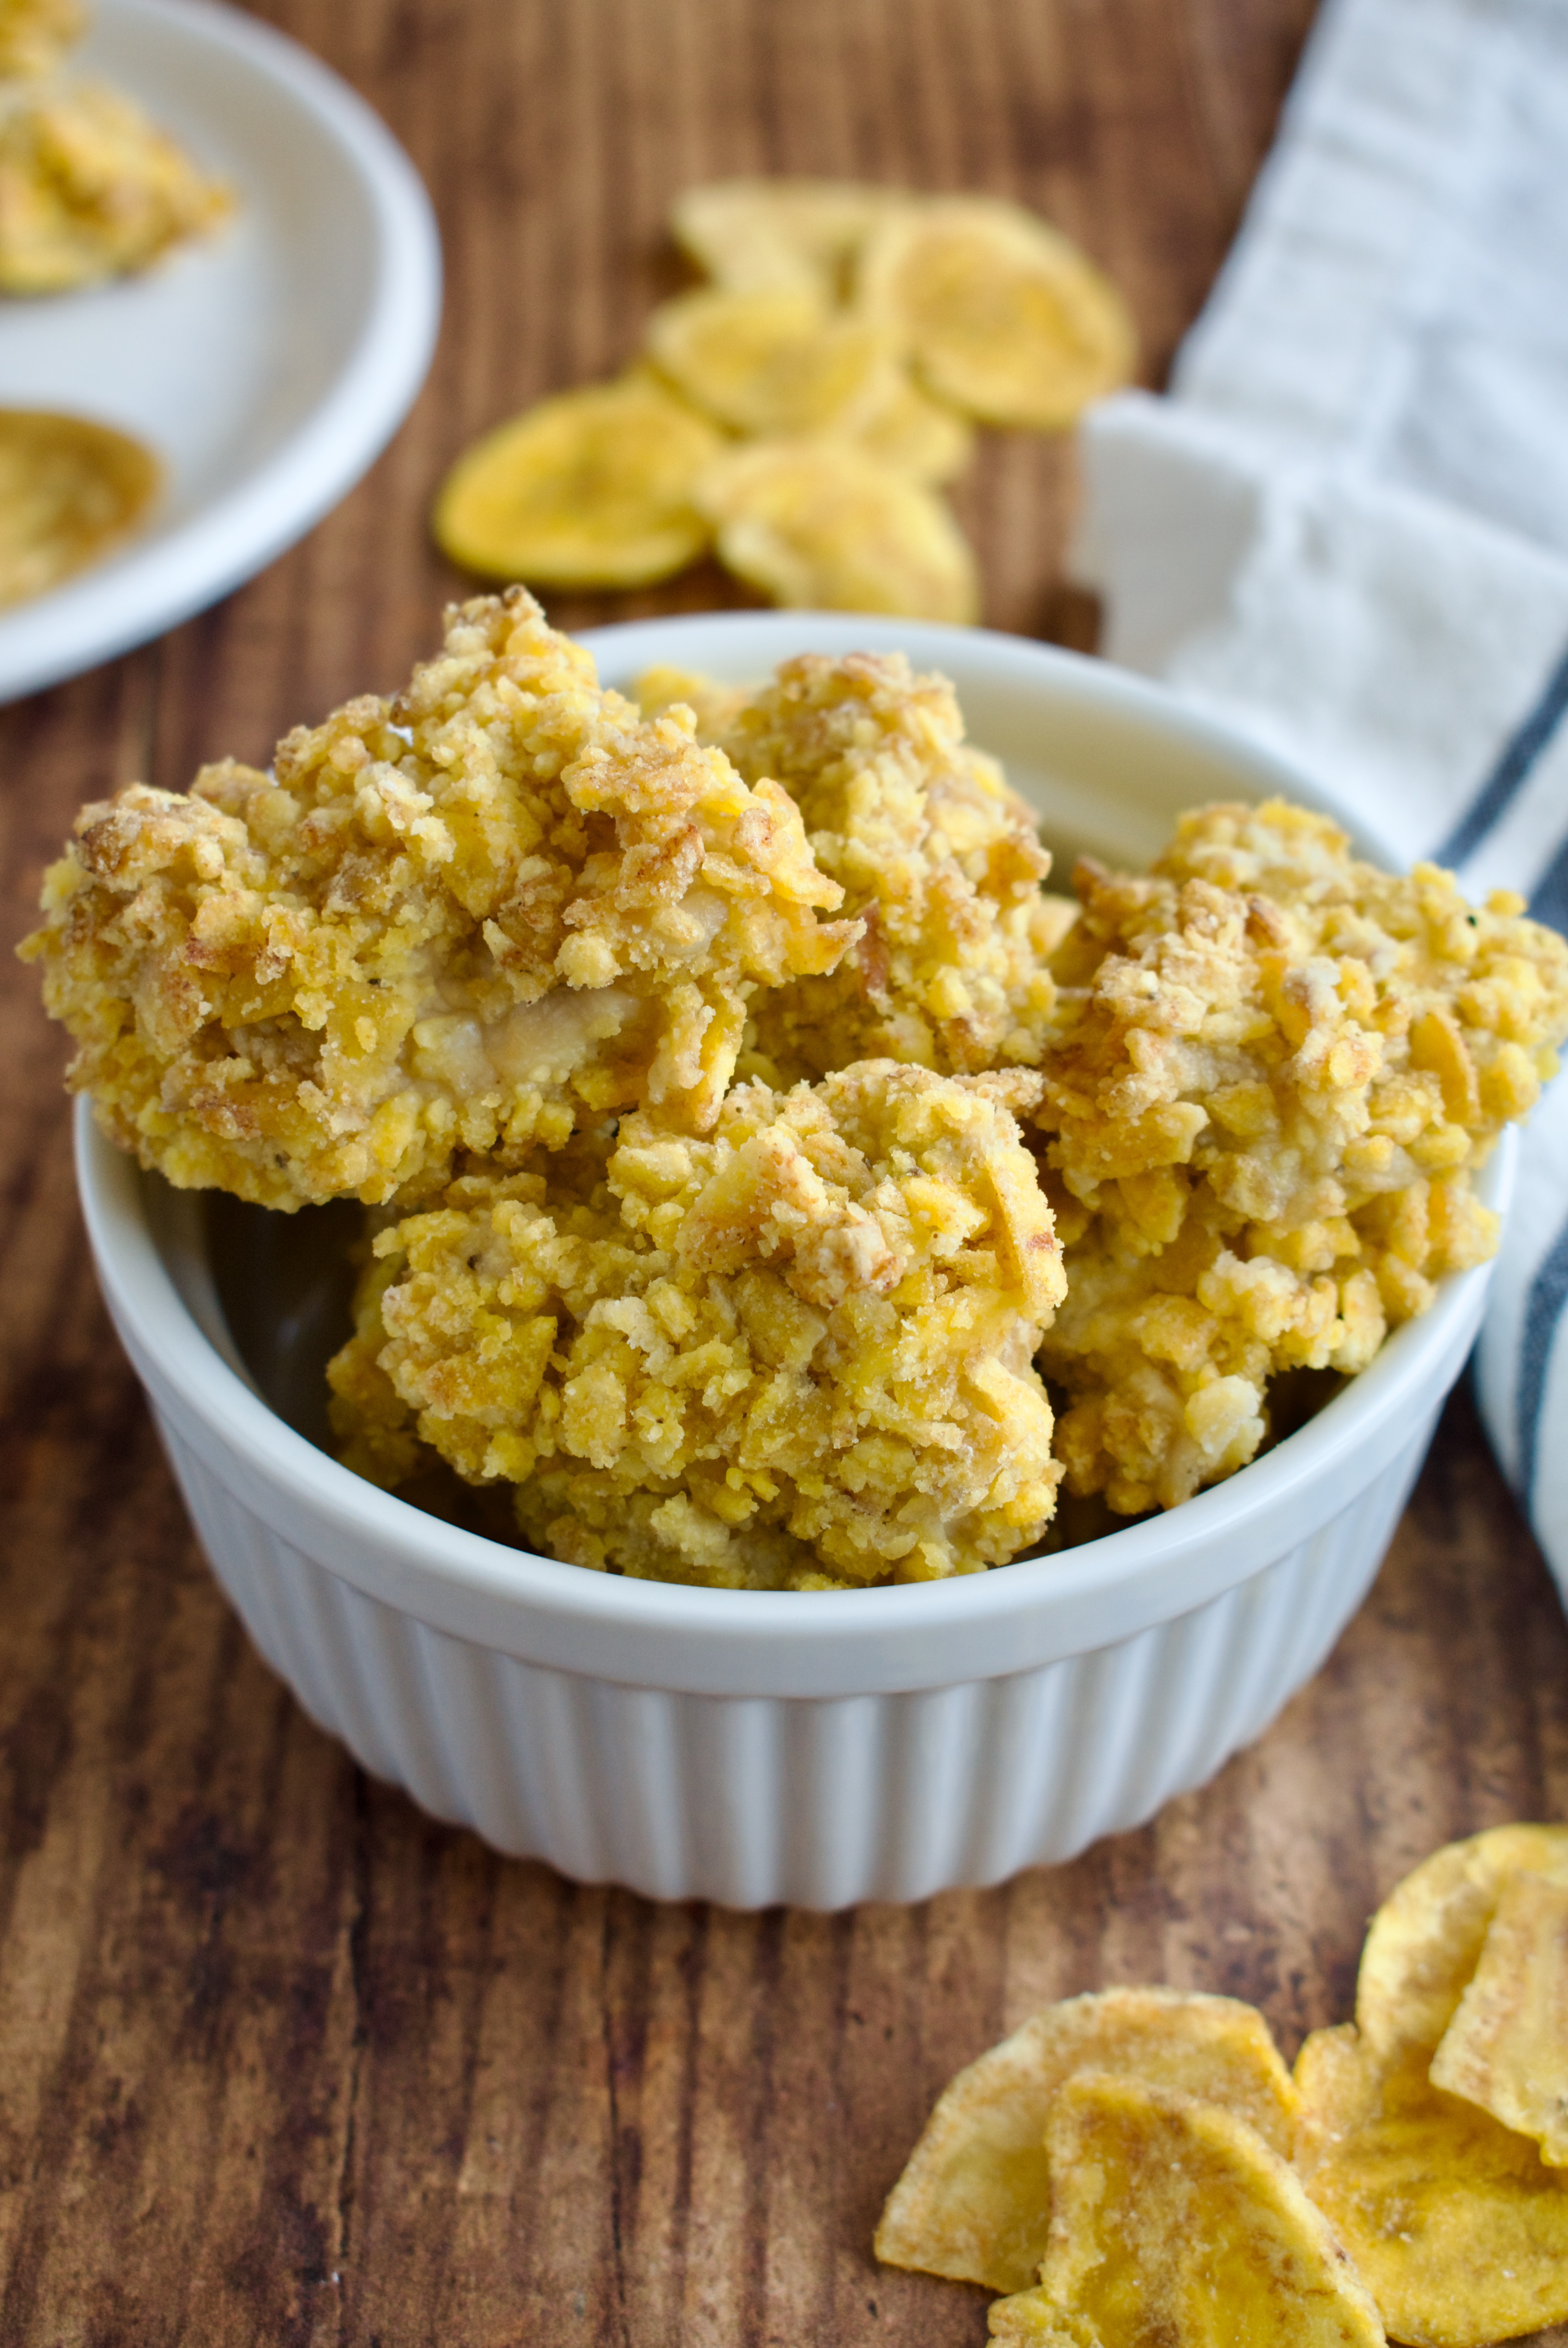
This Paleo Popcorn Chicken is healthier and allergy friendly. It is made in the air fryer for the crispiest texture without all the added oil of frying.
paleo popcorn chicken
What’s not to love about popcorn chicken? It’s high protein, crunchy, and salty! But traditional popcorn chicken is usually made with corn flour and fried in inflammatory oils. So, let me teach you how to make an easier, healthier popcorn chicken at home.
My paleo popcorn chicken is also completely gluten free and dairy free. It’s allergy friendly and can be made egg free too!
gluten free and paleo popcorn chicken
Paleo Popcorn Chicken
Popcorn Chicken Ingredients:
Chicken breast: you can also use dark meat if you prefer
Plantain chips: there are many different brands out there. If you are watching your seed oil intake, be sure to use a brand that makes their chips with coconut or avocado oil!
Tapioca or arrowroot starch: this is for the breading
Eggs: for getting the coating to stick. See below for substitutions!
Salt and spices to taste: add things like garlic powder, onion powder, or paprika.
Instructions:
Dice the chicken.
Blitz the chips, starch, and any spices in a food processor. Pour this mixture into a large bowl.
Whisk eggs in a small bowl.
Line up egg, chip mixture, and air fryer basket.
Dip the chicken in the eggs then coat in the chip mixture. Line chicken in an even layer in air fryer basket (you may have to cook in batches).
Air fry at 350F for 7-10 minutes until chicken is done.
What if I can’t have egg?
If you can’t eat eggs, but still want to make this gluten free popcorn chicken, use a mixture of milk and oil. Combine 1 cup of milk mixed with 1 Tbsp of oil, whisk and use instead of the eggs. This will make this recipe completely autoimmune paleo friendly too!
What if I don’t have an air fryer?
If you don’t have an air fryer, you can try baking the popcorn chicken in the oven. Although I have not tested this method myself, I think it would still work fine! Try baking at 350F for 10-15 minutes. You could even broil the chicken for a couple minutes at the end to get it extra crispy.
This healthier and allergy friendly popcorn chicken is Paleo, gluten free, and dairy free. Plantain chips provide that crisp and we get the perfect crunch from cooking everything in the air fryer.
Blitz the chips, starch, and any spices you are using together in the food processor until the chips are in crumbs. You can also do this in a bag, if needed. Pour this mixture into a large bowl.
Whisk the eggs in a small bowl.
Line up your egg, chip mixture, and air fryer basket.
Dip the chicken in the eggs then coat in the chip mixture. Line chicken in an even layer in air fryer basket (you may have to cook in batches).
Air fry at 350F for 7-10 minutes until chicken is done.
Enjoy!
Notes
If you like a little kick or want extra flavor, feel free to add some garlic or onion powder, paprika, or your other favorite spices!
You’ll never believe this Blueberry Crumble Cheesecake is completely gluten free, dairy free, and refined sugar free. Healthier than the traditional, but absolutely delicious!
gluten free and dairy free blueberry crumble cheesecake
I have a list of different cheesecakes I want to create recipes for and when I asked my Instagram audience which one they wanted to see a recipe for first, blueberry crumble won. So, here we are! I think this is an excellent summer cheesecake to kick things off, if I do say so myself.
gluten free and dairy free blueberry crumble cheesecake
My goal with this cheesecake was to make a healthier version of the classic, then amp it up with a blueberry crumble on top. This blueberry cheesecake is completely gluten free, dairy free, and refined sugar free. Plus, we are including yogurt to keep it a bit healthier and more gut friendly!
gluten free and dairy free blueberry crumble cheesecake
How to Make Gluten & Dairy Free Blueberry Crumble Cheesecake
Although this gluten free cheesecake isn’t that complicated to make, it does have several components and cheesecakes do take some time. They have a longer bake and need a setting time, so be sure to plan accordingly before baking. I suggest making this at least a day before your desired serving time.
Ingredients for Blueberry Cheesecake
This blueberry crumble cheesecake is made up of 3 main components: the gluten free crust/crumble, the dairy free cheesecake filling, and the blueberry compote.
The crust: is made up of a mix of gluten free flours, coconut oil or butter, and maple syrup. It’s that simple!
The cheesecake filling: is made of dairy free cream cheese, dairy free yogurt, starch and flour, maple syrup, vanilla extract, and eggs. It is also quite simple. I love using a combination of cream cheese and yogurt to keep things healthier. I find this combo yields a near similar texture to traditional cheesecake, without all that heavy cream cheese. My taste testers agree ;).
The blueberry compote: is a combination of blueberries, lemon juice, coconut sugar, and starch. The best part of this recipe is that you can use frozen blueberries for the compote. It’s also extremely easy, but making a compote really adds depth and flavor to this homemade cheesecake. It’s an absolute must and makes the cake!
Process for Making This Healthy Cheesecake
You will start by making the blueberry compote. You just cook the berries down with the other ingredients, then set it aside to cool while you make the rest of the components.
Next is the crust/crumble. Just mix everything together and then use half of the mixture for the crust. The crust is baked before adding the cheesecake filling.
Lastly, the cheesecake filling is made. You will beat together the cream cheese, yogurt, syrup, and flours then add the eggs one at a time.
To assemble, pour the cheesecake filling over the crust, top with some fresh berries then the compote, crumble the remaining crust on top and bake!
We will use a water bath in this recipe to help prevent cracking and slowly cool the cheesecake to help with this too. Trust me, water baths are much easier than you think!
What Cream Cheese and Yogurt Should I Use?
I love the Miyokos brand vegan cream cheese, but any dairy free cream cheese will do (or dairy filled if you can have it!).
I use a full fat coconut yogurt and suggest a thicker vegan yogurt that is coconut based (if you can have that). Many almond based vegan yogurts aren’t as thick, but will still work. If you can have dairy, I suggest using Greek yogurt. Plus, that will boost the protein content, as well.
gluten free and dairy free blueberry crumble cheesecake
More Cheesecake Recipes…
If you love this blueberry cheesecake, you will absolutely adore my Peach Crumble Cheesecake. In similar fashion, a dairy free cheesecake base is topped with ginger and cinnamon peaches and a gluten free crumble. Both recipes are a must make in summer!
This Blueberry Crumble Cheesecake is luscious and delicious, all while being gluten, dairy, and refined sugar free. A healthier, creamy cheesecake filling is topped with a blueberry compote and sweet crumble topping. Everyone will love this dessert!
Combine the blueberries, lemon juice, and sugar in a saucepan over medium low heat.
Cook until berries have released their juice and the mixture is looking jam-like. This can take 5-10 minutes.
Add the starch and stir to combine on low heat for about a minute, until the mixture thickens. Remove from heat and let cool while you make the rest of the cheesecake.
Crust/Crumble
We will be making a water bath for this cheesecake so make sure you have a rack on the bottom and one in the middle.
Preheat oven to 350F.
Line a springform pan with parchment paper or grease it very well.
Whisk together the flours then add the maple syrup and oil. Use a fork to combine until you have a crumbly texture.
Press about 1/3-1/2 the mixture into the bottom of the springform pan and up the sides a little- just enough to cover the transition from the bottom of the pan to the sides. Poke a few holes in the bottom of the crust.
Bake for 15 minutes then remove and let cool for a few minutes.
Cheesecake Filling
While the crust is baking, you can begin making your cheesecake filling.
Beat together the cream cheese and yogurt until smooth.
Add the flours, maple syrup, and vanilla and beat on medium speed to combine.
Add your eggs one at a time, beating to incorporate after each addition.
When the crust is ready, pour the filling over the crust.
Sprinkle the fresh blueberries evenly over the top of the cheesecake, then scoop the compote evenly over top, as well.
Next, crumble the remaining crust mixture evenly over the top of the cheesecake.
When ready to bake, boil 2 cups of water and pour into a glass baking dish or onto a baking sheet on the bottom rack of the oven.
Place the cheesecake on the middle rack and bake for 60-70 minutes, until edges are set and middle is still slightly jiggly (it will seem not quite done, but don't over bake it!).
When cheesecake is done, turn the oven off and crack the door to let the cake cool for 30 minutes in the oven. Then remove it and let it cool to room temperature before placing it in the fridge to set overnight.
When cheesecake is set, remove the springform pan, slice, serve, and enjoy!
gluten free and dairy free blueberry crumble cheesecake
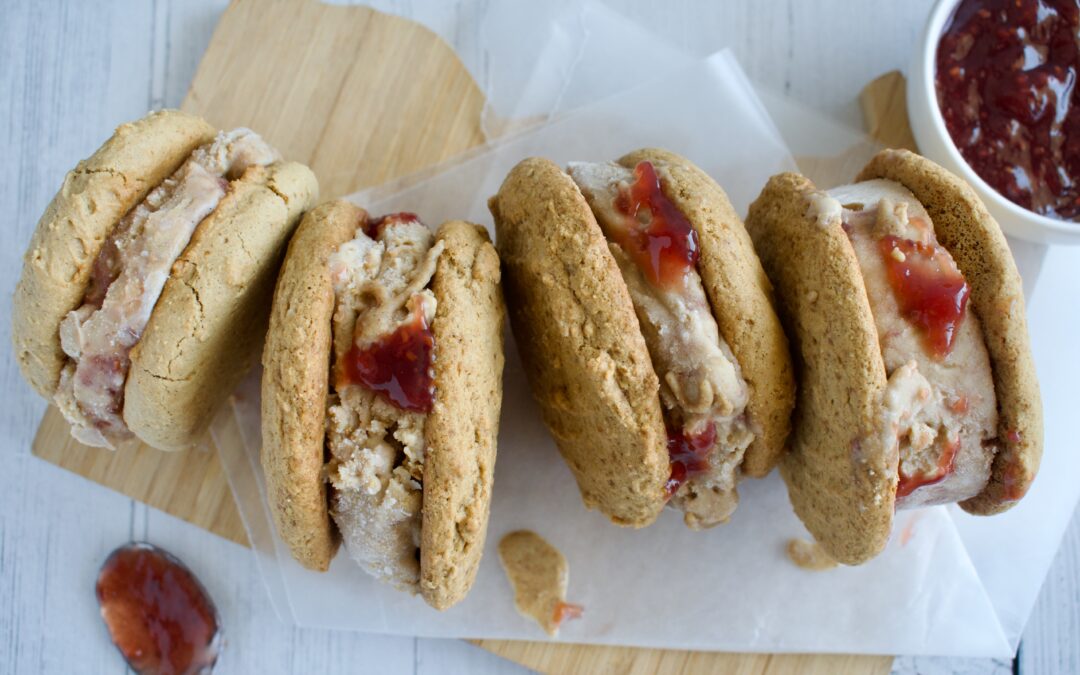
Upgrade your ice cream sandwich game with these Peanut Butter and Jelly Ice Cream Sandwiches that are gluten free, dairy free, and can be made completely nut/seed free.
In this series, I’m teaching you how to make healthier and allergy friendly ice cream sandwiches this summer. I promise you don’t want to miss out! Make sure you are subscribed to my newsletter or following me on Instagram, TikTok, and/or Pinterest so that you don’t miss a flavor. I can’t wait for you to make some of these healthy ice cream sandwiches. Make sure to share a photo on social media and tag me if you do make these!
gluten free and dairy free pb&j ice cream sandwiches
Peanut butter and jelly is a classic sandwich flavor, so I knew I had two make an ice cream SANDWICH version. As someone who is allergic to peanuts and focuses on allergy friendly recipes, I obviously had to make an allergy friendly variation. These days, there are so many great substitutes for peanut butter, including other nut/seed butters (like almond or sunflower). If you are allergic to all nuts and seeds though, try using my granola butter instead. That’s what I did!
These delicious “PB” and J ice cream sandwiches are completely gluten free and dairy free and can be made both refined sugar free and nut free. You know I’ll never let you down when it comes to a figuring out an allergy friendly alternative for almost every recipe!
gluten free and dairy free pb&j ice cream sandwiches
How to Make “Peanut Butter” and Jelly Ice Cream Sandwiches
If you are making my homemade vanilla ice cream, towards the end of churning, add the butter and jam to swirl into the ice cream before freezing.
If using store bought, let it melt enough to mix in the butter and jam then re-freeze
Cookies
Preheat oven to 350F.
Cream together the nut/seed/granola butter and sugar until smooth. Add the egg and vanilla and mix to combine.
Add the dry ingredients and mix to combine.
Scoop 6-8 cookies (depending on how big you want your sandwiches) onto a parchment lined baking sheet. Use a fork to press them down in a criss-cross pattern.
Bake for about 10 minutes until edges begin to golden. Let cookies cool completely before assembling.
Assembly
If you froze your ice cream in an old ice cream carton, cut horizontally to create perfect ice cream circles. Tear off the paper and sandwich between two cookies.
If just scooping your ice cream, scoop a large scoop into the center of one cookie. Gently press another cookie down on top to spread the ice cream out slightly.
I like to put the ice cream sandwiches back into the freezer for an hour or two so the ice cream can harden and they aren’t melting everywhere.
gluten free and dairy free granola butter and jelly ice cream sandwiches
What Can I Use Instead of Peanut Butter?
If you are allergic to peanuts or don’t like peanut butter, there are plenty of other options to make these homemade ice cream sandwiches. You can use another nut butter like almond (I do not suggest cashew butter as it doesn’t quite function the same as other nut butters). You can also use a seed butter like sunflower. If you have a nut and seed allergy, I suggest using granola butter. Check out my recipe to make your own!
What Jam Should I Use?
I love raspberry jam in these PB&J ice cream sandwiches, but strawberry would also work great. I’m not a grape fan, but if that’s your jam it might be okay. I just use a store-bought jam/jelly to make life easier, but you can certainly make a homemade version to use in this recipe.
Do I Have to Make Homemade Ice Cream?
The base for these PB and J ice cream sandwiches is a vanilla ice cream. I utilize my homemade version for this recipe, but you don’t have to make your own ice cream. If you want, you can just use a store-bought vanilla ice cream of your choice. You’ll just want to soften it enough to swirl in some of your butter and jam before assembling the ice cream sandwiches.
Let's upgrade the classic PB&J sandwich and turn it into an ice cream sandwich! These delicious PB&J ice cream sandwiches are completely gluten free, dairy free, and can be made nut/seed free.
If you are making homemade ice cream, be sure to make this ahead of time so it has enough time to harden some in the freezer.
If you are making my homemade vanilla ice cream, towards the end of churning, add the butter and jam to swirl into the ice cream before freezing.
If you are using store-bought, let it soften enough that you can mix in the butter and jam then re-freeze.
Since we are making cookies for this recipe, if you have an old wooden ice cream container, you may want to freeze the ice cream in there. This way you can cut the container into perfect round ice cream circles to sandwich between the cookies.
Cookies
Preheat oven to 350F.
Cream together the nut/seed/granola butter and sugar until smooth. Add the egg and vanilla and mix to combine.
Add the dry ingredients and mix to combine.
Scoop 6-8 cookies (depending on how big you want your sandwiches) onto a parchment lined baking sheet. Use a fork to press them down in a criss-cross pattern.
Bake for about 10 minutes until edges begin to golden. Let cookies cool completely before assembling.
Assembly
When ready to assemble, let your ice cream soften for about 10 minutes just so it is easier to work with.
If you froze your ice cream in an old ice cream carton, cut horizontally to create perfect ice cream circles. Tear off the paper and sandwich between two cookies.
If just scooping your ice cream, scoop a large scoop into the center of one cookie. Gently press another cookie down on top to spread the ice cream out slightly.
I like to put the ice cream sandwiches back into the freezer for an hour or two so the ice cream can harden and they aren't melting everywhere. But if you can't wait, eat up!
Remember strawberry shortcake ice cream bars? Well let’s make them in sandwich form! These Strawberry Shortcake Ice Cream Sandwiches are gluten free, dairy free, and allergy friendly.
gluten free and dairy free strawberry shortcake ice cream sandwiches
In this series, I’m teaching you how to make healthier and allergy friendly ice cream sandwiches all summer and you don’t want to miss out! I have more delicious and unique recipes coming, so make sure you are subscribed to my newsletter or following me on Instagram, TikTok, and/or Pinterest so that you don’t miss a flavor. I can’t wait for you to make some of these healthy ice cream sandwiches. Make sure to share a photo on social media and tag me if you do make any!
gluten free and dairy free strawberry shortcake ice cream sandwiches
Strawberry shortcake ice cream bars were one of my favorites. I love the sweet strawberry ice cream and crunchy rice pop coating. The contrast in textures was always delicious. I knew I had to make an ice cream sandwich version for my series.
These Strawberry Shortcake Ice Cream Sandwiches are completely gluten free and dairy free and they can be made refined sugar free too. Since my entire platform is based off of creating healthier and allergy friendly versions of recipes, these homemade ice cream sandwiches are also lower in sugar than your average ice cream bar or sandwich while still maintaining all the flavor.
healthy strawberry shortcake ice cream sandwich
How to Make Strawberry Shortcake Ice Cream Sandwiches
To make the ice cream you’ll combine some of the strawberries, milk, sugar, and salt in a blender.
Gently heat the base over low heat until warm then mix part of the base with the starch and add it back in. Cook on low until the base has thickened. Whisk in the vanilla extract, let cool, and place in the fridge overnight
When ready to churn the ice cream, macerate the leftover strawberries with the honey. When the ice cream is almost done churning in your ice cream maker, add the macerated strawberries to mix in.
Cookie base
Beat together the melted butter and sugar until combined. Add the eggs and vanilla and mix until just combined.
Add the dry ingredients to the wet and mix until just combined.
Spread the batter out evenly over the baking pan and bake cookies for 10 minutes.
Let the base completely cool for at least an hour before assembling the sandwiches.
Assembly
Line a cutting board with plastic wrap and place half of the cookie base on top. Spread your ice cream evenly over the base.
Flip the other cookie half on top of the ice cream.
Line everything up then tightly wrap up the sandwiches in the plastic wrap.
Place the sandwiches in the freezer for AT LEAST 3 hours, preferably overnight to allow the ice cream to fully set.
While freezing, pulse the rice puffs, dried strawberries, and sugar together.
When ready, slice into 8 sandwiches and dip each side in the rice puff mixture. Enjoy!
healthy strawberry shortcake ice cream sandwich
Do They Have to be Strawberry Shortcake?
If you aren’t a big strawberry fan, I think raspberries would be a fantastic option! Raspberry shortcake ice cream… that sounds pretty good.
Can I Use Frozen Strawberries?
Frozen strawberries will work fine for making the ice cream, but I suggest letting them thaw first. If you don’t, it will take longer to heat up the ice cream base.
Do I Have to Make the Strawberry Ice Cream?
Nope! You can use your favorite store-bought strawberry ice cream if desired. You’ll need about 1.5 pints, so buy 2 for good measure 😉.
How To Serve and Store These Strawberry Shortcake Ice Cream Sandwiches
Serve: I like to let my ice cream sandwiches sit for a couple of minutes at room temperature to soften the ice cream, but that is a personal preference. Just don’t let them sit out too long or they’ll melt!
Store: Once you have sliced the ice cream sandwiches, wrap each individually in plastic wrap, parchment paper, or wax paper. You can then place all of the sandwiches into a large ziplock bag or freezer container and store in the freezer until ready to eat.
Strawberry Shortcake but in ice cream sandwich form! These ice cream sandwiches are completely gluten free, dairy free, and can be made refined sugar free. These are such a fun summer treat.
You need to make the ice cream ahead of time, preferably the day before.
Blend 2 cups of strawberries, the milk, and coconut sugar together in a high speed blender until combined.
Heat the ice cream base on medium-low until warm to the touch.
Whisk a half cup of the ice cream base with the 1/4 cup of tapioca starch until there are no lumps. Add this back to the base and continue to heat and whisk the base regularly until it begins to thicken (about 10 minutes).
Let the base cool then place in the fridge for at least 4 hours, preferably overnight.
When ready, churn your ice cream according to your ice cream makers directions.
While ice cream is churning, macerate the remaining strawberries with the honey and lemon juice. Mash them up until lightly chunky and blended with the honey.
When the ice cream is almost done, add your macerated strawberries to mix in.
Transfer the ice cream to a freezer safe container and freezer for a couple of hours until ready to use.
Sugar Cookie Base:
Beat together the melted butter and sugar until smooth.
Add the egg, egg yolk, and vanilla and mix until combined.
In a small bowl, whisk together the flour, starch, baking powder, and salt then add to the wet ingredients and mix until just combined.
Line a 9×13 or 10×15 baking tray with parchment paper then spread the sugar cookie base on the lined tray.
Bake for 10 minutes (do not over bake, it should seem not quite done).
Let cool completely before assembling the sandwiches.
Assembly
Make sure your ice cream is quite soft and pliable, but not totally melted when ready to assemble.
When ready to assemble, take a cutting board (that will fit in your fridge) and place 2 long pieces of plastic wrap in a cross over the cutting board.
Cut the cookie base in half and GENTLY transfer one half to the center of the cutting board (the base is fragile until frozen, so work carefully).
Scoop your ice cream onto the cookie base and spread evenly. Gently transfer the other half of the cookie base on top. Wrap the giant sandwich tightly with plastic wrap and place in the fridge for 4-6 hours, preferably overnight.
When ready, smash or pulse the freeze dried strawberries, rice crisps, and sugar together until you have a rough texture.
Slice your ice cream sandwiches and then dip each side in the rice crisp mixture. Serve immediately or wrap individually and keep frozen until ready to eat.
Notes
*If you don’t want to make your own ice cream, you can use 1.5 pints of store-bought strawberry ice cream.
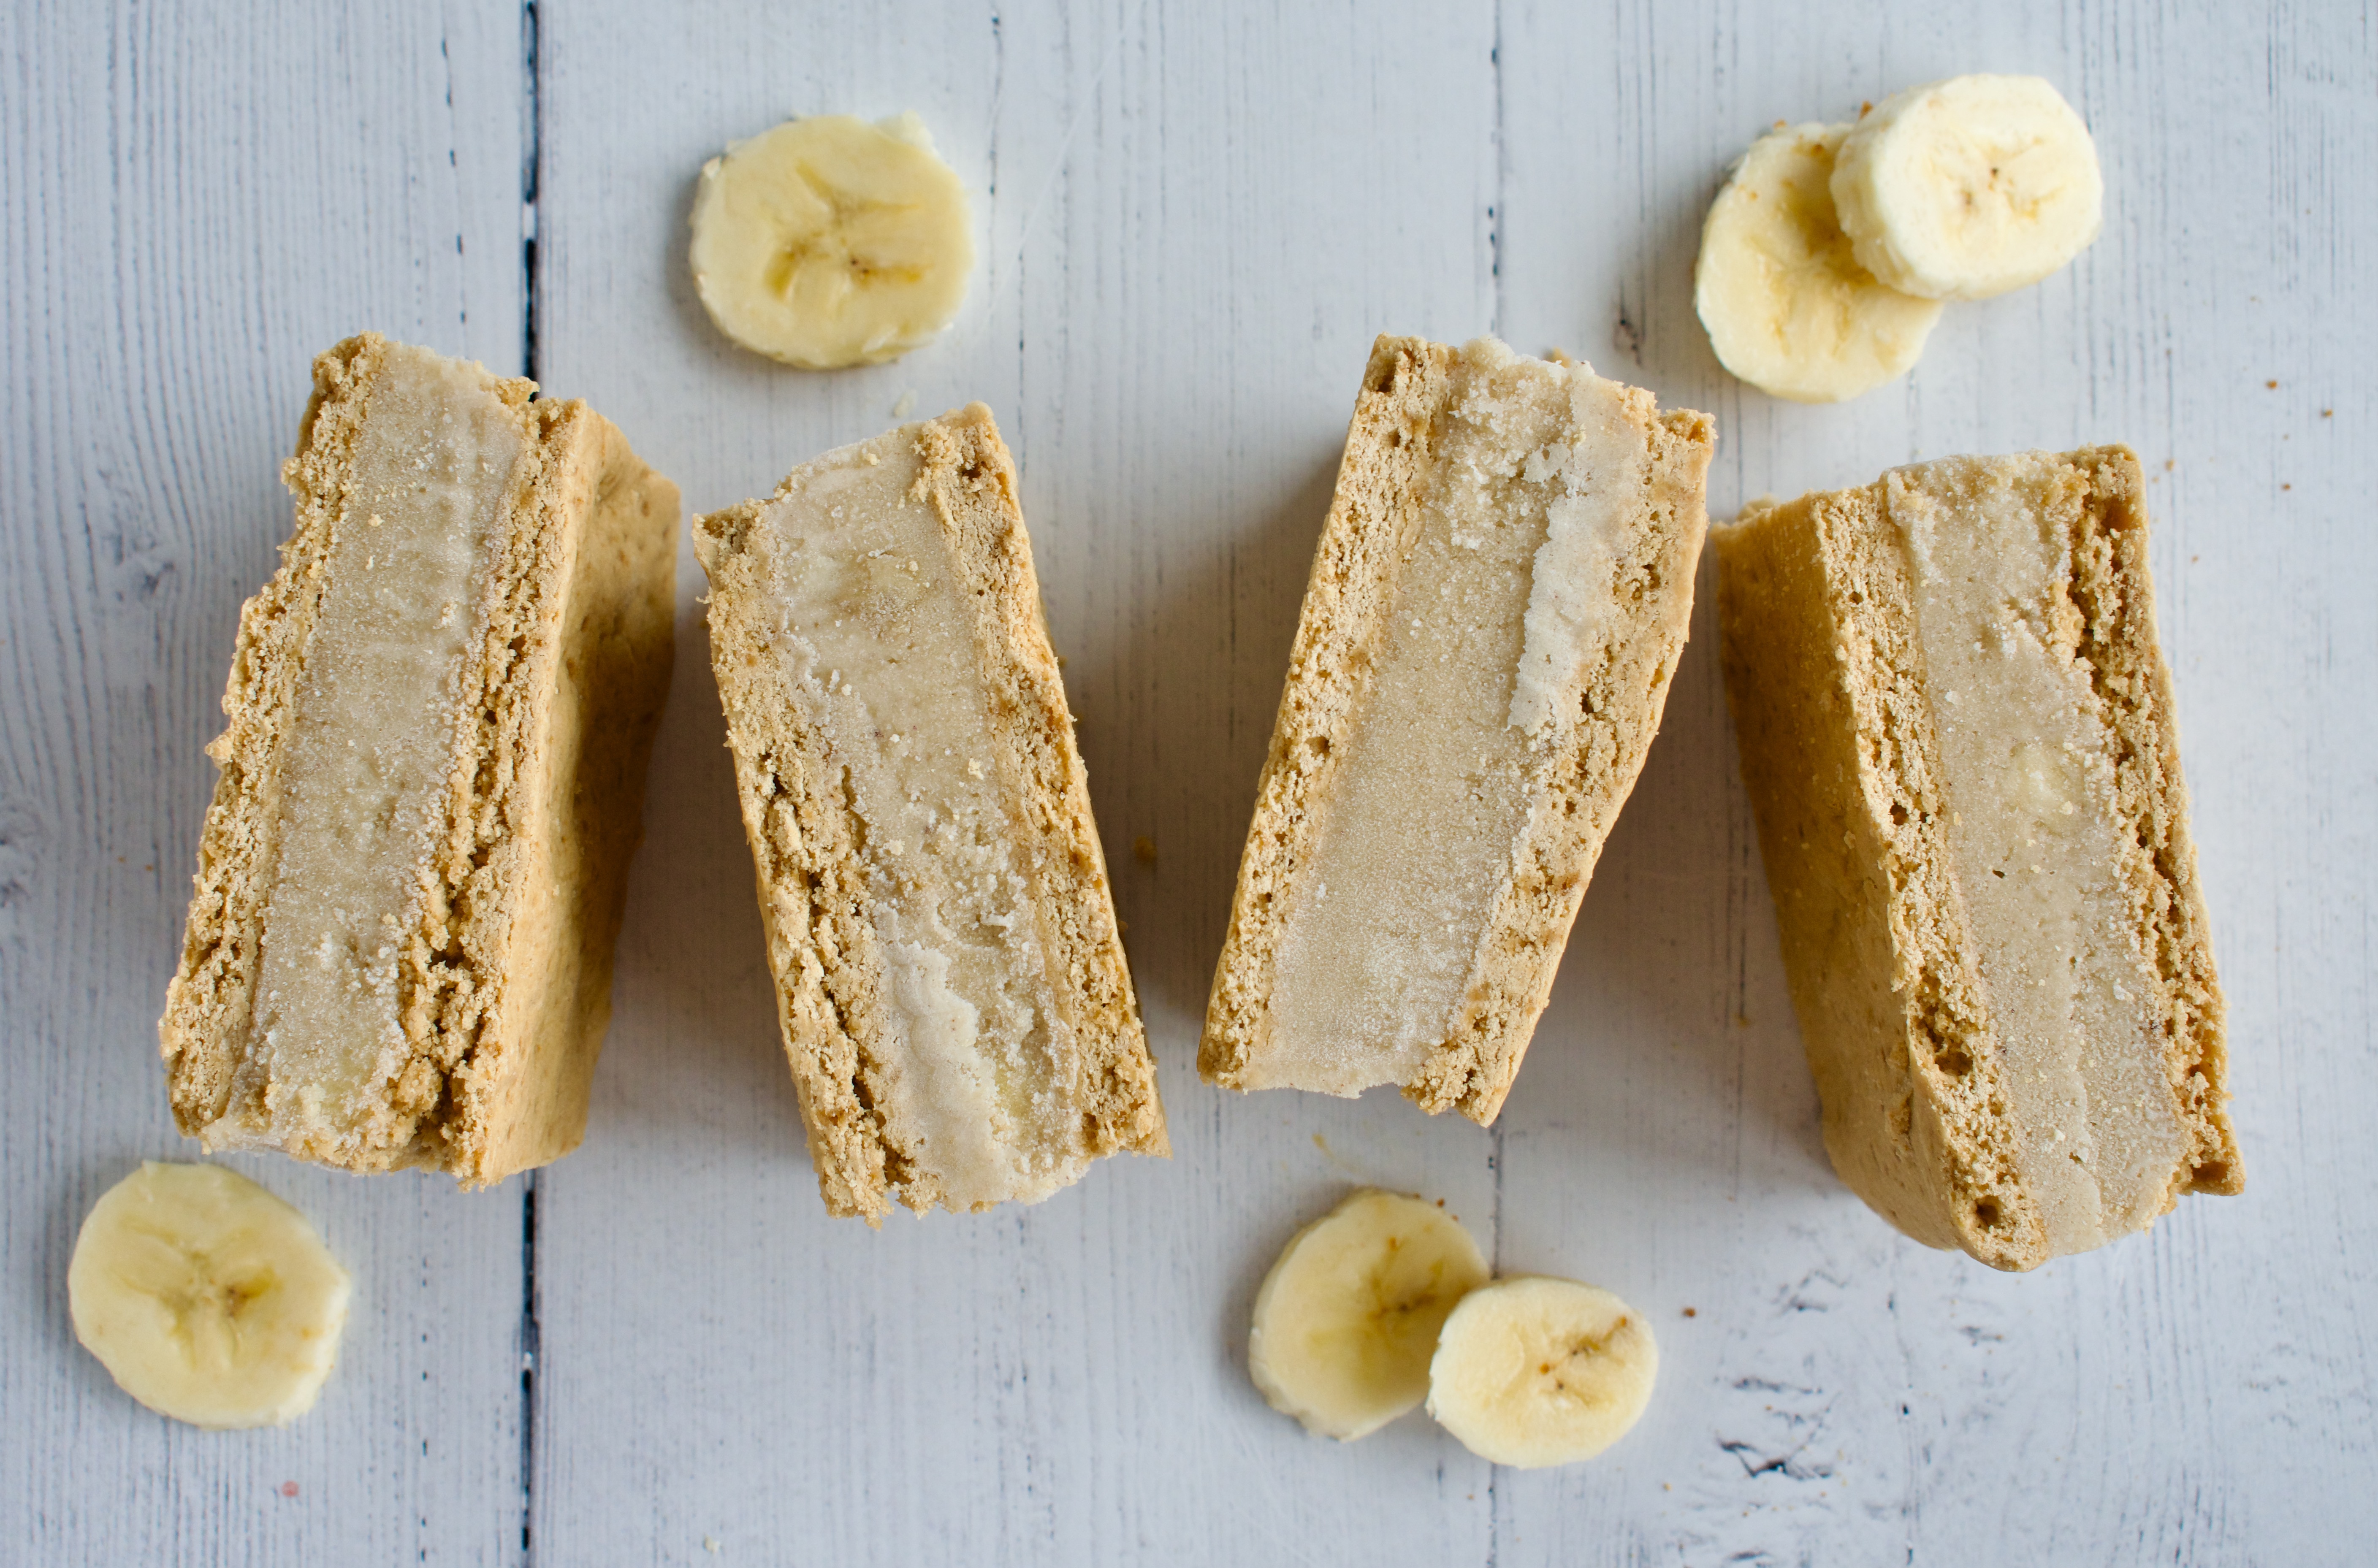
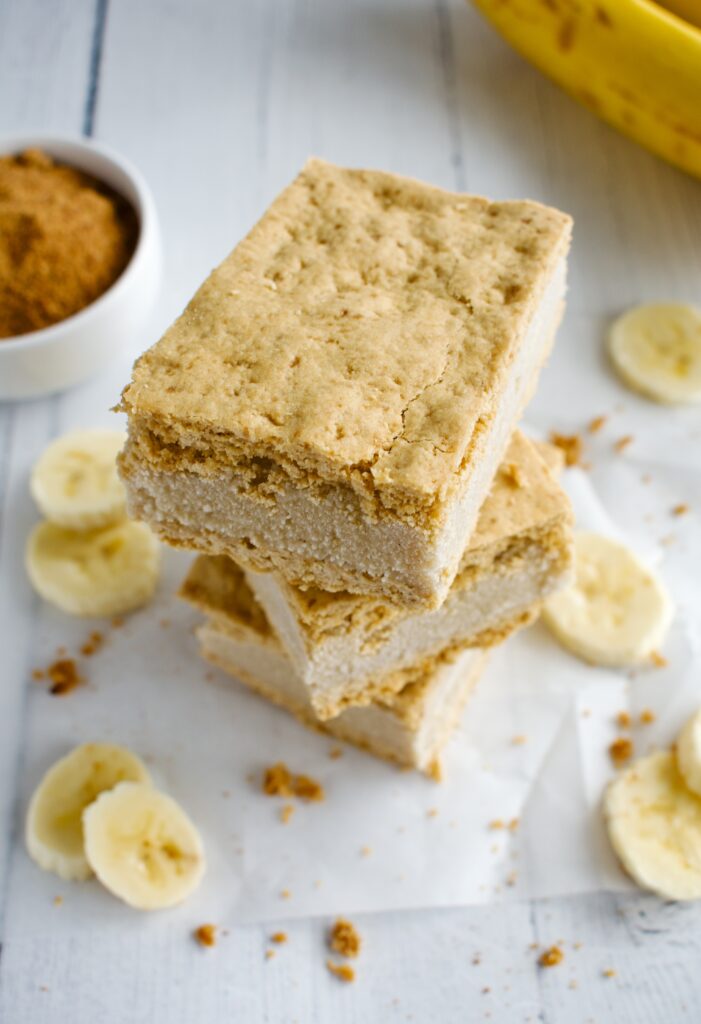
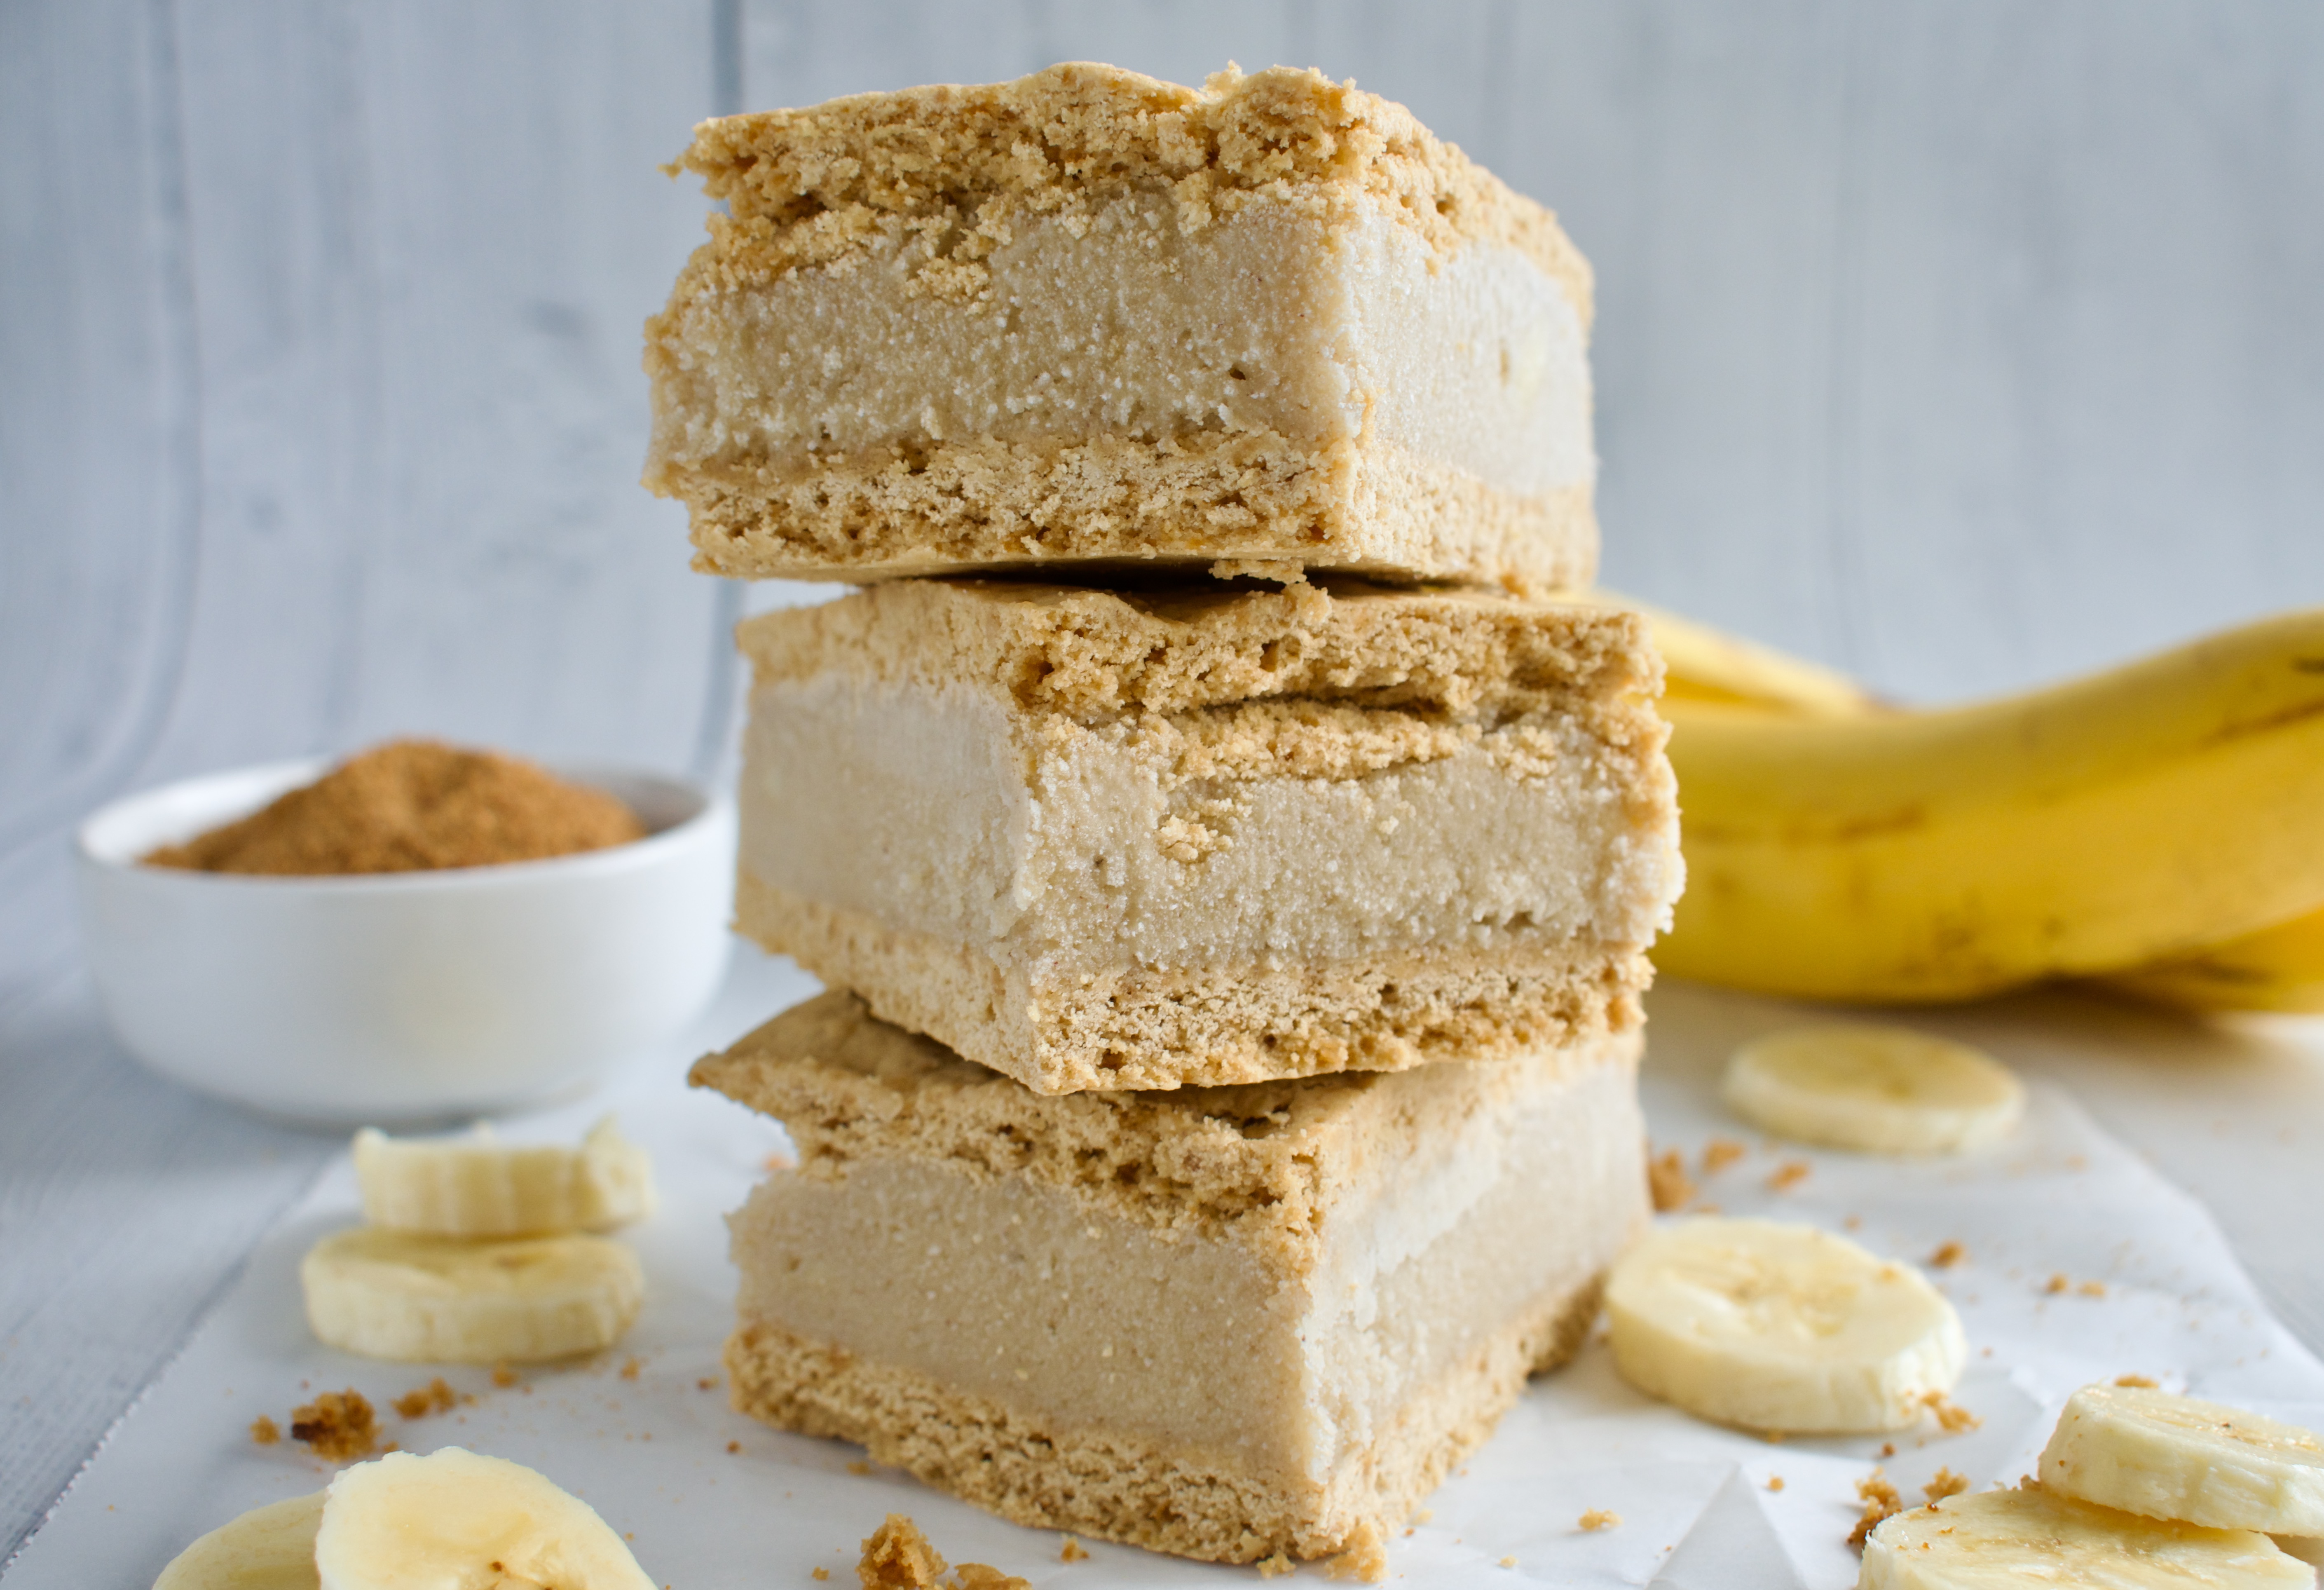
Dairy free banana pudding ice cream is sandwiched between gluten free brown sugar cookies for the ultimate banana lover Banana Pudding Ice Cream Sandwich.
banana pudding ice cream sandwiches
Welcome to part 2 of my summer ice cream series! If you missed part 1, be sure to check out my recipe for gluten free and dairy free Classic Ice Cream Sandwiches. I’m teaching you how to make healthier and allergy friendly ice cream sandwiches this summer and you don’t want to miss out! I have a lot more delicious and unique recipes coming, so make sure you are subscribed to my newsletter or following me on Instagram, TikTok, and/or Pinterest so that you don’t miss a flavor. I can’t wait for you to make some of these healthy ice cream sandwiches. Make sure to share a photo on social media and tag me if you do make these!
These Banana Pudding Ice Cream Sandwiches are for my banana lovers. I’ll be honest, they have a strong banana flavor, so if that’s not for you, make these for someone who is a banana fan. I highly suggest reading the recipe notes below before diving into the recipe,as I share a lot of helpful information about how to adjust these sandwiches to your liking.
gluten free and dairy free banana pudding ice cream sandwiches
Blend the coconut milk, 2 bananas, cinnamon, and maple syrup in a blender until smooth.
Add the ice cream base to a sauce pan and heat over low heat until warm to the touch.
Take 1/2 cup of the base and whisk it with the egg yolks or the tapioca starch. Add this mixture back to the base in the sauce pan and warm on low until it begins to thicken and mixture coats the back of a spoon.
Remove from heat and whisk in the salt and vanilla. Let mixture cool at room temperature before transferring to the fridge to fully cool. Then use your ice cream maker to make the ice cream.
Sugar Cookie Base
Beat together the melted butter, sugar, and molasses until combined. Add the eggs and vanilla and mix until just combined.
Add the dry ingredients to the wet and mix until just combined.
Spread the batter out evenly over the baking pan and bake cookies for 10 minutes.
Let the base completely cool for at least an hour before assembling the sandwiches.
Assembly
Line a cutting board with plastic wrap and place half of the cookie base on top. Spread your ice cream evenly over the base.
Flip the other cookie half on top of the ice cream.
Line everything up then tightly wrap up the sandwiches in the plastic wrap.
Place the sandwiches in the freezer for AT LEAST 3 hours, preferably overnight to allow the ice cream to fully set.
When ready, slice into 8 sandwiches and enjoy!
gluten free and dairy free banana pudding ice cream sandwiches
Important Recipe Notes
Cookie Base
If you prefer a thick cookie with less ice cream, feel free to either spread the cookie base into a smaller pan before baking OR double the recipe for some very thick cookies! I wanted to highlight the banana pudding ice cream in this recipe since that is the star of the show, but if you want a more subtle flavor, try one of those adaptations.
Can I Make Vegan Ice Cream Sandwiches?
Although you can make and use a vegan ice cream in these gluten free ice cream sandwiches, I have not tested a vegan version of the cookie base. I share in the recipe that you can use tapioca or arrowroot starch instead of egg yolks to keep the ice cream vegan. The gluten free cookie does require eggs, though. If you try making a vegan version, please leave a comment and let us know how it went!
What If I Don’t Have an Ice Cream Maker?
Although an ice cream maker helps with consistency, you can always put the base into a freezer safe dish and whisk it every 30 minutes until it freezes. It won’t be quite as smooth, but it works in a pinch. This method is a little more time intensive as you do want to keep stirring the ice cream.
How To Serve and Store These Ice Cream Sandwiches
Serve: I like to let my ice cream sandwiches sit for a couple of minutes at room temperature to soften the ice cream, but that is a personal preference. Just don’t let them sit out too long or they’ll melt!
Store: Once you have sliced the ice cream sandwiches, wrap each individually in plastic wrap, parchment paper, or wax paper. You can then place all of the sandwiches into a large ziplock bag or freezer container and store in the freezer until ready to eat.
Dairy free banana pudding ice cream is sandwiched between gluten free brown sugar cookies for the ultimate banana lover Banana Pudding Ice Cream Sandwich.
Blend the coconut milk, 2 bananas, cinnamon, and maple syrup in a blender until smooth.
Add the ice cream base to a sauce pan and heat over low heat until warm to the touch.
Take 1/2 cup of the base and whisk it with the egg yolks or the tapioca starch. Add this mixture back to the base in the sauce pan and warm on low until it begins to thicken and mixture coats the back of a spoon. DO NOT let the mixture boil or heat too quickly, especially if using egg yolks (this will scramble the eggs).
Remove from heat and whisk in the salt and vanilla. Let mixture cool at room temperature before transferring to the fridge to fully cool. This takes 2-3 hours, but it is preferable if you can leave it overnight.
When ice cream base is cooled, add to your ice cream maker according to manufacturers directions. Near the end, add 1 chopped banana and allow it to mix in. Transfer ice cream to a freezer safe container and place in the freezer until ready to use.
Sugar Cookie Base
Beat together the melted butter, sugar, and molasses until combined. Add the eggs and vanilla and mix until just combined.
Add the dry ingredients to the wet and mix until just combined. The batter will be sticky.
Line a 9×13 or 10x15inch baking pan with parchment paper. Spread the batter out evenly over the baking pan, trying to get even edges and a nice thin layer. You will probably need to use your hands to help spread the batter out. Dip them in oil or cold water to help with sticking.
Bake the cookie base for 10 minutes. It might seem like it needs one more minute, don't do it. Over baking will lead to dry and crumbly cookies.
Let the base completely cool for at least an hour before assembling the sandwiches.
Assembly
Pull your ice cream out of the freezer 10-30 minutes before ready to assemble if it has been fully frozen. You don't want it to be melted, but it should be very soft and spreadable.
Place a medium cutting board or flat plate that is freezer safe (and fits into your freezer- check this before starting!) on the counter. Next, place two long pieces of plastic wrap in a cross over the cutting board.
Trim the edges of your ice cream sandwich cookie base if desired then cut in half. GENTLY slide one half into the middle of your cutting board/plastic wrap. Spread your homemade ice cream over one half of the cookie base. Work gently and use as much or as little ice cream as you want. I used a thick layer of ice cream to highlight the banana pudding flavor!
Adding the top part of the cookie is a little hard since it is fragile, but do your best to flip the other half of the cookie base onto the top of your ice cream.
Line everything up then tightly wrap up the sandwiches in the plastic wrap. Wrapping tightly holds everything together while the ice cream is soft. The plate/cutting board provides a sturdy support as the sandwiches freeze.
Place the sandwiches in the freezer for at least 4-6 hours, preferably overnight to allow the ice cream to fully set.
When ready, slice into 8 sandwiches. I like to wrap each sandwich individually in plastic wrap or parchment paper then store in a freezer safe bag or container until ready to eat. Pull one out on a hot summer afternoon and enjoy!
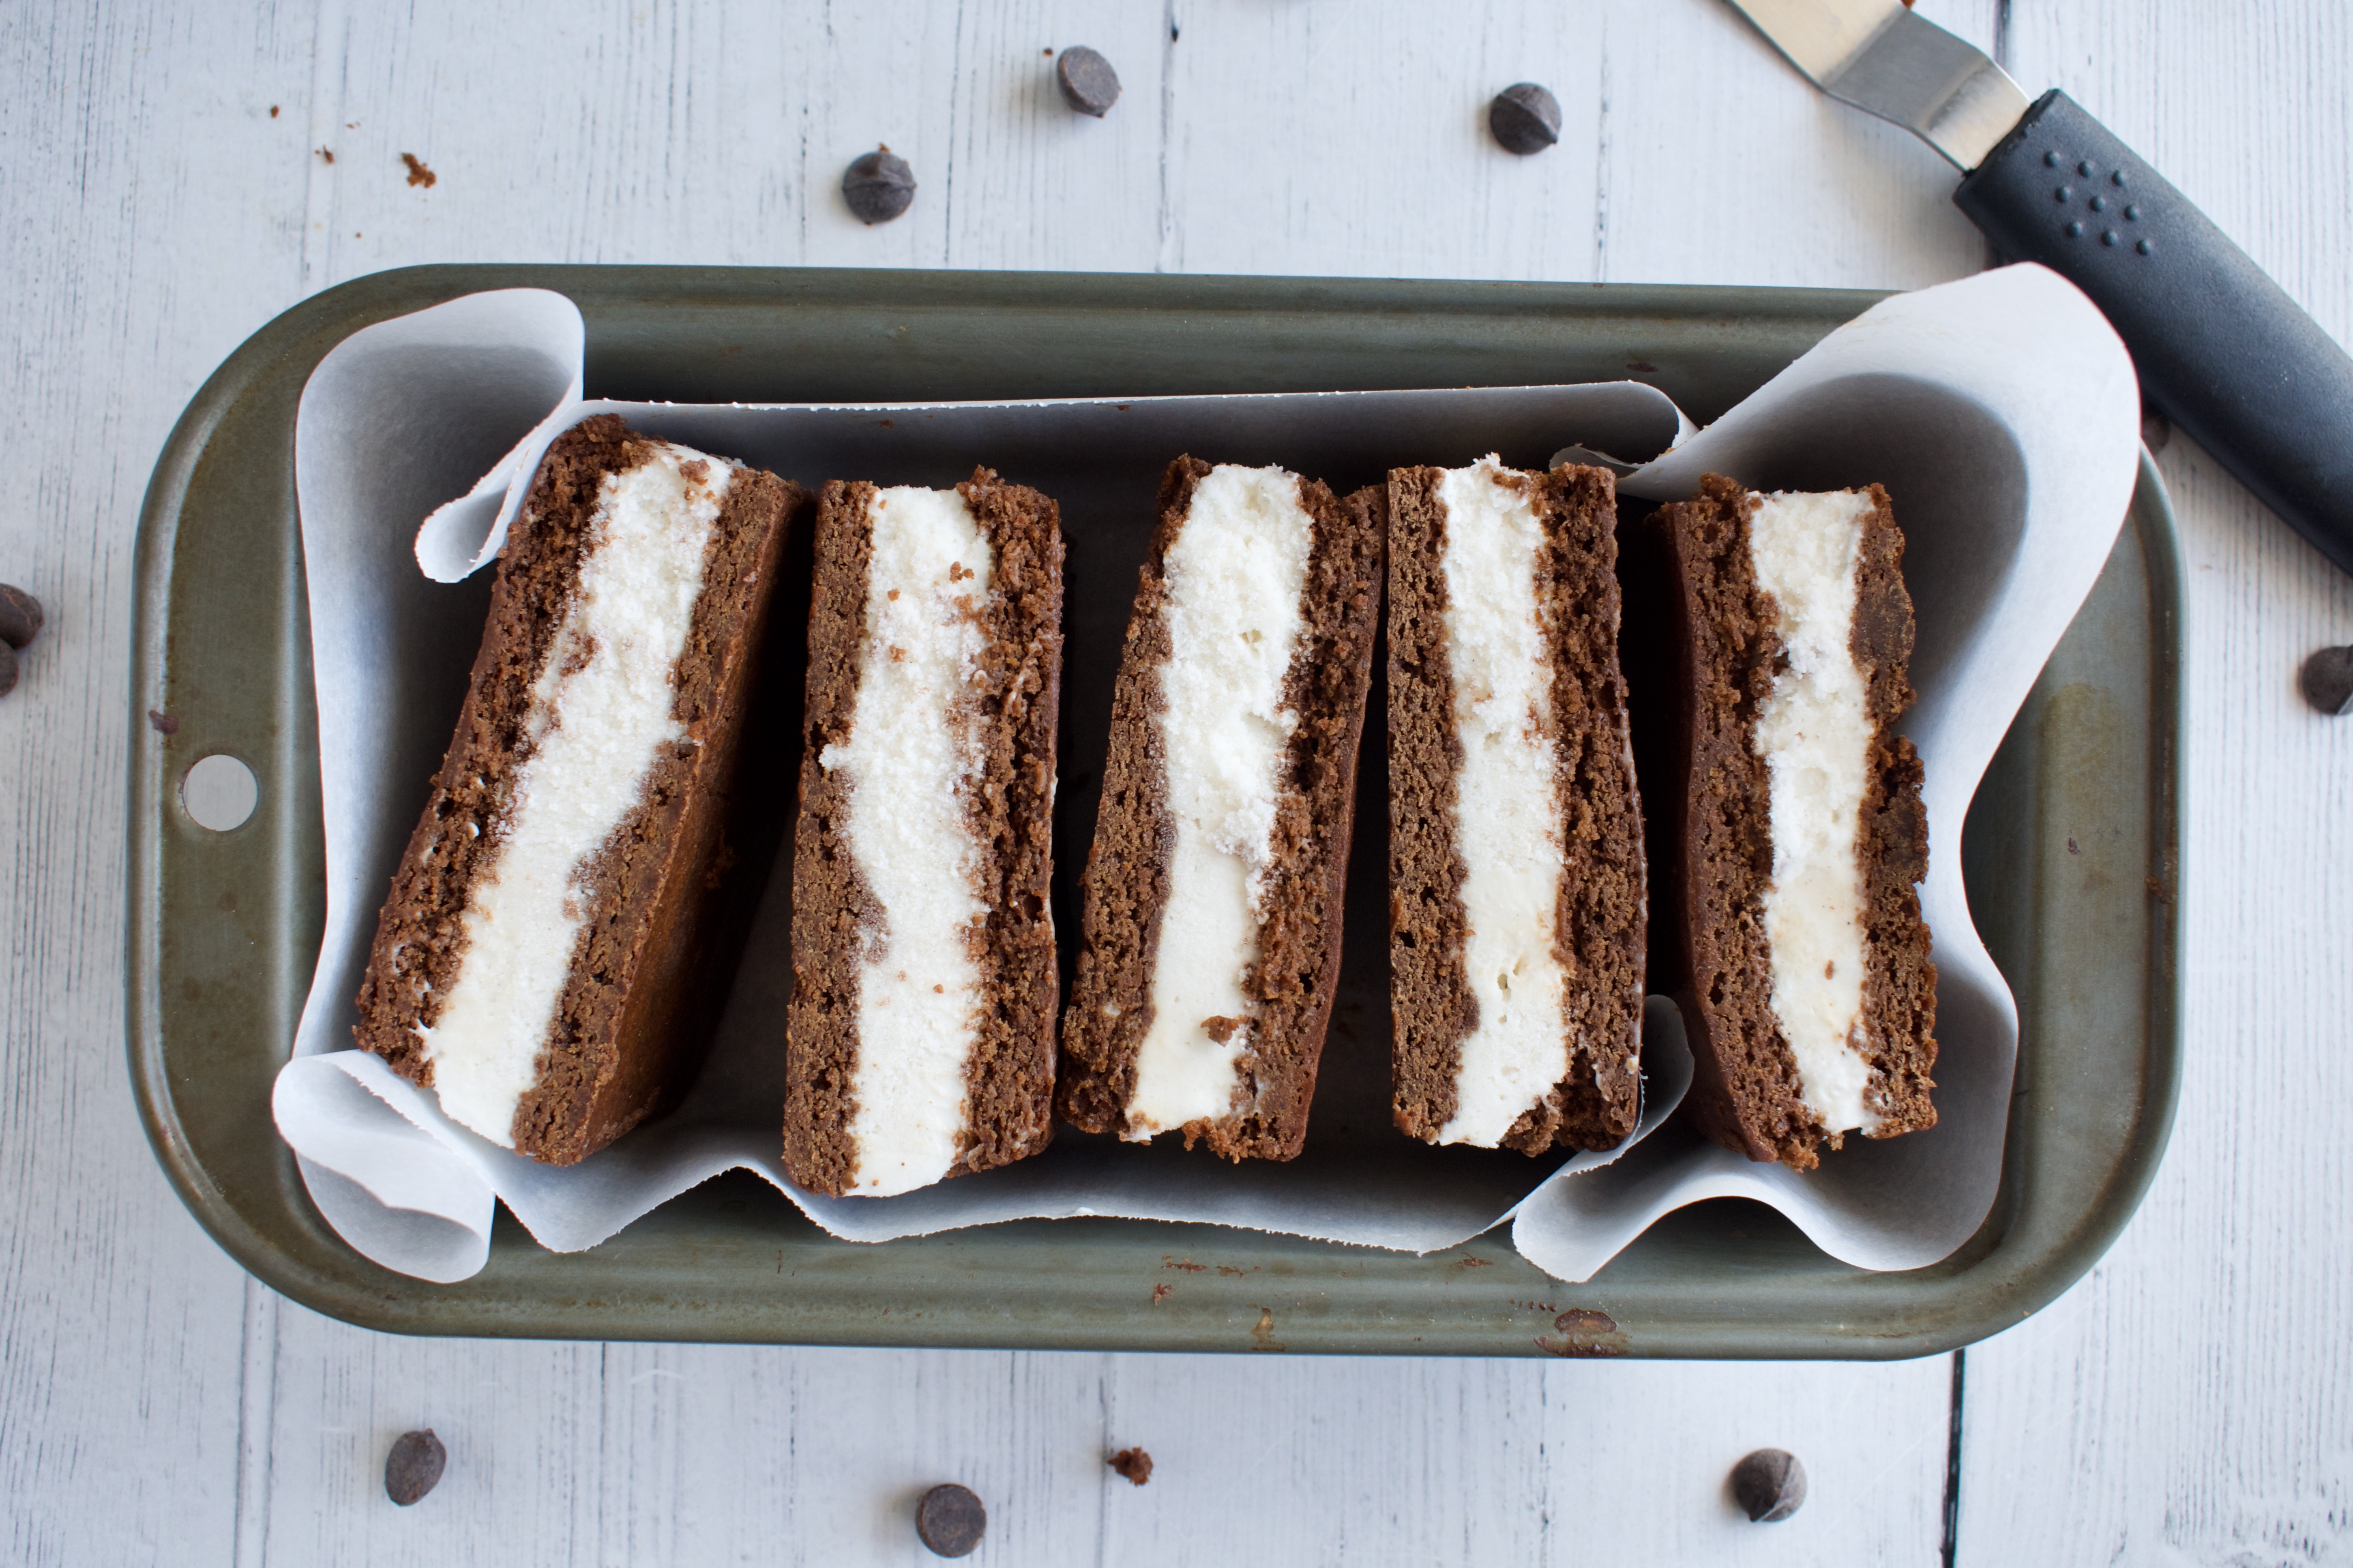
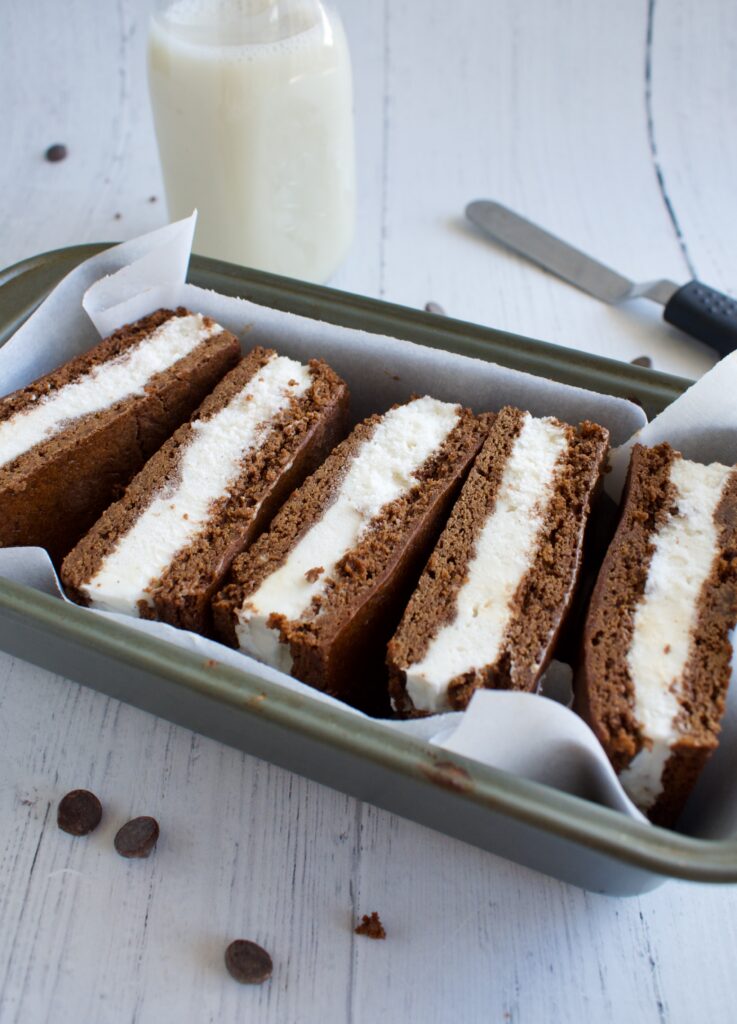
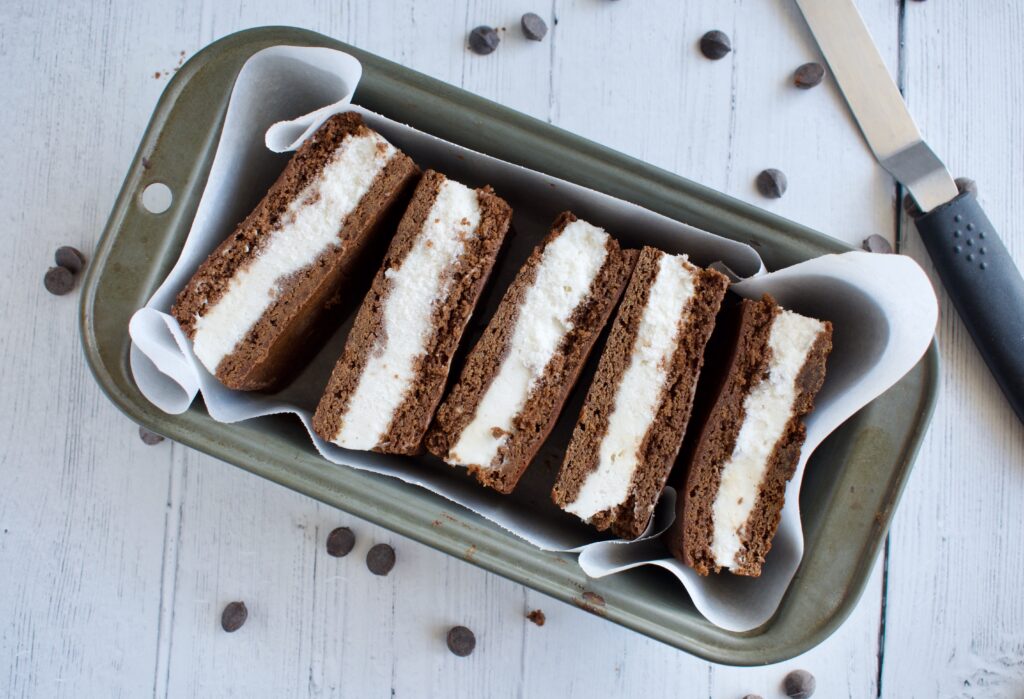
These homemade Ice Cream Sandwiches taste just like the classic. Dairy free ice cream is sandwiched between a gluten free chocolate cookie base and just like when you are a kid, it is stick to your fingers delicious!
gluten free ice cream sandwich
Welcome to my Ice Cream Sandwich series! I am so excited about this one. What’s summer without a delicious ice cream sandwich? Not as enjoyable, that’s what. So join me for this series where I’ll be sharing a new ice cream sandwich flavor each week. We are kicking things off with the classic, but I have a ton of fun and unique flavor combos coming. And every single sammie will be gluten free, dairy free, and refined sugar free.
I’m teaching you how to make healthier and allergy friendly ice cream sandwiches this summer and you don’t want to miss out! Make sure you are subscribed to my newsletter or following me on Instagram, TikTok, and/or Pinterest so that you don’t miss a flavor. I can’t wait for you to make some of these healthy ice cream sandwiches. Make sure to share a photo on social media and tag me if you do make these!
If you’re making homemade ice cream, be sure to make it ahead of time.
For the cookie base, preheat the oven to 350F.
Whisk the flours, cocoa powder, baking powder, and salt together in a bowl and set aside.
Beat together the melted butter and sugar until combined. Add the egg and egg yolk, vanilla extract, and milk, and beat to combine.
Add the dry to the wet and mix until just combined.
Line a baking sheet with parchment paper then spread the batter over the baking sheet evenly.
Bake for 10 minutes then let cool completely before cutting in half and sandwiching ice cream between the two halves.
Wrap tightly in plastic wrap and place in the freezer to set for at least 3 hours, preferably overnight before cutting.
homemade ice cream sandwiches
Ice Cream Sandwich Ingredient Notes
Gluten free ice cream sandwiches are not the easiest to make. It took 4 tries before I nailed the cookie base. The cookies can’t be too firm and dry, nor can they be too light and fluffy, so ingredient substitutions aren’t recommended. There are a few swaps you can make if necessary, though.
Flour: I use my favorite King Arthur 1:1 Gluten Free Flour in this recipe. I have not tested it with any other gluten free flours. I find King Arthur works best in gluten free baking, but make sure to use a 1:1 gluten free flour substitute if you try a different flour variety. I have not tested a Paleo version of this recipe.
Butter: I used Miyoko’s vegan butter in this recipe which worked perfectly. Regular butter would also work if you can tolerate dairy. Melted coconut oil should also work in this recipe.
Sugar: To keep these ice cream sandwiches refined sugar free and slightly healthier, I used coconut sugar. Coconut sugar can behave slightly differently than other sugars. I have not tested any other sugars in this recipe, but I *think* white sugar would work fine. If you try it, leave a comment and let me know how it went!
Milk: Any milk should do- vegan or otherwise!
What Ice Cream Should I Use?
I used my homemade vanilla ice cream in this recipe, but you can totally use whatever vanilla ice cream (or mint or chocolate chip!) that you want. You’ll need about a pint and a half of ice cream (or the full 2 pints if you like a thick ice cream layer). These days, vegan ice cream is expensive, so I like to make it at home for half the cost.
My homemade ice cream has both a dairy free and fully vegan option to fit your needs.
Can I Make Vegan Ice Cream Sandwiches?
Although you can make and use a vegan ice cream in these gluten free ice cream sandwiches, I have not tested a vegan version of the cookie base. The cookie does require eggs. If you try making a vegan version, please leave a comment and let us know how it went!
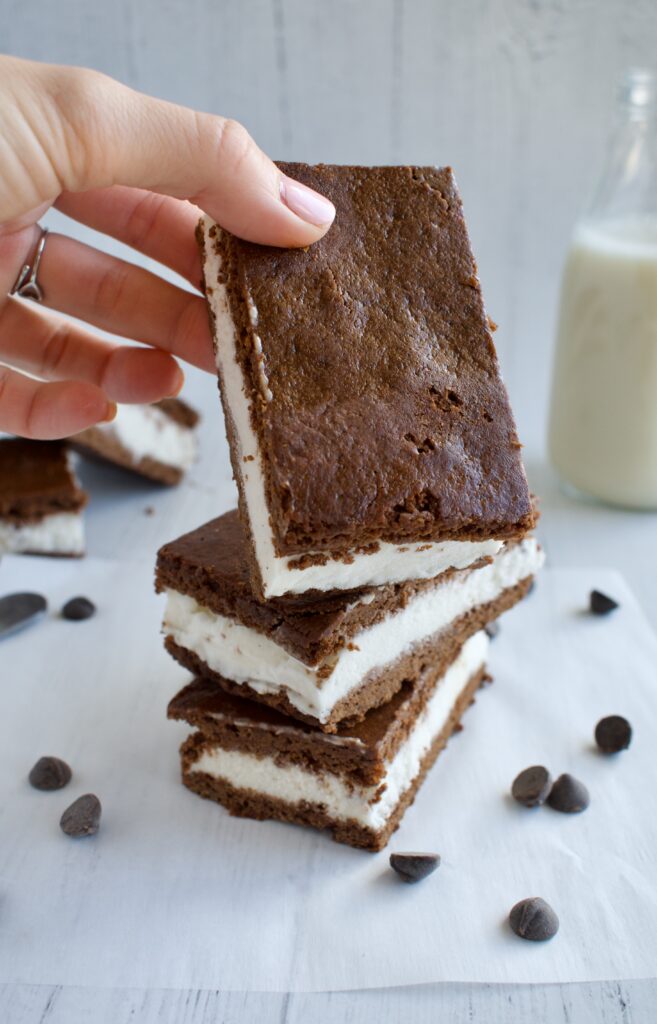
homemade gluten free ice cream sandwiches
How To Serve and Store These Ice Cream Sandwiches
Serve: I like to let my ice cream sandwiches sit for a couple of minutes at room temperature to soften the ice cream, but that is a personal preference. Just don’t let them sit out too long or they’ll melt!
Store: Once you have sliced the ice cream sandwiches, wrap each individually in plastic wrap, parchment paper, or wax paper. You can then place all of the sandwiches into a large ziplock bag or freezer container and store in the freezer until ready to eat.
These homemade ice cream sandwiches taste like the classic, but are gluten free, dairy free, and refined sugar free. Delicious vanilla ice cream is sandwiched between stick to your fingers chocolate cookie, just like when you were a kid!
If you are making your own ice cream, be sure to make this ahead of time so it is ready to go. You will want to take the ice cream out about 10-30 minutes before ready to use (depending on how hot your kitchen is) so it is nice and soft.
Cookie Base
Preheat oven to 350F.
Whisk the flours, cocoa powder, baking powder, and salt together in a bowl and set aside.
Beat the melted butter and sugar together until combined. Add the egg, egg yolk, milk, and vanilla and beat to combine.
Add the dry ingredients to the wet and beat on low until just combined.
Line a 10x15inch baking pan with parchment paper (You could get away with using a bigger pan and not spreading the batter all the way out or use a 9×13 inch baking dish. Your cookies will just be slightly thicker and sandwiches slightly smaller).
Spread the batter out evenly over the baking pan, trying to get even edges and a nice thin layer.
Bake the cookie base for 10 minutes.
Let the base completely cool for at least an hour before assembling the sandwiches.
Assembly
Pull your ice cream out of the freezer 10-30 minutes before ready to assemble. You don't want it to be melted, but it should be very soft and spreadable.
Place a medium cutting board or flat plate that is freezer safe (and fits into your freezer- check this before starting!) on the counter. Next, place two long pieces of plastic wrap in a cross over the cutting board.
Trim the edges of your ice cream sandwich cookie base if desired then cut in half. GENTLY slide one half into the middle of your cutting board/plastic wrap.
Spread your homemade ice cream or about 1.5-2 pints of vanilla ice cream of choice over one half of the cookie base. Work gently and use as much or as little ice cream as you want. I like about an inch thick of ice cream.
Adding the top part of the cookie is hard since it is fragile, but do your best to flip the other half of the cookie base onto the top of your ice cream. Line everything up then tightly wrap up the sandwiches in the plastic wrap. Wrapping tightly holds everything together while the ice cream is soft. The plate/cutting board provides a sturdy support as the sandwiches freeze.
Place the sandwiches in the freezer for at least 4-6 hours, preferably overnight to allow the ice cream to fully set.
When ready, slice into 8 sandwiches.
I like to wrap each sandwich individually in plastic wrap or parchment paper then store in a freezer safe bag or container until ready to eat. Pull one out on a hot summer afternoon and enjoy!
Hi! I'm Victoria. I was diagnosed with Lyme in 2012 and have been on a healing journey ever since. I love helping others on their road to healing through allergy friendly recipes, exercise, and overall well-being.