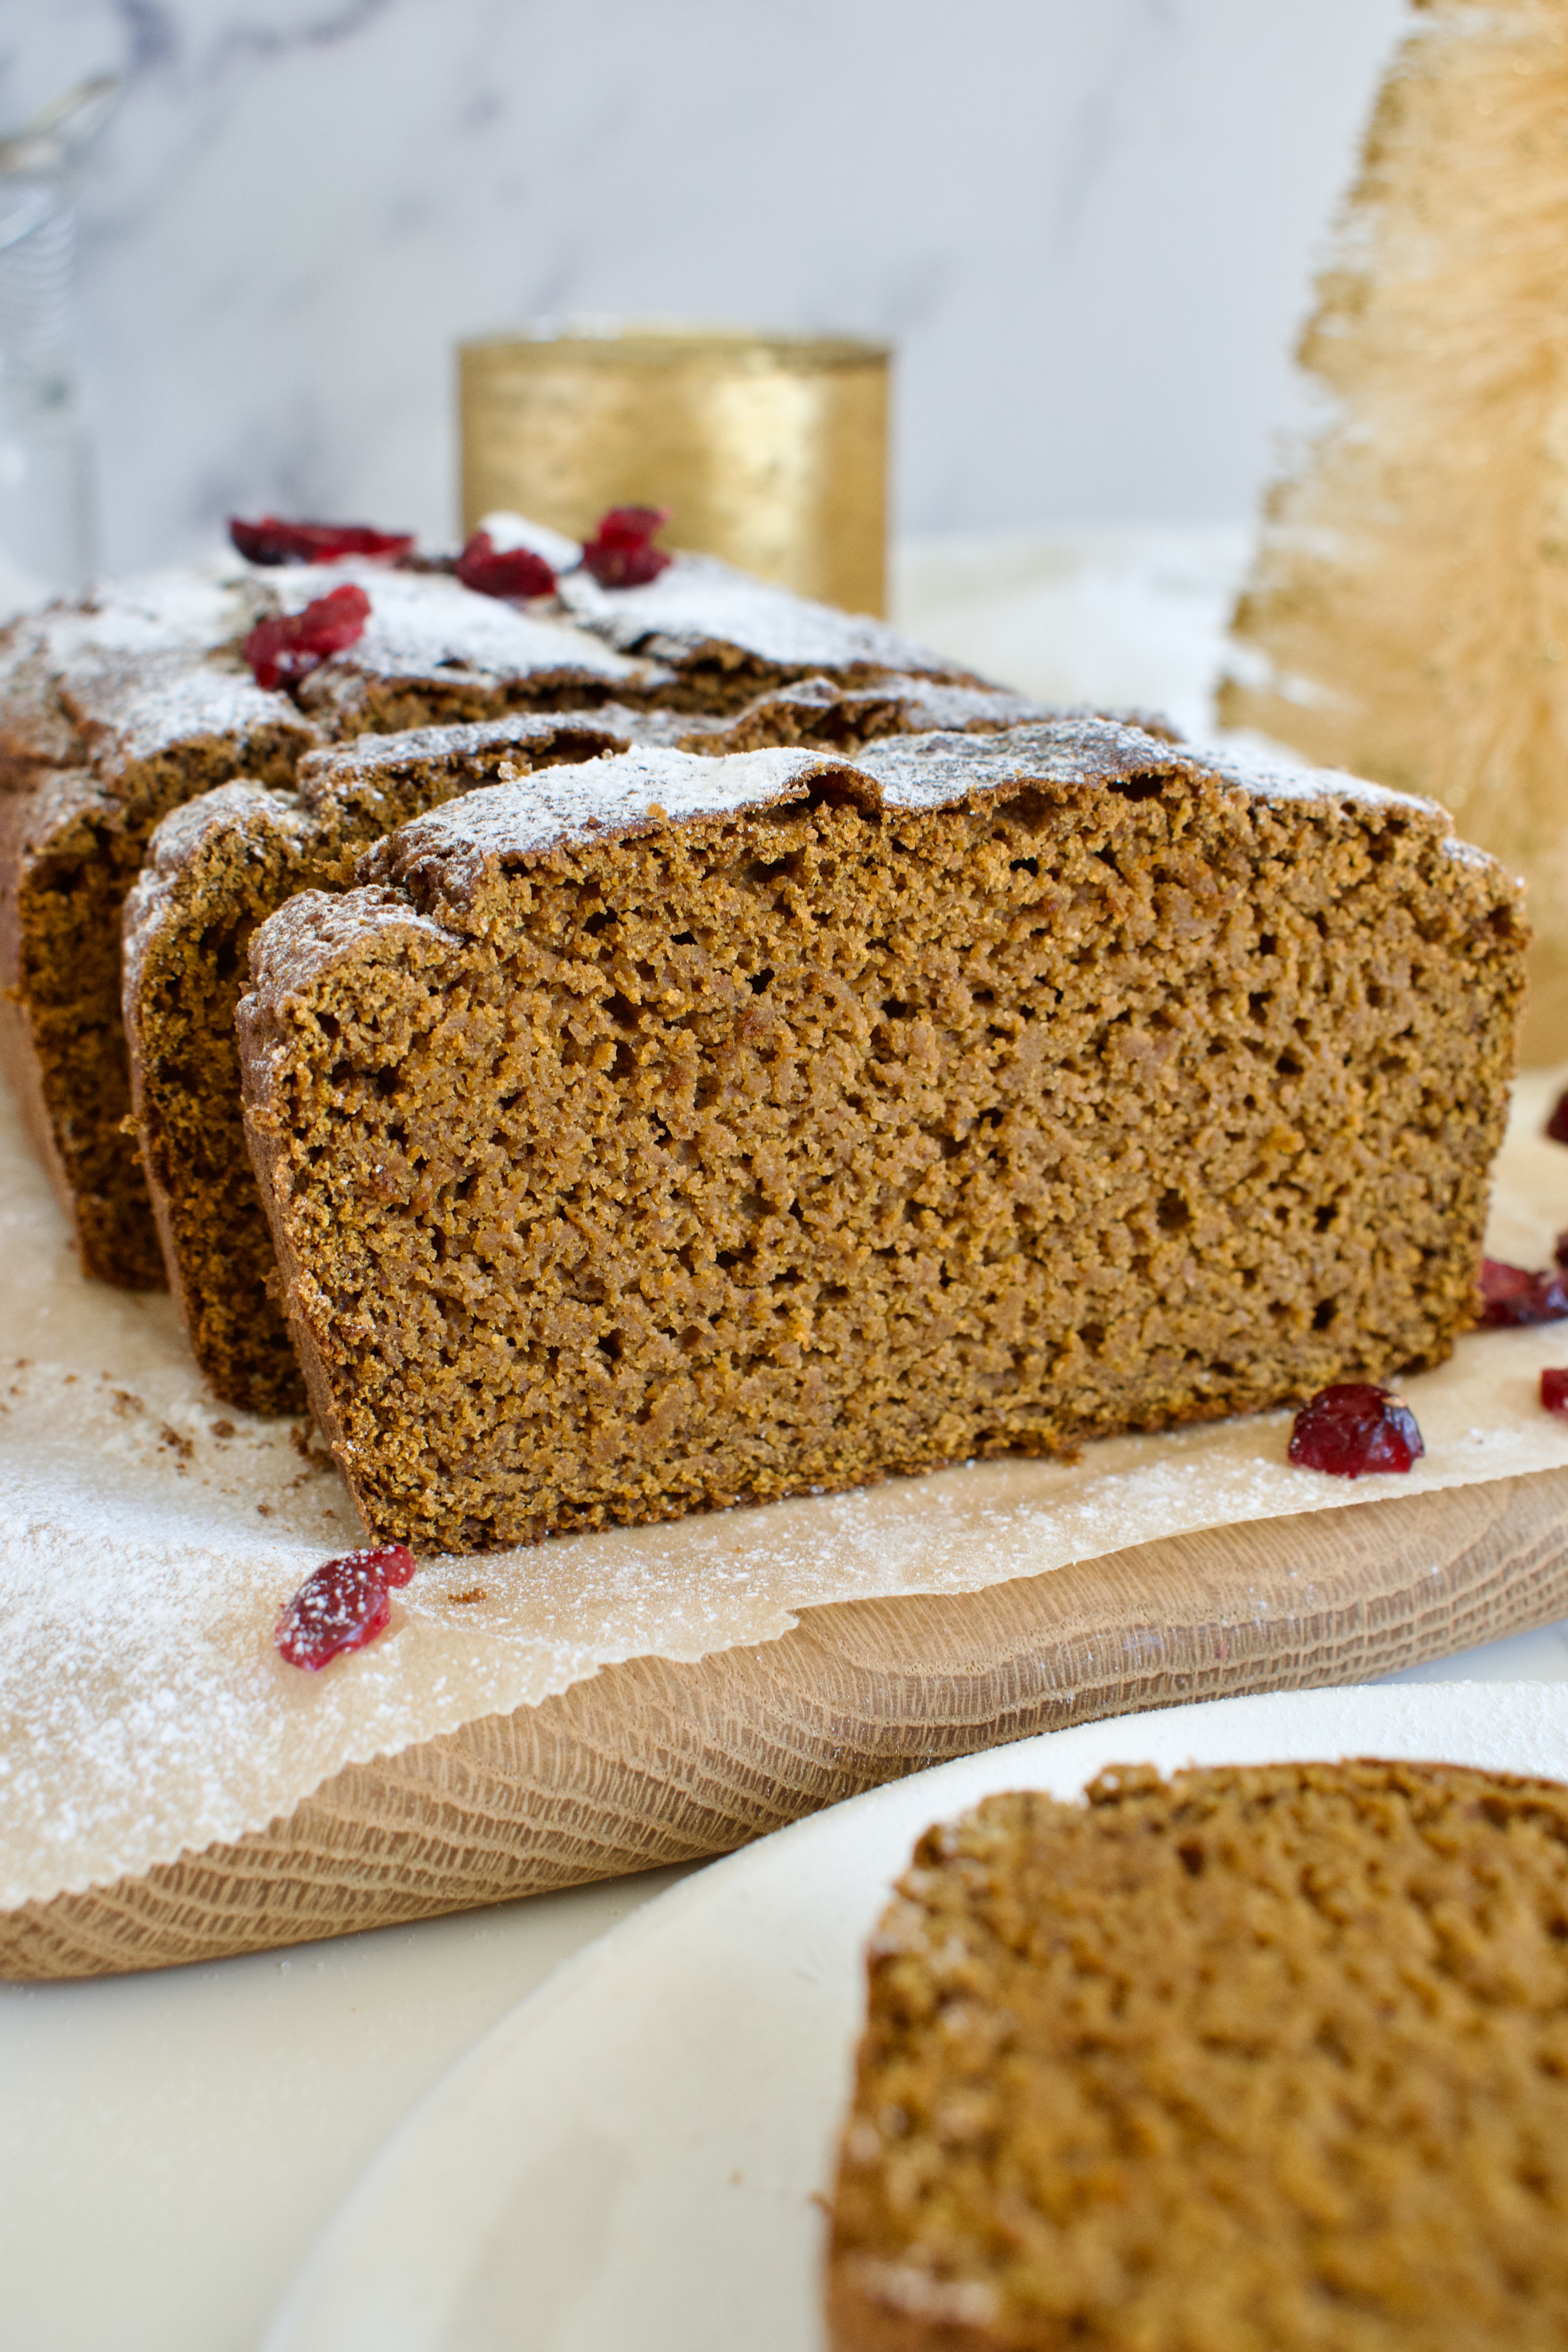
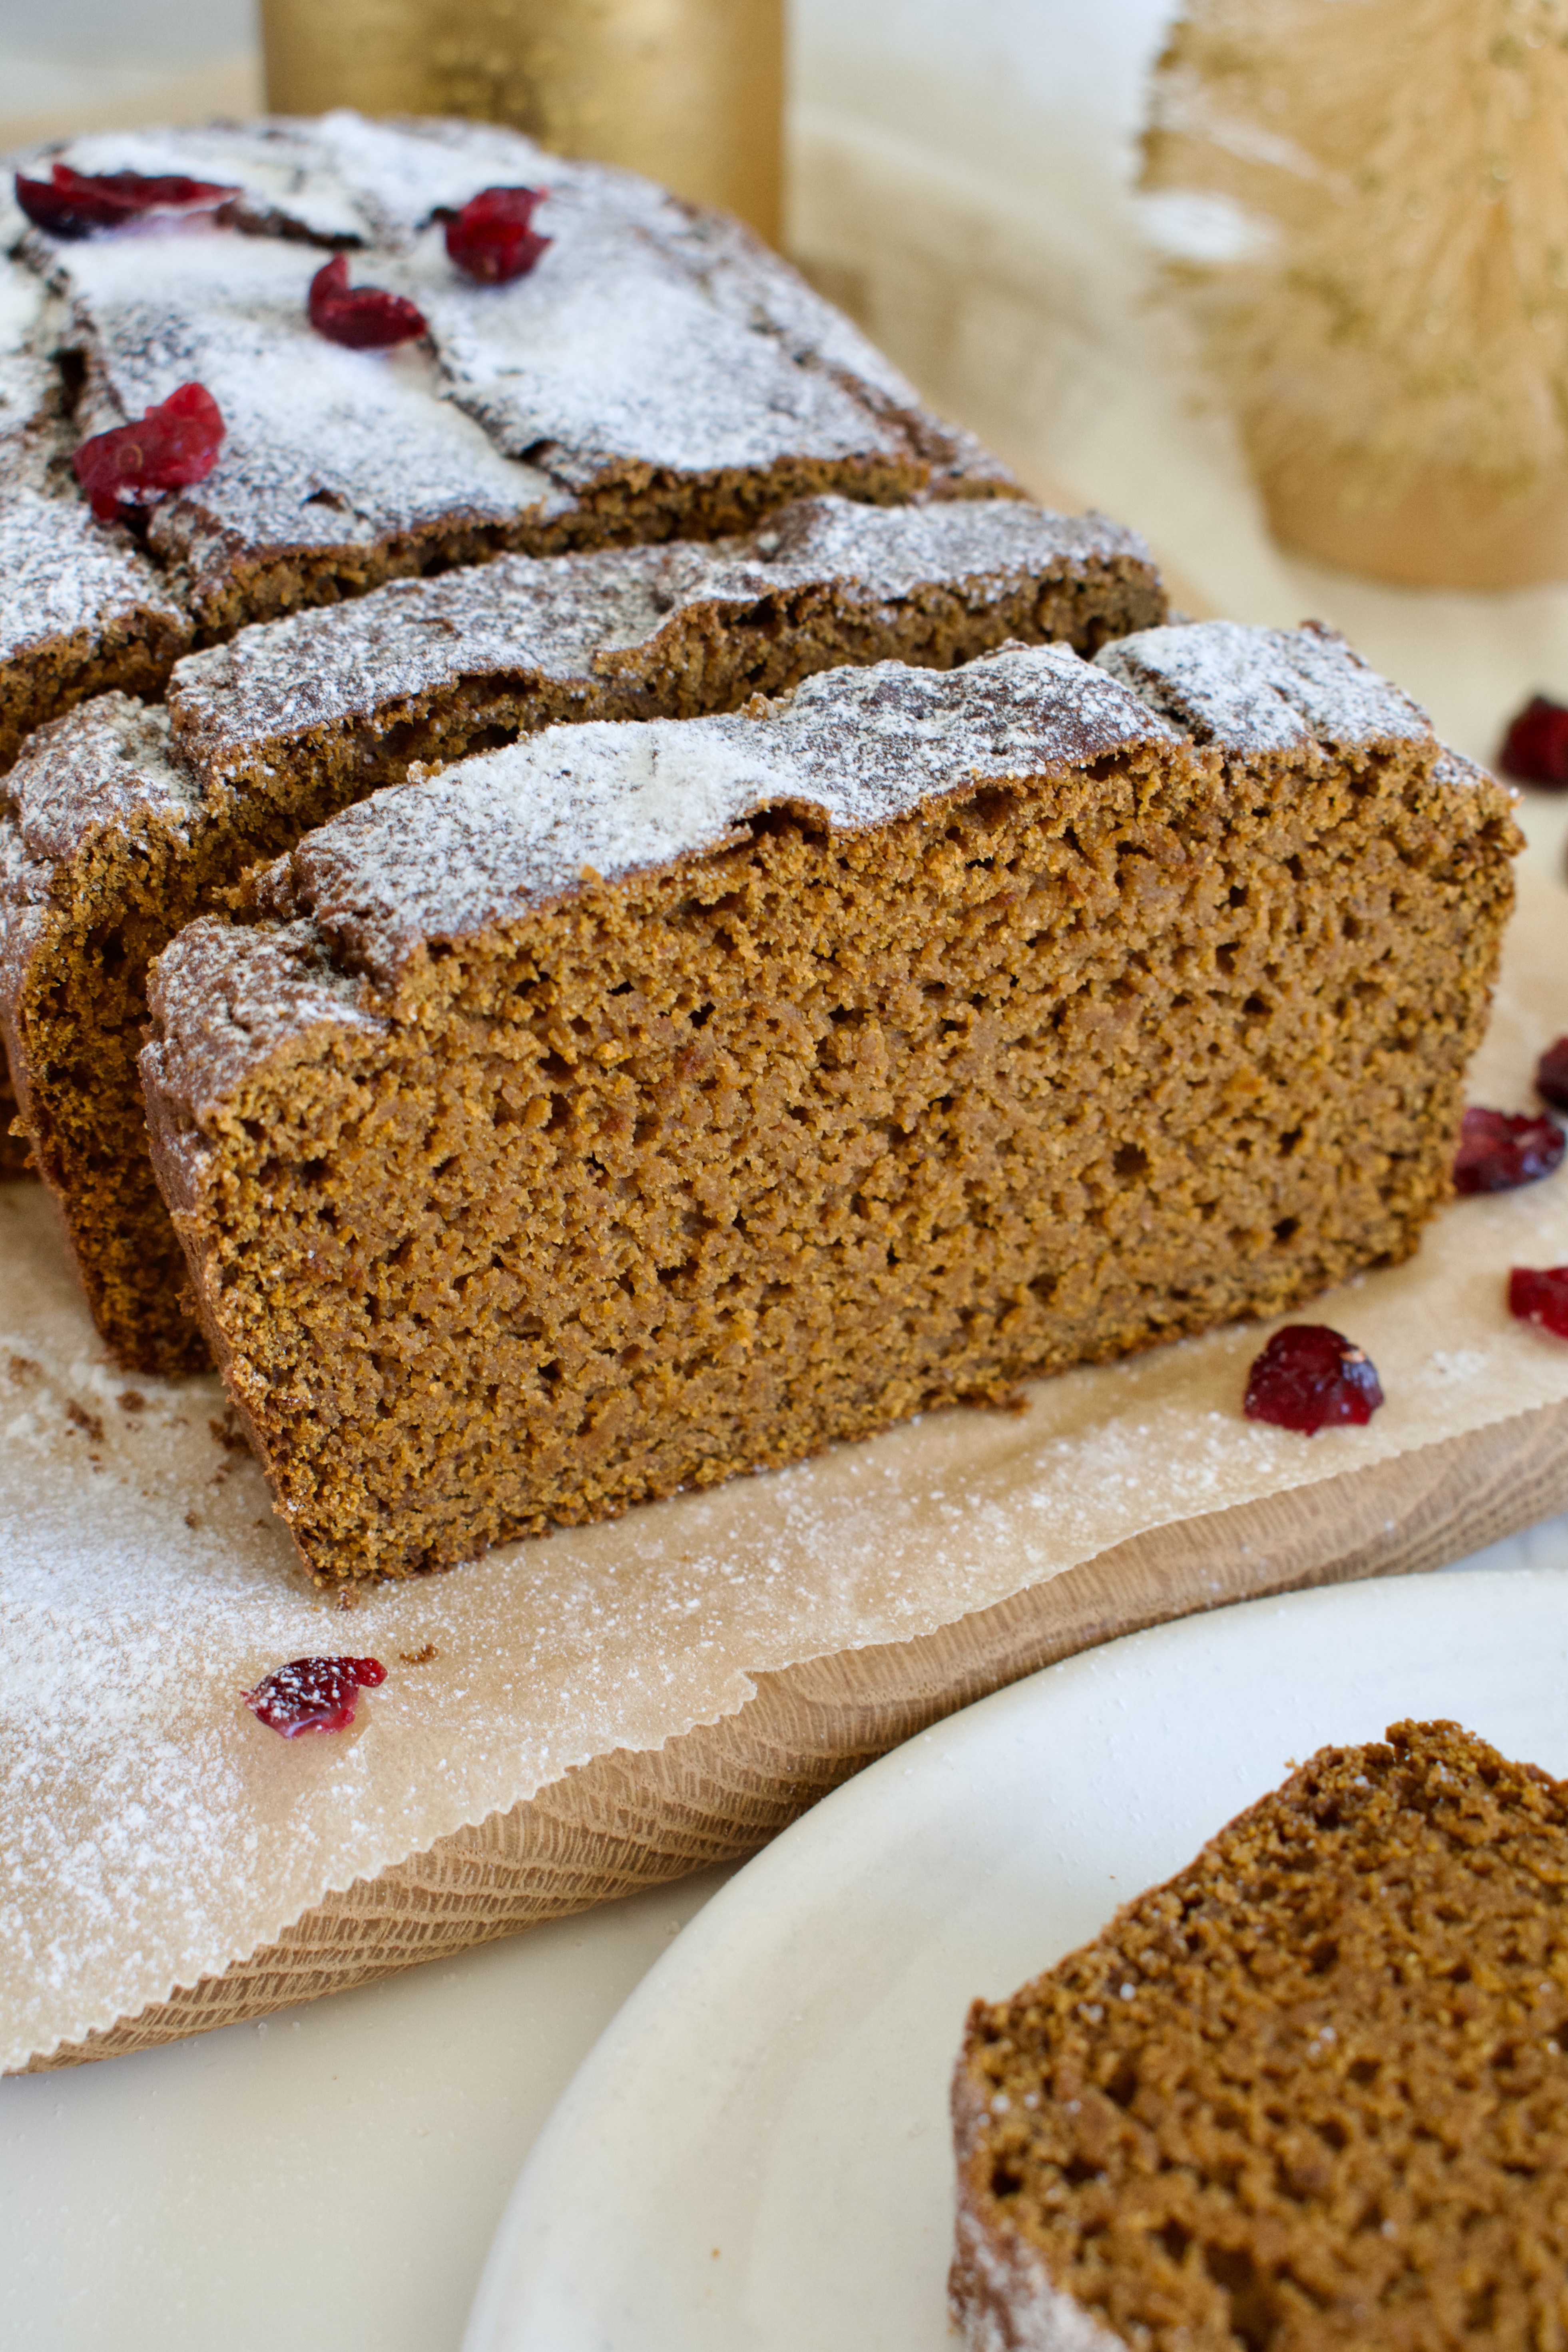
Enjoy the delicious flavors of winter without the gluten, dairy, or refined sugars with this Healthy Gluten Free Pumpkin Gingerbread loaf.
gluten free pumpkin gingerbread loaf
Ginger is one of my favorite winter flavors. Gingersnaps, gingerbread, ginger spice in everything I cook for dinner… I Around Christmas, we are inundated with cookie recipes, so if you also want something a little different, then this pumpkin gingerbread loaf recipe is for you! This healthier gingerbread is completely gluten free, dairy free, and refined sugar free. The gingerbread flavor is complimented with subtle sweetness so it’s not over powering.
This gluten free pumpkin gingerbread is a great option for dessert, Christmas brunch, or just to snack no around the holiday season when you want a healthier sweet treat. The pumpkin keeps this loaf moist and pairs perfectly with the warming spices and molasses in this recipe. Plus, it’s easy to make and bakes up in under an hour.
gluten free and dairy free pumpkin gingerbread loaf
Store this loaf in an airtight container at room temperature for up to 3 days or in the fridge for up to 5 days.
You can also slice and freeze this gingerbread loaf for up to 3 months. I suggest wrapping individual slices in plastic wrap or freezing in a single layer and then transferring to a freezer safe container or bag.
This healthy gluten free pumpkin gingerbread is the perfect winter loaf. Enjoy all the gingerbread flavor without any of the gluten, dairy, or refined sugar.
1/4cupolive oilor melted and cooled butter or coconut oil
1/4cupmolasses
1/3cupmaple syrup
1tspvanilla extract
Instructions
Preheat oven to 350 F. Line a loaf pan with parchment paper and set aside.
Whisk all dry ingredients together in a small bowl and set aside.
Beat the pumpkin and eggs in a large bowl until smooth. Add the remaining wet ingredients and beat until smooth and combined.
Add the dry ingredients to the wet and mix until just combined.
Pour or scoop the batter into the lined loaf pan and use a spatula to smooth out the top.
Bake for ~45 minutes or until a toothpick comes out clean and the top springs to the touch. Let cool for 10 minutes in the loaf pan before removing to finish cooling on a wire rack (grab the edges of the parchment paper to lift the loaf and transfer it).
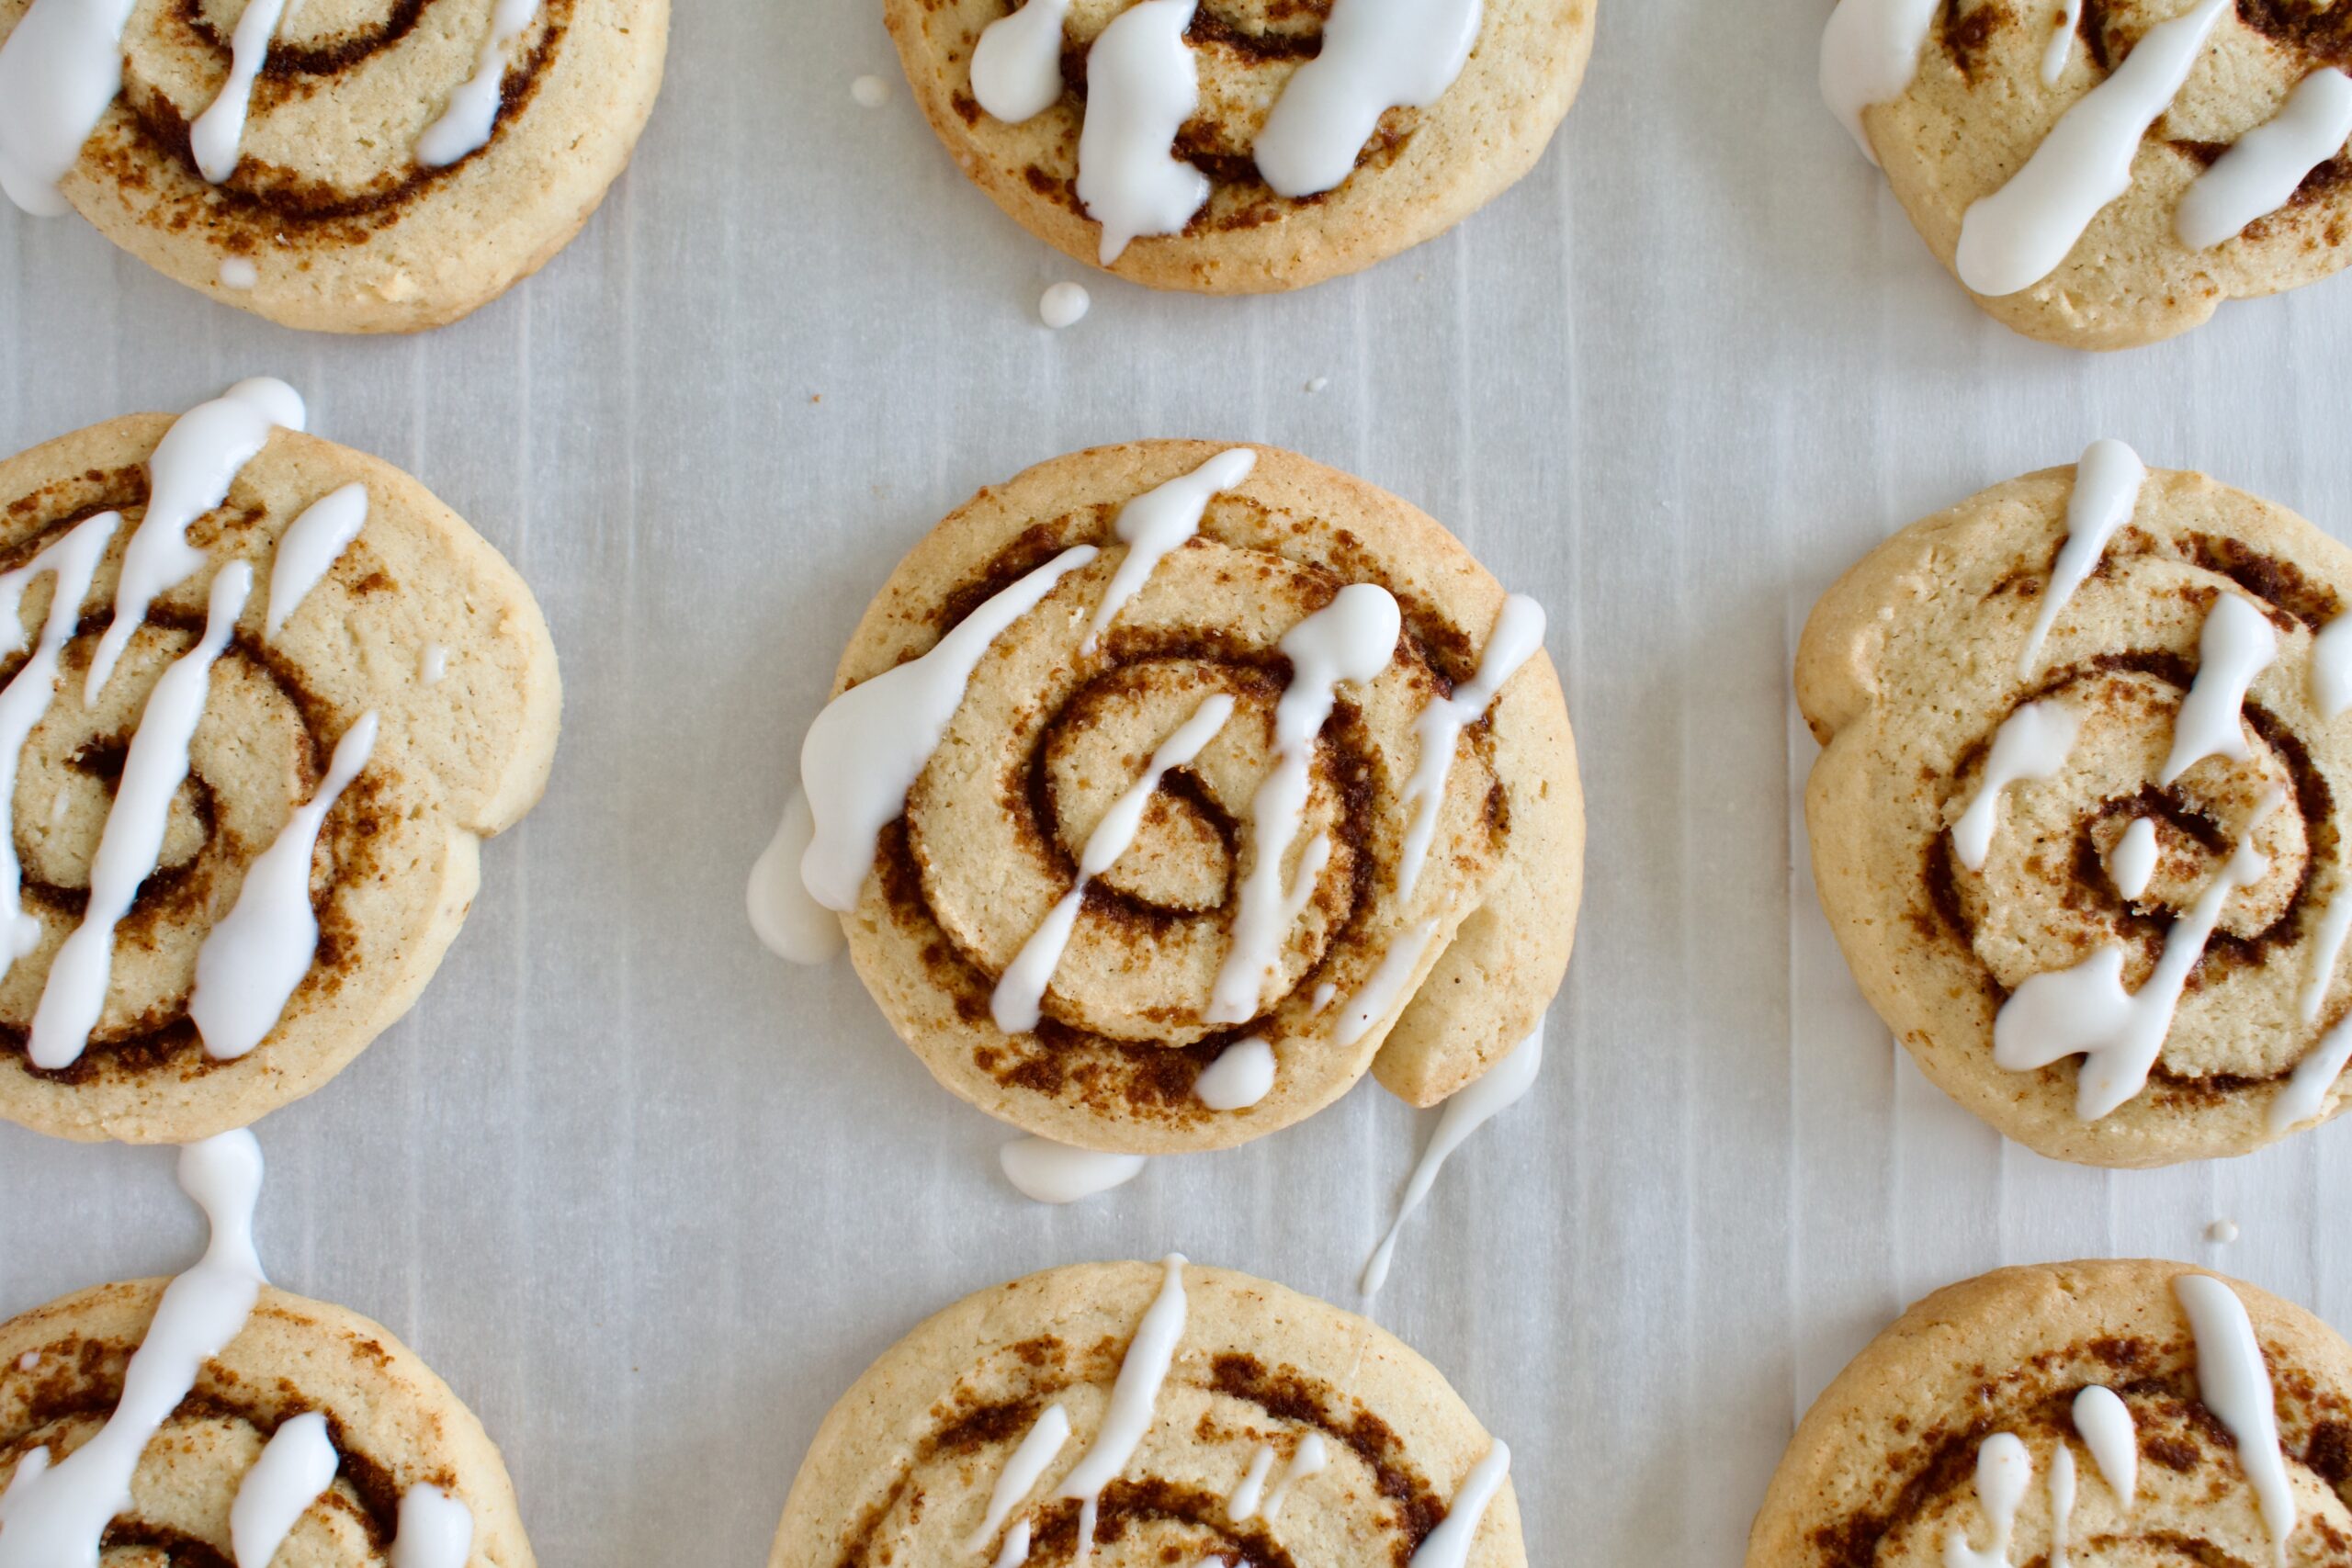
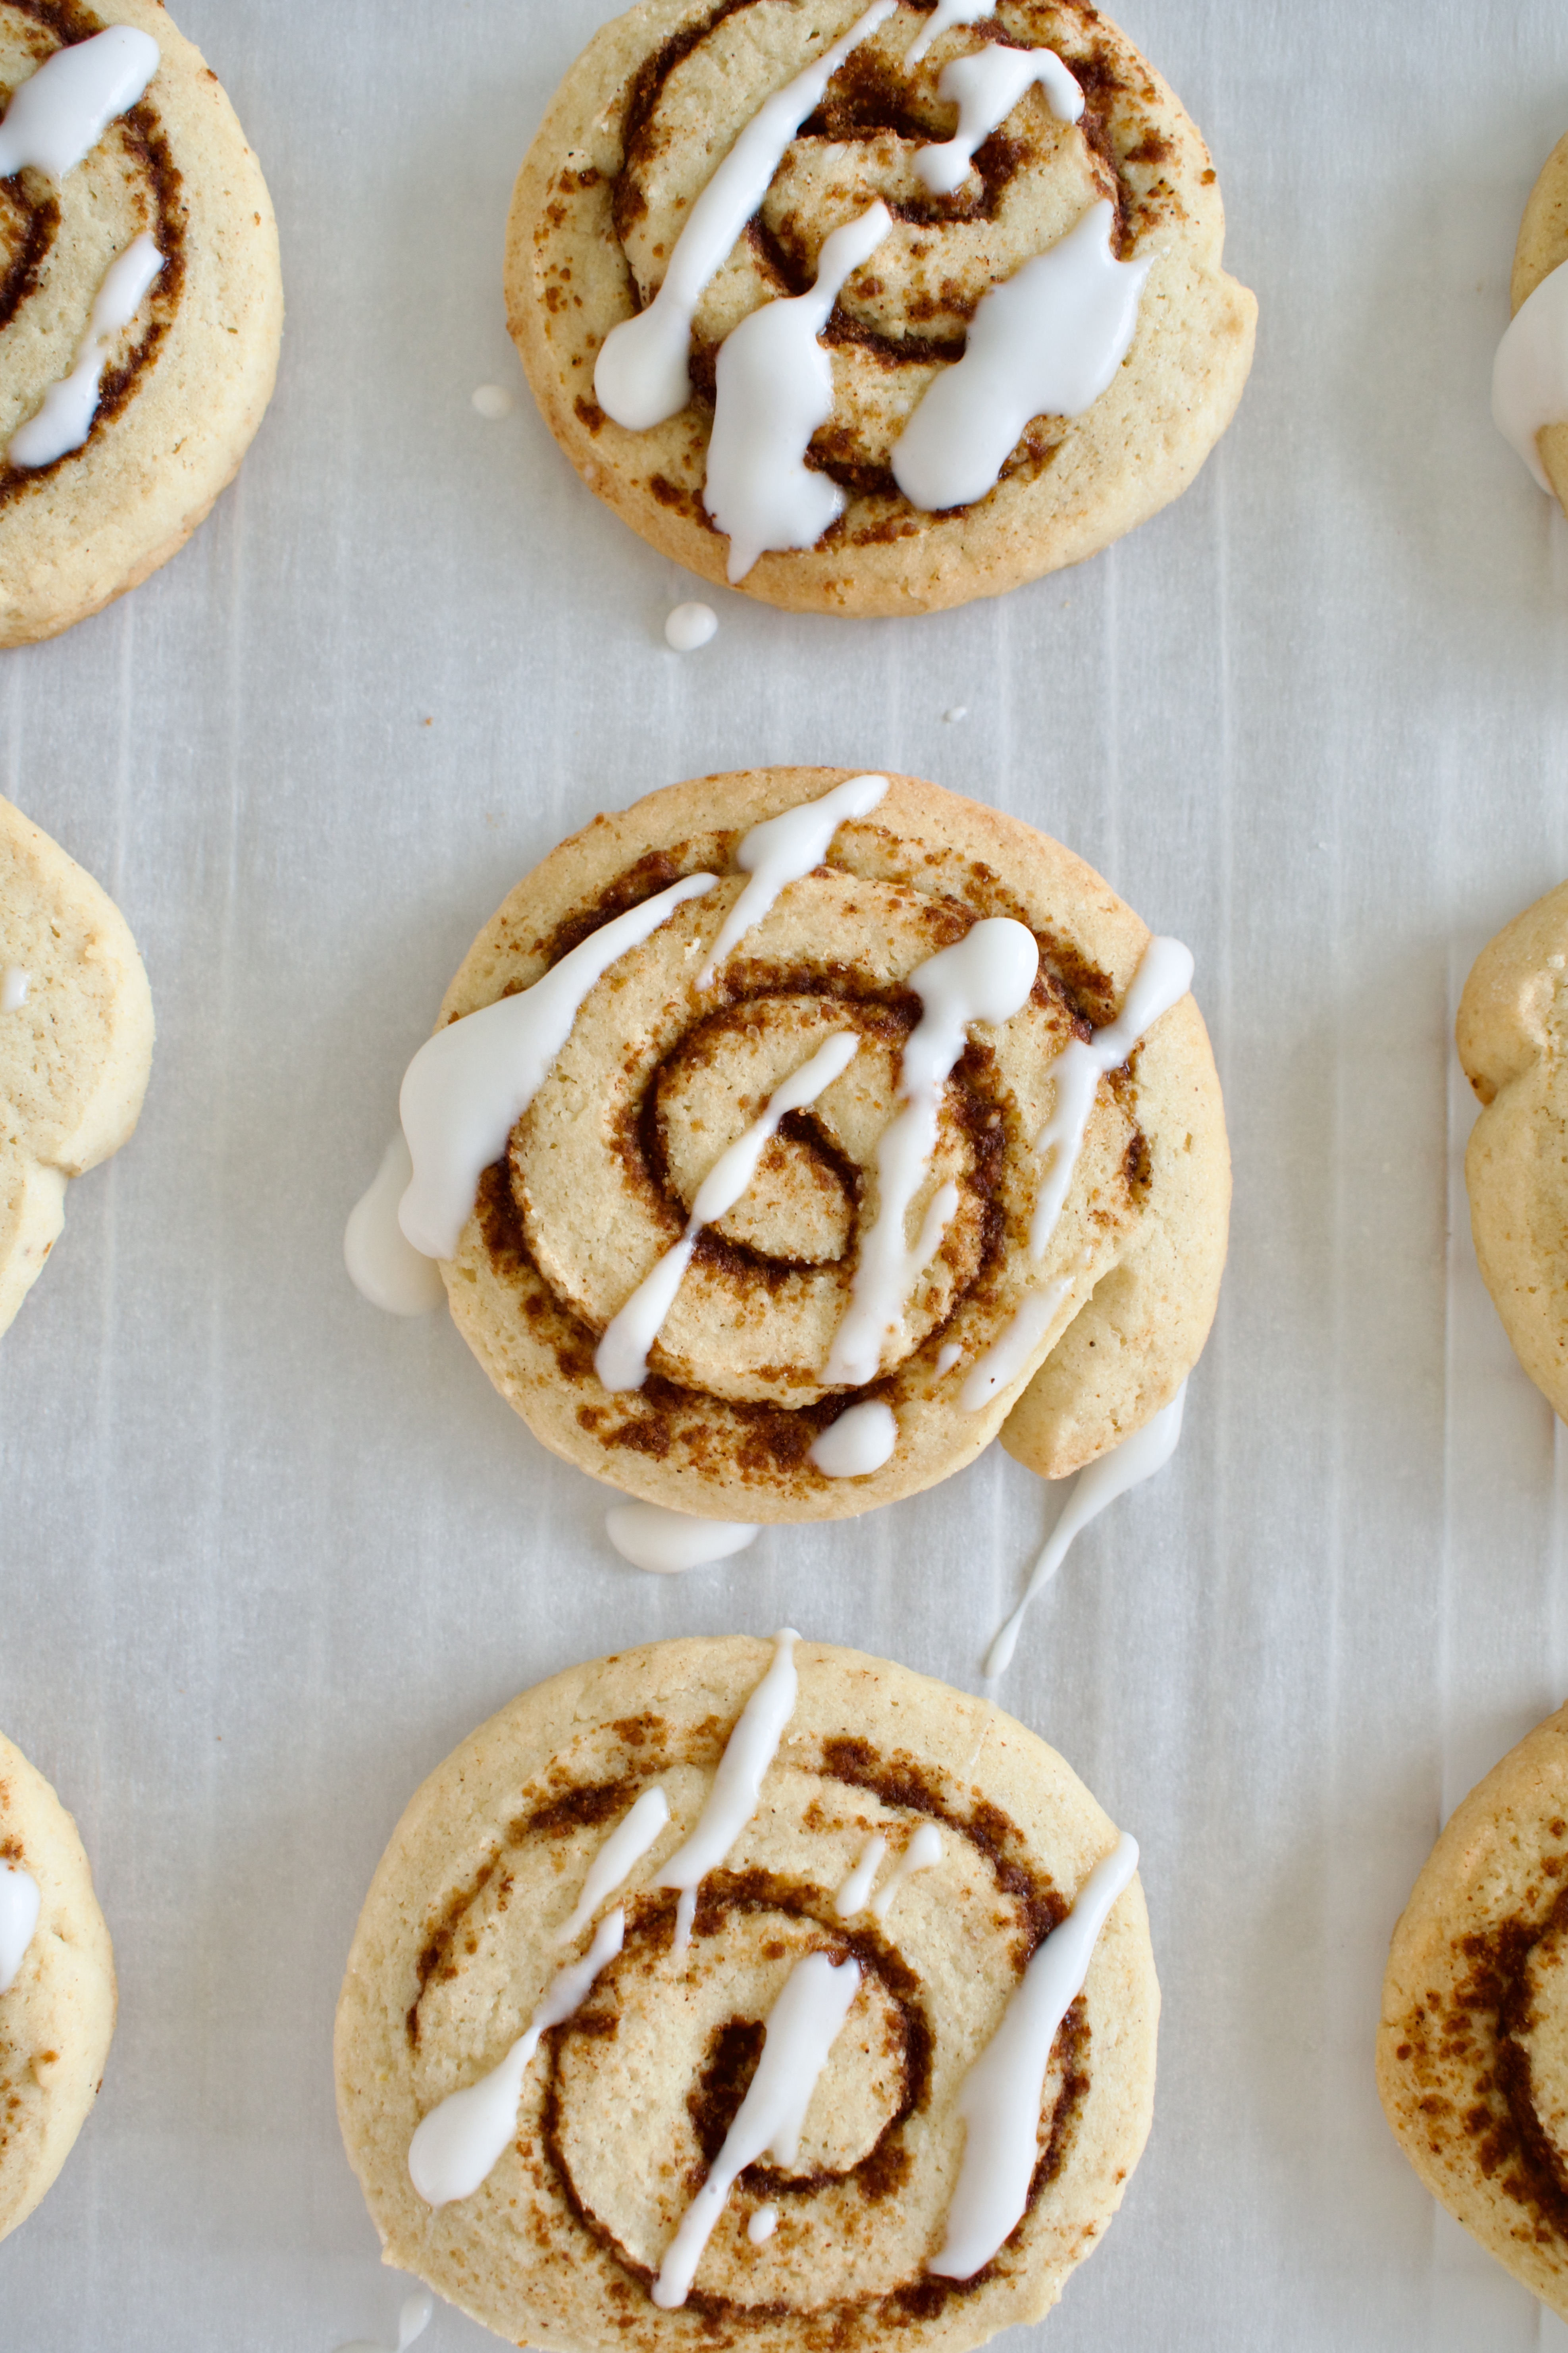
These gluten free Cinnamon Roll Cookies are filled with cinnamon sugar flavor while being far easier to make than a batch of cinnamon rolls.
gluten free cinnamon roll cookies
Craving cinnamon rolls, but don’t want to put in the work to make them? Then you need to make these cinnamon roll cookies! These gluten free cookies are also dairy free and a fraction of the sugar in traditional cinnamon rolls. I love making these around the holidays. They make a great addition to a Christmas cookie box or plate!
Cinnamon rolls require yeast, rise times, perfect temps and more finicky details that are easy to mess up. These cookies are easy to make, taste delicious, and come together in a fraction of the time. Plus, they still have the signature cinnamon sugar swirl! A sugar cookie dough is rolled up with a cinnamon sugar filling and baked for the perfect cinnamon roll in cookie form.
One of my goals with baking is to make allergy friendly and healthier alternatives. My gluten free cinnamon roll cookies contain applesauce to cut down on the fat while still maintaining good flavor and texture. These cookies also call for gluten free flour to keep them gluten free and allergy friendly.
Can I use coconut sugar?
I normally don’t bake with refined sugars like white granulated sugar, but these cookies do call for it. This is for two reasons. First, I find white sugar provides the best texture in the cookie base. I have tested this recipe many times with coconut sugar and it’s just not quit the same. Second, white sugar allows for the definition between cookie and filling. Using coconut sugar will result in an all brown cookie.
Can you use coconut sugar, though? Yes, the cookies will bee a little puffier and drier and not as visually appealing, but you can technically get away with it.
gluten free and dairy free cinnamon roll cookies
How to store these cinnamon roll cookies
You can store the cut, pre-baked cookies in the freezer for up to 3 months and bake only a few at a time when ready. Just follow steps 1-9, but don’t bake them. Freeze in a single layer in a freezer safe bag or container.
Once baked and cooled, store in an airtight container unfrosted for up to 5 days, or frosted in the fridge. Alternatively, you can freeze the baked cookies (unfrosted) in the freezer for up to 3 months.
Cinnamon rolls in cookie form! These easy cookies are gluten free and dairy free, packed with cinnamon sugar flavor, and take half the time and effort to make. If you love cinnamon rolls, you'll love this cookie version.
Beat sugar and coconut oil until smooth. Add in the applesauce, egg, and vanilla and beat until combined.
Add the dry ingredients and mix on low until the dough comes together. Use paddle attachment on a stand mixer.
Gather the dough into a ball and refrigerate dough for 1-3 hours. The dough should be firm, but pliable when ready to bake. If it is too hard, let sit at room temperature for 10-20 minutes as needed.
When ready to bake, mix together the filing ingredients in a small bowl and set aside.
Preheat oven to 350F. Line baking sheets with parchment paper.
Flour a large square of parchment paper and roll out the dough on it to roughly a 9×9-10×8 rectangle.
Spread the cinnamon-sugar filling evenly over the dough.
Use the parchment paper to help you start the rolling process and roll into a tight log. If the dough feels like it has gotten to warm and soft, pop in the freezer for a few minutes to harden up before cutting.
Cut the log in 1/2 inch increments. Place 2 inches apart on a baking sheet and bake for 12-14 minutes, until edges are golden.
Let cook on baking sheet for 5-10 minutes before transferring to a wire rack to finish cooling.
While cookies cool, make the icing by mixing everything together until you have a smooth, runny glaze.
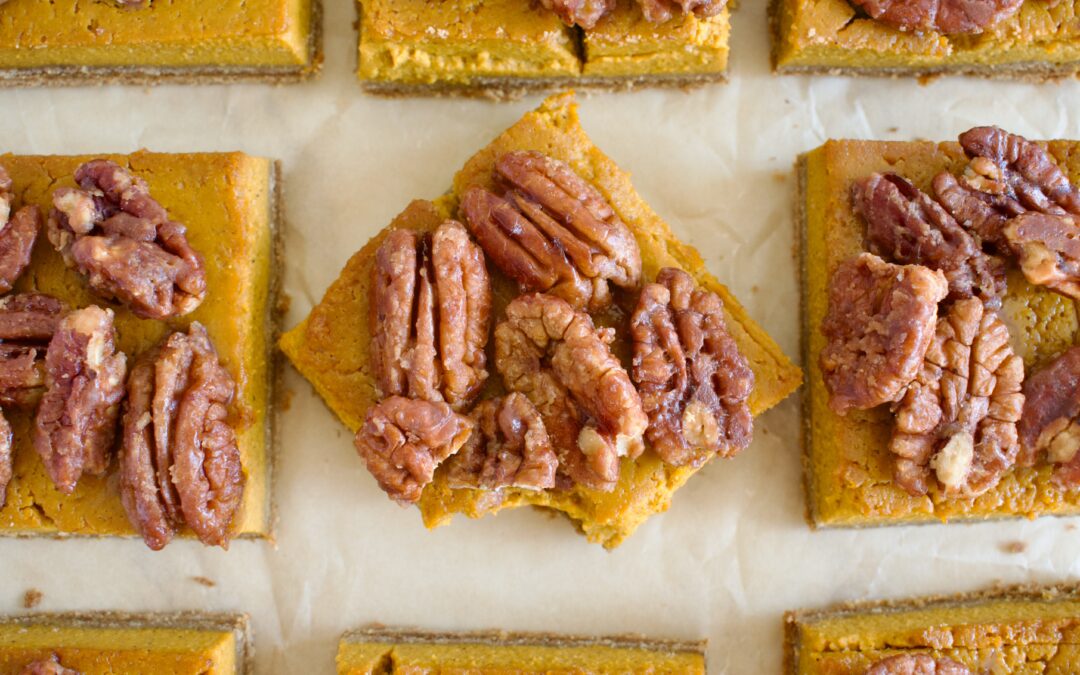
These healthier Pumpkin Pie Bars with Caramelized Pecans are an easy way to impress this holiday season. Gluten free, dairy free, and refined sugar free, these bars have a gingerbread crust, healthy pumpkin filling, and are topped with maple glazed pecans.
gluten free pumpkin pie bars with caramelized pecans
I know that baking a pie is daunting. Getting the crust just right always feels like a gamble. So that’s why I created this pumpkin pie bar recipe for you. There’s not flaky pie crust to contend with, just a super simple and easy base to these bars. I did want to make them a little more decadent and exciting by adding the maple caramelized pecans on top which elevate this recipe with very little extra work.
This recipe is perfect for Thanksgiving since it’s easy to make, but will be sure to impress. The gingerbread crust takes about 5 minutes to whip up and the entire filling is made in a blender or food processor making this recipe super simple!
gluten free pumpkin pie bars with caramelized pecans
Pumpkin Pie Bars with Caramelized Pecans
My goal is always to make healthier and allergy friendly, but still delicious, desserts for every occasion and holiday. These pumpkin pie bars are just that and let me tell you why!
Crust
The crust is made of a combination of gluten free flour, tigernut flour (or almond) and tapioca starch. I use tigernut flour because it is a nut free alternative as someone who is allergic to almond flour. But almond flour and tigernut flour are interchangeable! This flour combination keeps the crust gluten free and allergy friendly.
You will add coconut oil or butter, maple syrup, and molasses to bring the dough together. The molasses is what gives the crust the gingerbread flavor which goes perfectly with the pumpkin, so this is definitely important!
Pumpkin Filling
The pumpkin filling is extremely easy. You just blend everything together in a food processor or blender!
Yogurt is what gives these bars their creaminess and you can use whatever yogurt you desire. I use a vegan coconut yogurt to keep these pumpkin bars dairy free. If you don’t have yogurt or don’t want to use it, you can always use the cream off the top of a full fat coconut milk can. Just be sure to put the can in the fridge the night before to set! Many pumpkin pie fillings call for condensed milk, but yogurt is a healthier alternative that is just as delicious in this recipe.
Pecan Topping
Making caramelized pecans is super easy and only takes 10 minutes (plus cooling time). We are using maple syrup in this recipe for two reasons. First, it keeps the recipe refined sugar free. Second, the maple flavor is a really nice compliment to pumpkin. There are only two tablespoons of maple syrup which adds sweetness without being sickeningly sweet.
You just add the pecans, maple syrup, and coconut oil to a pan and stir until the pecans are toasted and sugar is caramelized then let them cool! You’ll want to keep an eye on the pecans so they don’t burn and keep stirring frequently. They should smell fragrant when done without any burnt smell. If you start to smell burning, pull them off the heat immediately.
gluten free and dairy free pumpkin pie bars with caramelized pecans
How to store pumpkin pie bars
Keep these gluten free pumpkin pie bars stored in the fridge for up to 5 days. If you are keeping them in the original baking dish, cover with tinfoil or plastic wrap. Alternatively, you can transfer the cut bars to an airtight container.
Gluten Free Pumpkin Pie Bars with Caramelized Pecans
These Pumpkin Pie Bars with Caramelized Pecans are an easy way to impress during the holidays. This fall recipe is fully gluten free, dairy free, and refined sugar free. A gingerbread crust is filled with an easy pumpkin pie filling and topped with maple caramelized pecans.
Line a 8×8 or 9×9 baking dish with parchment paper.
Whisk together the dry ingredients for the crust (flours, starch, cinnamon). Add the wet ingredients and mix until combined and you have a dough that holds together.
Press the crust into the bottom of your baking dish and up the sides just slightly.
Bake for 12 minutes then remove and let cool while you make the filling.
Combine all ingredients for the pumpkin filling in a blender or food processor and blend to combine. Alternatively, add everything to a bowl and beat on medium to combine.
Pour the filling over the crust and bake for 60-70 minutes, until a toothpick come out clean in the center. There should be a slight jiggle, but the filling should be set.
Let the bars cool completely then place in the fridge overnight to set.
Pecans
You can make these whenever, but you will not add them to the top of the bars until ready to serve.
Line a large baking pan or plate with parchment paper and set aside.
Add all ingredients for the pecans to a pan and heat on medium heat stirring frequently until the pecans are toasted and the sugar is caramelized. This takes about 7-10 minutes and the pecans should be fragrant, but not burning!
Pour the pecans onto your baking pan and separate them so they don't stick together. Let them cool. As they cool, they will harden.
Once cooled, you can wipe off some of the excess liquid/fat and store them in an airtight container in the fridge.
Assembly
When ready to serve, distribute the pecans evenly over the pumpkin bars and cut (or cut and then add them to each bar in a pattern you desire). Enjoy!
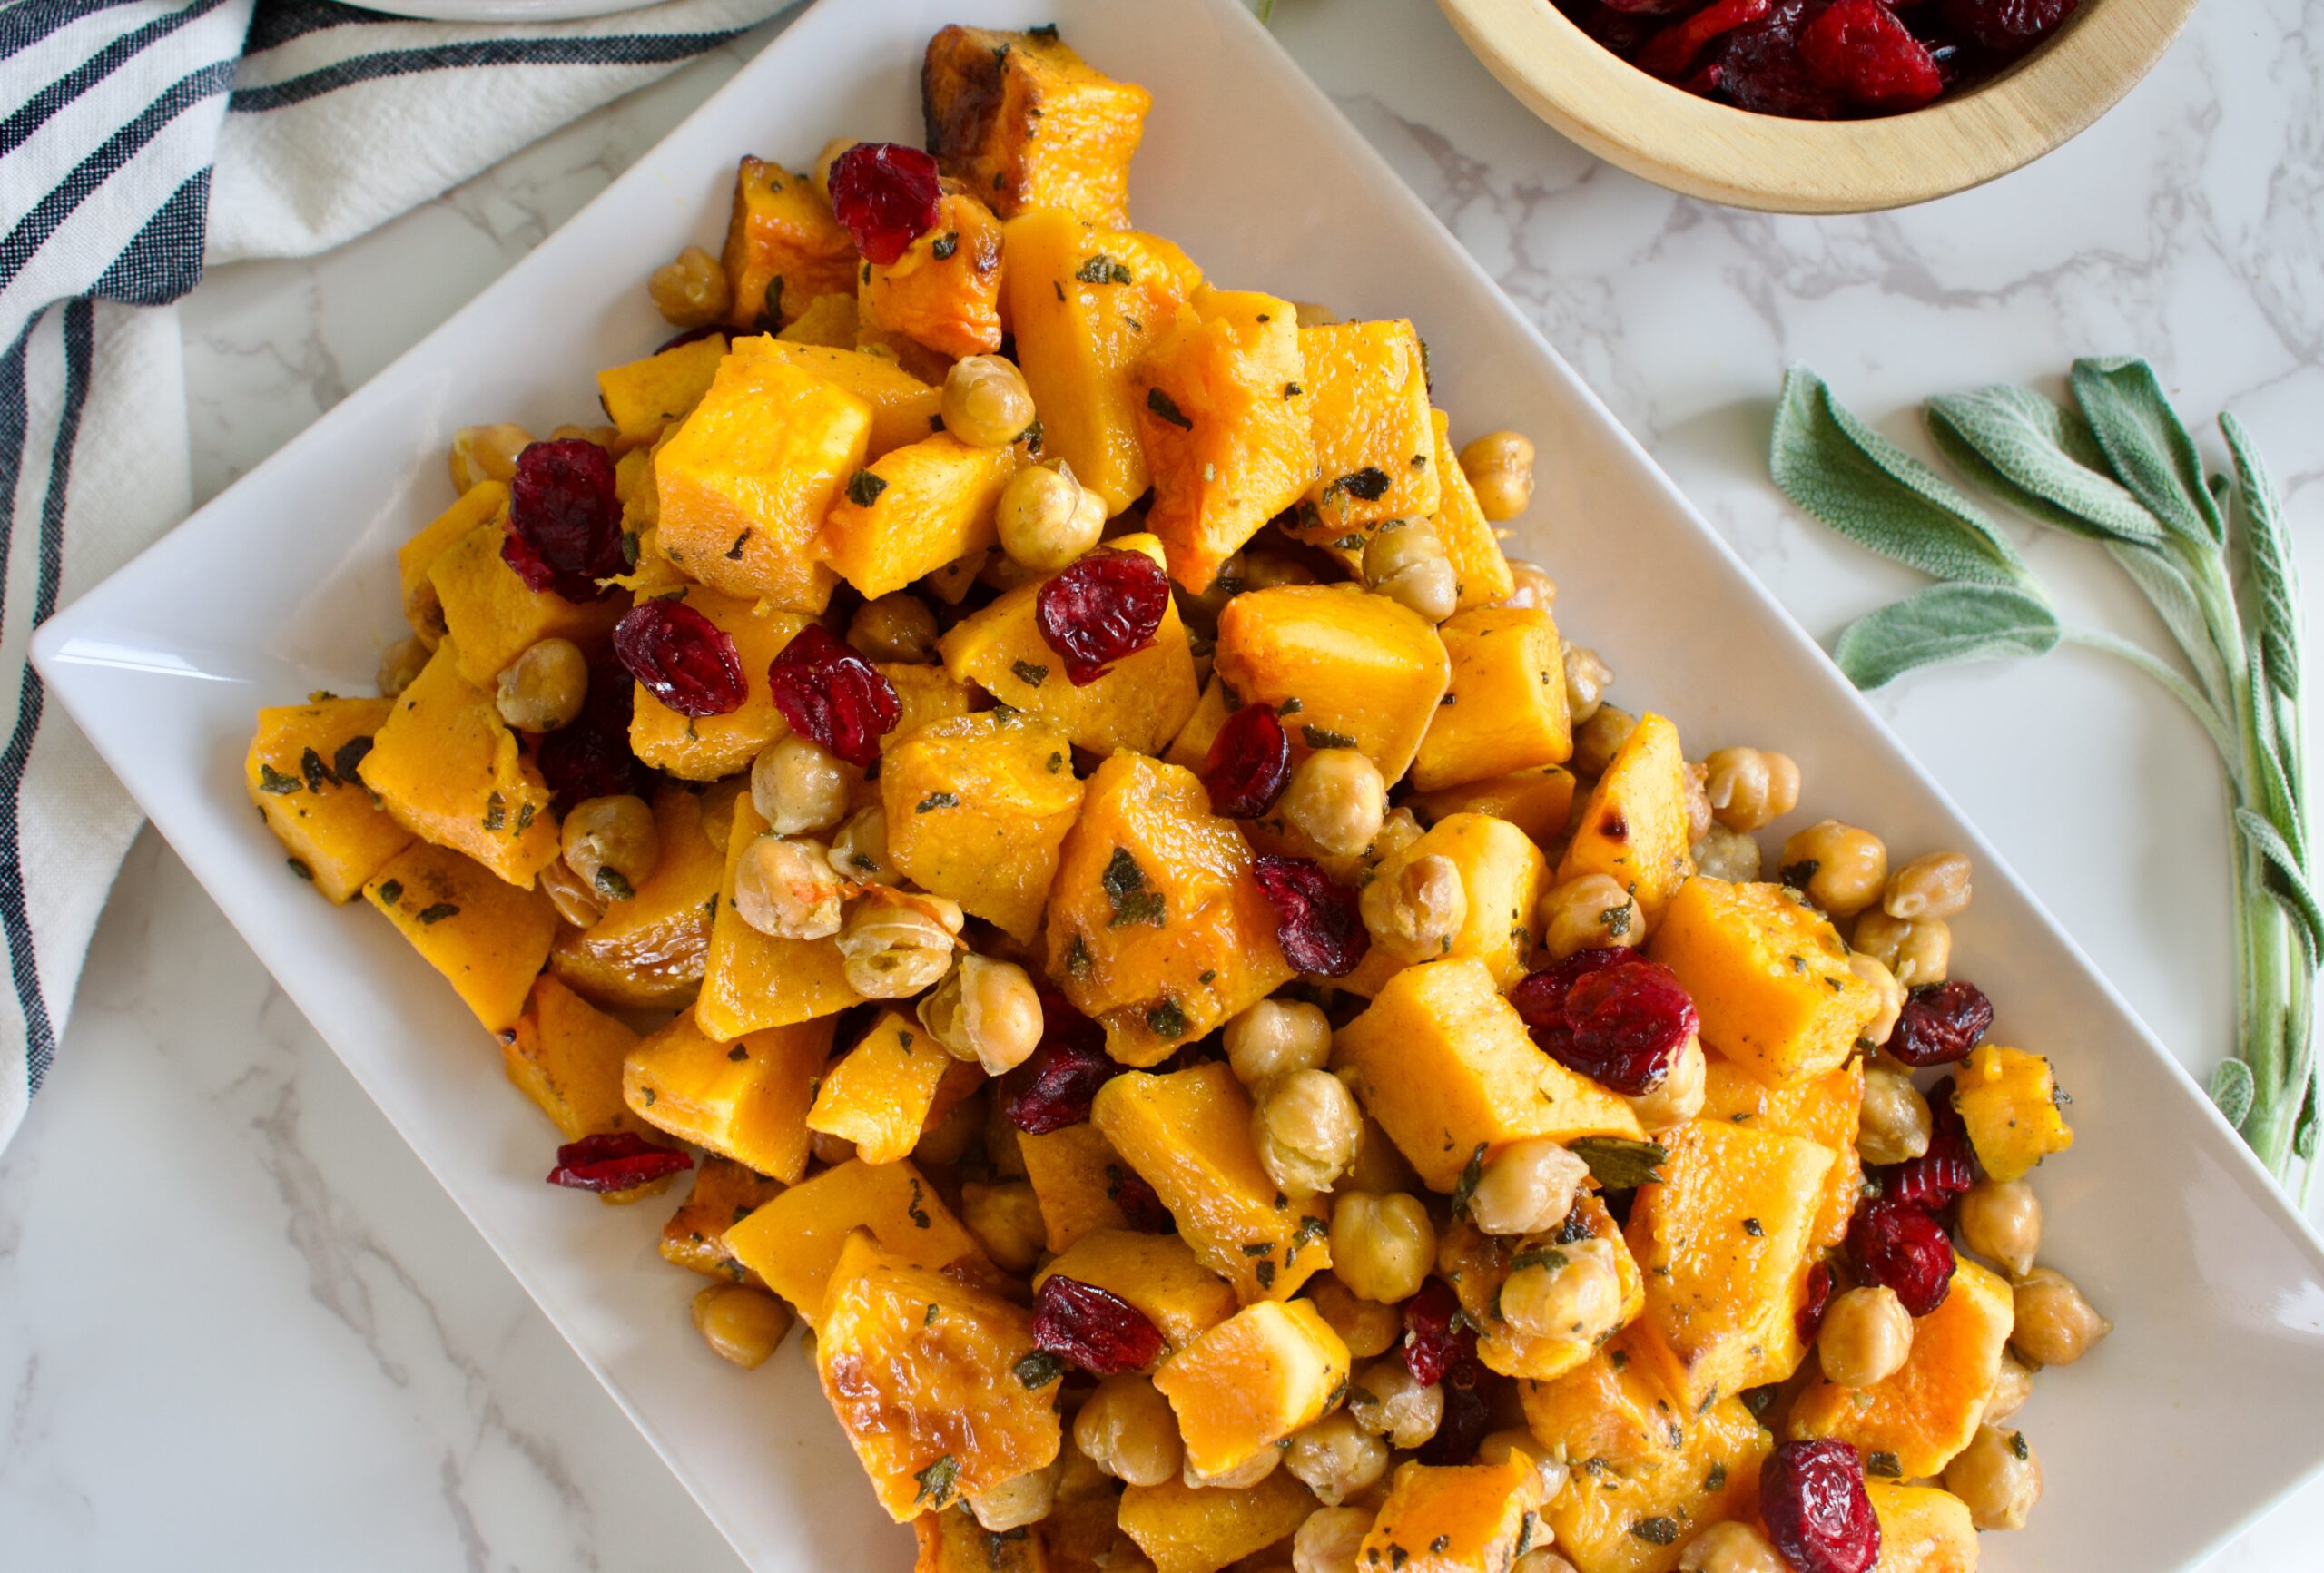
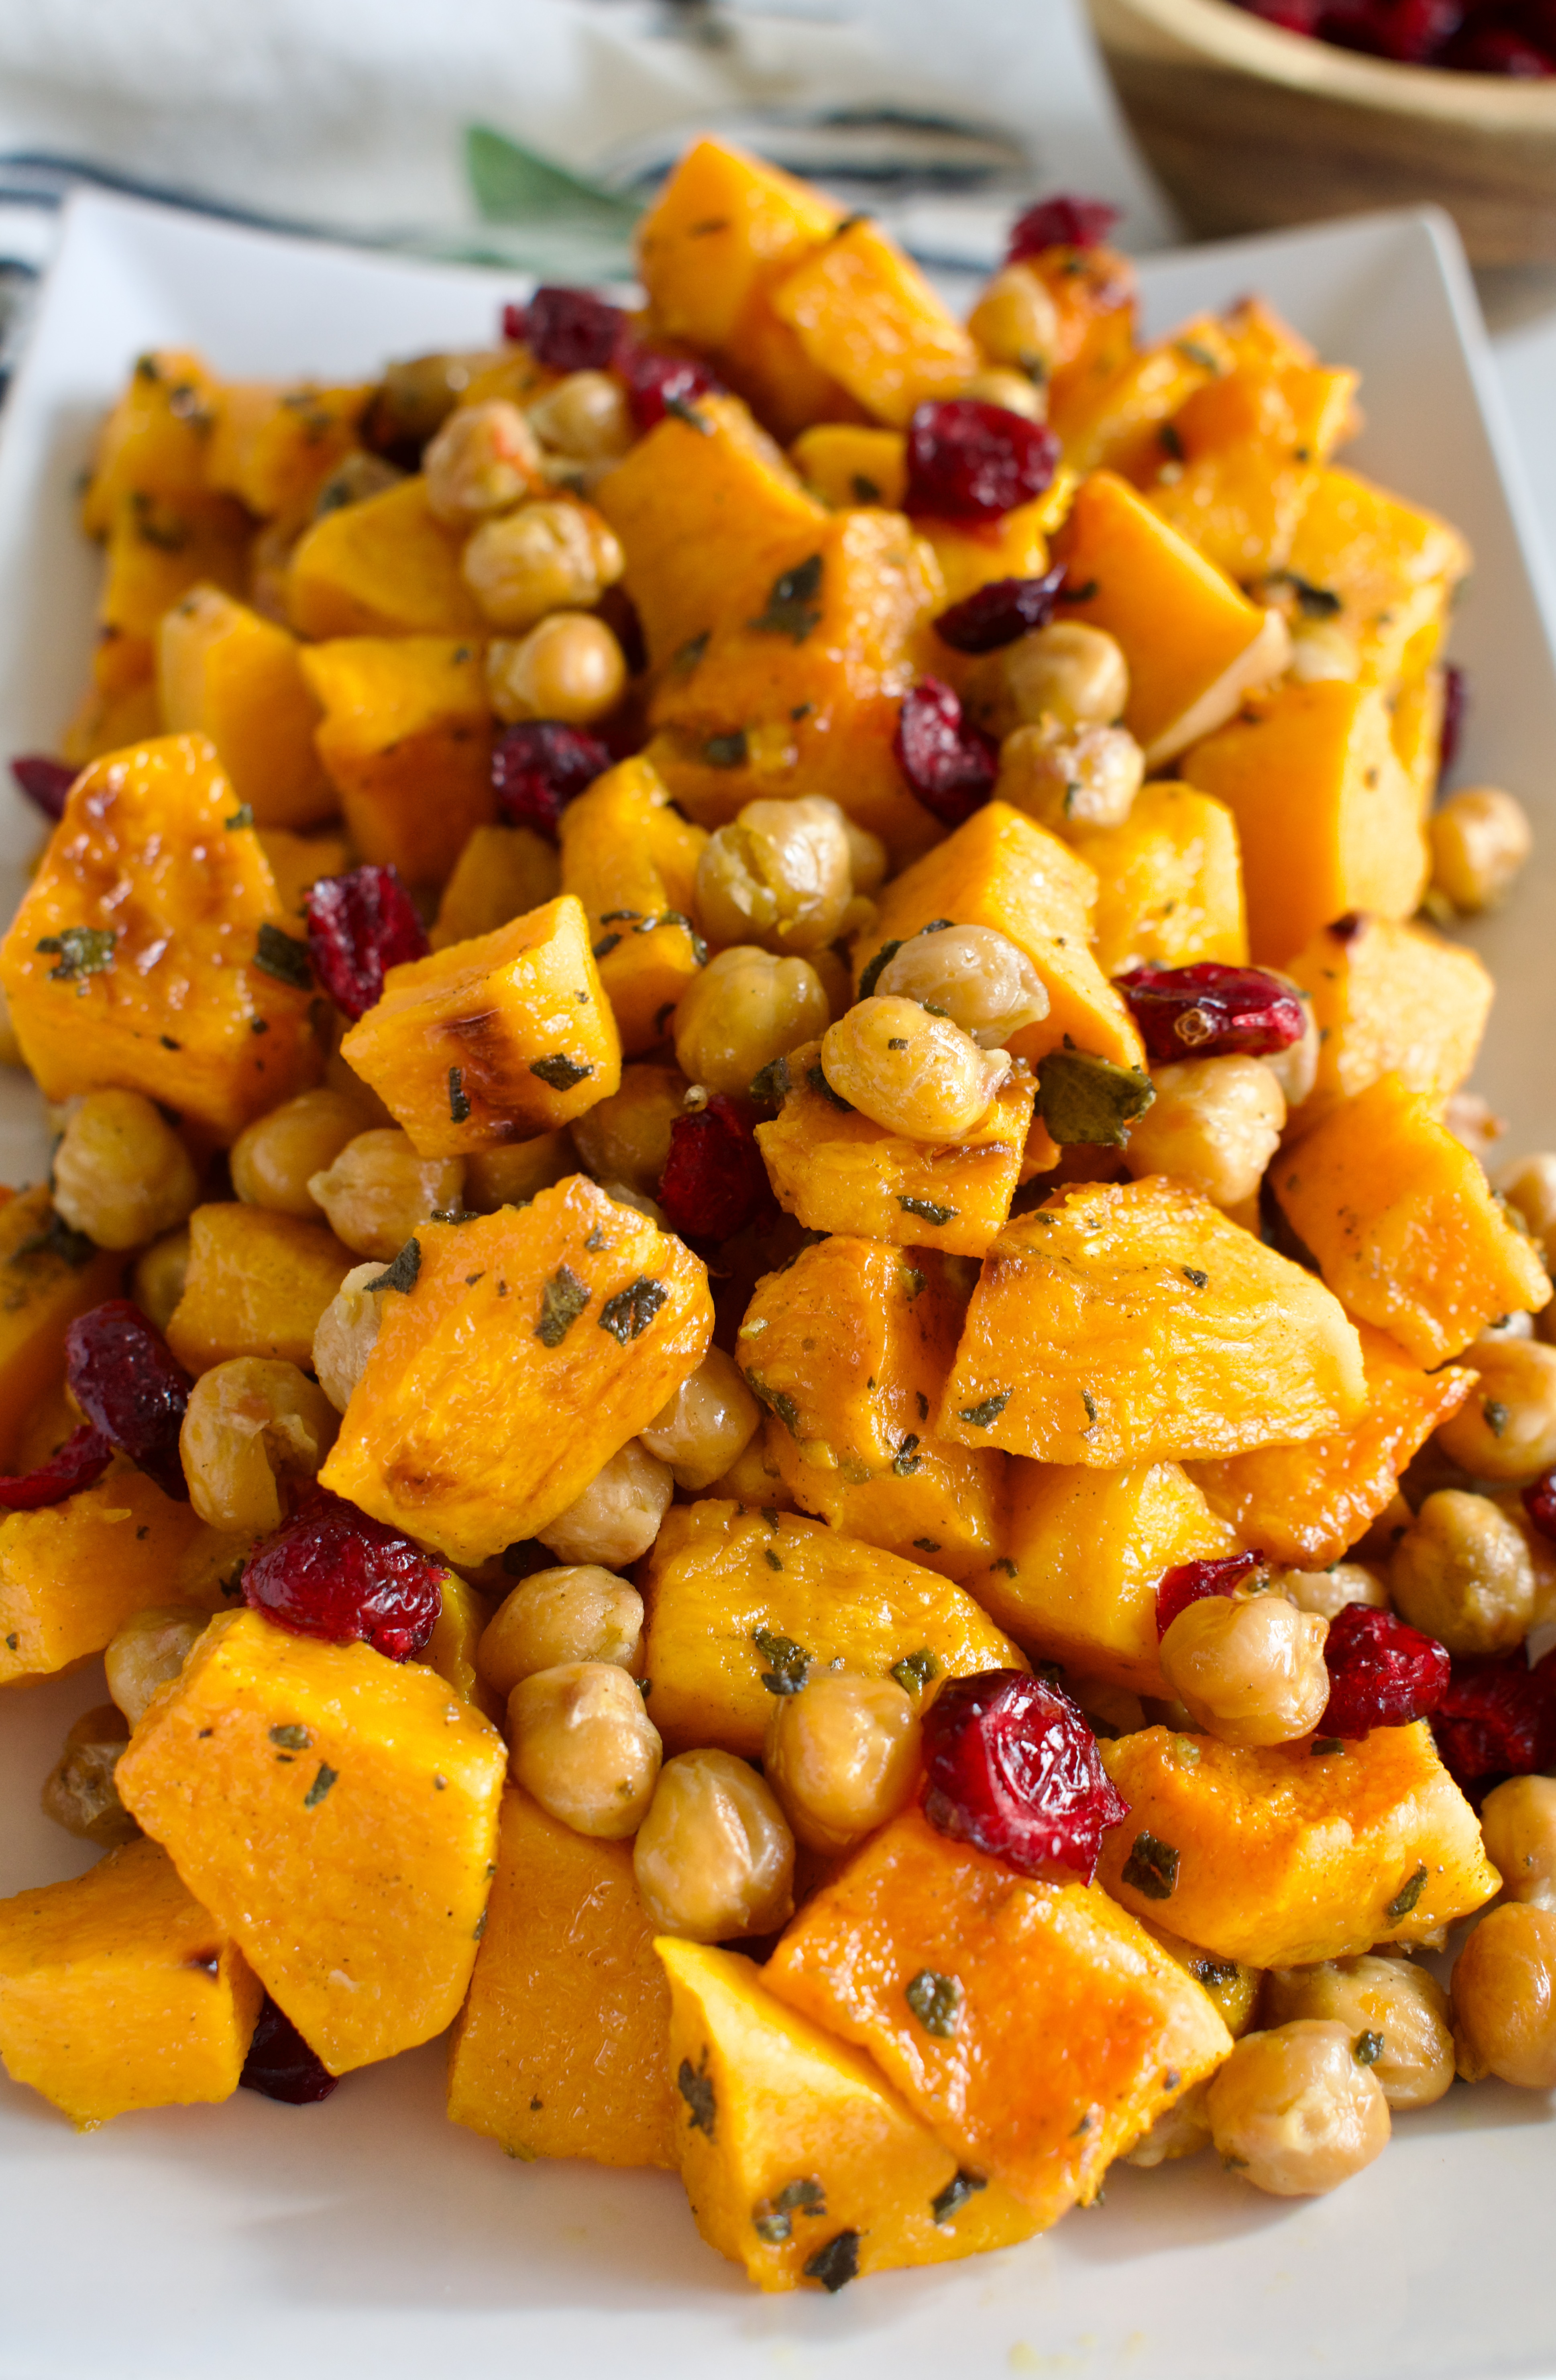
This Sage Roasted Butternut Squash with Chickpeas tastes like Thanksgiving in a bite! It’s a delicious gluten free and vegan side dish option for the holidays.
gluten free and vegan sage roasted butternut squash with chickpeas and cranberries
Butternut squash is my favorite winter root vegetable and I love creating new recipes with it every year. This year, I knew I wanted to develop some delicious and easy side dish recipes for the holidays. Sage and butternut squash are a classic combo, so I knew I wanted to take this basic dish up a notch.
This butternut squash recipe calls for the addition of chickpeas for crunch and cranberries for depth of flavor. This side dish is the perfect mix of sweet and salty with soft and crunchy mouth feel. Plus, since it’s vegan, it’s the perfect addition to a holiday spread as it will satisfy the meat eaters and non-meat eaters alike.
gluten free and vegan sage roasted butternut squash with chickpeas and cranberries
How to make sage roasted butternut squash with chickpeas
Ingredients
Butternut squash, peeled and diced
Chickpeas, rinsed and drained
Olive oil
Fresh sage leaves, minced
Salt
Dried, sweetened cranberries
Instructions
Preheat oven to 425F.
Roast everything but the cranberries.
Toss the cooked squash with the cranberries and enjoy!
gluten free and vegan sage roasted butternut squash with chickpeas and cranberries
Can I make this dish ahead of time?
This roasted butternut squash dish tastes best fresh when the chickpeas are crispy. I highly suggest making this recipe as close to serving time as possible.
How to store and serve leftovers?
If you have leftovers, store in an airtight container in the fridge for up to 5 days. The chickpeas will soften, but it’s still yummy! Warm leftovers in the oven on a low temperature.
gluten free and vegan sage roasted butternut squash with chickpeas and cranberries
This delicious sage roasted butternut squash side dish tastes just like the holidays in one bite! Filled with soft butternut squash, crunchy chickpeas, and sweet cranberries, everyone will love this side dish. It's fully gluten free and vegan too!
1largebutternut squash, peeled and diced(you should have about 4-6 cups of cubed squash)
1canchickpeas, rinsed and drained
2Tbspolive oil
2Tbspfresh sage leaves, mincedabout 12 leaves
1tspsaltI like using flaky sea salt
1/3cupdried, sweetened cranberries
Instructions
Preheat oven to 425F.
Peel and dice your butternut squash into bite sized cubes.
Mix the squash, chickpeas, oil, sage and salt together on a parchment lined baking sheet so the squash and chickpeas are evenly covered with the oil and seasonings.
Roast for 45-55 minutes, until chickpeas are crispy and squash is golden and cooked through.
Let cool for 5 minutes before transferring to a serving dish and tossing with the cranberries.
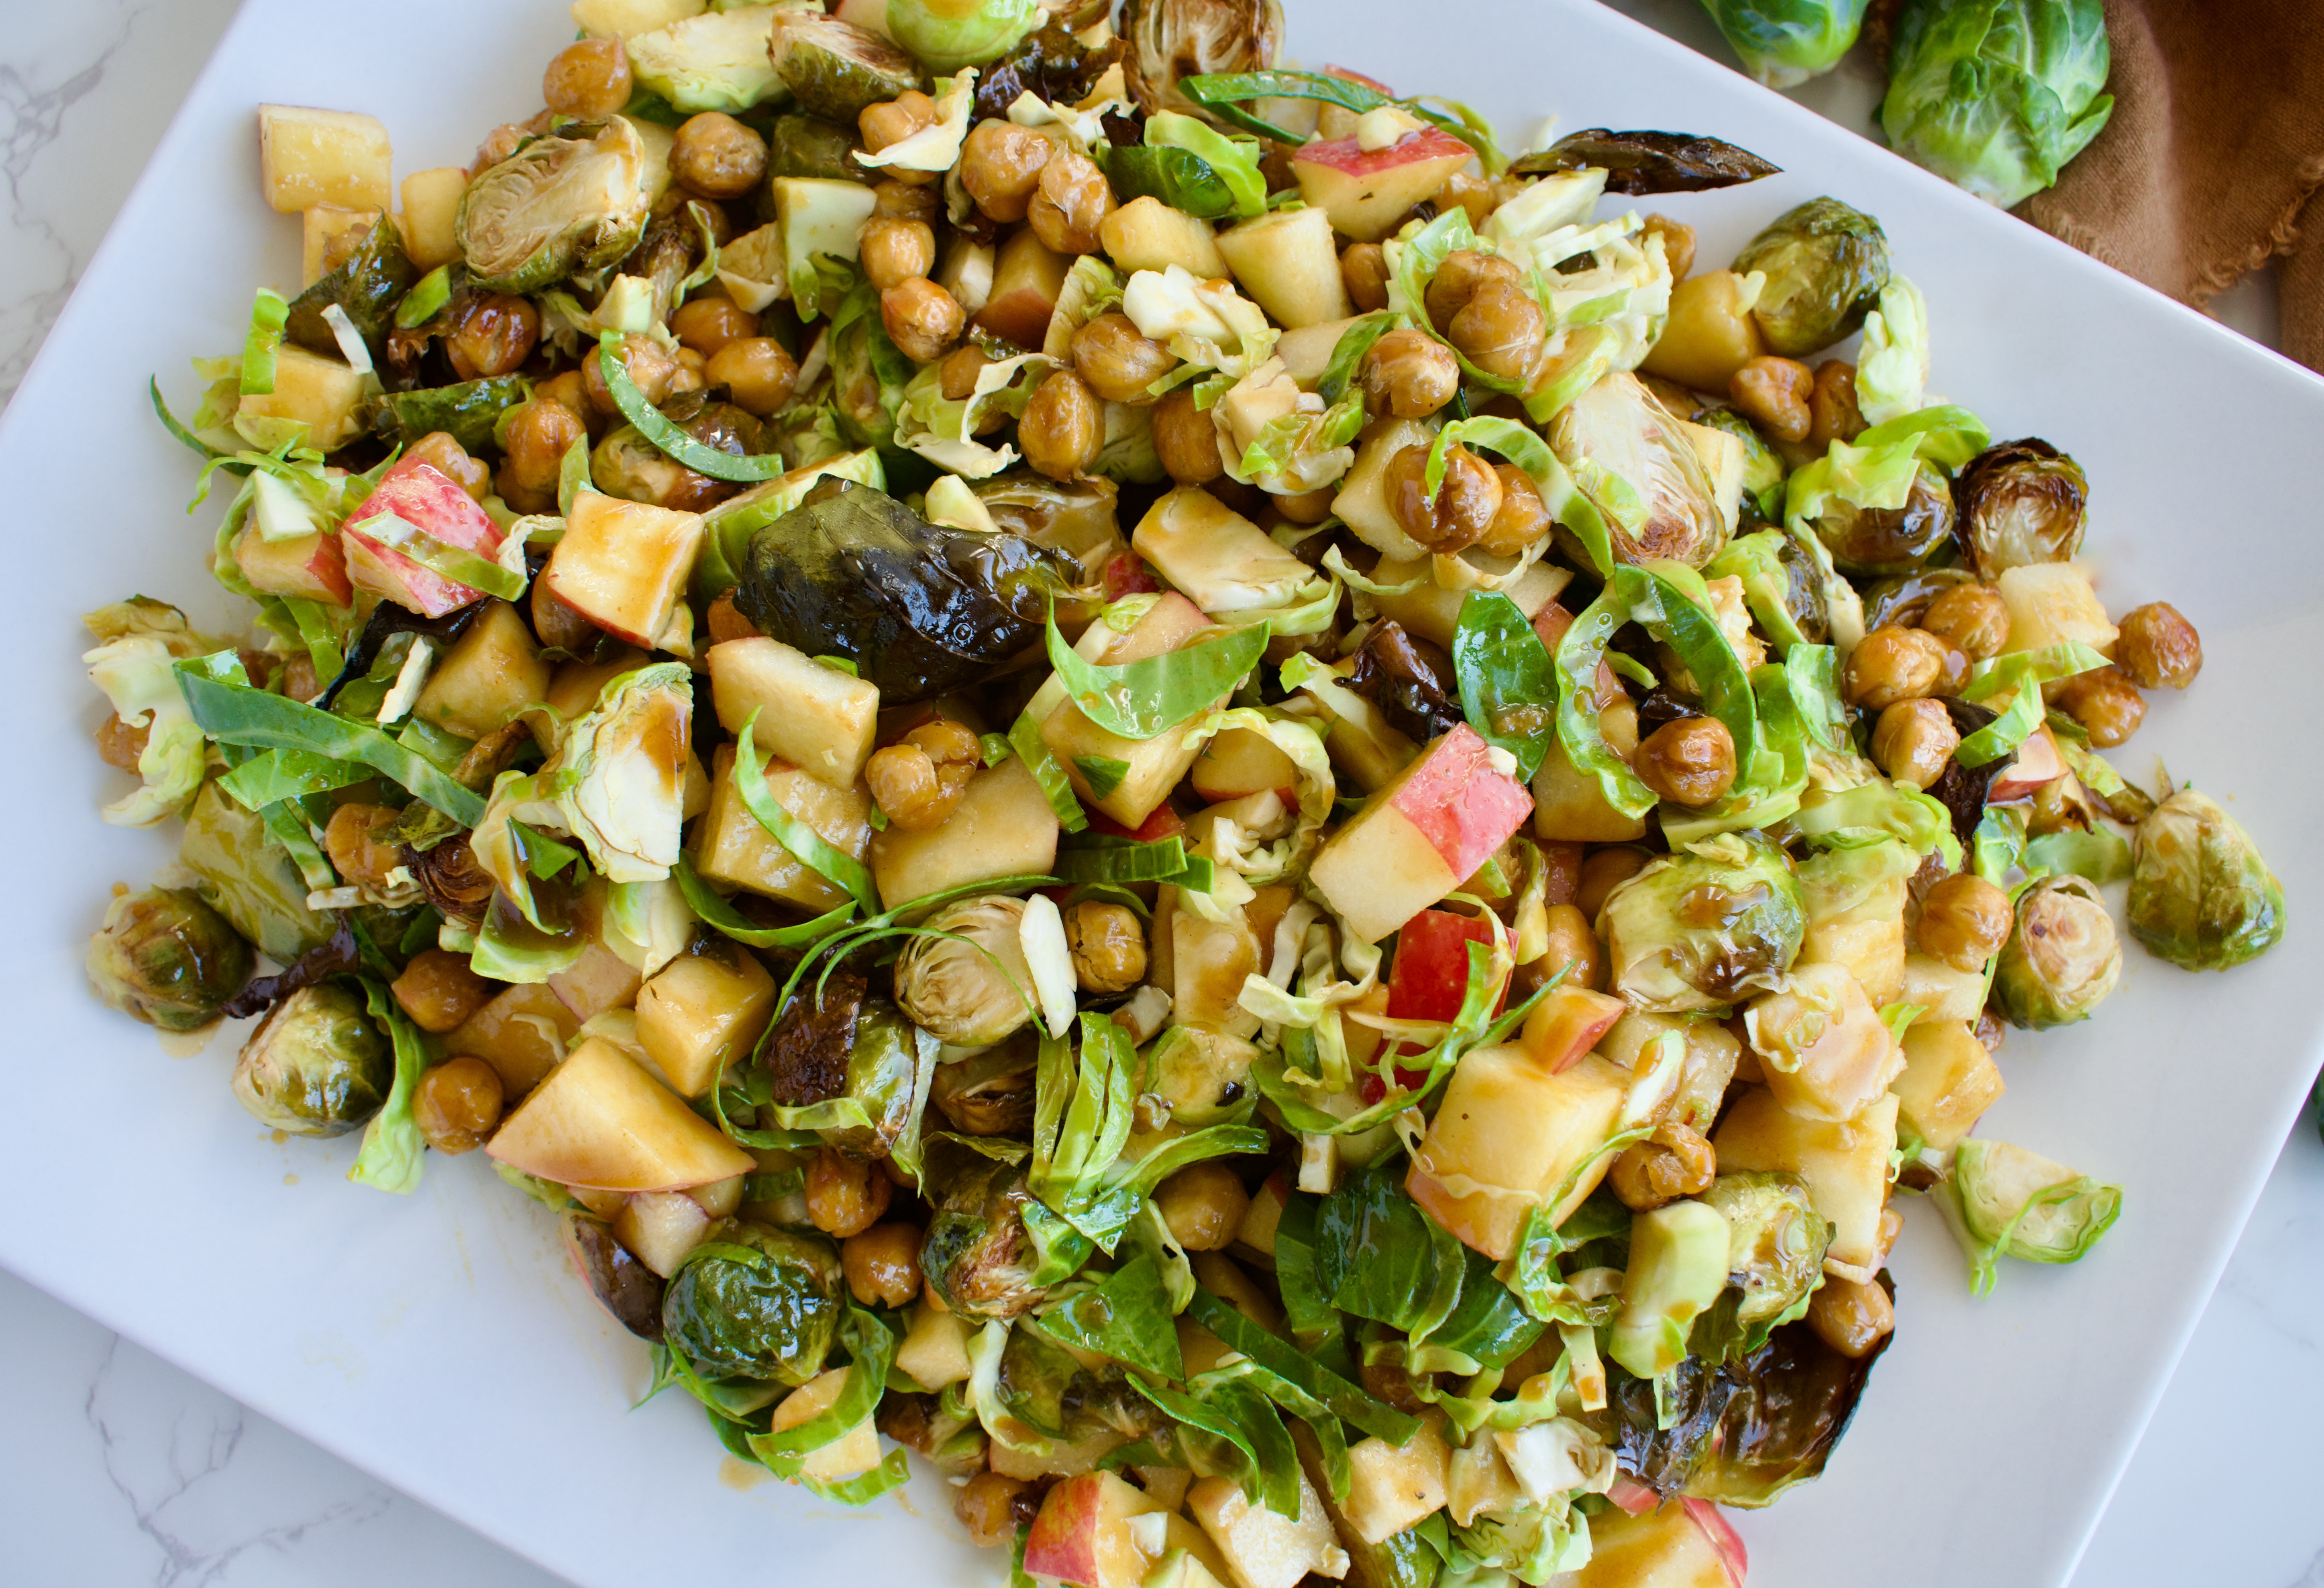
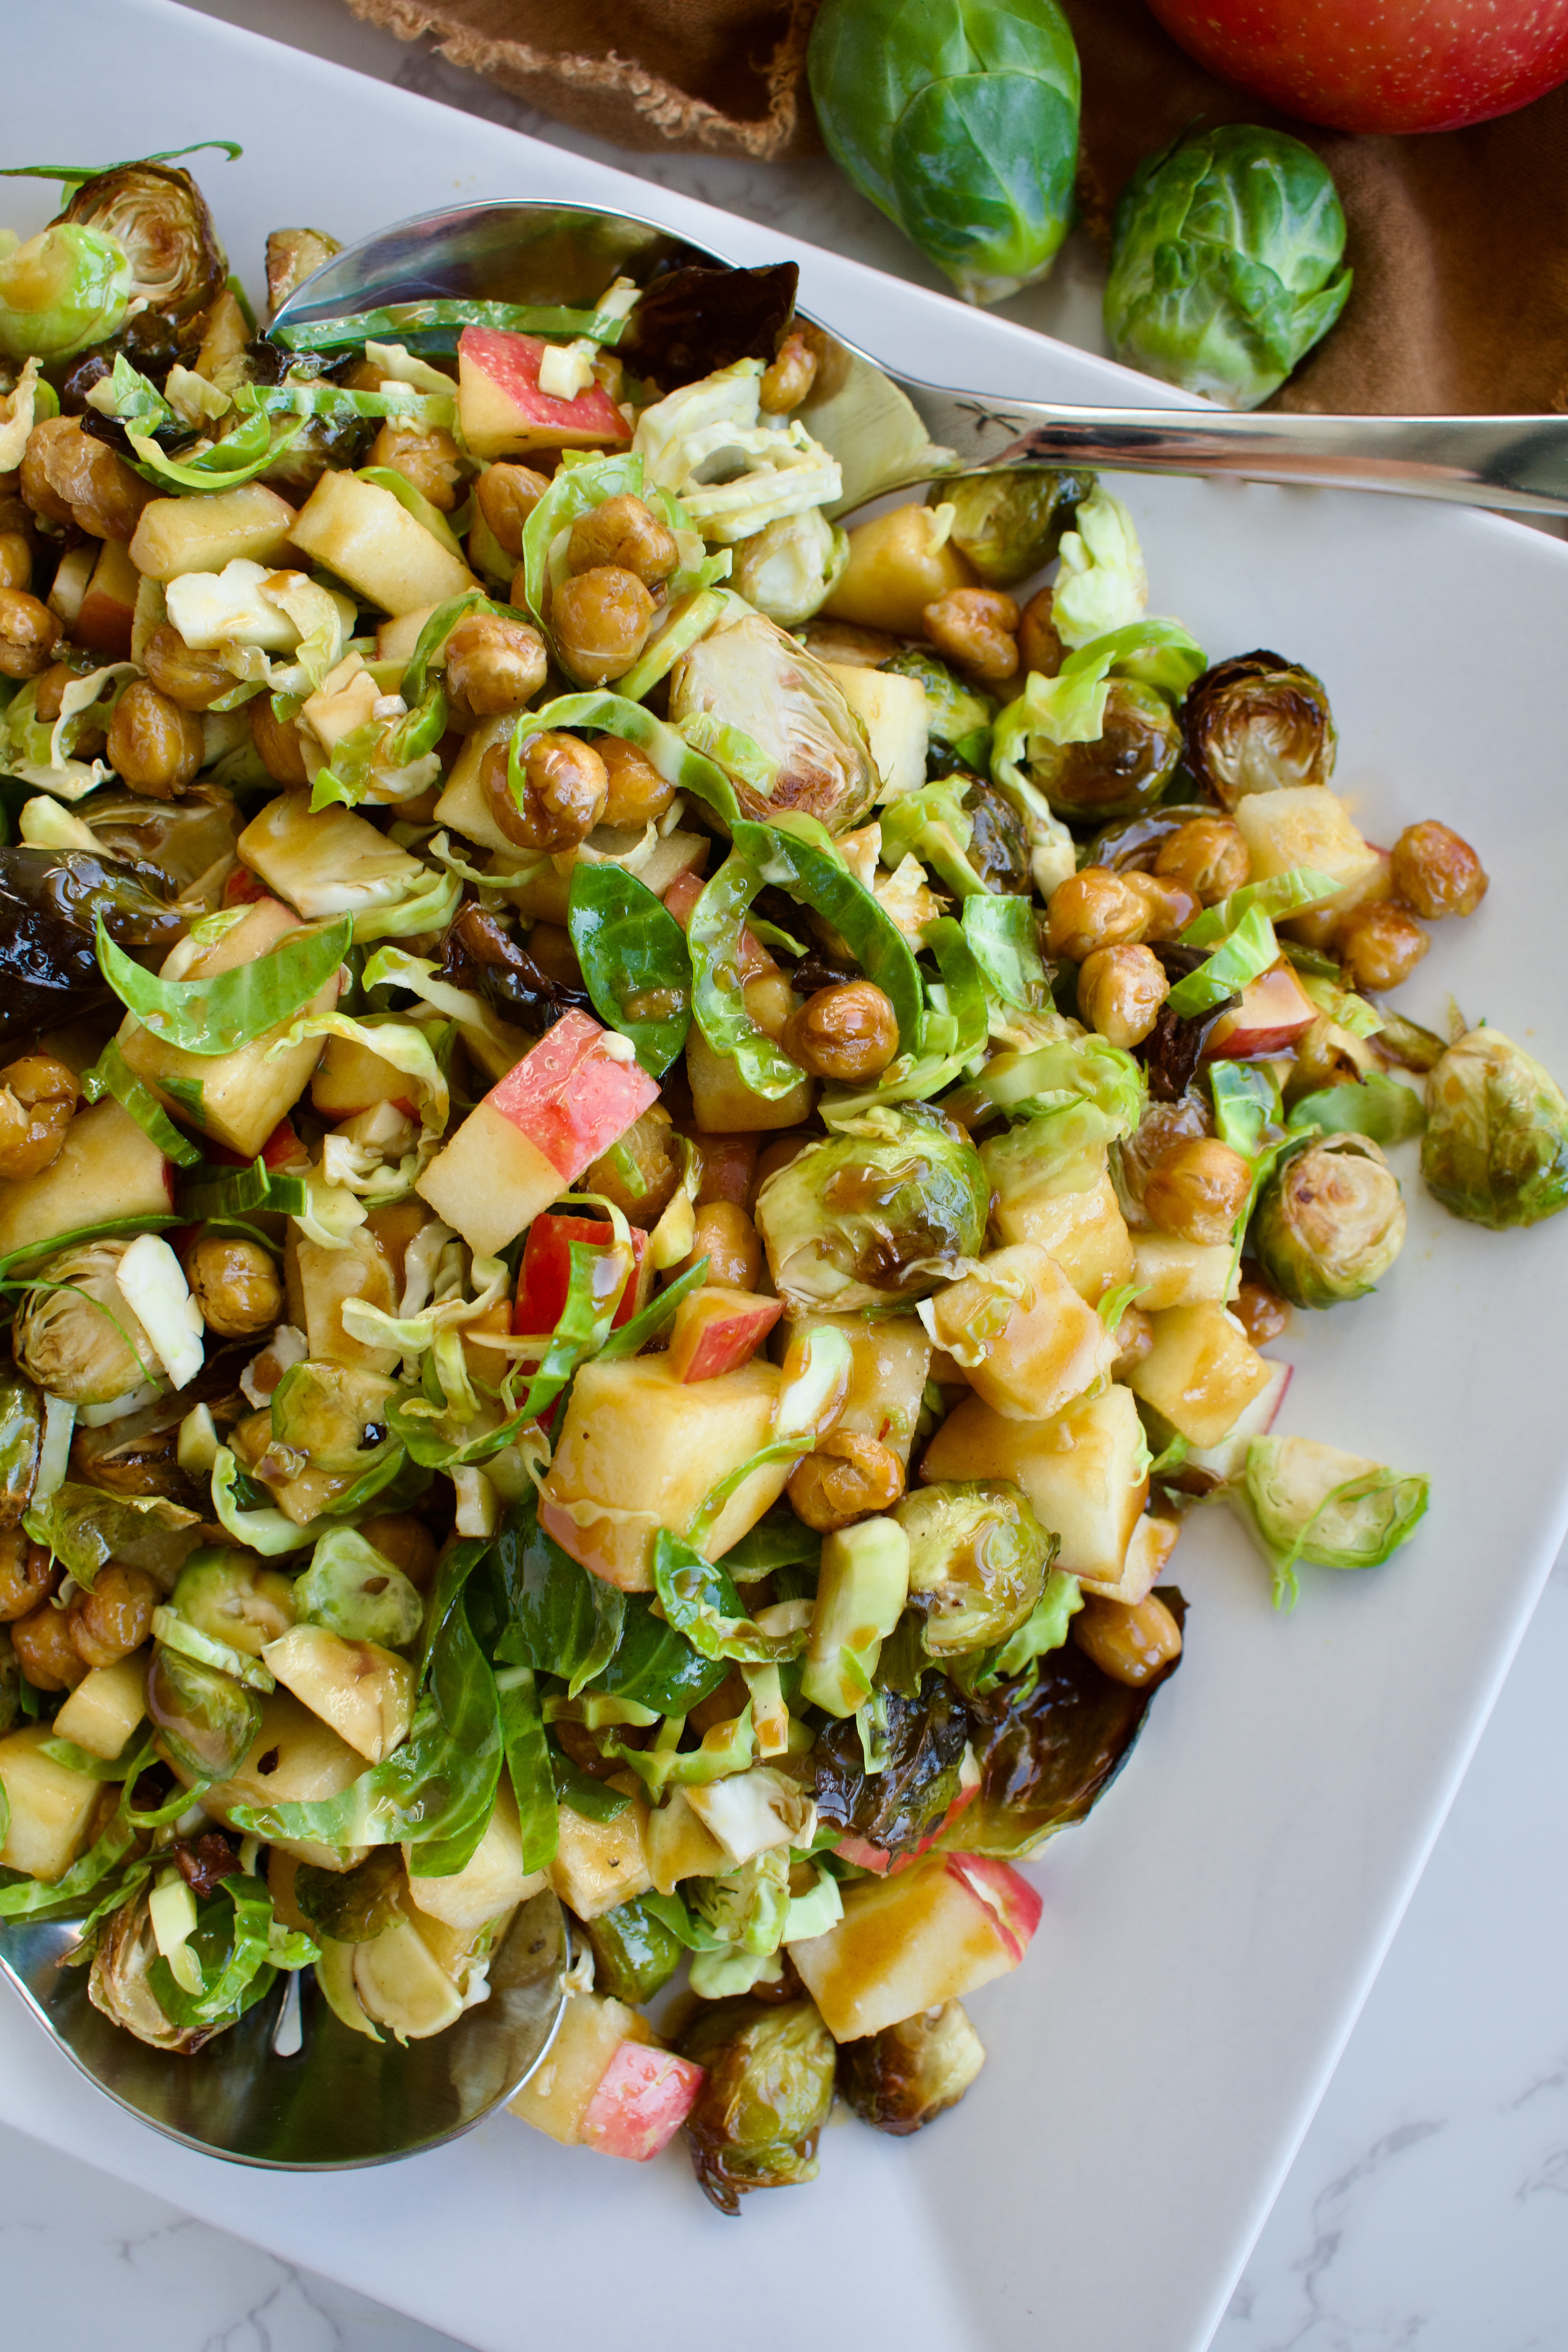
This flavorful Brussels Sprouts Salad with Apples and Chickpeas is a perfect holiday side dish that is fully gluten free and dairy free.
brussels sprout salad with apples and chickpeas
Thanksgiving is a big deal in our household because we are a foodie family, so we love creating and trying new recipes every holiday season. We rarely make the same thing twice! As a food blogger, I try to develop 1-2 new side dishes for the holiday season (desserts are my real speciality) and this year I knew I wanted to create some sides that were filling enough that they would be a good addition to the table for those who may not eat meat.
If you are on the hunt for Thanksgiving and holiday side dishes, then add this recipe to the list! Brussels sprouts and apples are a classic salad combo, but we are taking it up a notch by using a mix of roasted and raw Brussels sprouts, plus adding some roasted chickpeas for crunch and protein. Everything is tossed in a simple honey mustard vinaigrette to pull it all together.
gluten free and vegetarian brussels sprout salad with apples and chickpeas
Brussels Sprouts Salad with Apples and Chickpeas FAQ
Brussels Sprouts
We are using two types of Brussels sprouts in this recipe- roasted and raw. This gives the salad more texture and flavor. It’s like a roasted vegetable salad, but the lettuce is the raw Brussels.
Chickpeas
I added chickpeas to this salad for flavor, texture, and protein. This salad makes a great vegetarian option at the holidays for those who may not eat meat. The crunchy, salty chickpeas are a higher protein addition versus adding nuts. Of course, if you don’t like chickpeas, adding some roasted walnuts would be lovely!
The Dressing
This Brussels sprout salad calls for a honey-mustard vinaigrette. If you’re vegan, you can totally replace the honey with maple syrup! The dressing is very easy to make, you just combine all the ingredients in a bowl and whisk together.
How to store this Brussels sprouts salad
This salad tastes best fresh and if you are serving it for a dinner party or holiday dinner, make it as close to eating time as possible! If you have leftovers, you can keep them stored in an airtight container in the fridge for up to 5 days. The chickpeas won’t stay as crispy, but it will still be delicious.
gluten free and vegetarian brussels sprout salad with apples and chickpeas
This flavorful Brussels sprout salad is the perfect side dish. Made with both roasted and raw Brussels sprouts, juicy apples, and crispy chickpeas, this salad has it all! Everything is tossed with a honey mustard vinaigrette, making this salad gluten free and dairy free.
Course Main Course, Side Dish
Cuisine American
Keyword dairy free, gluten free, healthy, holiday, side dish, thanksgiving
Prep Time 20 minutesminutes
Cook Time 40 minutesminutes
Total Time 1 hourhour
Servings 4servings
Author Victoria Faling
Ingredients
Salad
1.5lbsBrussels sprouts, divided
1Apple, diced
1canChickpeas, rinsed and drained
2TbspOlive oil, divided
Salt
Dressing
1/4cupOlive oil
2TbspMustard
2TbspBalsamic vinegar
2tspApple cider vinegaror juice of half a lemon
1TbspHoney
1/4tspSalt
1/8tspPepper
Instructions
Preheat oven to 425F.
Take 2/3 of the Brussels and de-stem and cut them in half. Place in a large bowl and add the can of chickpeas. Toss in 2 Tbsp of olive oil and 1/2-1 tsp of salt so everything is covered.
Pour the Brussels and chickpeas onto a parchment lined baking sheet, making sure the Brussels are cut side down.
Roast for 35-45 minutes, until Brussels are cooked and crispy on the edges and chickpeas are crispy.
While the Brussels roast, chop the apple, other Brussels, and make the dressing.
To cut the other 1/3 of Brussels, de-stem them and then finely slice into ribbons. Set aside.
To make the dressing, combine all the ingredients in a bowl or cup and whisk thoroughly to combine.
When Brussels are done, let cool for 10 minutes before tossing with the apple and dressing.
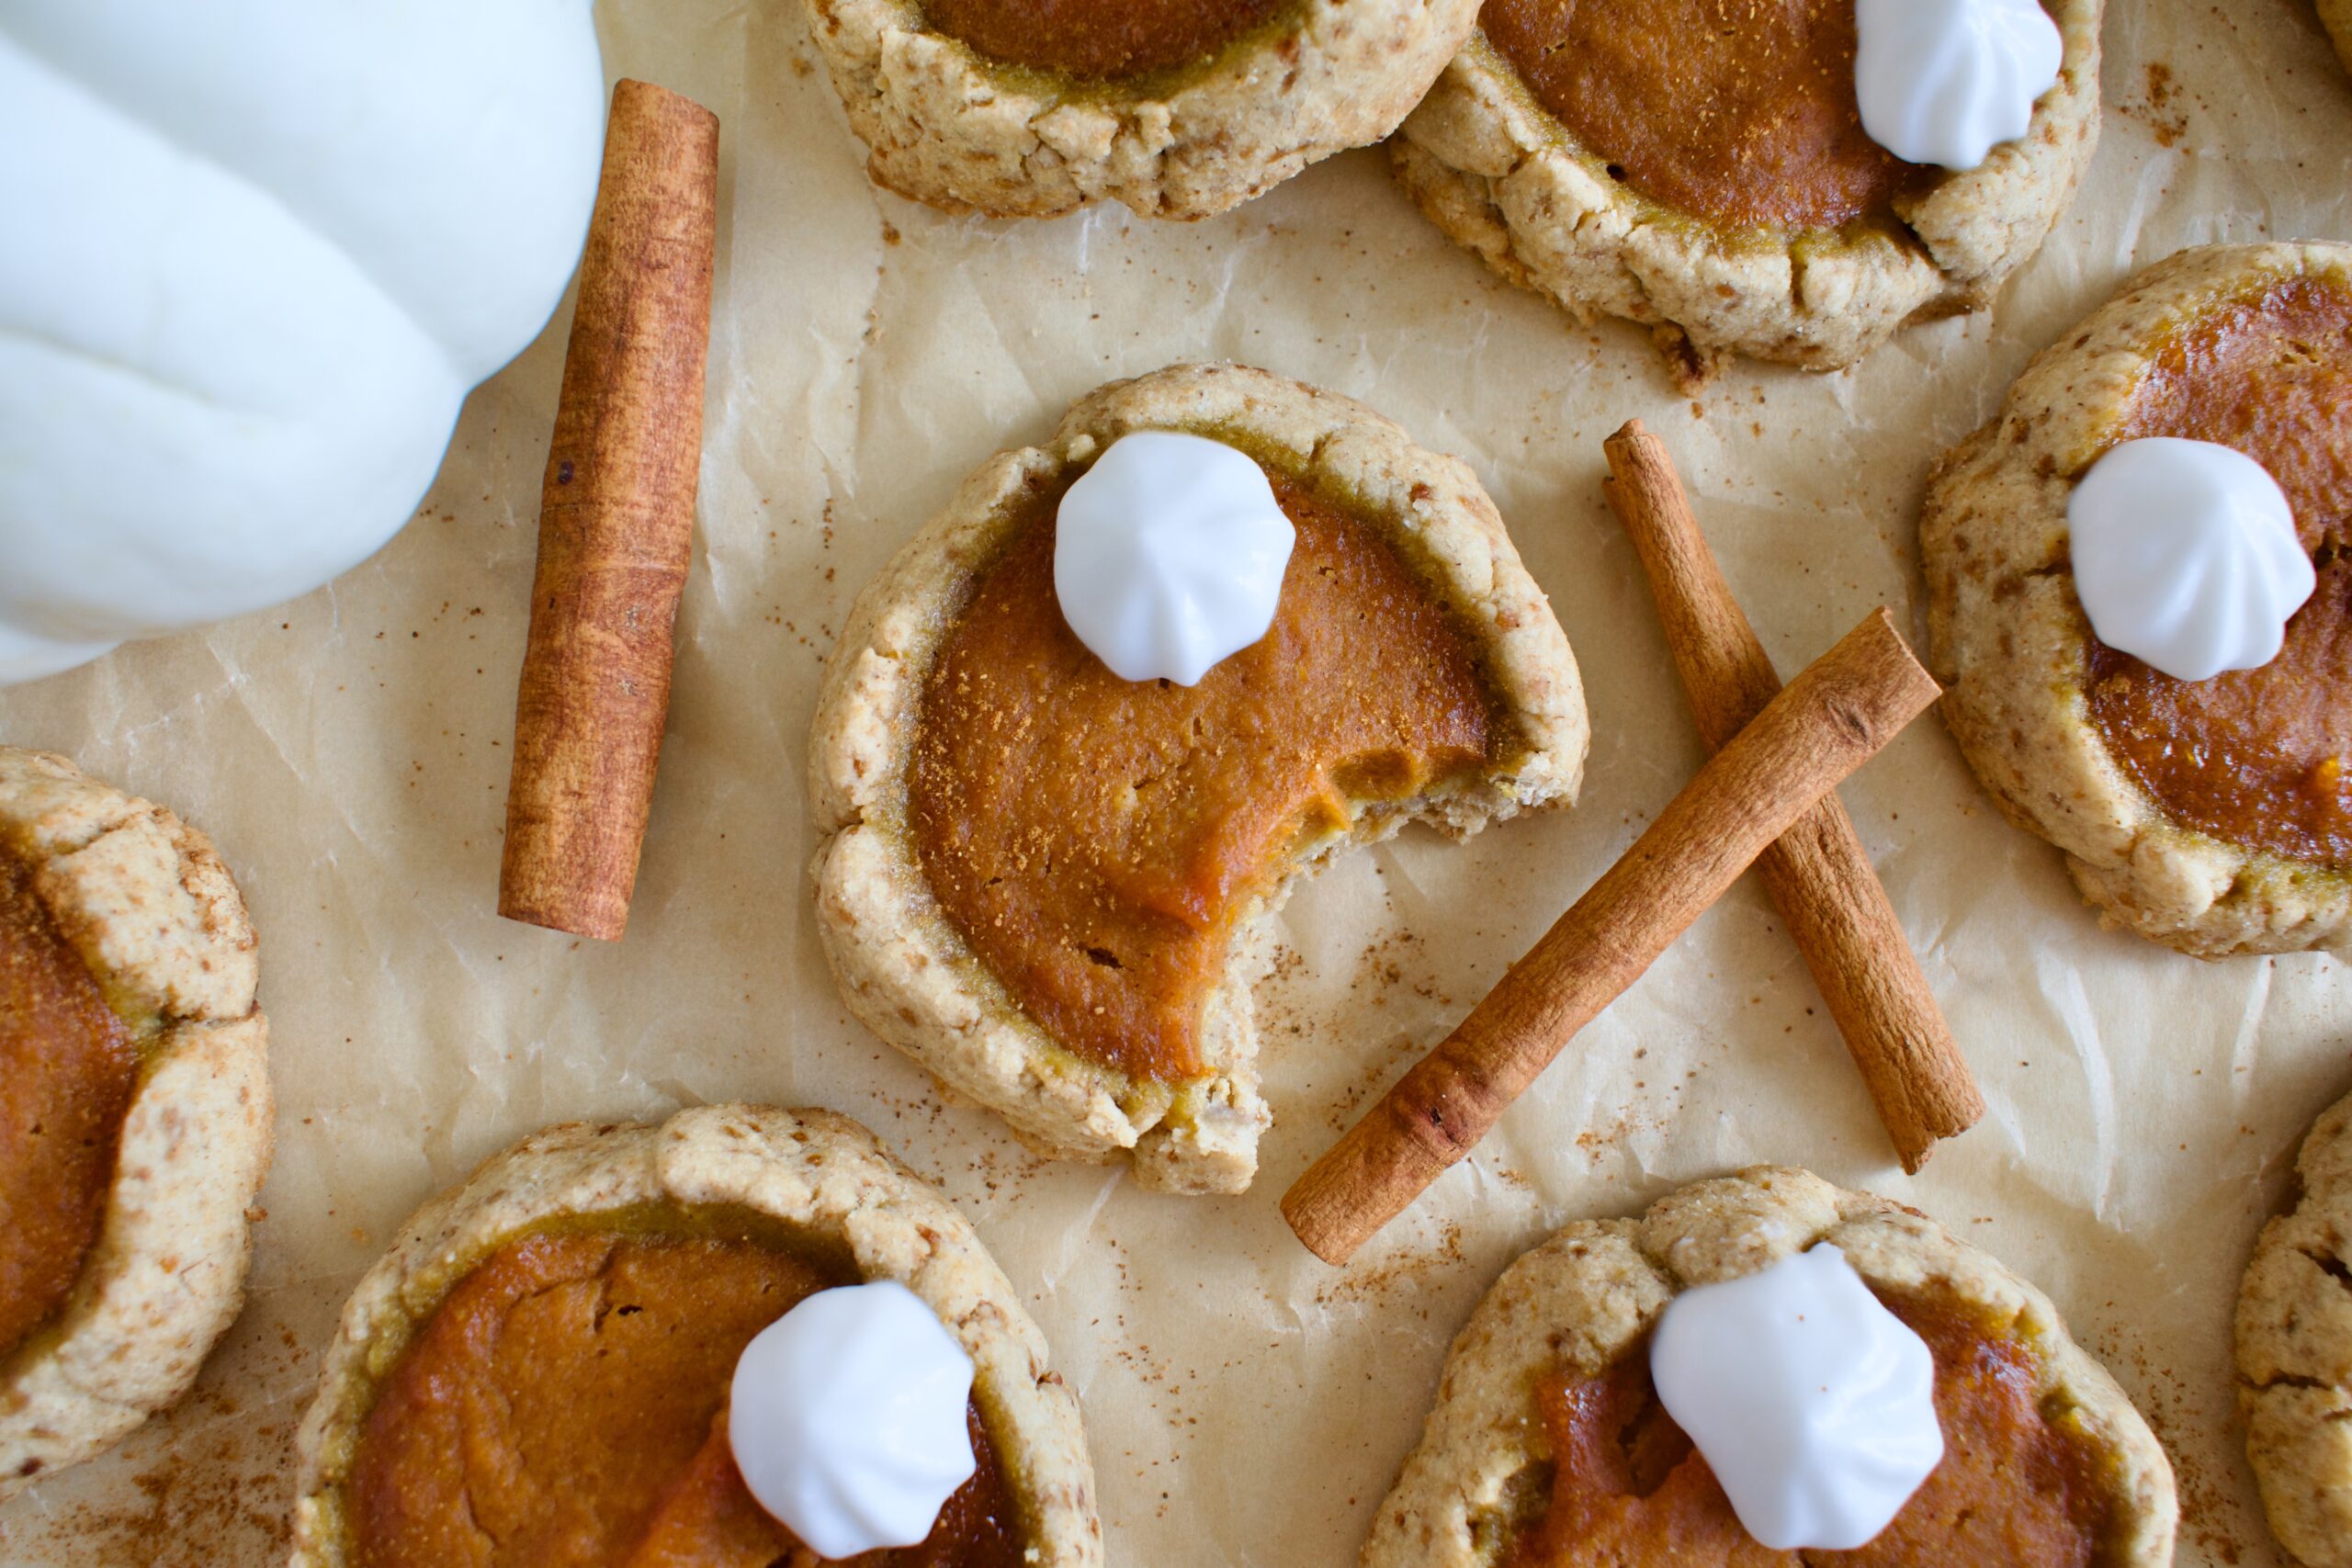
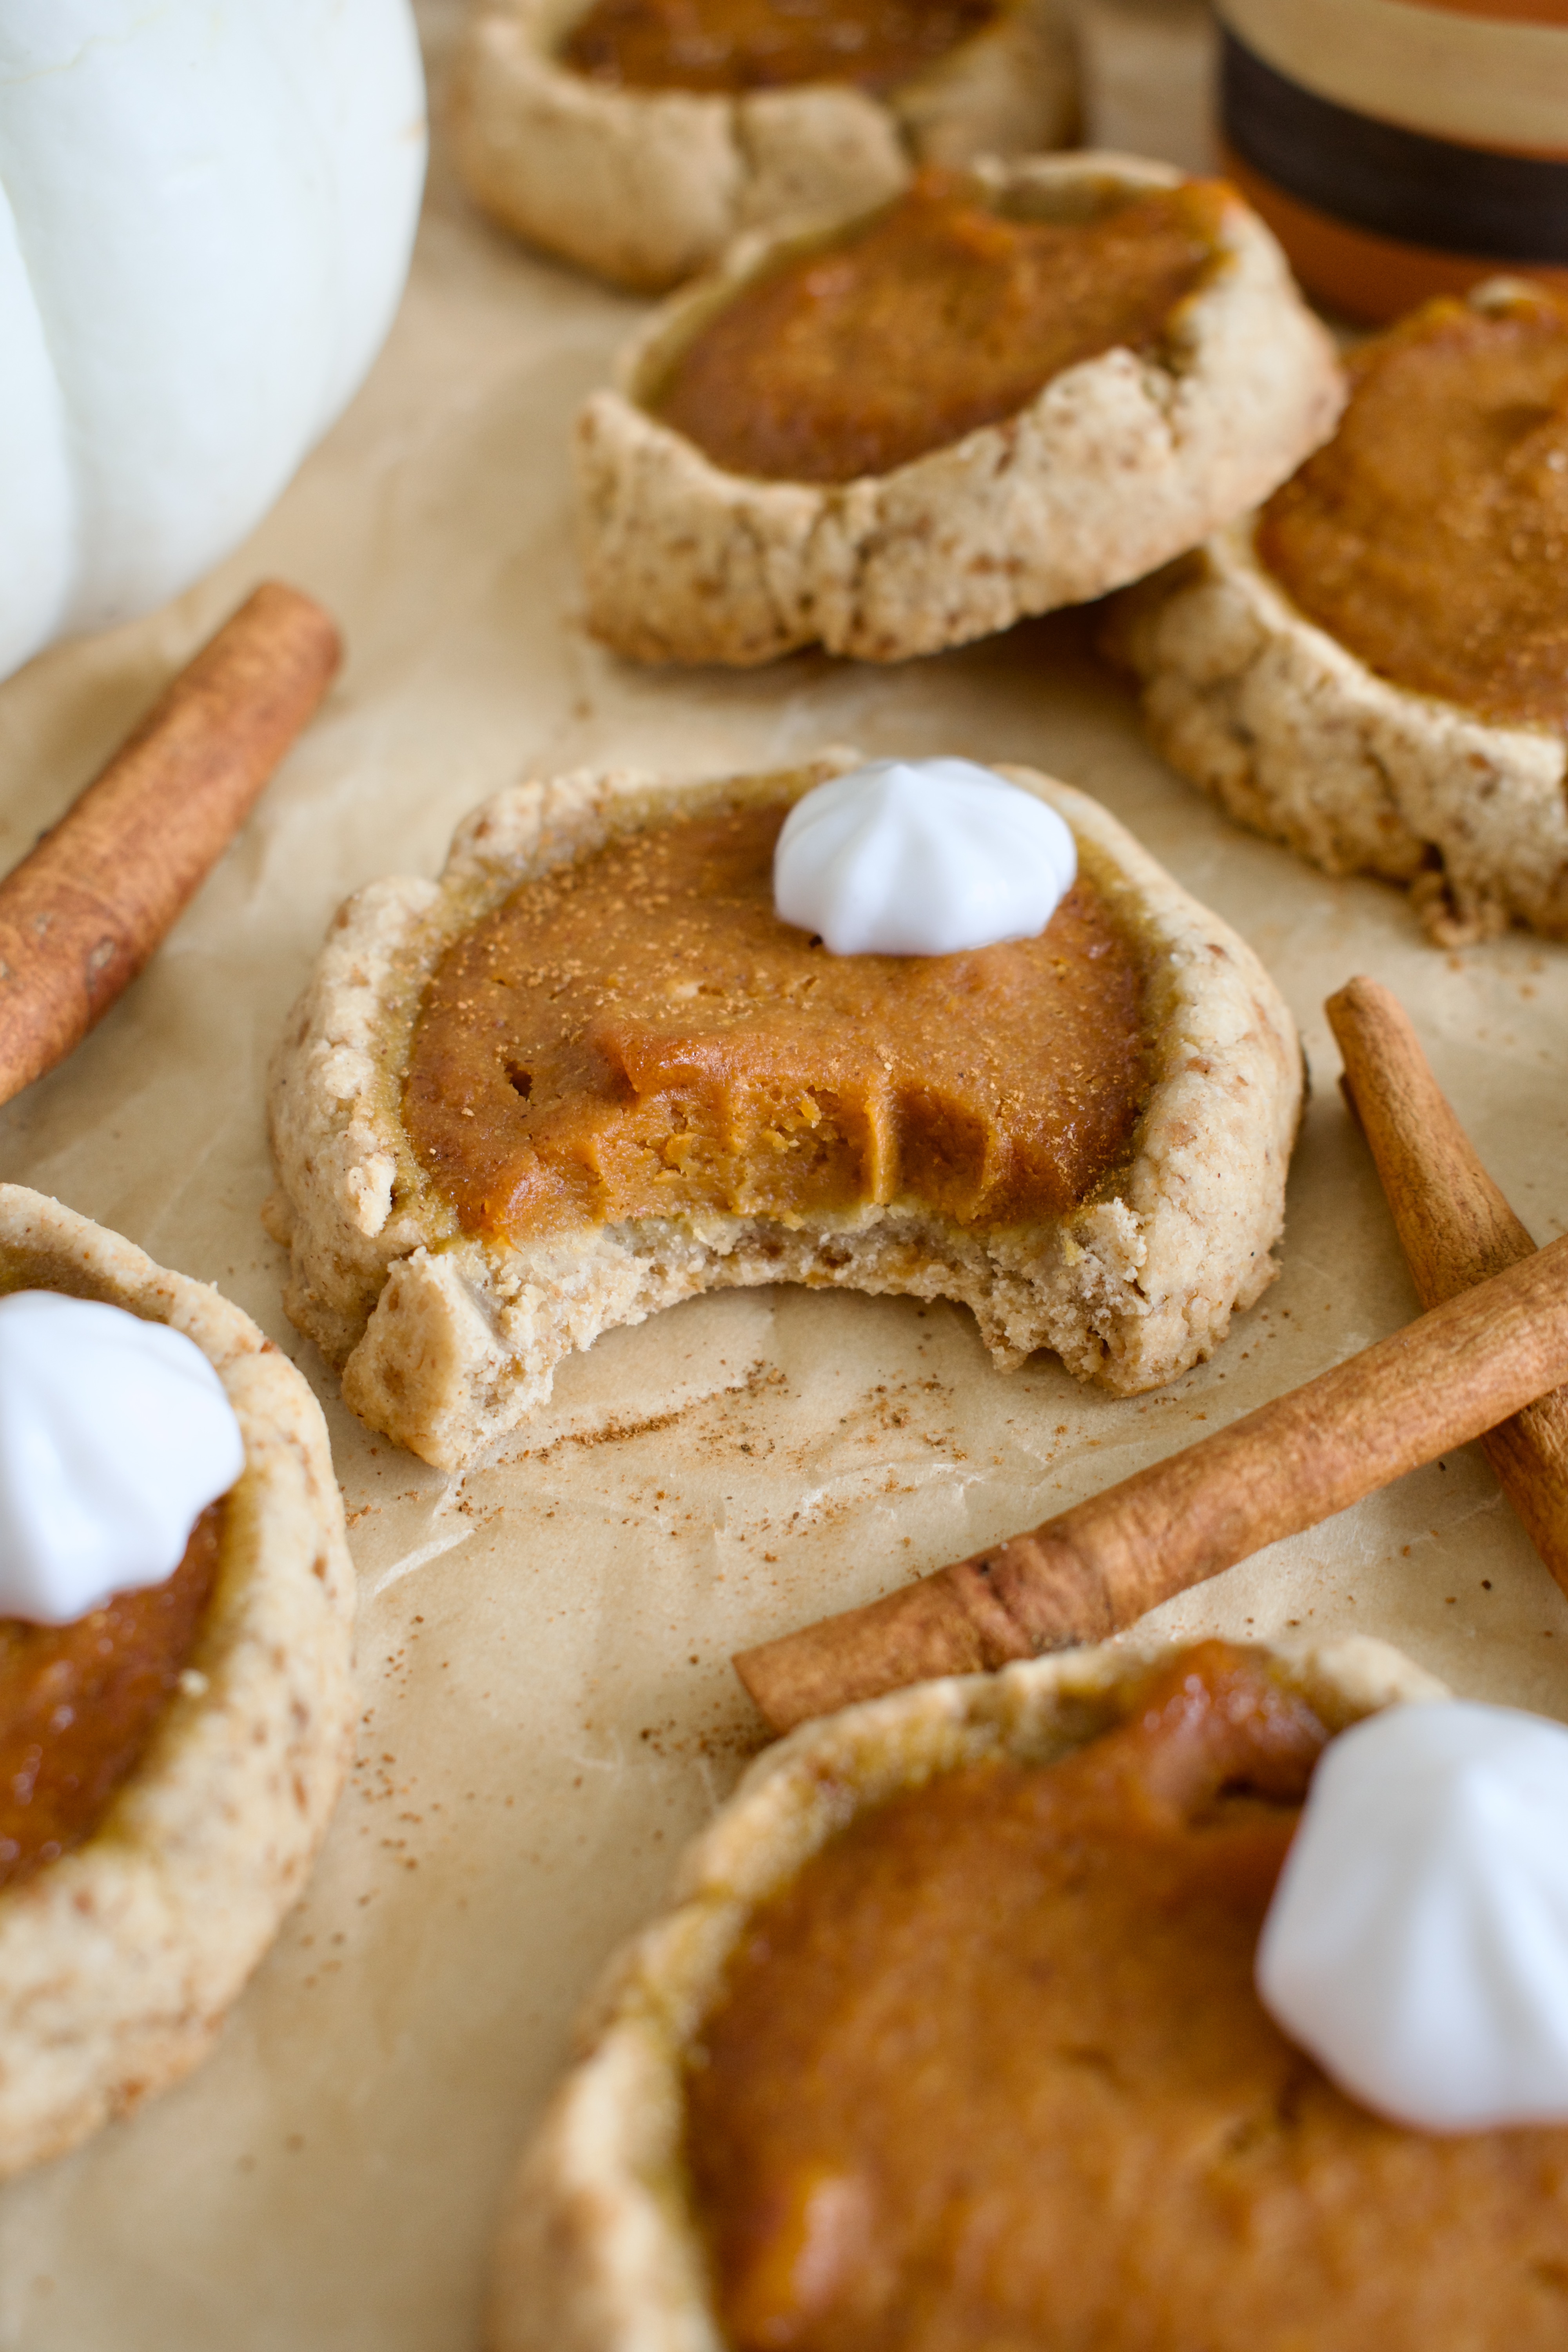
If you love pumpkin pie, but don’t want to bake a whole pie, then these Gluten Free Pumpkin Pie Cookies are for you! They are also dairy free and refined sugar free.
gluten free pumpkin pie cookies
Baking a whole pie can be very daunting and getting the crust right is hard, but these pumpkin pie cookies are easy and delicious. We are in full on pumpkin season and fast approaching pumpkin pie prime time in the US with Thanksgiving this month. If you are looking for an easier and fun dessert to feed a crowd, then these cookies are it.
These pumpkin pie cookies are made of a pie crust like cookie and filled with a simple and dairy free pumpkin pie filling. It took me a few rounds to get the cookie and spice levels just right, but these little treats taste like pumpkin pie in bite size form.
To make these cookies, you combine the butter and sugar then add the remaining wet ingredients. Mix in the flour and roll the dough into balls. Use a tablespoon scoop to press an indentation into the cookie. You’ll want to use your hands to shape into a little pie crust that is on the thinner side.
Make the filling and then scoop it into your cookies.
Bake, cool, and let set in the fridge overnight!
gluten free and dairy free pumpkin pie cookies
Ingredient Notes
Butter or coconut oil? These cookies come out best with the use of (vegan) butter. I use the Miyoko’s brand of vegan butter. I have tasted them with coconut oil and for some reason find that you may need to increase the amount used. So you may need to use 3/4 cup of coconut oil. If you find that the dough is not holding together well or seems to dry, add extra oil 1 Tbsp. at a time.
How to shape these pumpkin cookies
You essentially want to shape the dough into little pie crusts. To do this, take a tablespoon of dough and roll it into a ball. Press the back of a tablespoon measuring cup down into the ball to create an indentation then use your fingers to gently shape into a wider, flatter circle with a thin crust on the sides. If the dough starts to separate, that is okay! Use your fingers to keep it together.
If the dough is sticking to the tablespoon measure, just spray it with some cooking oil to keep it from sticking!
These gluten free pumpkin pie cookies are pumpkin pie in bite sized form. If you don't want to deal with baking a whole pie, make this cute dessert instead! These cookies are also dairy free and refined sugar free.
2Tbsp(vegan) yogurtor the coconut cream off the top of a set can of coconut milk
1tspvanilla extract
Whipped creamoptional
Instructions
Preheat oven to 350F.
Cookie Base
Beat together the butter and sugar (use paddle attachment if you have a stand mixer) until combined.
Add the egg yolks, milk, and vanilla and beat until combined.
Add the dry ingredients and beat on low with a paddle attachment or fold in with a spatula until dough comes together.
Place the dough in the fridge while you make the filling.
Filling
Whisk all ingredients for the pumpkin pie filing together in a bowl until smooth. If you like a mild pumpkin spice flavor, only add 1 tsp of pumpkin pie spice. If you want more of a punch and stonger flavor, add the full 2 tsp.
Assembly
Take tablespoon amounts of dough and roll into balls. Place balls on a parchment lined baking sheet at least 2 inches apart.
Use the back of a tablespoon measuring spoon to press can indentation into the ball of dough. Use your fingers to create what looks like a little pie crust. It should be on the thinner side, but not too thin it falls apart. You should get about 16 cookies.
Add a tablespoon scoop of filling to each cookie and spread to smooth out the tops.
Blake cookies for 14-16 minutes until cook is golden.
Let cool on baking tray for at least 10 minutes before moving to a wire rack to cool completely.
Place cookies in the fridge overnight to set.
If desired, when ready to serve, add a little dollop or squirt of whipped cream!
Hi! I'm Victoria. I was diagnosed with Lyme in 2012 and have been on a healing journey ever since. I love helping others on their road to healing through allergy friendly recipes, exercise, and overall well-being.