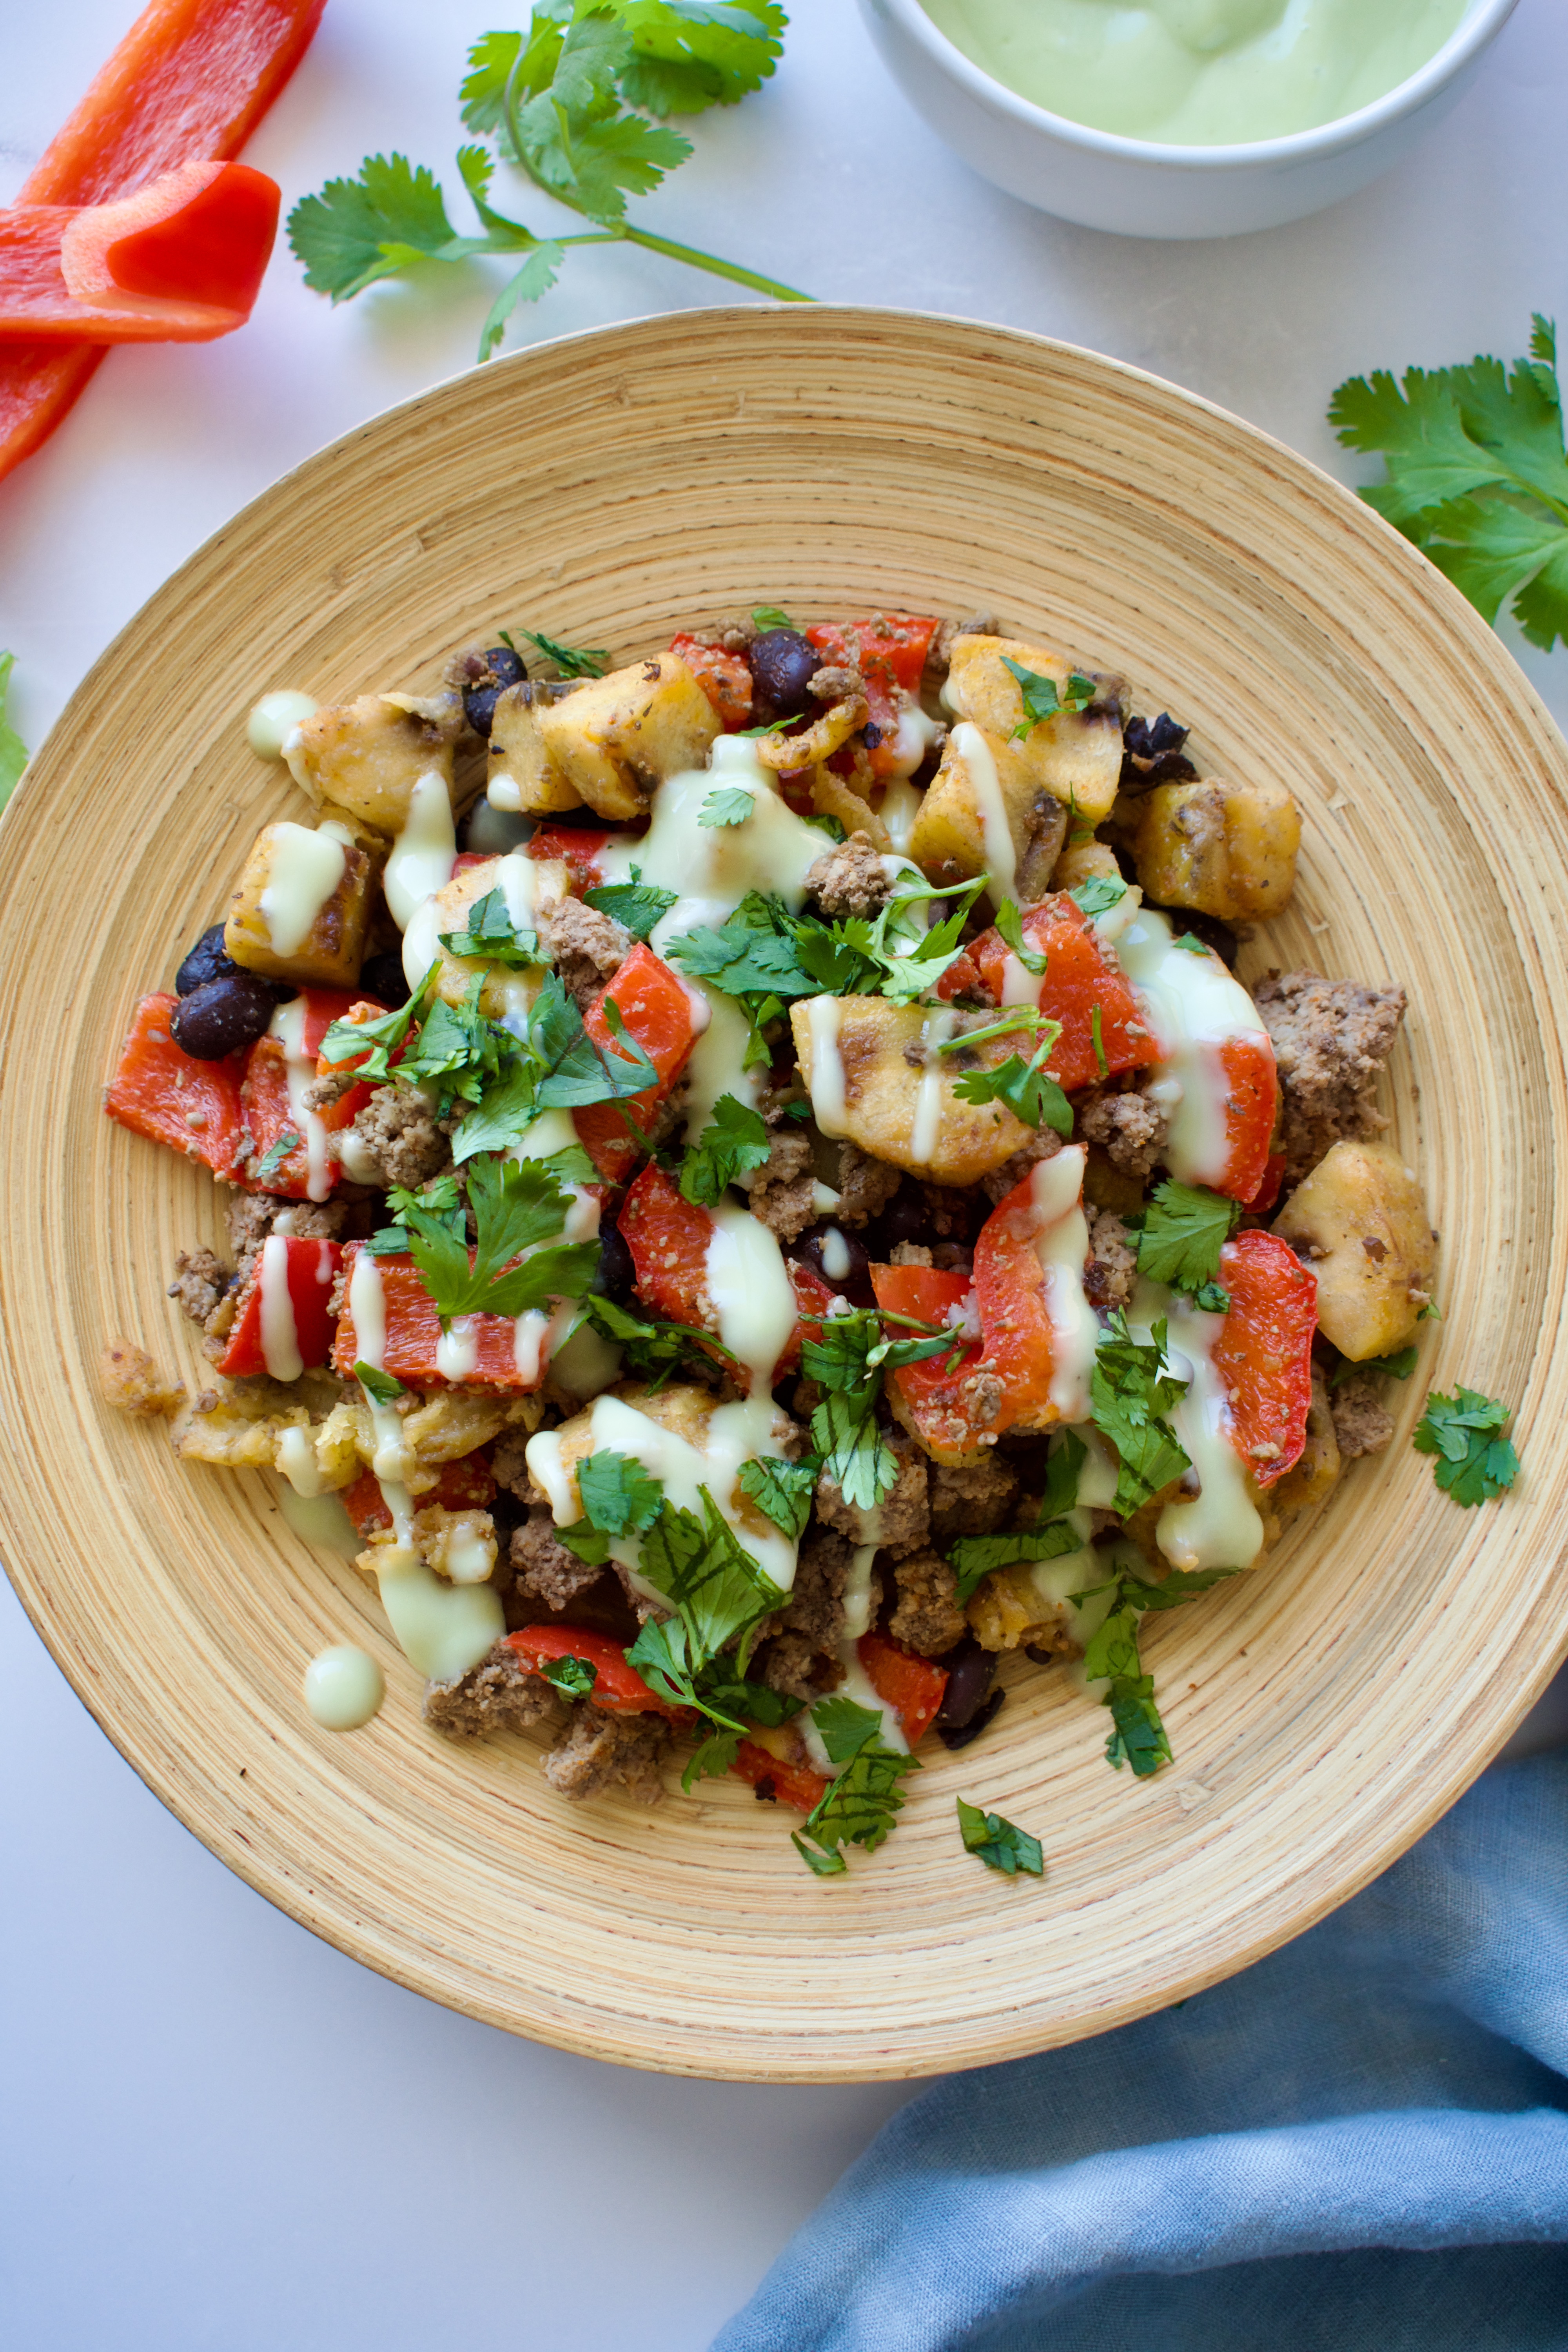
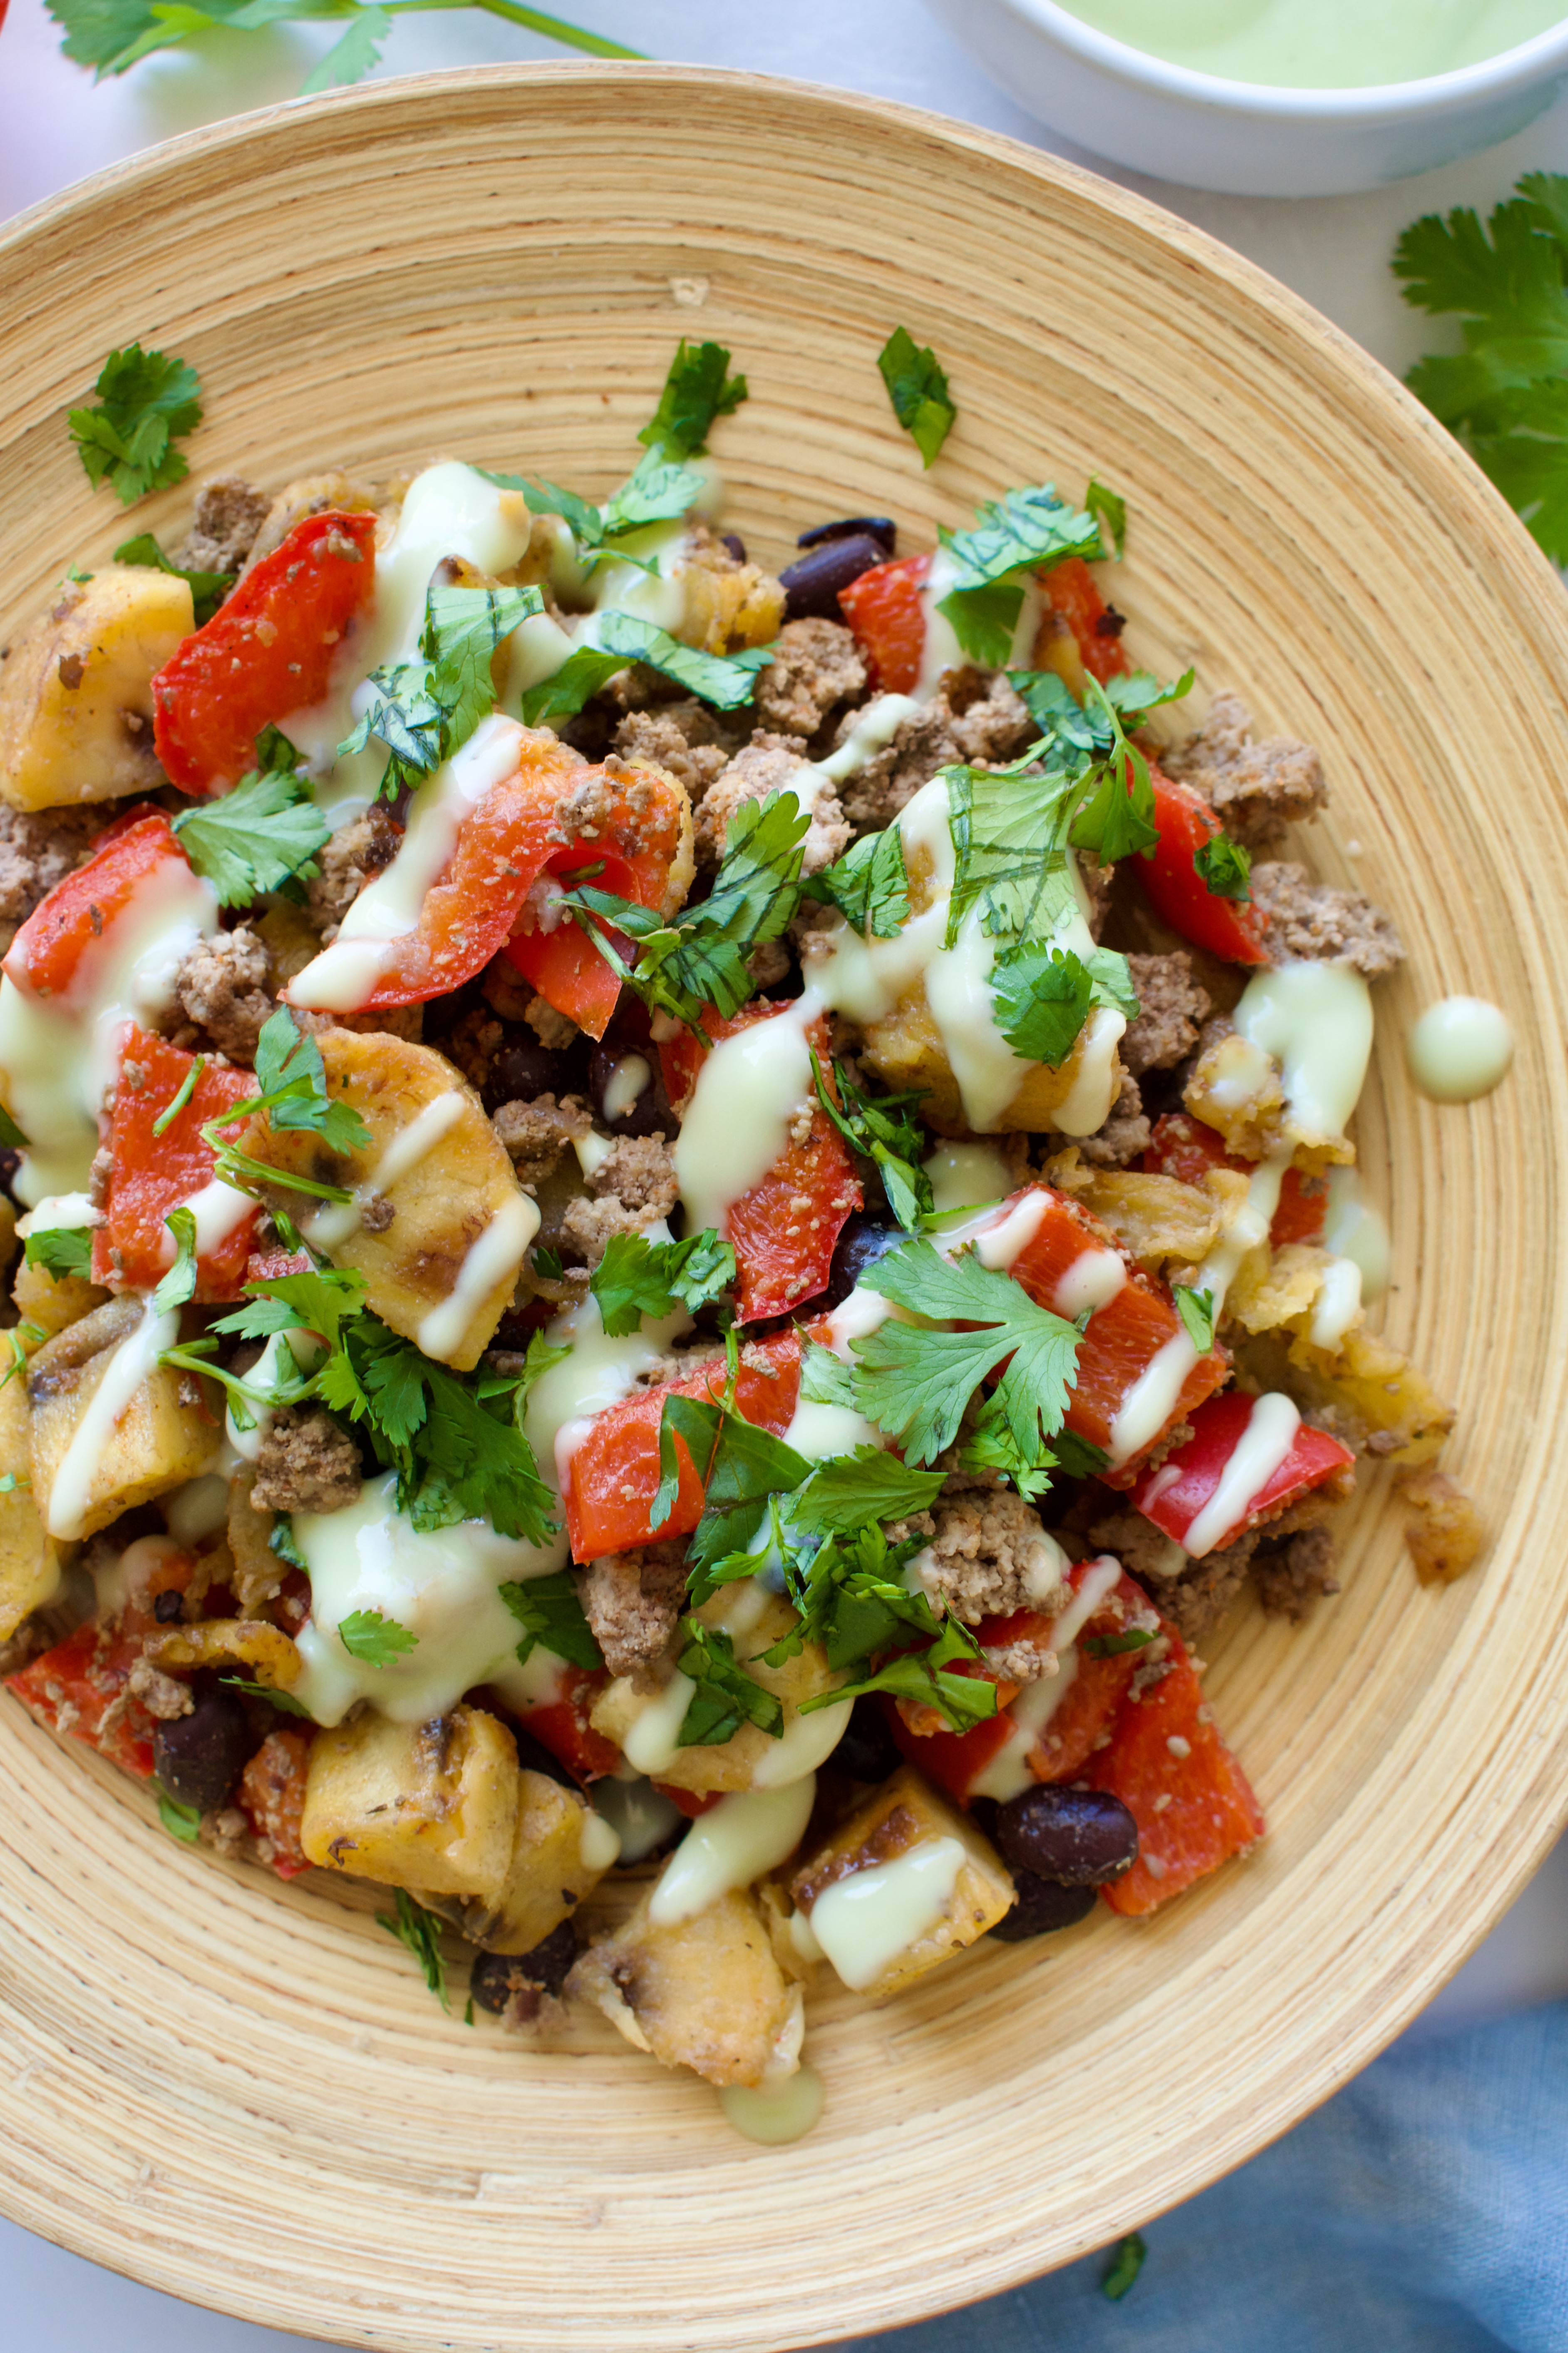
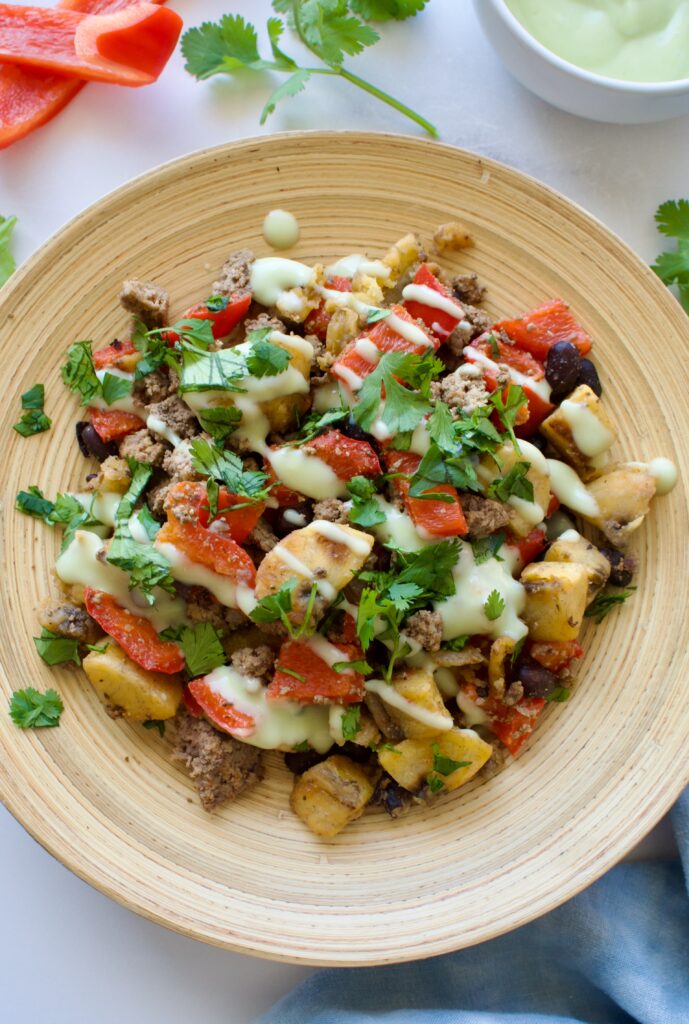
This one pan plantain taco bowl is easy and delicious! It’s the perfect simple weeknight meal all while being gluten free, dairy free, allergy friendly, and high protein.
plantain taco bowl
Who doesn’t love an easy and nourishing meal? I love one pan and bowl-based dinners, they make life easier. And this taco bowl does not miss! Packed with nutrients including lots of protein, fiber, and micro-nutrients, this healthy taco dish will become a staple in your meal rotations. We are using plantains in this dish to switch things up and because plantains are delicious. If you’ve never had plantains, you need to try one and this is the perfect recipe to dip your toe in!
These taco bowls are also a great, easy Cinco de Mayo option. If you’re looking for a quick recipe or a recipe you can double or triple for a crowd, these taco bowls are perfect. They are allergy friendly and the perfect post-drinking meal ;).
plantain taco bowl
Where to buy plantains
You can find plantains at most grocery stores these days depending on what part of the US you are in (I am unsure about other countries- sorry!). If you can’t find them at your regular grocery store, speciality stores likely carry them including places like Whole Foods and your local ethnic grocery store (many of these stores are more familiar with tropical fruits and veg).
How to pick plantains
For this recipe, we want greener plantains or just beginning to yellow with only a couple black spots. AKA less ripe plantains. The less ripe plantains are not sweet and work better in savory dishes. Very yellow or black plantains are much sweeter and are great for desserts.
gluten free plantain taco bowl
One Pan Plantain Taco Bowl
This entire meal can be made in one pan, except for the sauce which is blended together in a food processor or blender.
Ingredients:
-ground beef
-plantains
-bell pepper
-black beans
-olive oil
-coconut oil
-salt
-taco seasoning
-avocado
-yogurt of choice
-lemon
-garlic infused olive oil
-cilantro
Process:
First, brown your ground beef in a large skillet. Alternatively, you can cook your beef in one skillet and veggies in another so they cook at the same time.
If using the same pan, remove your beef to a bowl once done cooking. Add 1 tbsp of olive oil and the coconut oil and melt on medium heat. Add the chopped plantains and cook, stirring occasionally, for about 5-10 minutes until they are beginning to brown on the edges.
Add the bell pepper to the plantains and more oil if needed. Cook for another 5-7 minutes, until the peppers are soft.
While veggies are cooking, make your dressing. Combine all ingredients together in a small food processor or blender, starting with 1/4 cup of water. Blend until smooth and add water as needed to reach desired consistency. I like something that is runny and pourable vs dippable.
Once veggies are cooked, add the beef and beans along with the salt and taco seasoning to the pepper and plantains. Mix to combine
Serve as is, over a bed of lettuce, or rice. Drizzle the sauce on top, some chopped cilantro, and enjoy!
This easy and delicious one pan dinner is completely gluten free and dairy free. This is the perfect weeknight dinner or meal prep!
Course Main Course
Keyword allergy friendly, autoimmune paleo, dairy free, Easy, gluten free, one pan
Prep Time 15 minutesminutes
Cook Time 30 minutesminutes
45 minutesminutes
Servings 4servings
Author Victoria Faling
Ingredients
1lbsground beef
2largemedium ripe plantainspeeled and diced
1largered bell pepper
1canblack beansdrained and rinsed
2-3 Tbspolive oil
1Tbspcoconut oil
2tsptaco seasoning
1/2tspsalt
Cilantrochopped
Dressing
1avocado
1/4cupyogurt of choiceI used a dairy free coconut yogurt
1tspgarlic infused olive oilor 1 tsp olive oil and a clove of garlic
Juice of half a lemon
Salt to taste
Water
Instructions
First, brown your ground beef in a large skillet. Alternatively, you can cook your beef in one skillet and veggies in another so they cook at the same time.
If using the same pan, remove your beef to a bowl once done cooking. Add 1 tbsp of olive oil and the coconut oil and melt on medium heat. Add the chopped plantains and cook, stirring occasionally, for about 5-10 minutes until they are beginning to brown on the edges.
Add the bell pepper to the plantains and more oil if needed. Cook for another 5-7 minutes, until the peppers are soft.
While veggies are cooking, make your dressing. Combine all ingredients together in a small food processor or blender, starting with 1/4 cup of water. Blend until smooth and add water as needed to reach desired consistency. I like something that is runny and pourable vs dippable.
Once veggies are cooked, add the beef and beans along with the salt and taco seasoning to the pepper and plantains. Mix to combine
Serve as is, over a bed of lettuce, or rice. Drizzle the sauce on top and some fresh chopped cilantro and enjoy!
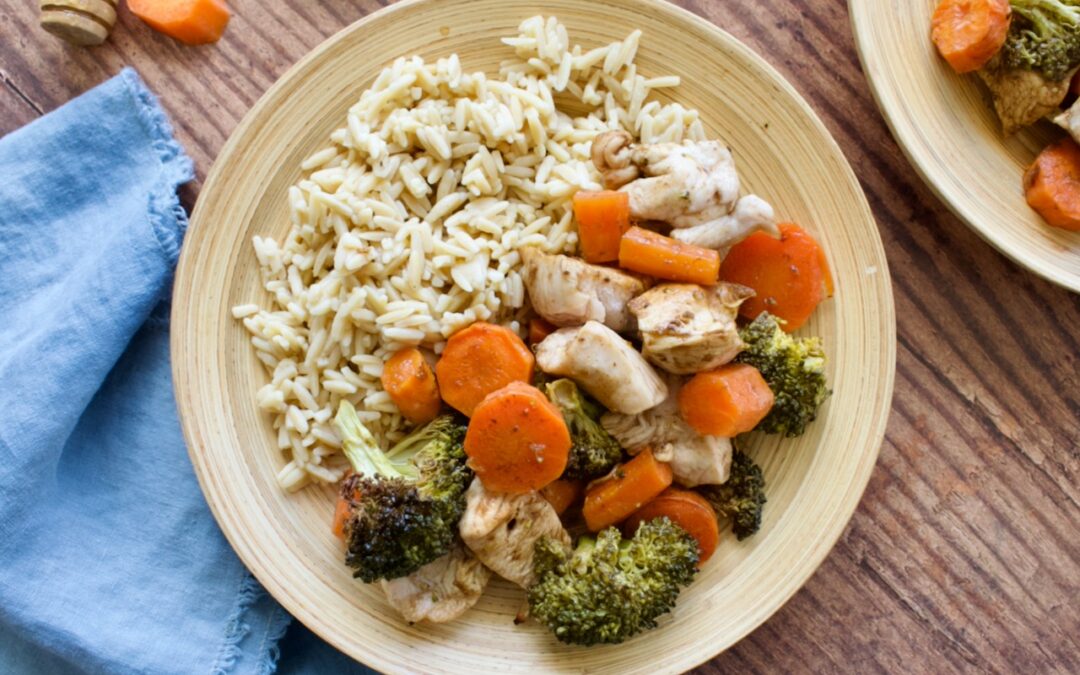
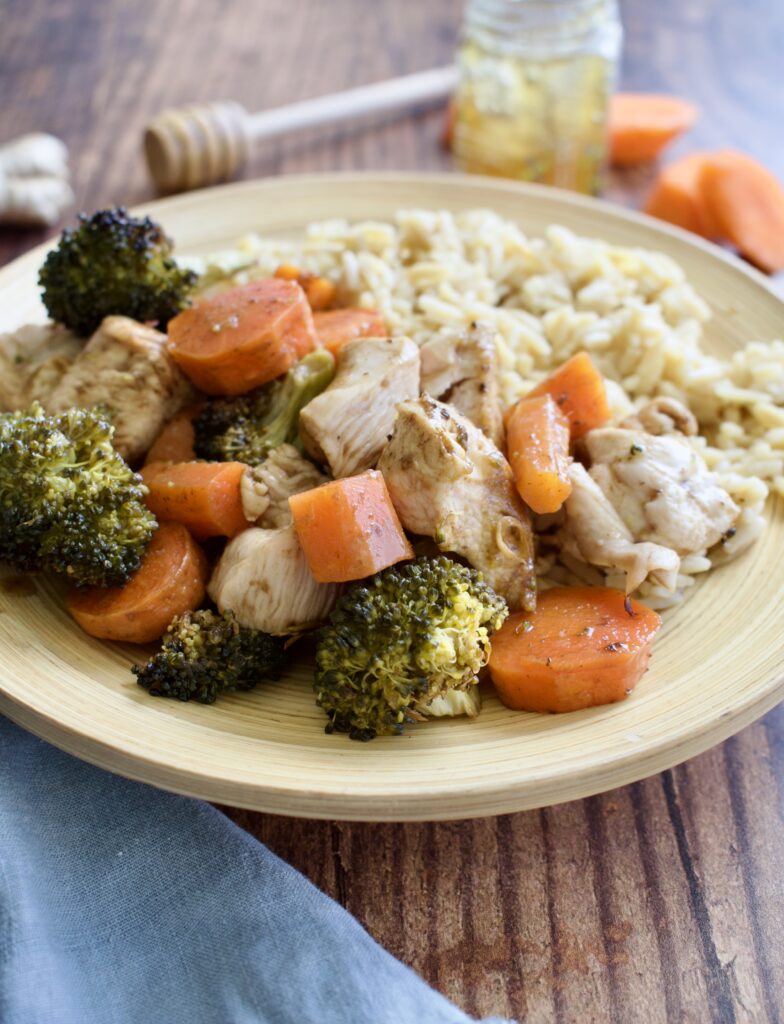
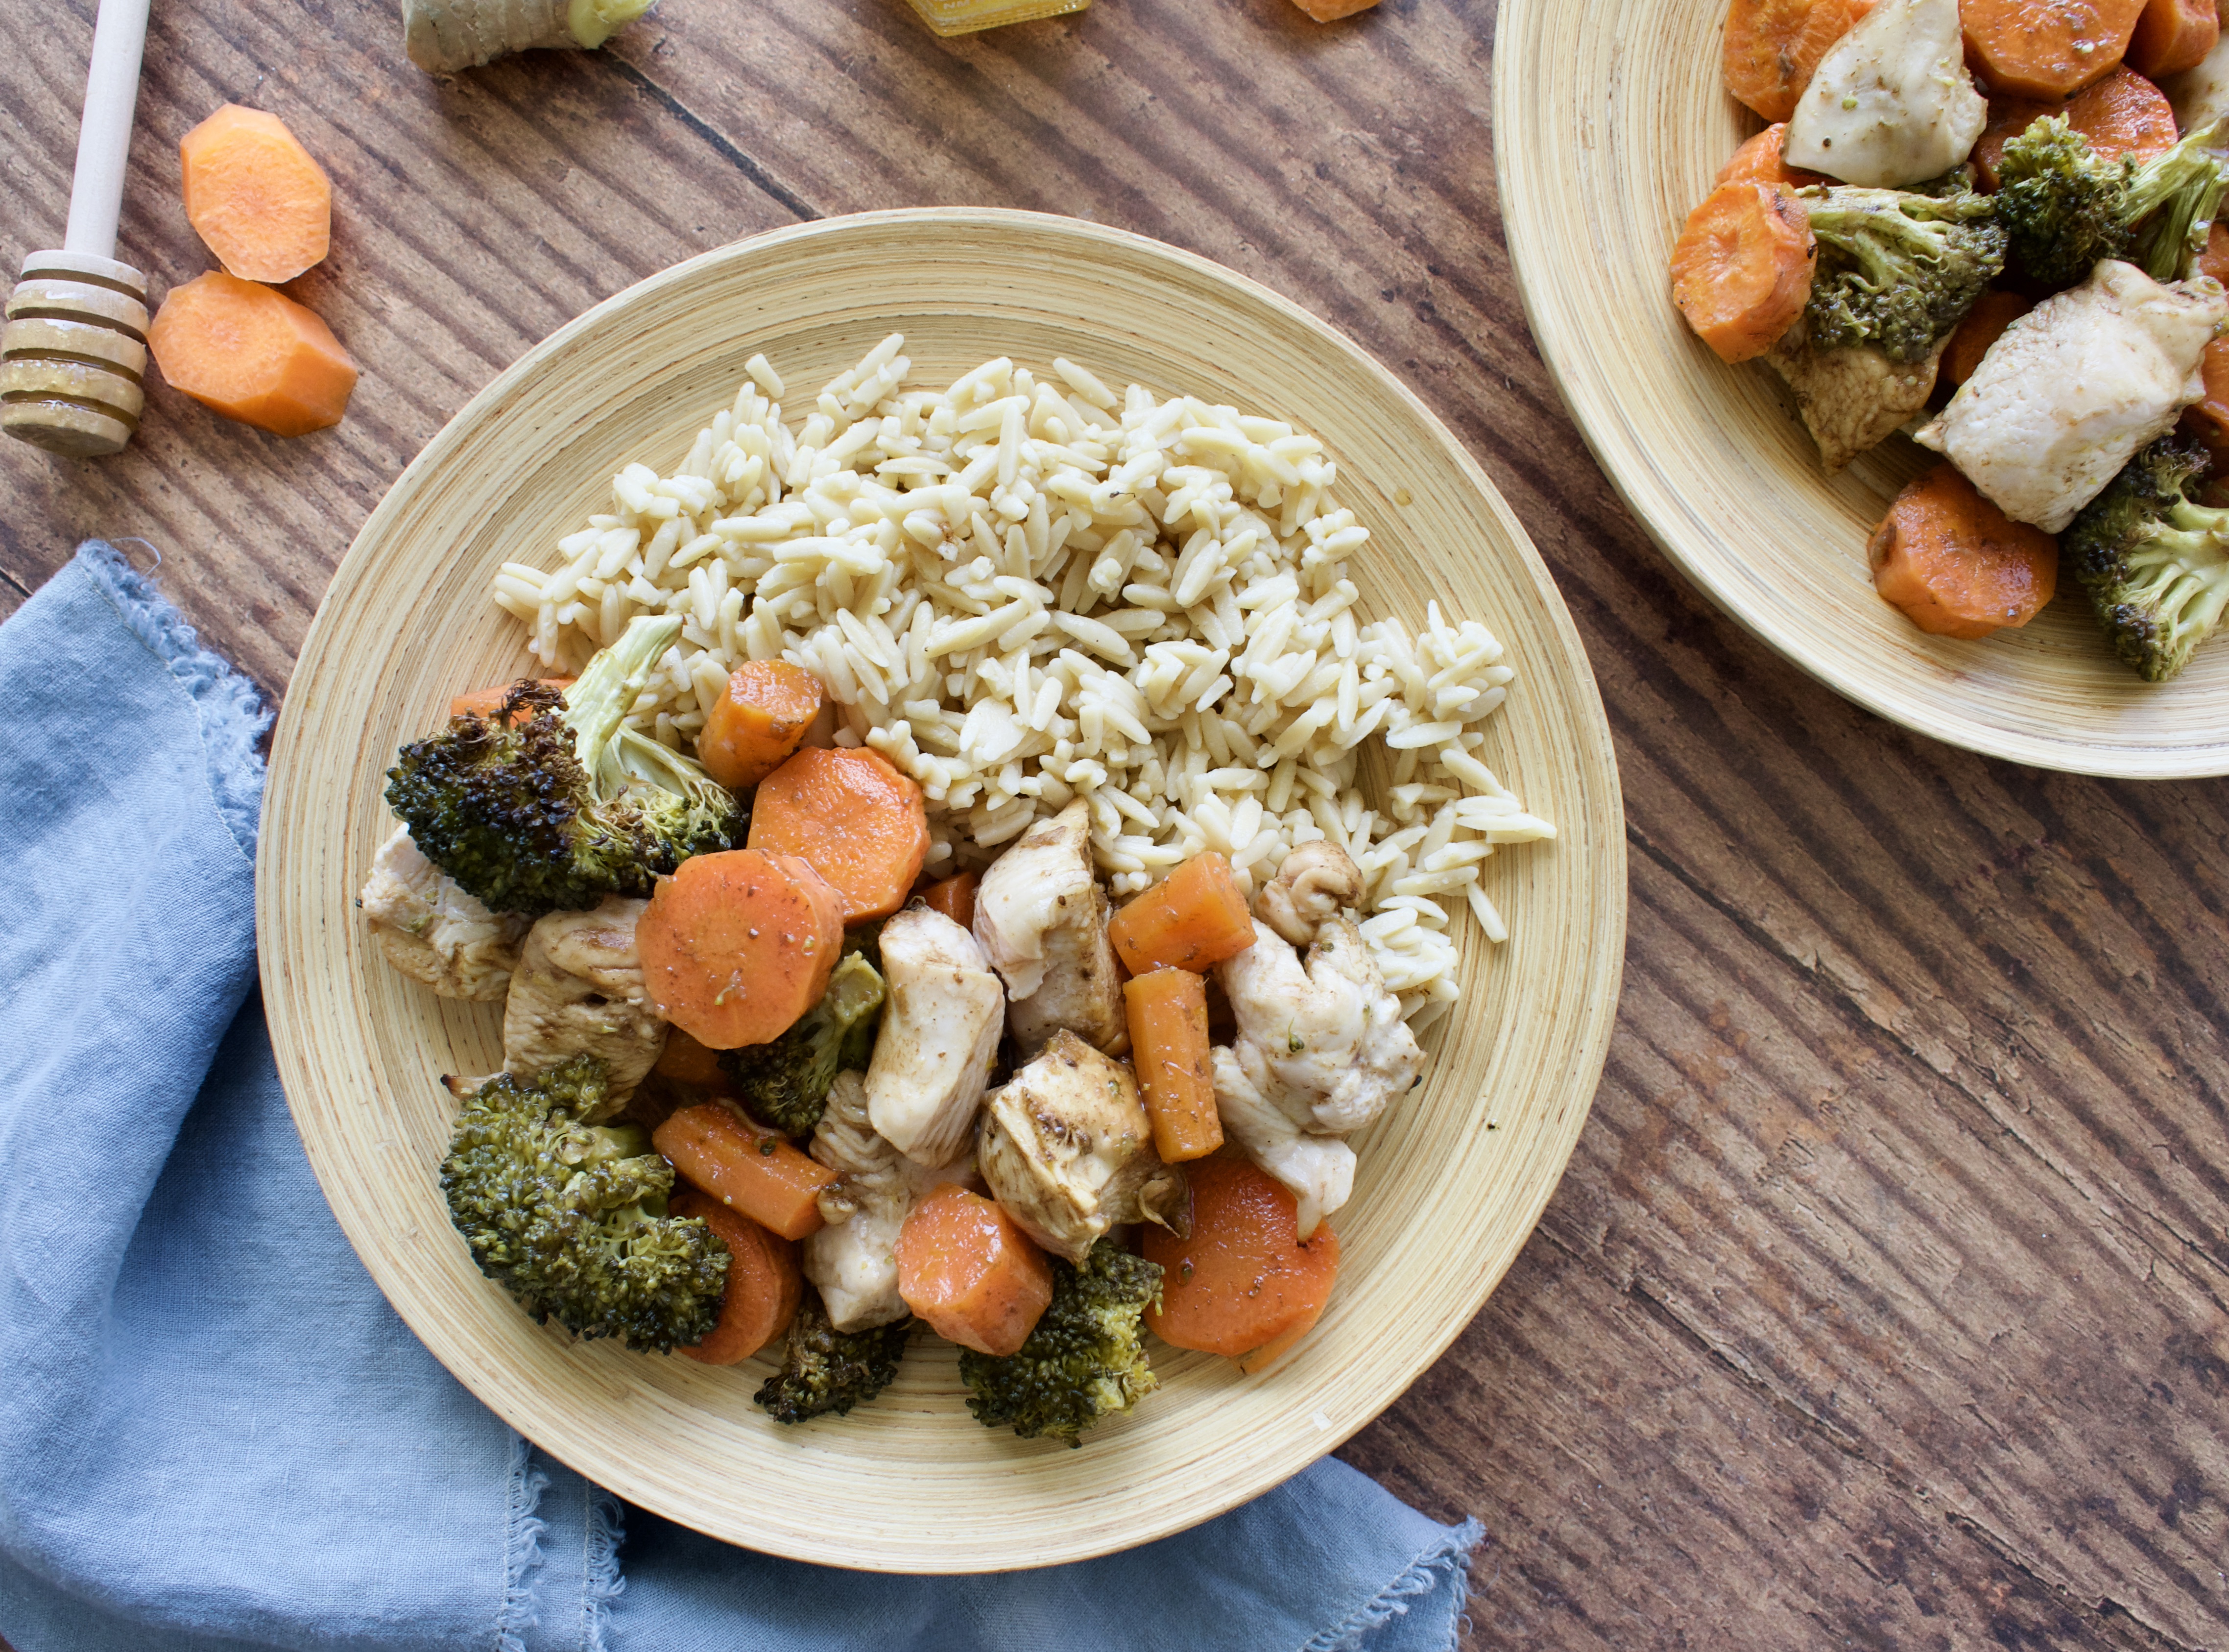
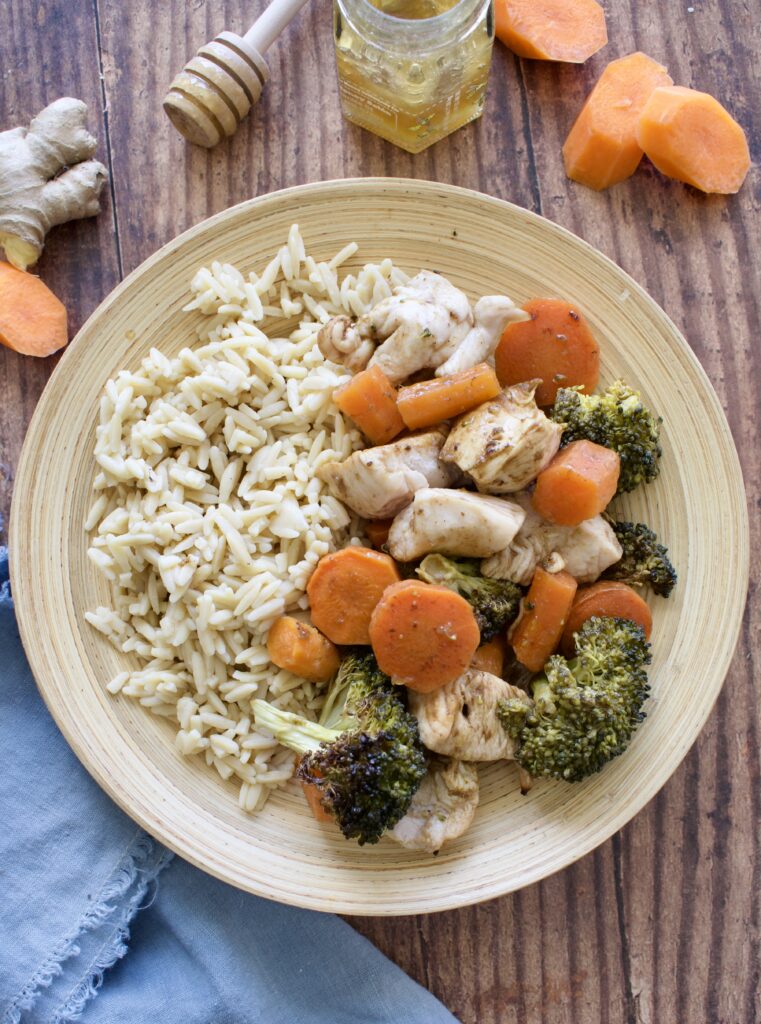
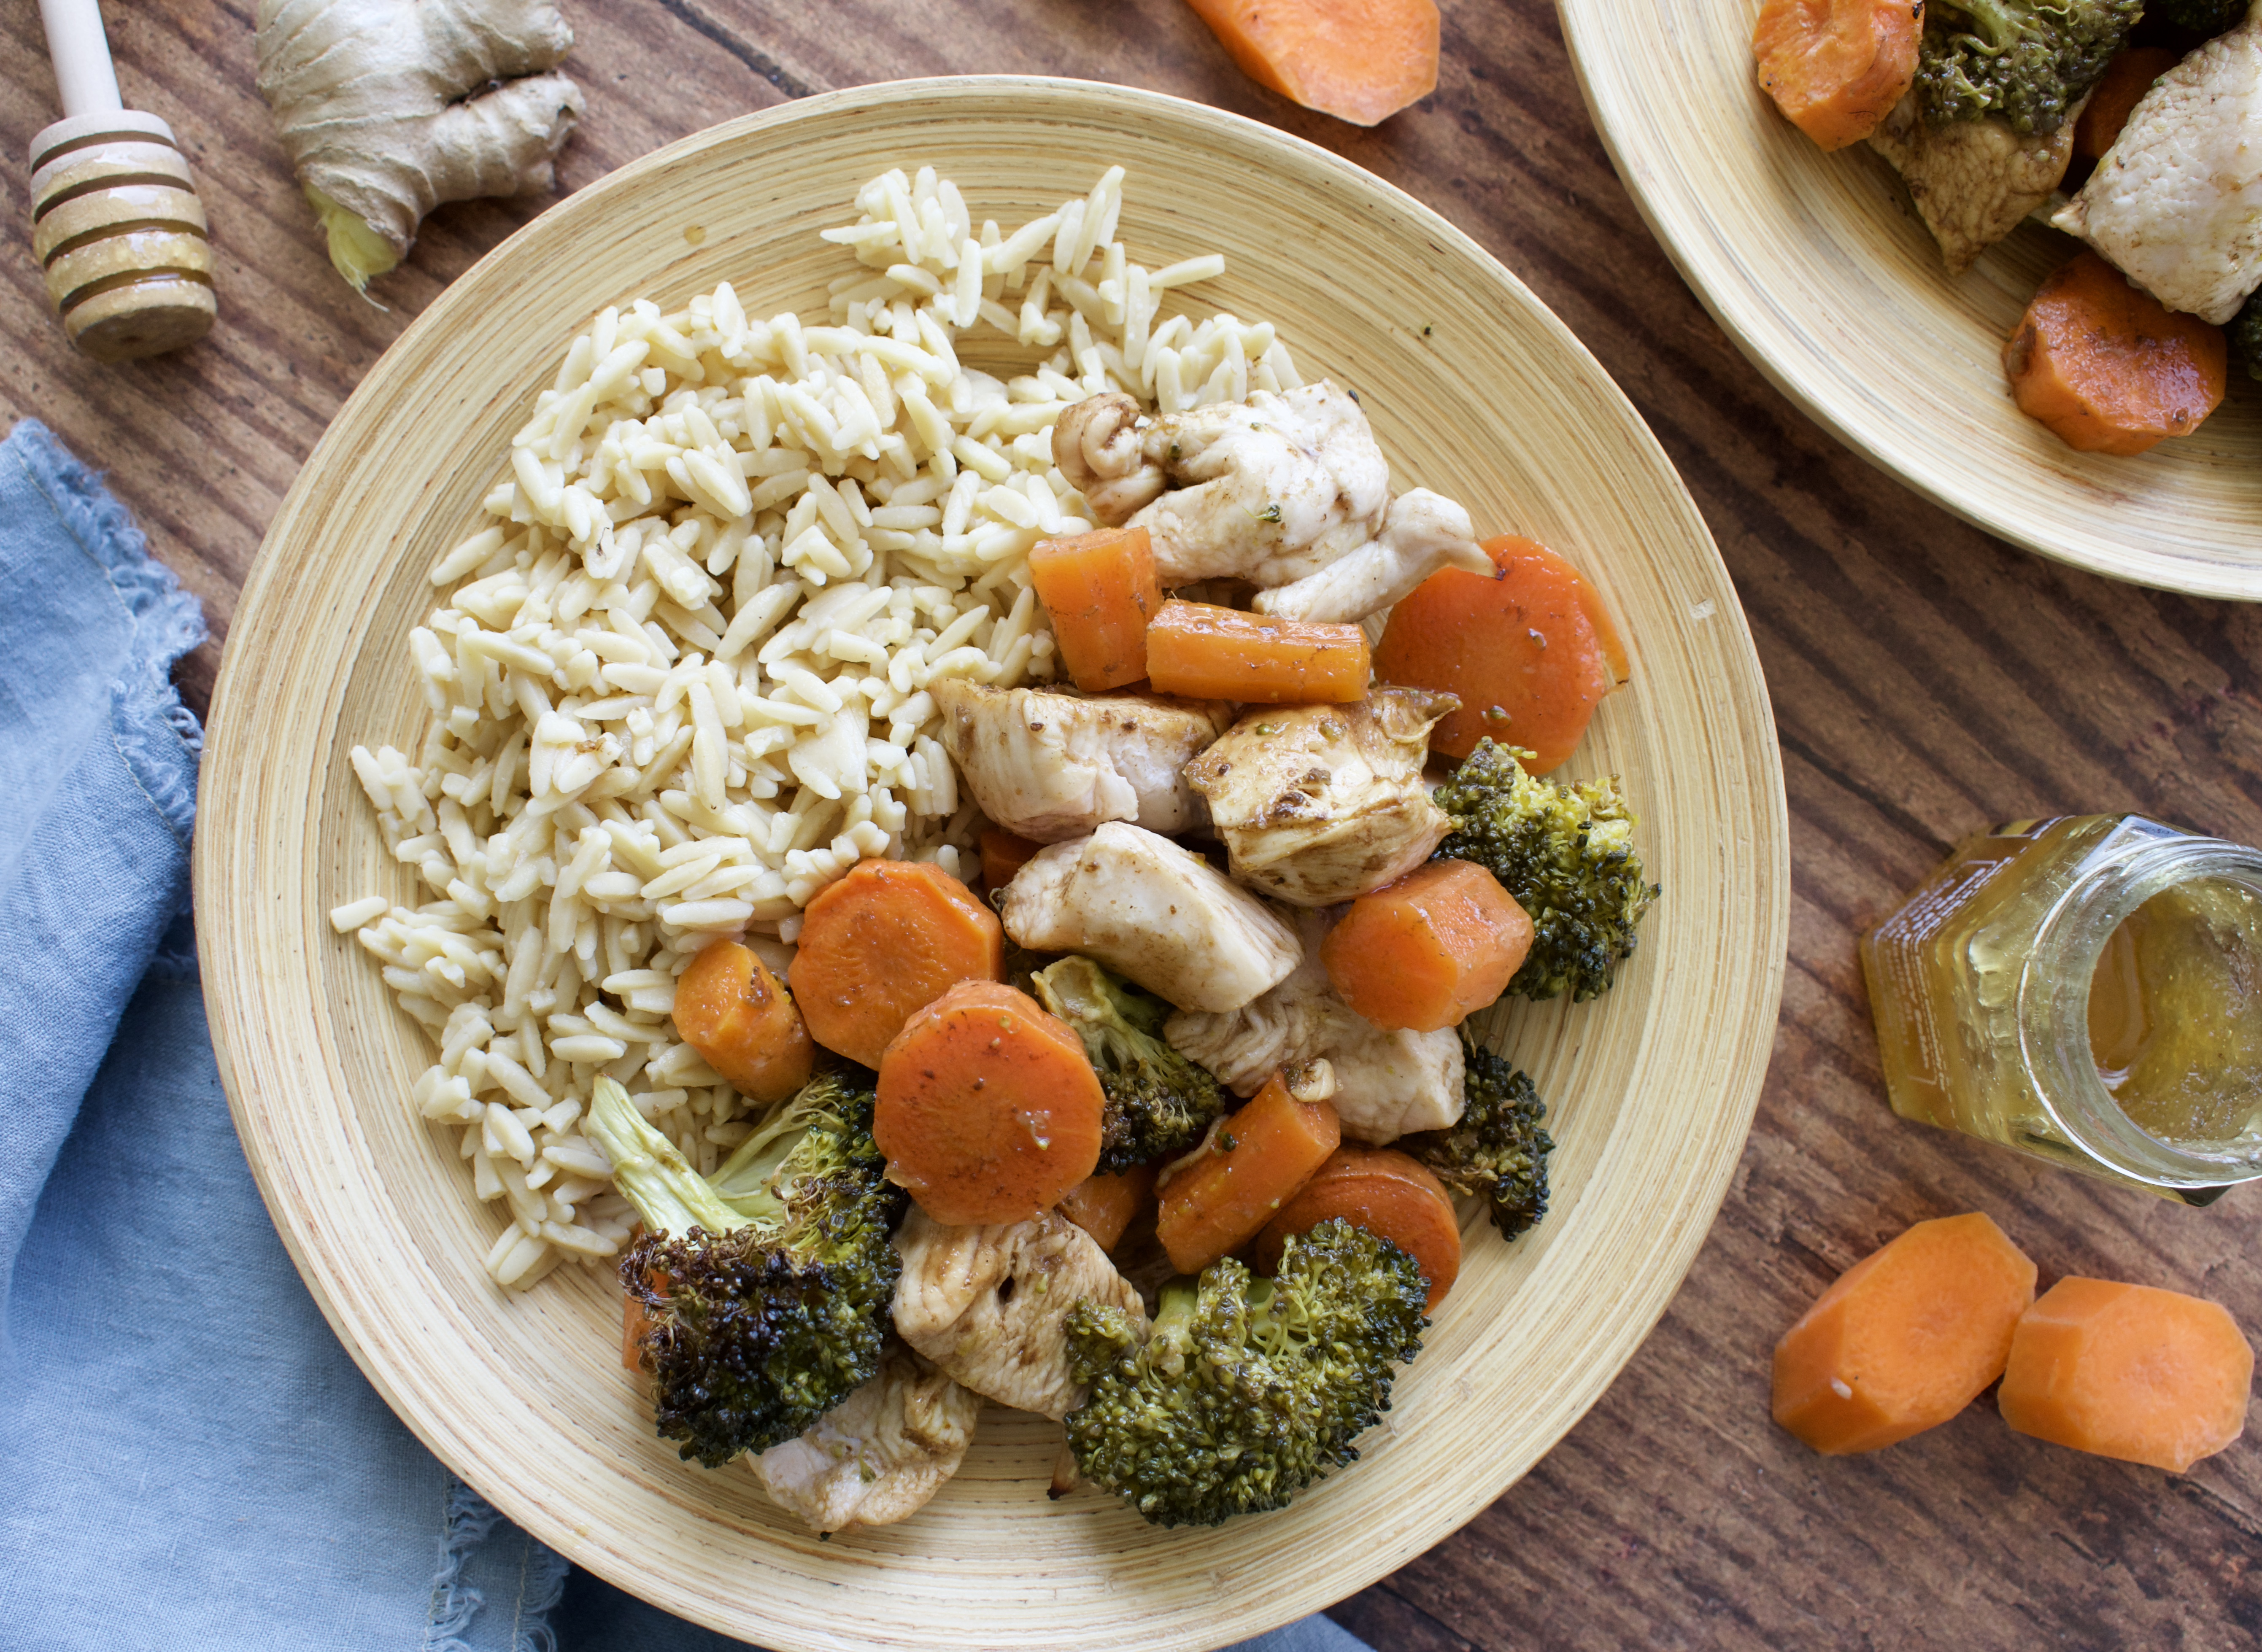
This easy sheet pan dinner is a delicious way to upgrade your standard chicken and vegetable dinner. Coated in a delicious honey balsamic, you’ll love this quick weeknight meal.
honey balsamic chicken and vegetables
Who doesn’t love a simple sheet pan meal? It makes dinner so much easier during a busy week. A lot of sheet pan meals can be boring because they are basically just chicken and veggies on a pan with some olive oil and salt. BORING! We need more flavor, people! That’s why I love this honey balsamic chicken.
This easy dinner is made with a honey balsamic sauce that upgrades your boring chicken and vegetables. I love this meal because it’s made on one sheet pan and doesn’t require reducing the sauce. If I don’t need to take extra steps, then I’m all about it. I wanted to create this meal without having to worry about cooking the sauce separately.
sheet pan honey balsamic chicken and vegetables
This simple sheet pan meal is completely gluten free, dairy free, nut free, and allergy friendly. It’s free of all major allergens, making it the perfect crowd pleasing dish for the entire family (or friends!). This recipe is also completely Paleo.
sheet pan chicken and veggies
Honey Balsamic Chicken and Vegetables
Ingredients:
-chicken
-broccoli
-carrots
-olive oil
-salt
-balsamic
-rice wine vinegar
-honey
-ginger
Process
This is the simplest meal you’ll make! You add your chopped veggies to a sheet pan and begin roasting them while you cut up the chicken and prep the sauce. The sauce is just whisking everything together, no reducing needed. Halfway through cooking, you’ll add the chicken to the sheet pan and toss everything with half of the sauce. Finish roasting until the chicken is cooked through, then toss everything with the remaining sauce. That’s it!
Upgrade your standard chicken and vegetable dish with this quick and easy weeknight dinner made on one pan! Packed with flavor and highly nutritious, this is the ultimate simple dinner recipe.
Toss the carrots and broccoli with the olive oil and salt and lay evenly across a parchment lined baking sheet. Bake for 30 minutes.
While veggies are roasting, prepare your sauce by whisking everything together in a measuring cup. Taste and adjust the ginger and honey to your liking.
After the veggies have been cooking for 30 minutes, add the chicken to the sheet pan and half the sauce. Toss everything and spread evenly across the pan again. Roast for another 15 minutes, until chicken is done and veggies are fork tender.
Remove the tray from the oven and toss everything with the remaining sauce.
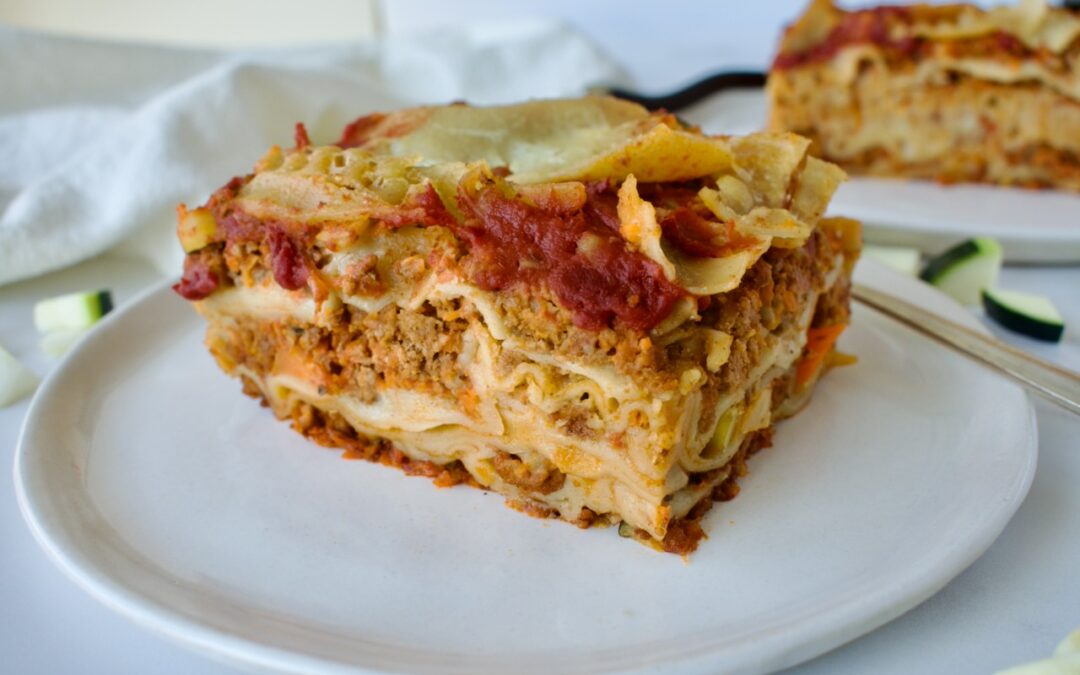
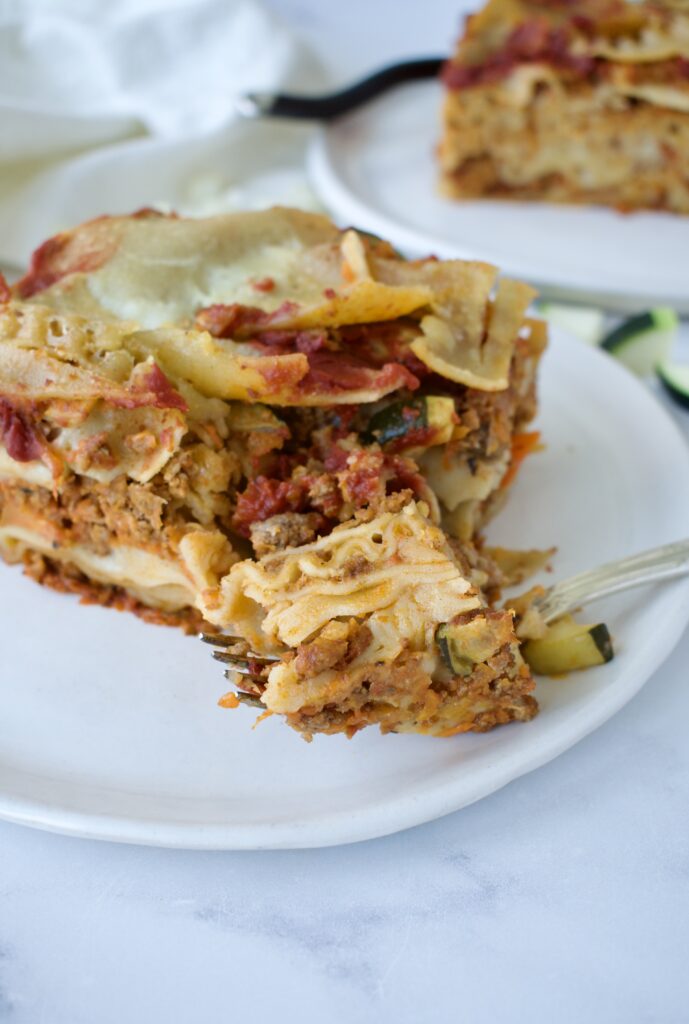
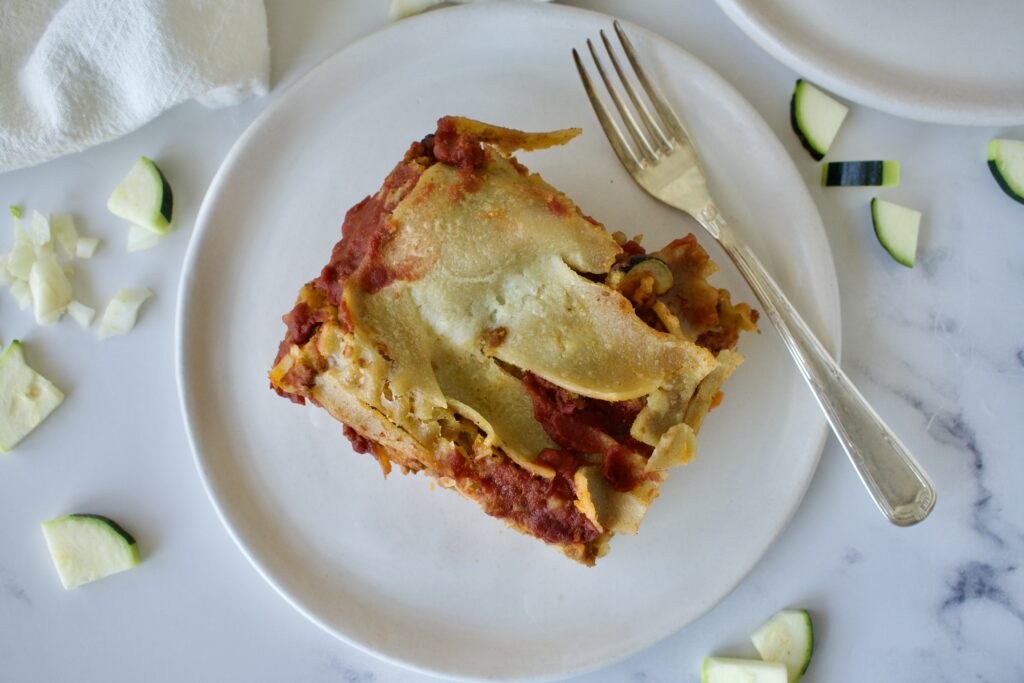
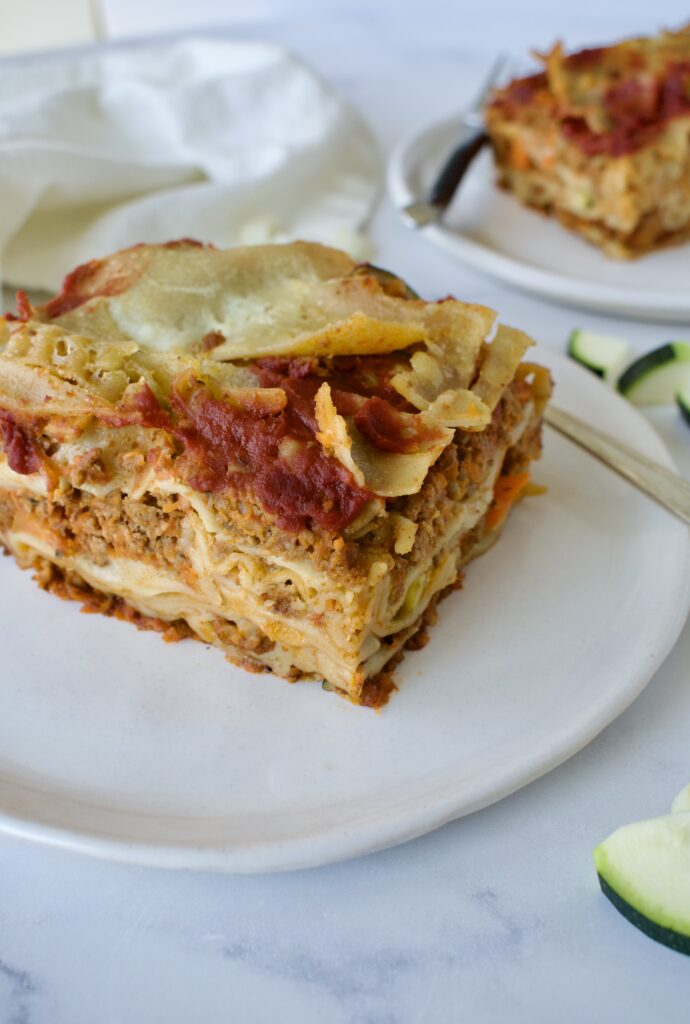
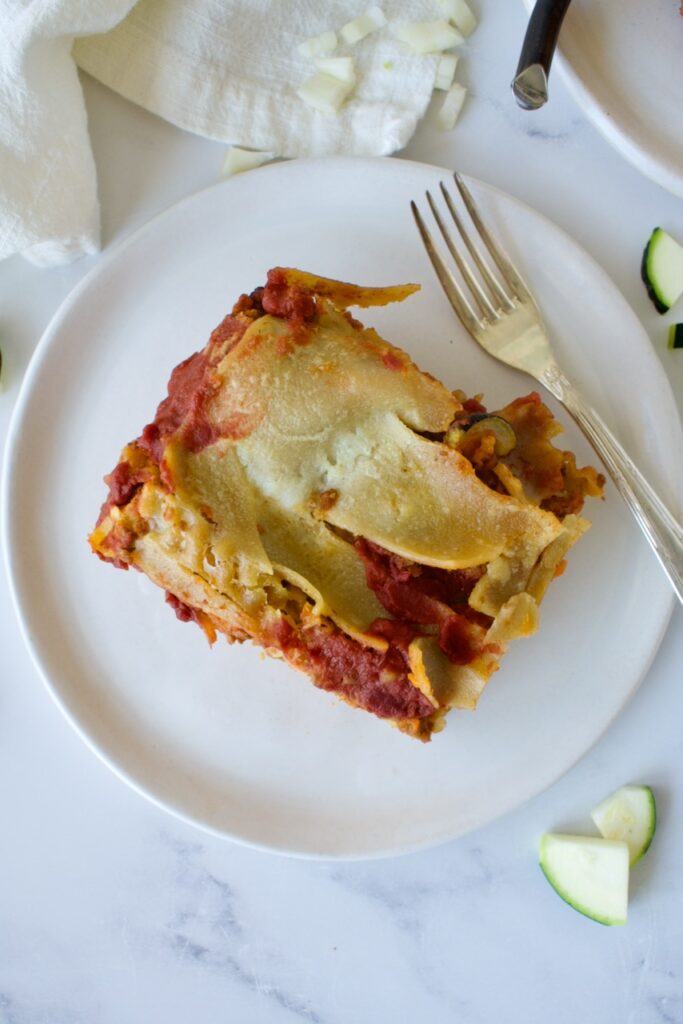
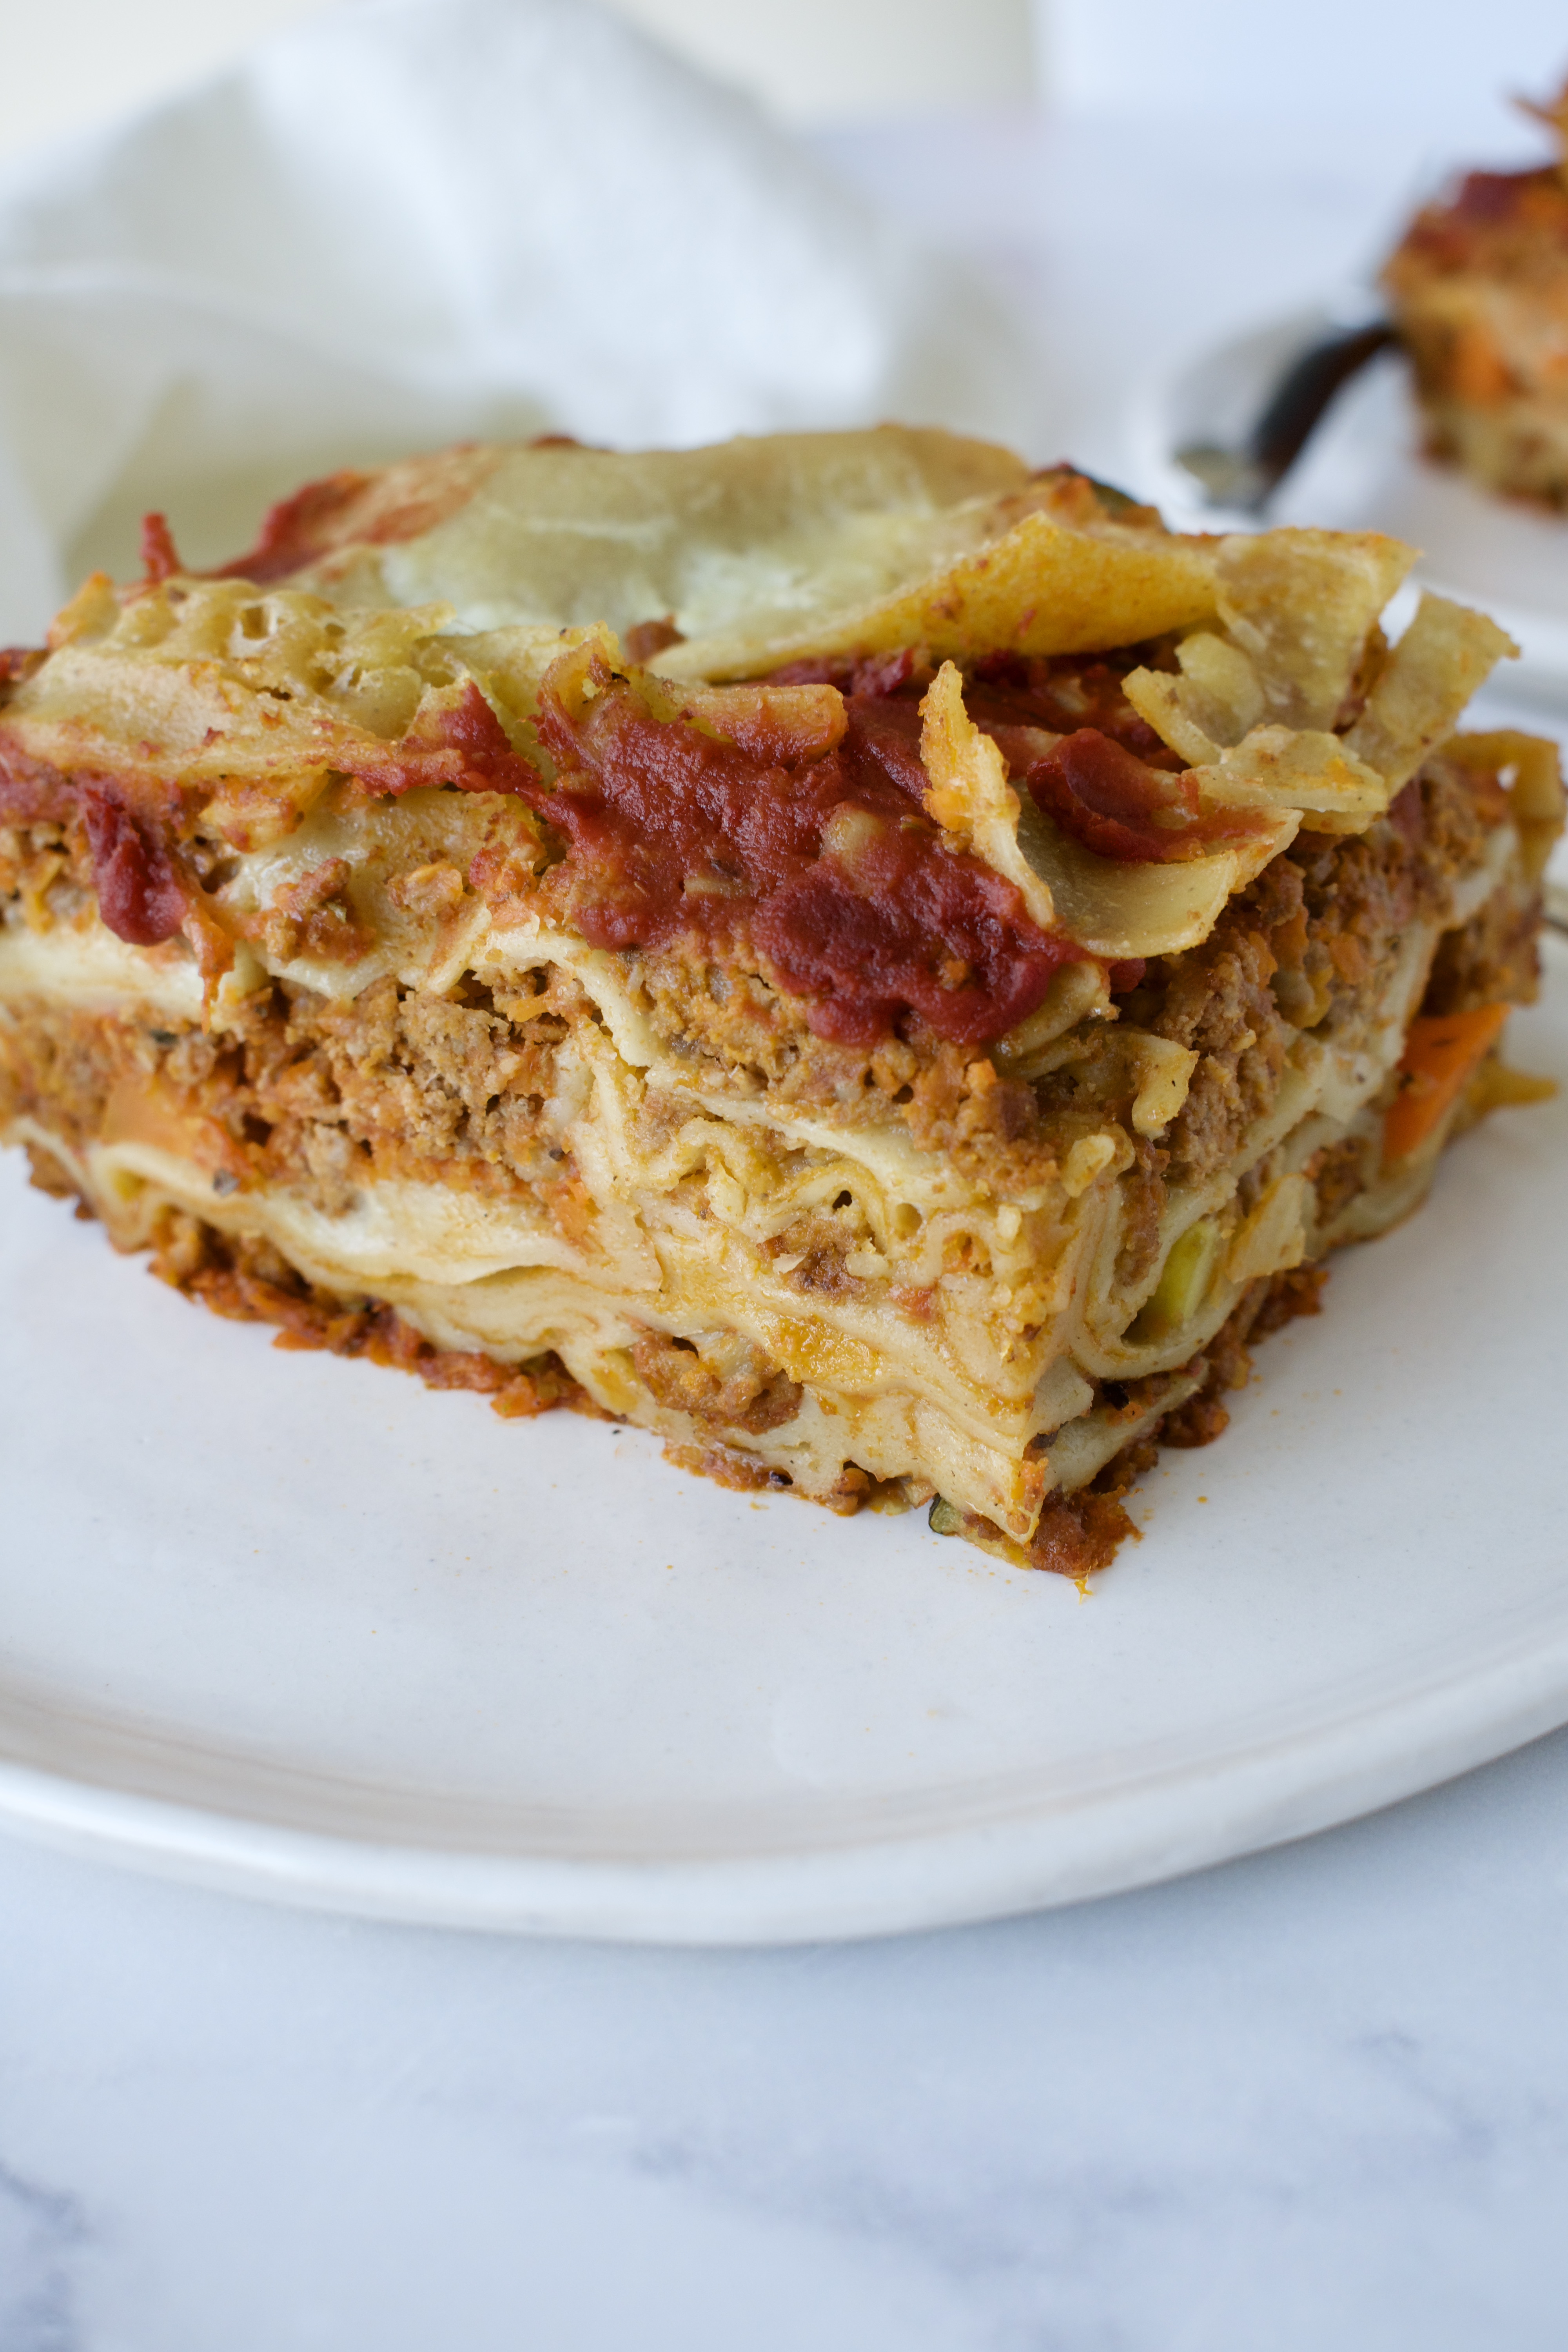
This veggie and protein packed lasagna is completely allergy friendly and low FODMAP. Everyone will love and be able to eat this dish!
gluten free and dairy free lasagna
You honestly won’t believe that this lasagna recipe is gluten free and dairy free. My gluten and dairy loving dad even gave this homemade lasagna high marks. It’s packed with three different vegetables along with ground beef making this dish a complete meal. It’s the perfect dinner party meal, family dinner option, or meal prep choice. This lasagna produces 8 servings and can be frozen in portions.
veggie packed lasagna
I love sneaking vegetables and protein in wherever I can. If you’ve been following me for a while, you know my goal is always to create healthy and allergy friendly versions of your favorite recipes. I thought lasagna would be a tough one due to the cheese and FODMAPS, but it ended up being much easier than I anticipated! This recipe does take some time and since the cheese is made from scratch, you do need to plan ahead (the cheese is super easy, though, don’t worry!).
I get so excited to eat this nutrient dense gluten free lasagna any chance I get. I honestly could probably eat it every night, it’s just that good. This homemade lasagna is proof that you can eat delicious, healthier, and allergy free versions of classic dishes! I can’t wait to hear what you think of this one.
gluten free lasagna
The Best Veggie Packed Lasagna
The layers:
The first key to this dairy free lasagna is dairy free cheese of course! We are going to make a completely vegan and allergy friendly cheese that has no weird additives. This cheese is also fully Paleo and I love using it in lots of other recipes! The cheese does need to be made ahead of time, by at least 3 hours, or even the day before. This vegan cheese is made from coconut milk, nutritional yeast, tapioca starch, garlic infused olive oil, and salt. It’s super easy to make, it just needs time to set before using it in the lasagna.
The next important layer is the noodles. I love using the Jovial gluten free noodles. They are made from rice with no corn involved!
Of course, we need our filling. This delicious lasagna is made high protein and nutrient dense with a mix of ground beef and three different veggies PLUS tomato sauce! Fennel (or onion if you can handle it), zucchini, and carrots add lots of nutritious fiber and micronutrients to this classic dish. Shredded carrots are added to the ground beef and tomato sauce so you can’t even taste them! Fennel and zucchini taste pretty mild once sautéed and mixed in with the rest of the ground beef mixture, keeping this dish picky eater friendly.
Ingredient notes:
Cheese: make sure to use full fat coconut milk from the can to make the cheese. I also use garlic infused olive oil to keep this recipe low FODMAP, but I provide alternatives if you don’t have an infused oil and prefer to use garlic powder.
Tomato sauce: I love using Rao’s Sensitive Marinara as it doesn’t contain any garlic or onion. This helps keep the lasagna stomach problem girl friendly!
Noodles: feel free to use whatever noodles you prefer, but as mentioned above, my favorite brand is the Jovial noodles since they are completely allergy friendly and no-boil.
Fennel: I use fennel over onion since fennel is low FODMAP, but you can always use onion instead!
beef and vegetable lasagna
Also, it just occurred to me that lasagna is a casserole… right? Leave a comment and let me know if you think lasagna counts as a one. If so, then here’s to a delicious gluten free and dairy free casserole!
This veggie and protein packed lasagna is completely allergy friendly and low FODMAP. Gluten free and dairy free, this classic dish still tastes amazing! Everyone will love this healthier take on lasagna.
*Please keep in mind the cheese needs to be made ahead!
Cheese
To make the cheese, combine the coconut milk, olive oil, nutritional yeast, salt, and lemon juice together in a saucepan and whisk to combine over medium heat.
Whisk together the water and tapioca starch in a measuring cup. Pour this into the saucepan with the other ingredients, whisking often, until the cheese thickens.
It will take about 5 minutes to start noticing it thickening and another 5-10 to reach the desired consistency. You'll know the cheese is done because it starts to pull away from the side of the pan. It should drip off a spatula like a pot of melted cheese would.
Remove the cheese from the heat and transfer to a heat safe, glass container. Let cool at room temperature for 15-30 minutes, before adding the lid and transferring to the fridge to set for at least 2-3 hours or overnight.
Lasagna
Preheat oven to 375F.
Heat a large skillet over medium heat and add 2 Tbsp of olive oil. Sauté the fennel for 5 minutes then add the zucchini and sauté for about another 5 minutes until soft and veggies are slightly browned.
You can cook the beef at the same time in a separate large frying pan if you have one, or set the veggies aside and brown the beef in the same pan. Brown your ground beef then add in the carrots, 1 1/2 jars of tomato sauce, zucchini, fennel, salt, basil, and oregano. Mix to combine and set aside.
To assemble the lasagna, keep in mind that we will be making 4 layers. In a large 9×14 dish, spread a quarter of the meat and veggie mixture over the bottom. Arrange 4 lasagna noodles in a single layer on top of the mixture. Then use your hands to spread a quarter of the homemade vegan cheese over the noodles. This is messy and the cheese may seem a little runny, but it's okay! It may not cover ever inch of noodles perfectly and that is alright. Just use your hands the stretch the cheese over as much as you can.
Now, take the next quarter of meat mixture and spread it evenly over the cheese. Add your noodles. Add your cheese.
Repeat 2 more times.
Take some of the leftover sauce and spread around with the cheese on the top layer, being sure to get the edges of the lasagna noodles (they need liquid to cook!). Cover the dish with tinfoil and place in in the oven for 50 minutes.
Uncover the noodles and pat them down gently to make sure they are flat and covered in some sauce and cook for another 10 minutes until golden and bubbly.
Let cool for at least 10 minutes before slicing and serving!
This lasagna will stay fresh in the fridge for up to 4 days and can be portioned and frozen if needed!
Notes
*If you do not have garlic infused olive oil, you can use regular olive oil plus a clove of minced garlic or 1/2 tsp. garlic and onion powder.
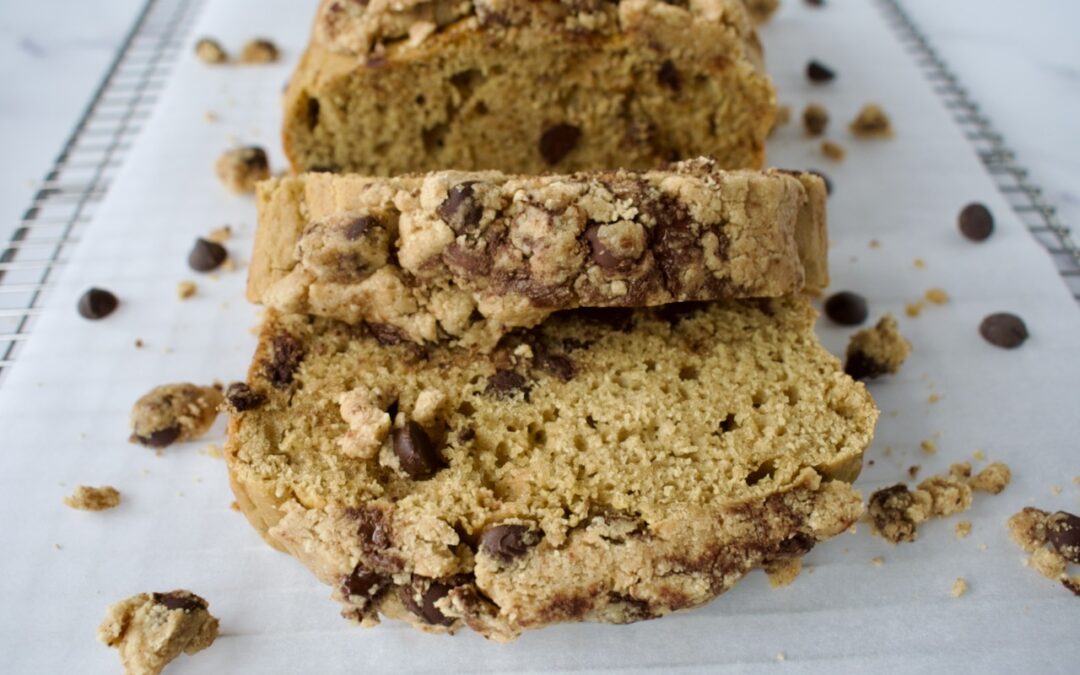
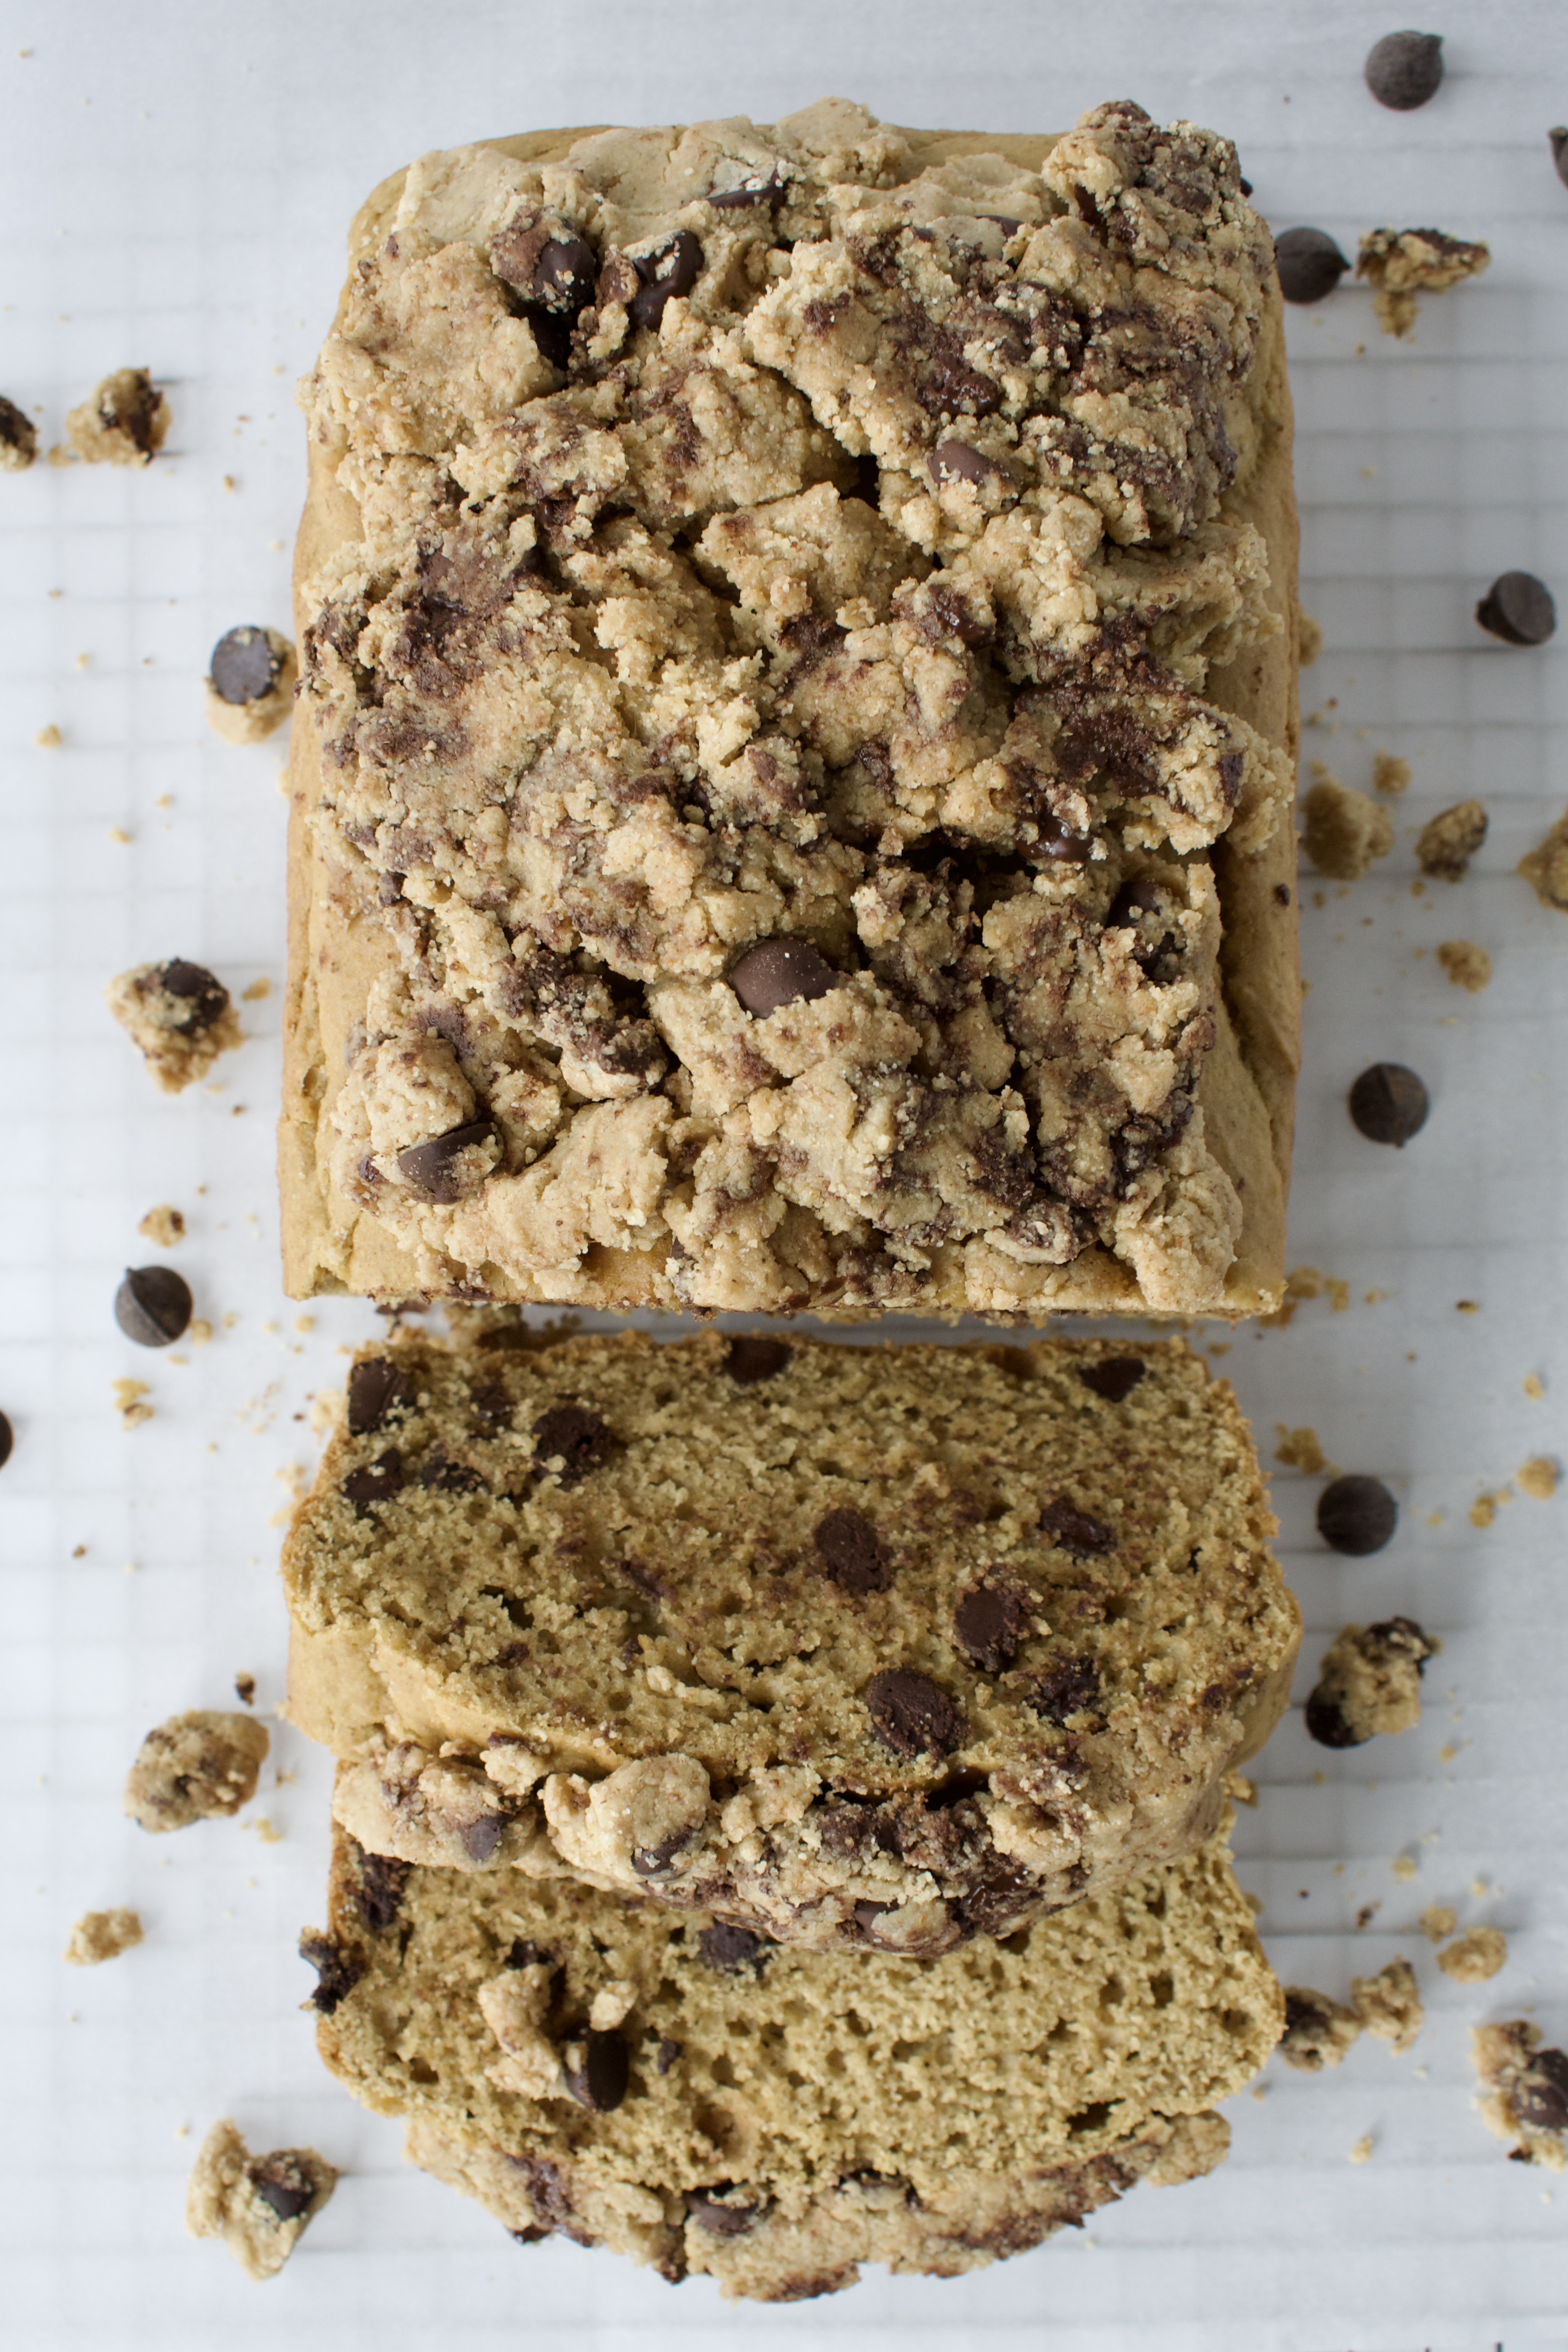
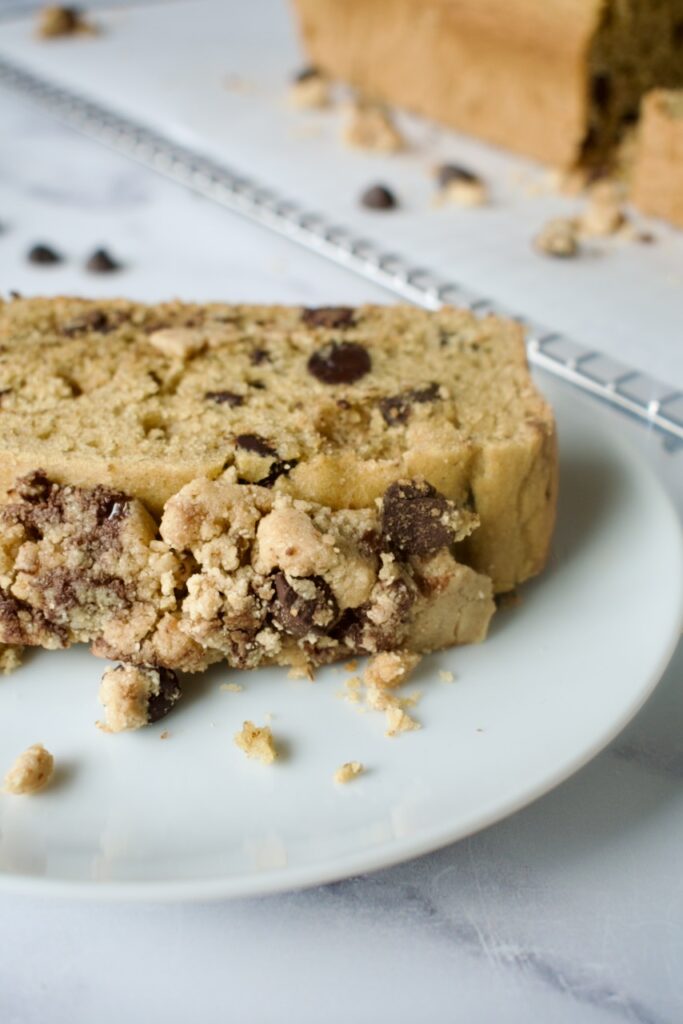
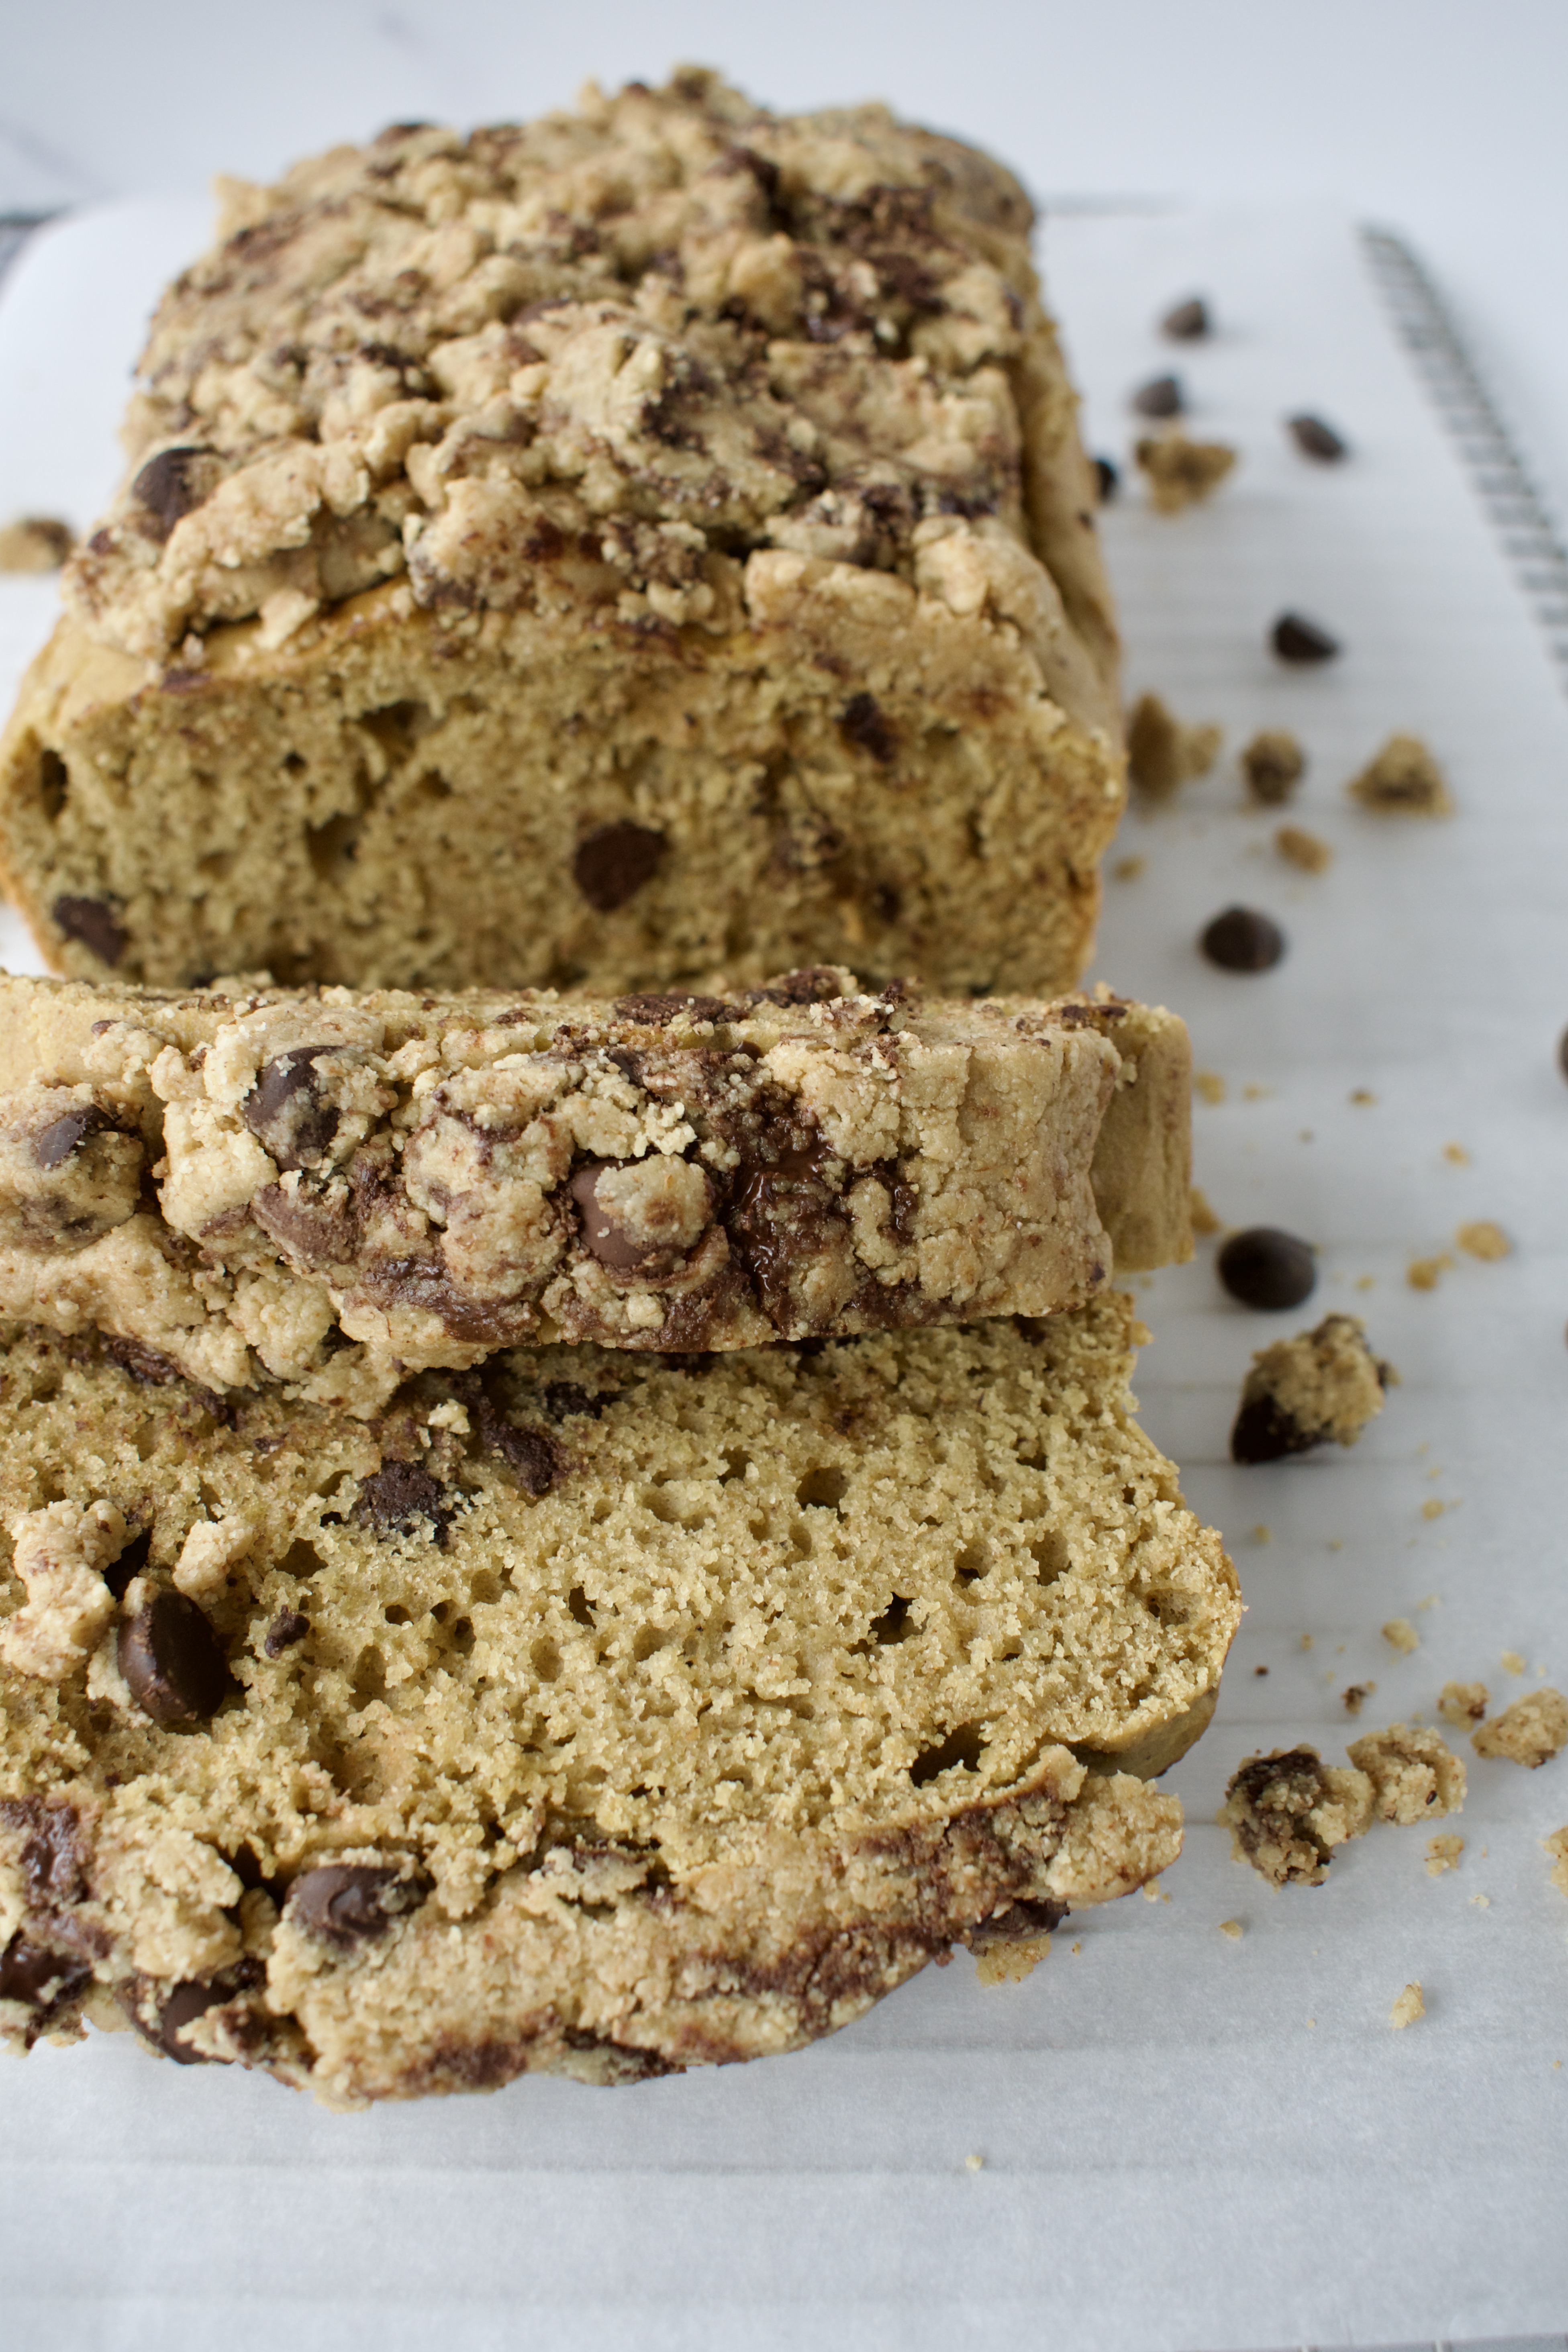
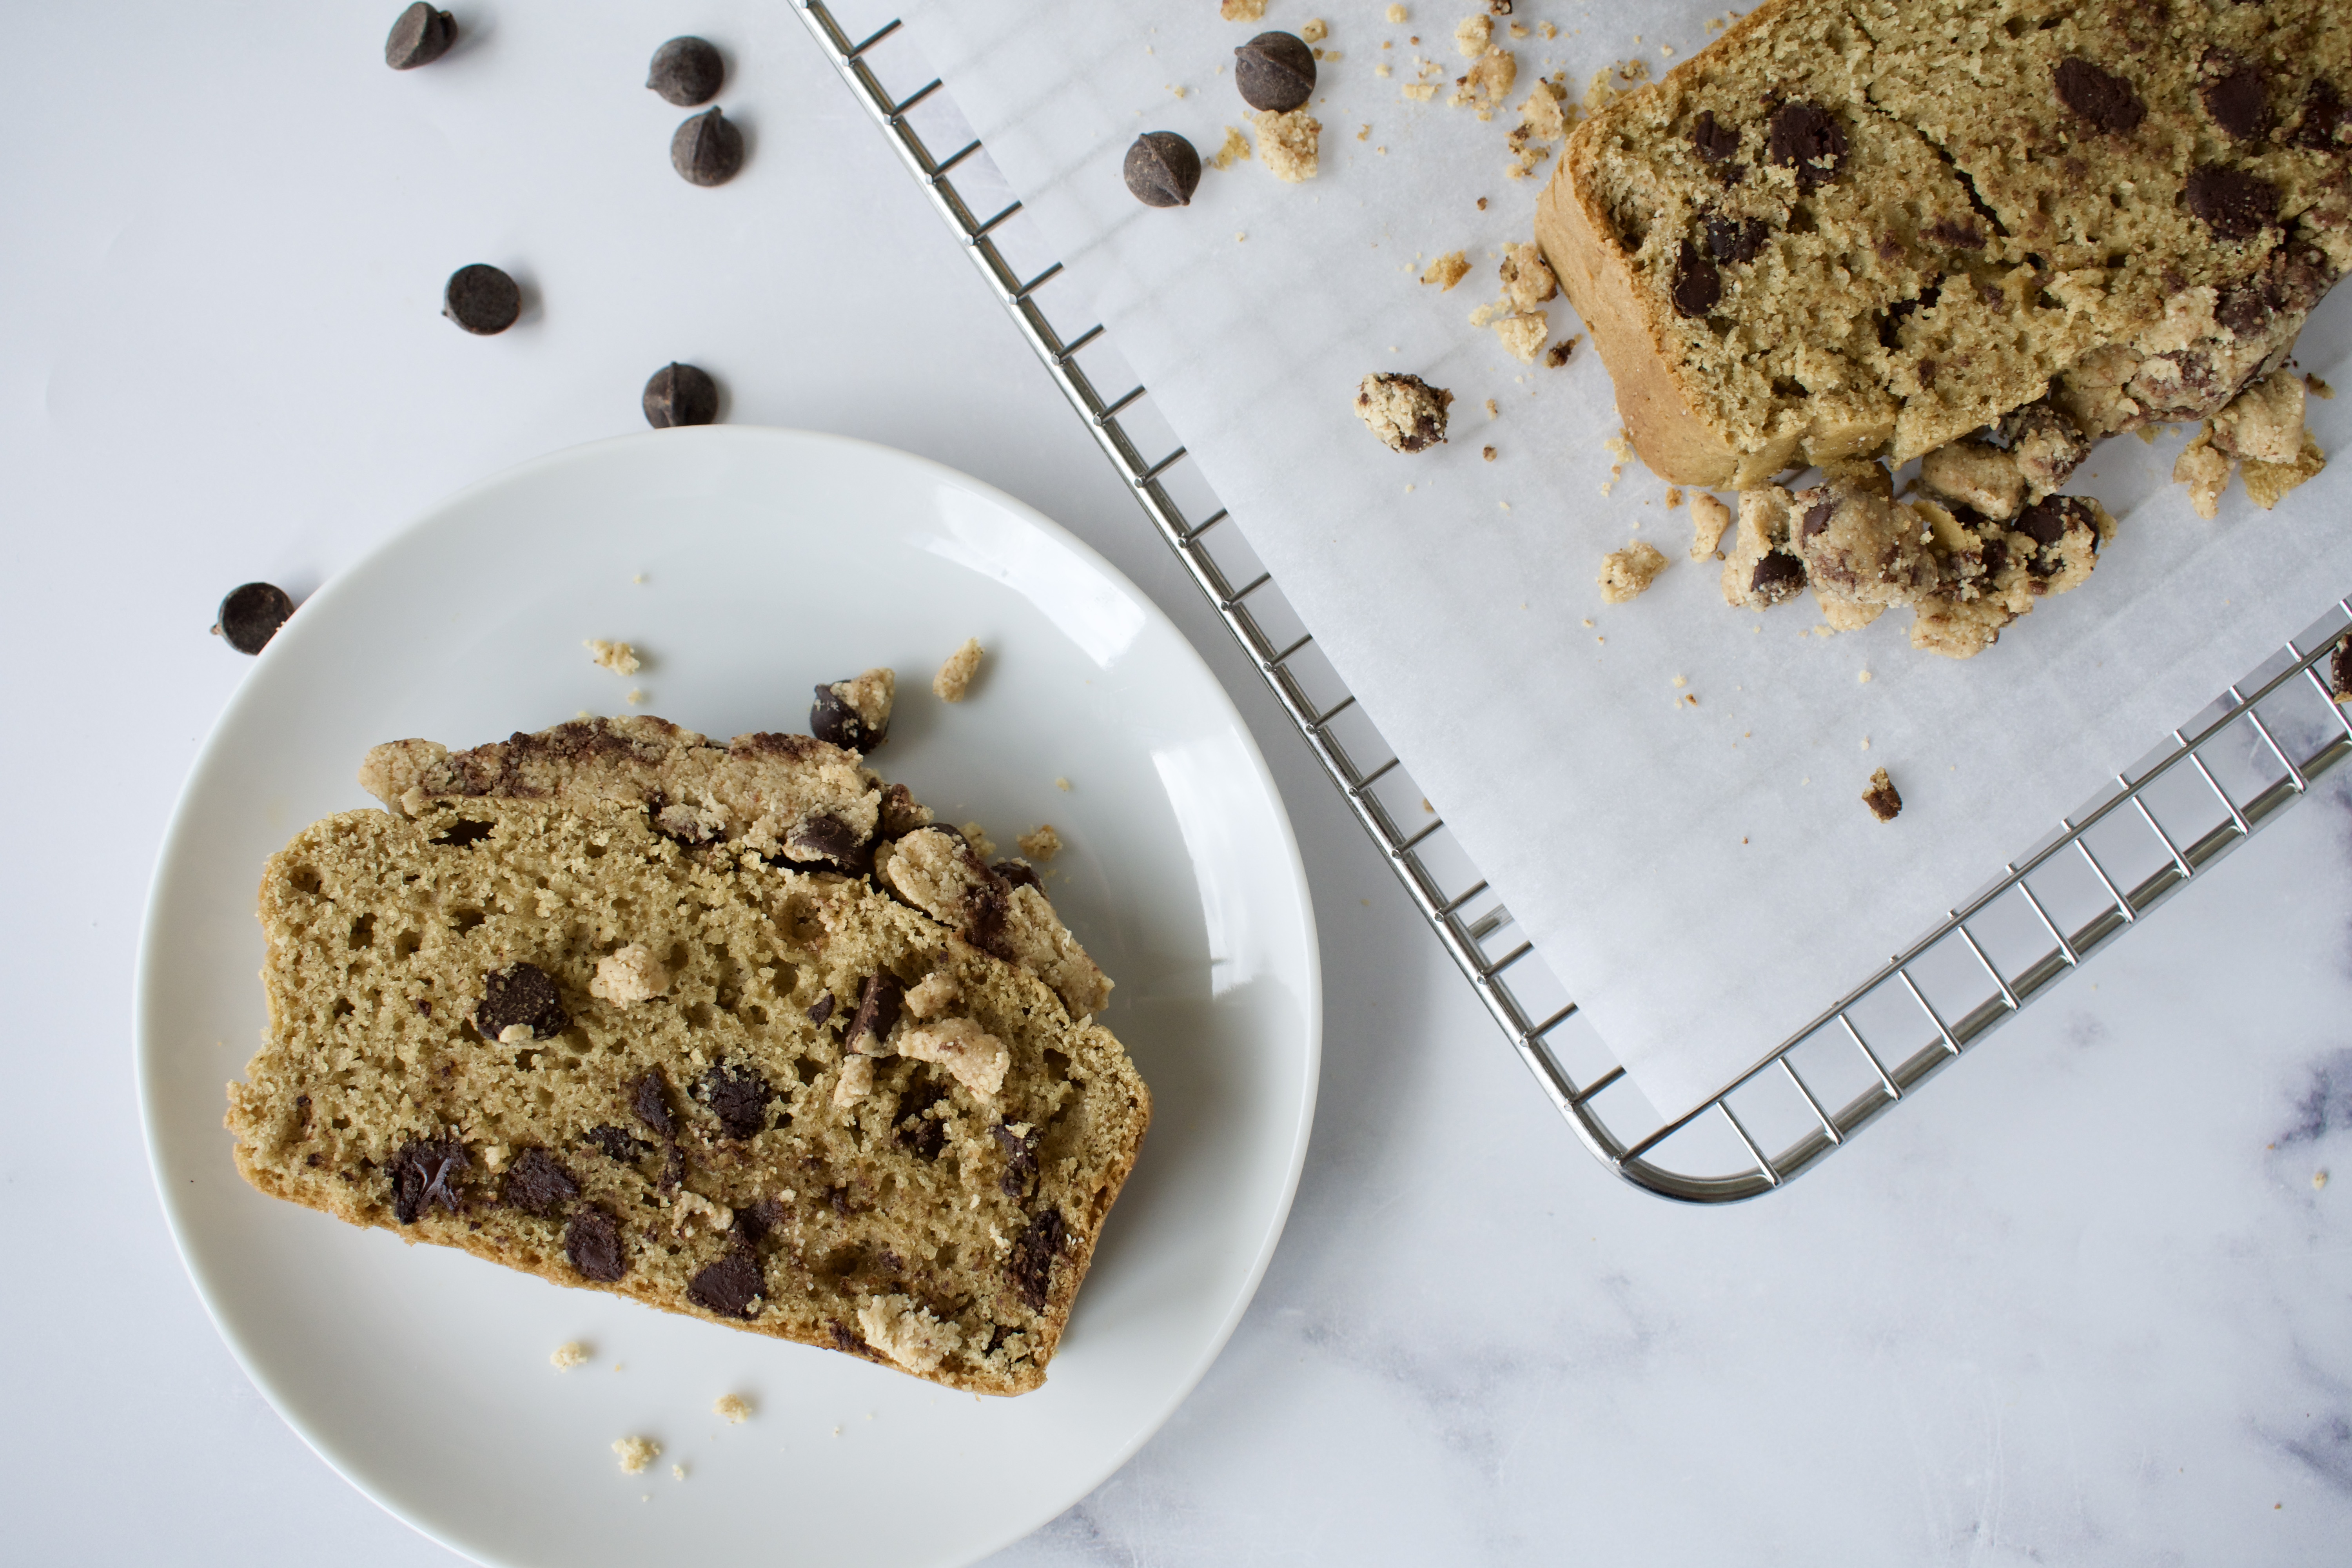
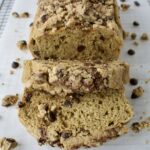
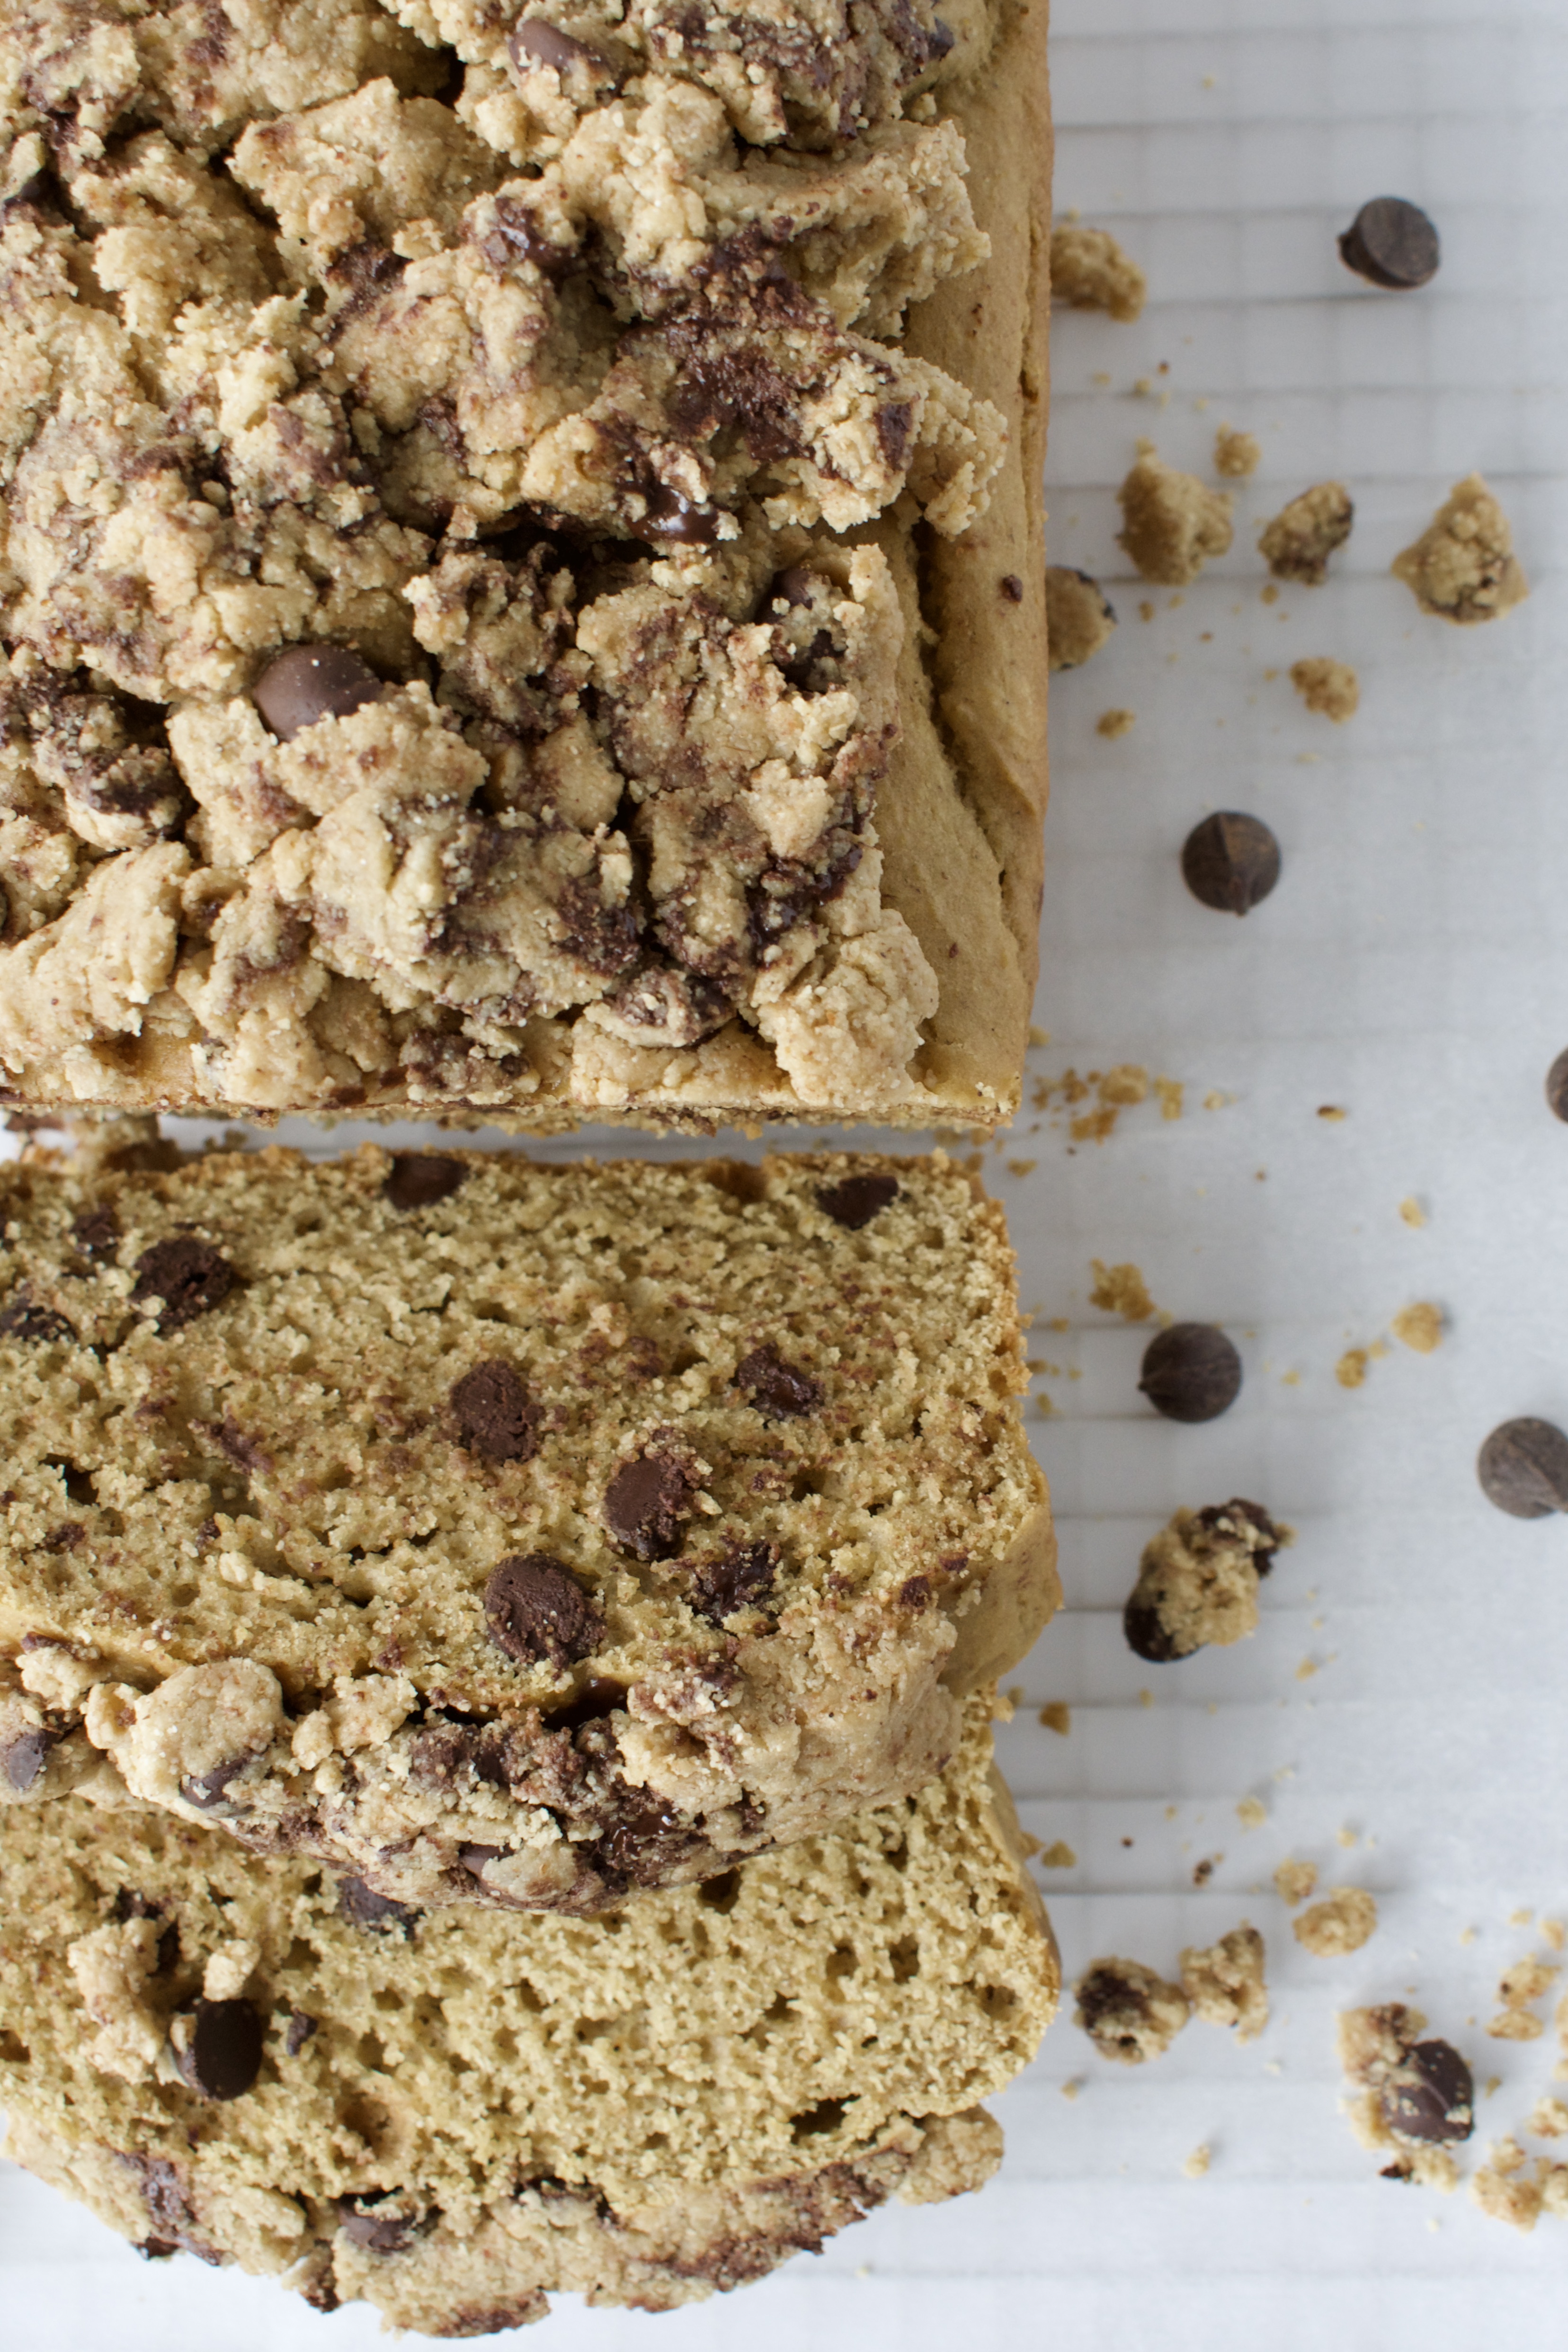
If you love cookie dough, then this bread is for you! You can have healthy cookie dough and eat it too. This loaf is gluten free, dairy free, and refined sugar free.
gluten free cookie dough bread
I’m absolutely obsessed with this cookie dough bread. I love cookie dough (who doesn’t?!), so I put it into bread form. AND this gluten free bread is actually healthier than you could imagine. it’s a fraction of the sugar of traditional cookie dough and can be made fully refined sugar free.
gluten free cookie dough bread
I knew I wanted to make this loaf more than just a chocolate chip bread. It needed some oomph. So I decide adding some raw, edible cookie dough on top would really bring it all together! This chocolate chip loaf is made dense and moist with the addition of yogurt, so it’s not just like a fluffy chocolate chip muffin- you really get that cookie dough vibe. I didn’t want it to be a banana bread, so the yogurt is what still gives us the thick, gooey vibes! Then there is a layer of delicious gluten free cookie dough on top to really take this bread to the next level.
gluten free cookie dough bread
Gluten Free Cookie Dough Bread
Ingredients:
The loaf itself is made of a mix of gluten free flours that includes 1:1 gluten free flour, tigernut or almond flour, and oat flour. Then there are the basics of baking powder and soda, and salt. The wet ingredients consist of eggs, maple syrup, liquid oil or butter, yogurt, and vanilla extract. Of course, plenty of chocolate chips too! The flour combo and yogurt are what give this bread the delicious gluten free cookie dough vibes.
Make sure to use certified gluten free oat flour to keep this recipe completely gluten free. I like to grind my own oat flour.
Use a vegan butter and yogurt to keep this recipe dairy free.
You can keep this recipe completely refined sugar free depending on the chocolate chips you use!
The vegan cookie dough topping is made from a mix of oat and tigernut (or almond) flour, maple syrup, coconut oil, granola/nut/seed butter of choice, vanilla, and chocolate chips. The topping is optional, but just makes this delicious dessert more decadent.
Process:
Cookie dough bread is really easy to make! First, you sift the dry ingredients together. Then beat all the wet ingredients together. Add the dry to the wet, fold in the chocolate chips, and bake.
While the bread is cooling, you can make the cookie dough topping by whipping the wet ingredients together and then adding the dry to combine. Fold in the chocolate chips then top your loaf with the delicious gluten free cookie dough!
This healthy cookie dough bread is gluten free, dairy free, and can be made refined sugar free. It's a decadent and delicious snack or dessert that takes everyones favorite- cookie dough- and makes it into an edible loaf!
Sift together the dry ingredients in a medium bowl and set aside.
In a large bowl, beat together the eggs, maple syrup, butter/oil, yogurt, and vanilla extract until well combined.
Add the dry to the wet and mix until well combined.
Fold in the chocolate chips.
Let batter sit while you line a loaf pan with parchment paper. Spread the batter evenly into the pan and bake for 35-40 minutes, until just done (toothpick has a few crumbs on it).
Let loaf cool in the pan while you make the cookie dough topping. Beat together the syrup, oil, nut/seed butter, and vanilla until well combined. Add in the dry ingredients and beat to combine. Fold in the chocolate chips. Press the cookie dough on top of the loaf evenly and gently.
After 10 minutes, remove the loaf from the pan to finish cooling on a wire rack. Let the loaf cool completely, preferably several hours, before cutting into it.
I highly suggest warming up a slice before eating. It tastes amazing warmed with the chocolate chips a little bit melty.
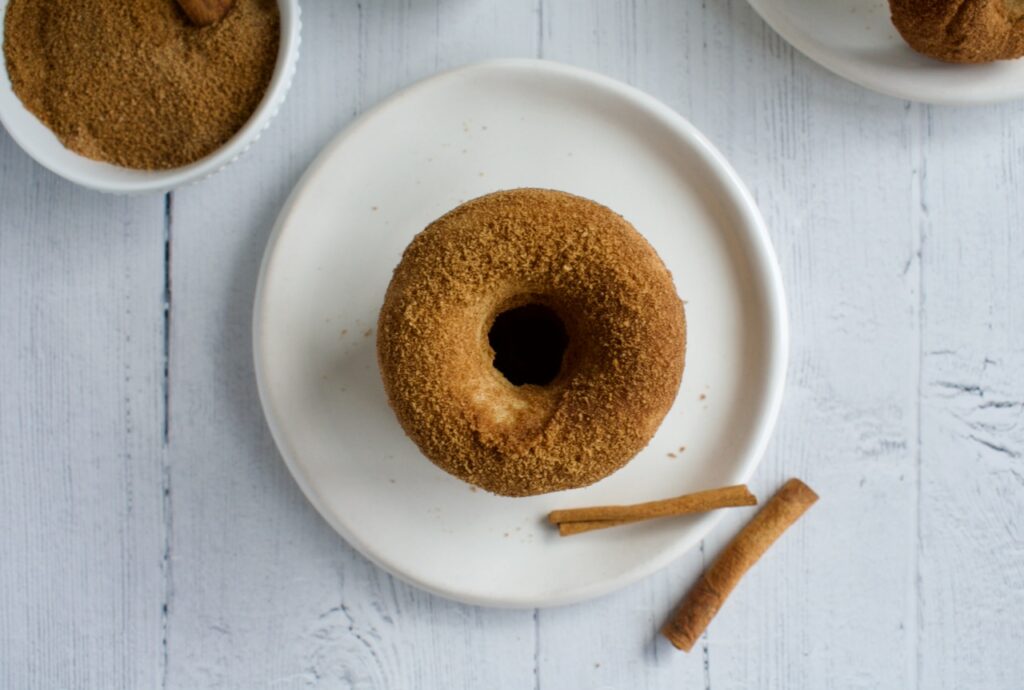
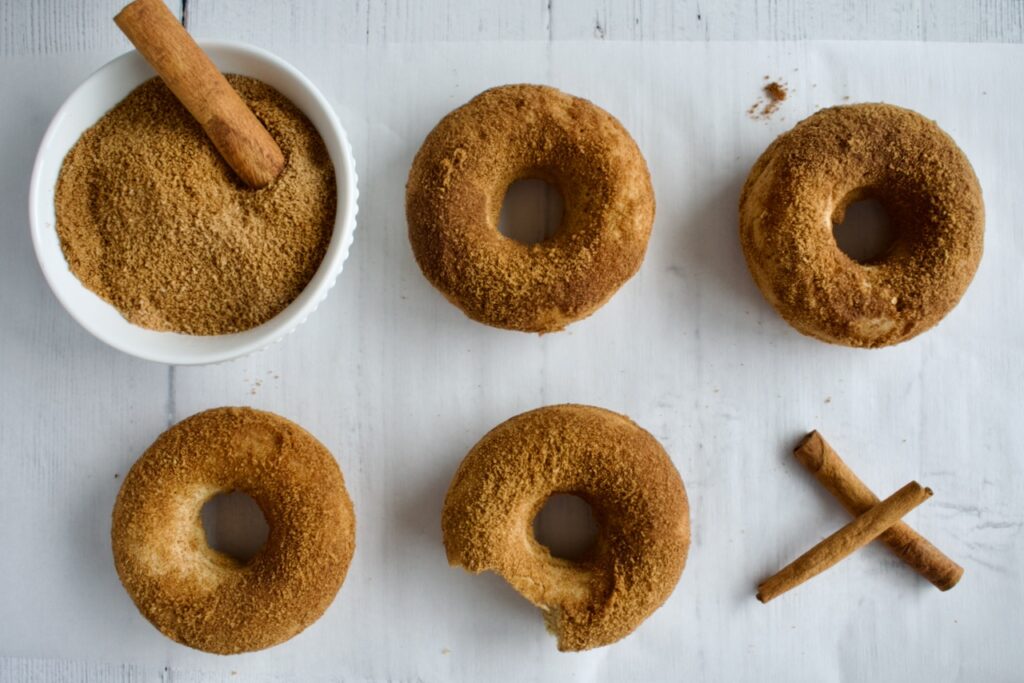
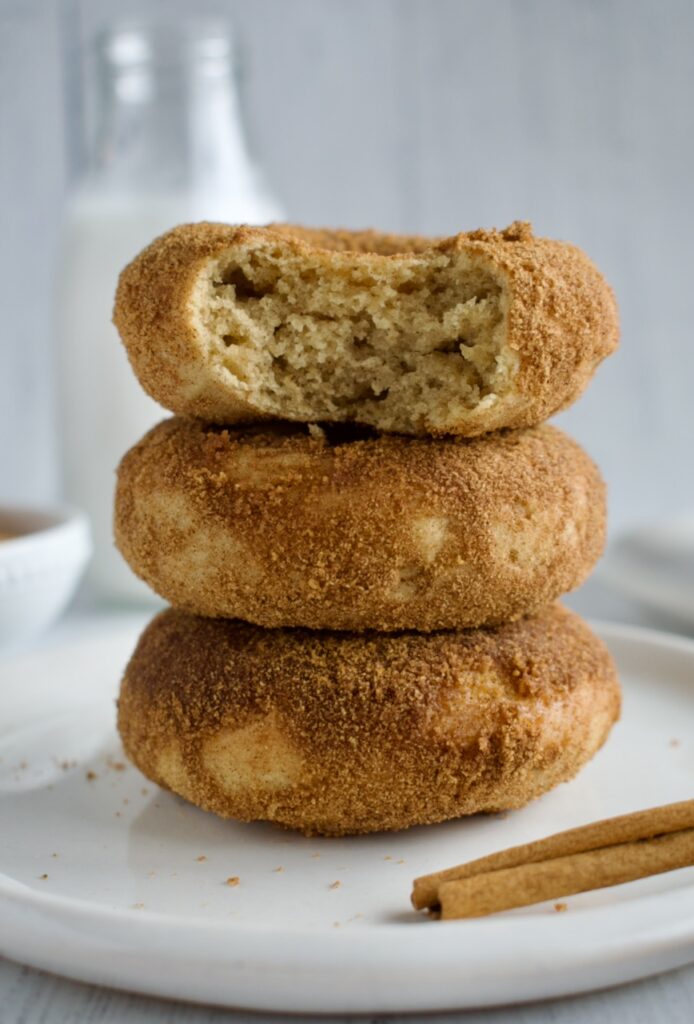
These gluten free donuts are baked and then tossed in a cinnamon sugar coating for pure perfection. Dairy free, refined sugar free, and nut free, how can you go wrong?
gluten free cinnamon sugar donut
I have an important question for you- are you a fried donut person or baked donut person? Let me know in the comments! I’m partial to baked donuts because, well, fried foods can be intense. Also, making baked donuts at home is so much easier. I like that baked donuts are a little denser too.
These gluten free baked donuts are allergy friendly, free of dairy, nuts, and refined sugar. Plus, they are lower sugar than any donut you’d find in the store. My mission is always to create lower sugar baked goods. You don’t need all the sugar usually called for in recipes to make treats taste good! Why not enjoy something delicious without the blood sugar crash? Of course, there is a science to baking with sugar and higher amounts are needed in certain recipes.
gluten free cinnamon sugar donut
Cinnamon Sugar Donuts
Ingredients:
gluten free flour
tigernut or almond flour: this is my favorite way to decrease the amount of sugar needed. Both of these flours are naturally sweet, so you can get away with less added sugar.
cinnamon
baking powder
salt
olive oil: yes, healthy fats in donuts!
maple syrup: there is only 1/4 cup of maple syrup in these donuts making them lower GI.
yogurt: you can use a vegan yogurt like I did (my favorite is Forager) or Greek yogurt if you can have dairy
egg
vanilla
coconut sugar: this unrefined sugar is used to toss the donuts in!
coconut oil
Instructions:
Making donuts is actually super easy. You just combine all the ingredients, pipe the batter into a donut pan, and bake. When the donuts are done, you’ll toss them in cinnamon sugar and try not to eat them all in one sitting.
Sift together the flours and then whisk in the cinnamon, salt, and baking powder.
In a separate bowl, beat together the oil, maple syrup, yogurt, egg, and vanilla extract.
Add the dry to the wet and stir to combine.
Grease a donut pan then pipe the batter into the pan. You will get 8-10 donuts (so you may have to bake in batches if you only have one pan, or you can make donut holes with the remaining batter).
Bake the donuts for 14-16 minutes until a toothpick comes out clean. Let cool for 10 minutes in the pan before flipping the donuts out.
While donuts cool, combine your sugar and cinnamon in a ziplock bag. The amount of cinnamon really depends on your preference. I like to start with 1 tsp and add if desired.
When donuts are cool enough to handle, brush one with the melted coconut oil then place it in the bag of cinnamon sugar. Close the bag and toss the donut until fully coated. Remove to a wire rack and repeat with the remaining donuts.
These donuts taste best fresh, but will last for a couple days at room temperature.
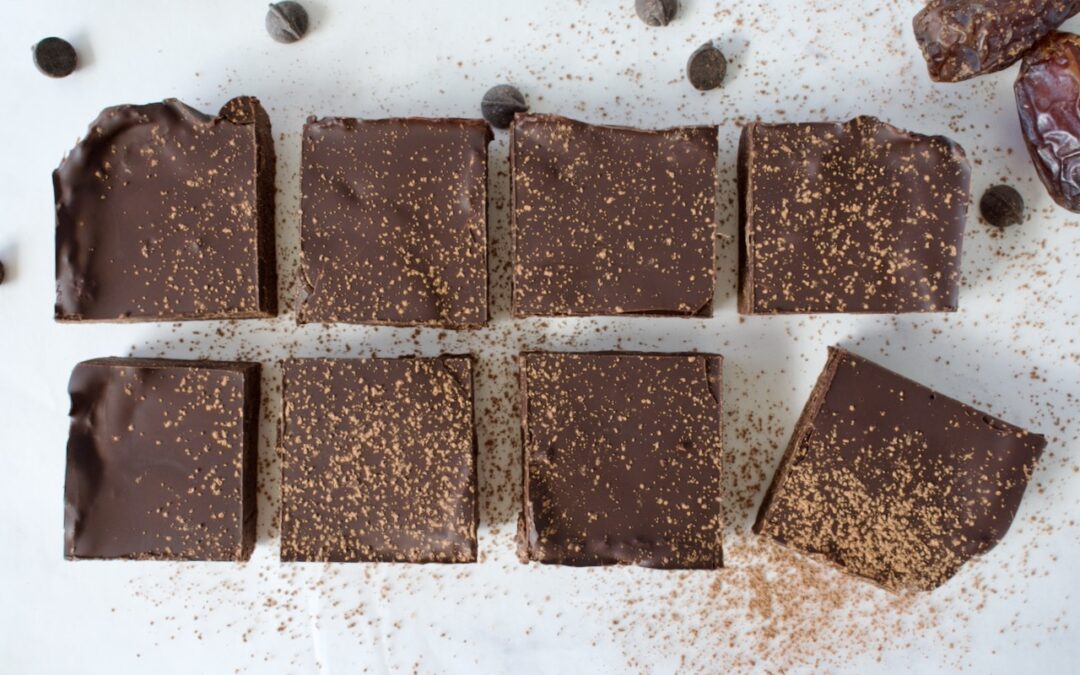
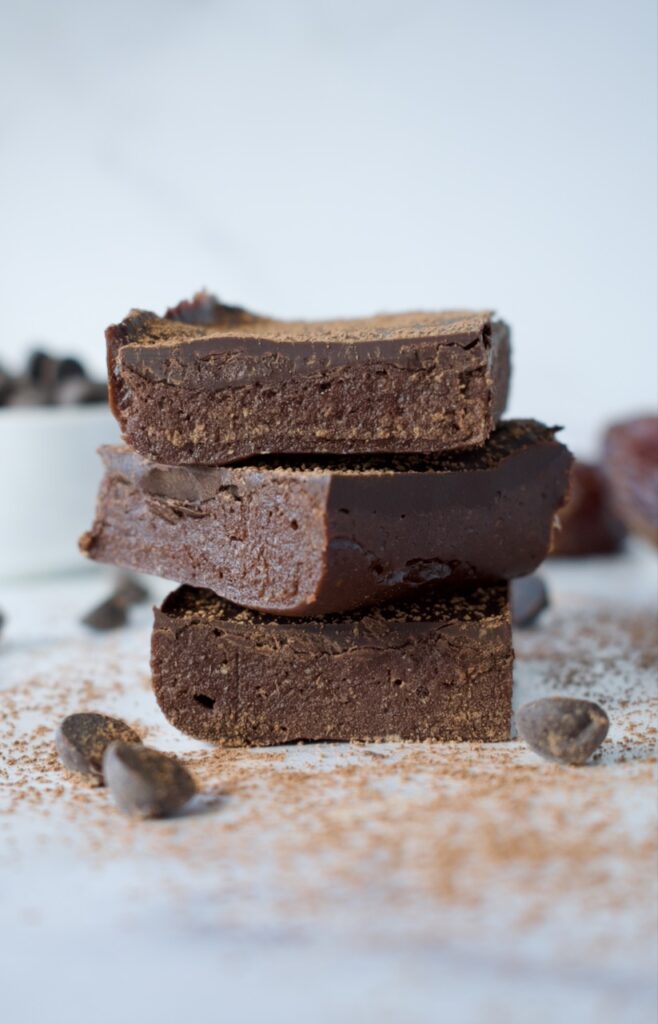
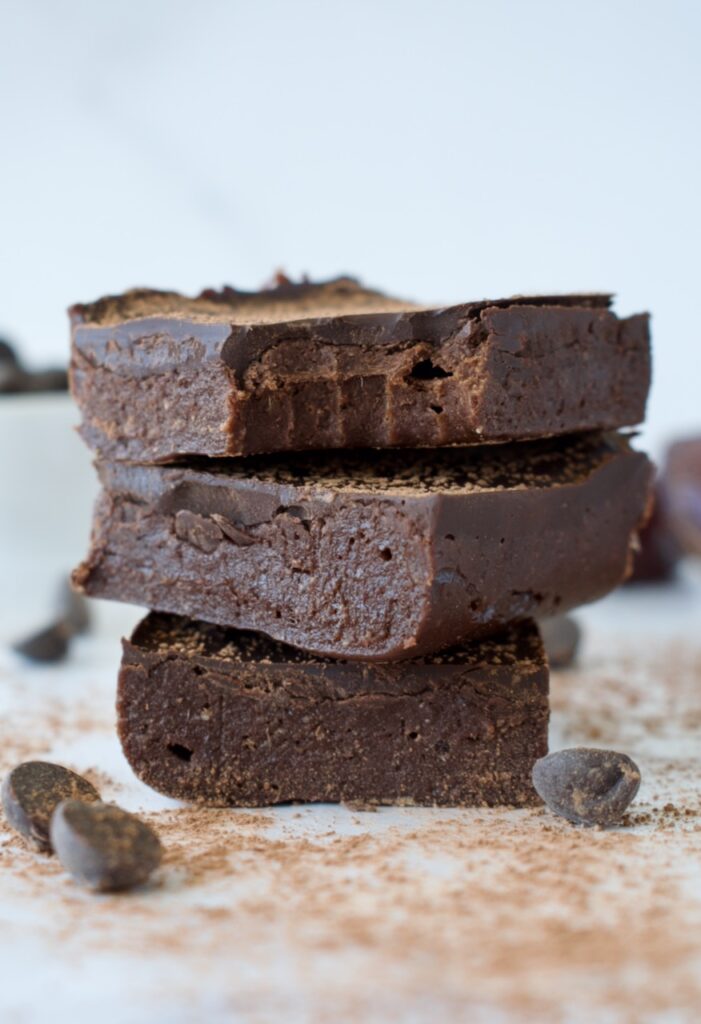
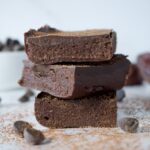
These will be the easiest brownies you’ve ever made. Packed with all the chocolate goodness, they are completely gluten free, refined sugar free, can be made vegan, AND are high protein!
no bake brownies
Craving a chocolate treat, but don’t want to go through the hassle of turning the oven on and baking an entire batch of brownies? Then this recipe is for you! These no brownies only require the fridge. Plus they are completely gluten free and can be made both vegan and refined sugar free. My favorite thing about these healthy brownies is that they are high in protein, making them an awesome snack. They’ve been my go-to afternoon snack for weeks now.
gluten free no bake brownies
No Bake Protein Brownies
Let’s talk ingredients! What’s in these gluten free brownies that makes them so healthy?
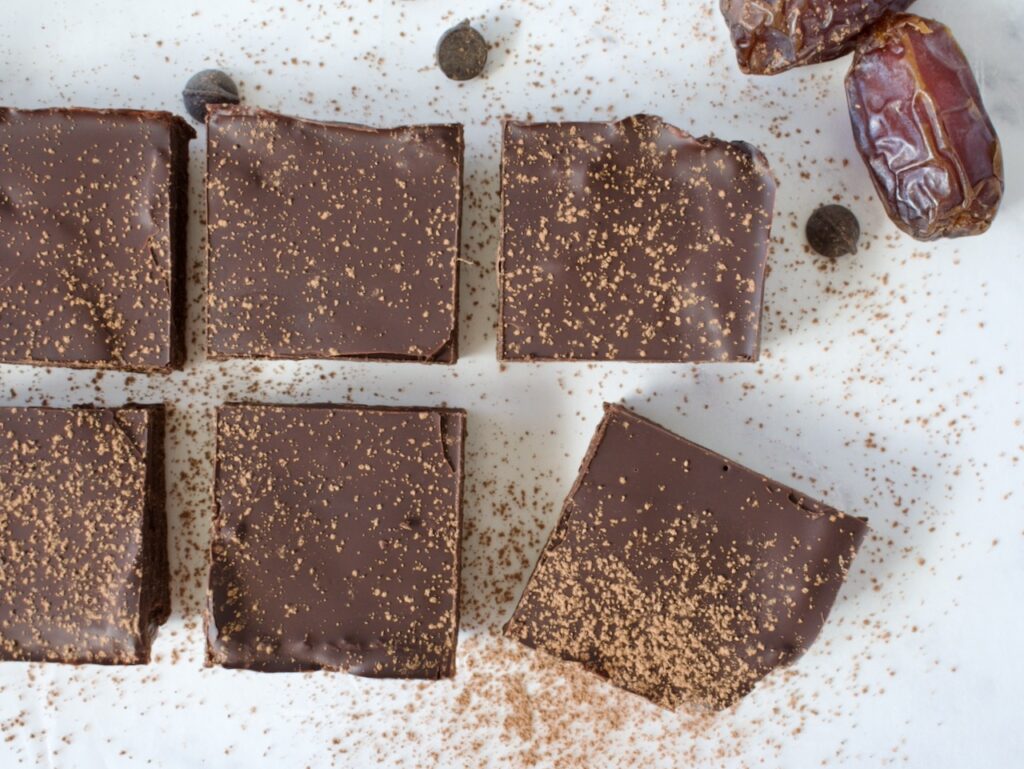
Dates: these no bake brownies are sweetened only with dates!
Cocoa powder: pure cocoa powder delivers the rich chocolate flavor.
Protein powder: the “flour” in these brownies is protein powder. I like to use the pea protein from Sprout Living (code LEMONSNLYME20 for 20% off) to keep these brownies vegan. You can use any protein powder you want, though, and feel free to use a chocolate flavored one to enhance the chocolate in this recipe!
Granola butter: I use my granola butter recipe to keep these brownies nut free, but you can use any nut/seed butter you want.
Chocolate chips: to enhance these no bake brownies, they are topped off with a layer of melted chocolate. You can keep them vegan and refined sugar free depending on the chocolate you use. I love Enjoy Life for an allergy friendly option or HU Chocolate to keep them completely refined sugar free.
How do you make no bake brownies?
You just blend everything together! Yes, it really is that easy. First, the dates are soaked until soft and then combined with the remaining ingredients. Everything is blended together in a food processor until you get a smooth batter.
The batter is spread into the bottom of a loaf pan and topped with melted chocolate. Let everything set in the fridge and then your no bake brownies are ready. Blend, spread, refrigerate, and eat. That’s it!
These easy brownies require no oven or hand mixing. They are high in protein and completely gluten free and can be made vegan and refined sugar free. The perfect no bake brownies do exist!
Soak the dates in hot water for 10 minutes to soften.
Combine dates, granola/nut/seed butter, protein powder, cocoa powder, vanilla, and salt in a food processor and blend until you have a smooth batter.
Line a loaf pan with parchment paper then spread the brownie batter evenly into the pan.
Combine the chocolate chips and coconut oil together in a microwave safe dish (I like to use a measuring cup) and melt at 30 second intervals until smooth. Pour the chocolate over your brownie batter and spread evenly across the top.
Refrigerate the brownies for an hour, until the chocolate on top has hardened. Cut and enjoy! Keep these brownies in the fridge for up to 5 days, place leftovers in the freezer.
Hi! I'm Victoria. I was diagnosed with Lyme in 2012 and have been on a healing journey ever since. I love helping others on their road to healing through allergy friendly recipes, exercise, and overall well-being.