Growing up, the lemon Girl Scout cookies were one of my favs. They don’t make the one I had growing up anymore, but they have these new Lemonades which are a lemon sandwich cookie. Since I can’t eat gluten, I’m not exactly sure what they taste like, but here’s my version… healthier of course! 😊
These cookies start out with a lemon shortbread. I utilize white sweet potato as the base for the icing. I love using white or Japanese sweet potato for an icing because it’s mild and holds it’s form, plus we are sneaking in a veggie! Trust me, you’ll love it too! The sweet potato serves as a base for a lemon icing that we’ll sandwich between two shortbread cookies
Important note:
These cookies have a strong lemon flavor. If you love lemon, you’ll love these! If you prefer something more subtle and mild, leave out the lemon zest and juice in cookie and only include it in the filling. They’ll still turn out great.
1cupcooked and mashed white or japanese sweet potato
1/4cuppowdered sugar*
2Tbsplemon juice
1tsplemon zest
1tspvanilla extract
1Tbspcoconut oilmelted
Instructions
Whisk all of your dry ingredients for the cookies together and set aside.
Beat all of your wet ingredients for cookies together in a large bowl.
Add dry to wet and mix to combine.
Form the dough into a ball then wrap in plastic wrap and place in the fridge for 10-20 minutes.
While dough cools, preheat oven to 350F and make your icing.
For the icing, blend everything together until smooth. You can add more sugar if you want it to be sweeter.
Place in the fridge until ready to use.
When ready to bake the cookies, roll out the dough between two pieces of parchment paper until about 1/4 inch thick.
Use a cookie cutter or glass to cut an even amount of round cookies out. Place on a parchment lined baking sheet.
Bake for 12 min.
Let cookies cool for 5 min on the cookie sheet, then transfer to a wire rack to finish cooling.
When ready to assemble, scoop icing into a piping bag (or plastic bag and cut tip off) then pipe some icing onto half the cookies. Sandwich with another cookie on top and enjoy!
Notes
*I make my own powdered sugar by blending 1 tbs of tapioca, arrowroot, or corn starch with 1 cup of white sugar on high until you get a fine powder.
These oil free, protein-packed banana muffins are gluten free and dairy free. The perfect snack or dessert!
gluten free protein banana muffins
These are the easiest, simplest banana muffins that are also packed with protein. With no oil, each muffin is only 100 calories, basically no fat, and ~6 grams of protein. They are pretty much the perfect carb to protein ratio which makes chowing down on a few of these an excellent as a post-workout snack!
gluten free and dairy free protein banana muffins
How to Make Gluten Free Protein Banana Muffins
Ingredients:
Bananas
Maple syrup
Egg
Vanilla extract
Pea protein (My favorite is the Sprout Living brand which is linked. Use code LEMONSNLYME20 for 20% off your order)
Mash bananas then whisk or blend together with remaining wet ingredients.
Add dry ingredients and mix until combined. Mix in chocolate chips if desired or sprinkle on top of muffins.
Divide batter into 9 muffin cups and bake for 20 minutes, until a toothpick comes out clean.
Let cool and eat up 🍌
gluten free and dairy free protein banana muffins
Can these gluten free banana muffins be made vegan?
The only non-vegan ingredient in these protein muffins is the egg. Although I have not tested using a vegan egg substitute, I think it would work just fine! The best protein for these muffins is a vegan pea protein.
What add-ins should I use?
Although these protein banana muffins taste great on their own, I love adding chocolate chips. You can’t go wrong with the chocolate and banana combo! Other add-in options that would be great include walnuts or even other fruit like blueberries. Adding an extra chopped banana for some texture would be wonderful, as well. Lots of options to experiment with!
These high protein banana muffins are oil free, gluten free, and dairy free. They are the perfect post-workout snack. High nutritional value and low in added sugar.
Course Breakfast, Dessert, Snack
Cuisine American
Keyword dairy free, Easy, gluten free, high protein
Prep Time 10 minutesminutes
Cook Time 20 minutesminutes
Total Time 45 minutesminutes
Servings 9muffins
Author Victoria Faling
Ingredients
2ripe bananas
2-4Tbspmaple syrupdepending on how sweet you like things
1egg
1tspvanilla extract
2scoopspea proteinuse code LEMONSNLYME20 for 20% off
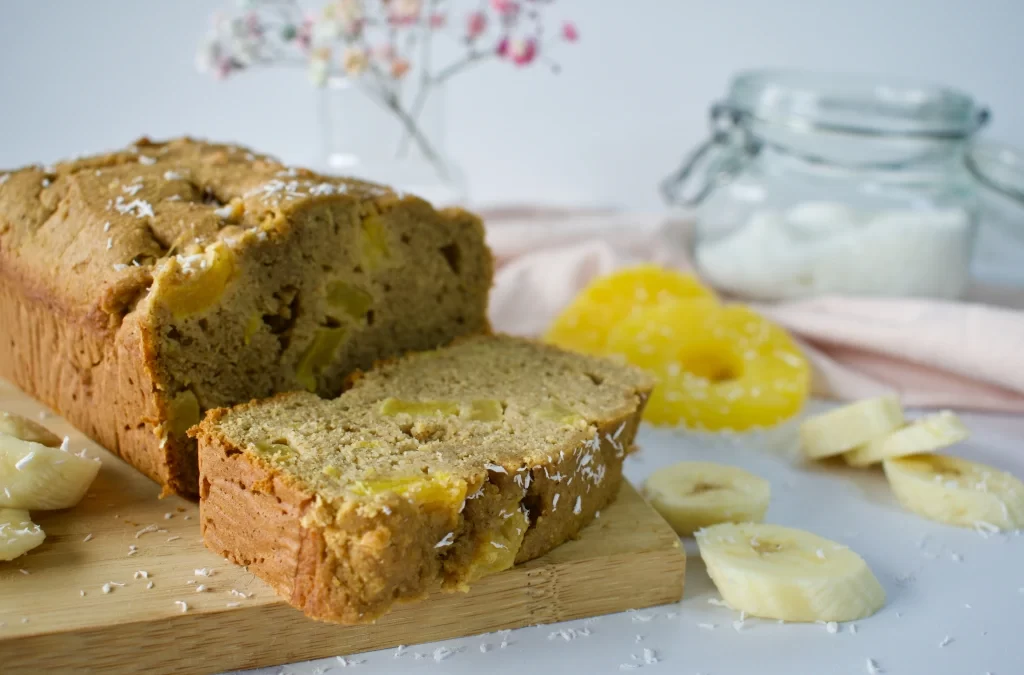
Hummingbird bread is like a banana bread with pineapples, pecans, and coconut. It’s a sweet bread that is often made as a cake as well. My gluten free hummingbird bread is lower in sugar and allergy friendly, making it the perfect snack, dessert, for addition to breakfast.
I hesitate to call this hummingbird bread as I changed quite a bit around. To keep this recipe nut free, I left out the pecans (and toasted coconut), opting for a lighter and healthier gluten free bread that is sweetened slightly with banana and moistened with dairy free yogurt.
This gluten free bread is a healthier, paired down version of the traditional hummingbird bread. Sweetened slightly with banana and coconut sugar, it’s kept moist with dairy free yogurt, and there are no nuts to keep it more allergy friendly. This healthy loaf is the perfect snack or dessert!
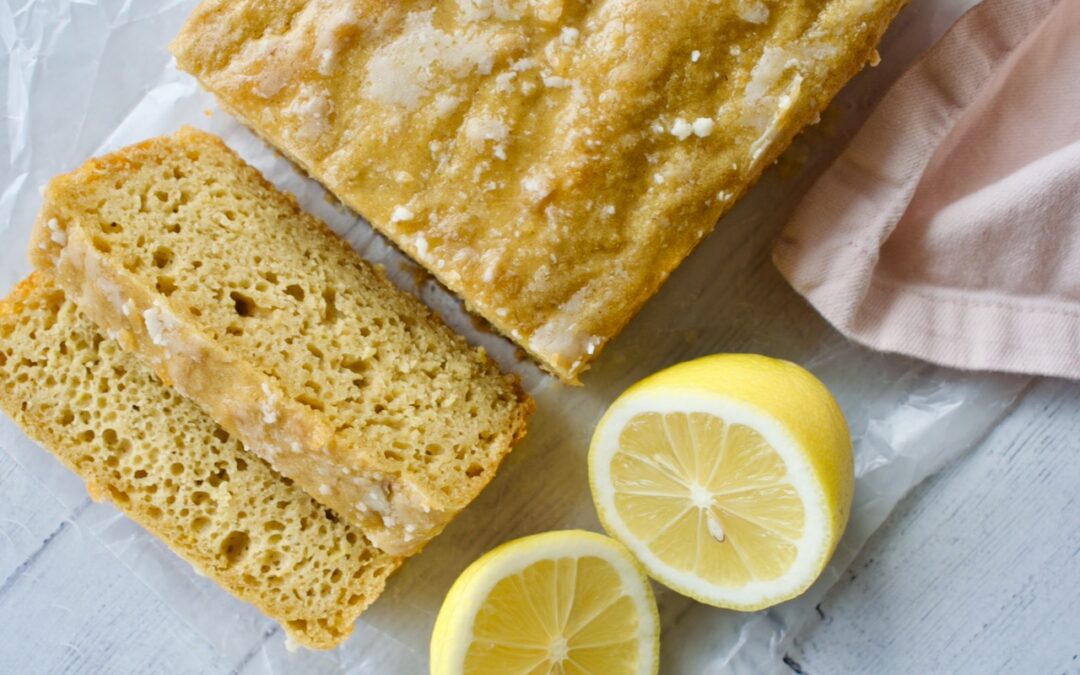
This lemon loaf is the perfect mix of sweet and tangy with the zingy citrus. It’s easy to make, but tastes decadent. This gluten free bread is packed with lemon flavor and kept moist with dairy free yogurt. A sweet citrus glaze tops off this loaf, bringing all the flavors together. It’s the perfect winter or spring treat!
gluten free lemon loaf
Ingredient Notes
To keep this lemon loaf gluten free, a mix of 1:1 gluten free flour and tigernut flour is used. I like using tigernut flour as it adds some sweetness, allowing for less added sugar to be used. The tigernut flour can also be subbed for almond flour if that is more readily available for you and you can tolerate nuts.
Any type of yogurt can be used in this lemon bread, but to keep it dairy free, use a vegan yogurt. Oatly and Forager brand are two of my favorites, but Greek yogurt should also work and will add a protein boost.
Yogurt Lemon Loaf with Citrus Glaze (Gluten-Free, Dairy-Free)
This sweet and zingy gluten free lemon loaf is a delicious sweet treat that can be made completely dairy free. If you love lemon flavored dishes, this bread is for you! A rich and moist lemon bread is topped off with a sweet glaze to bring it all together.
Beat all the wet ingredient, including zest, together in a large bowl on medium speed.
Add the wet to the dry and mix on low to just combine.
Pour batter into a parchment lined loaf pan and bake for ~40 min, until a toothpick comes out clean (the loaf may look pale or feel soft when touched, but if the toothpick comes out clean, take it out! don’t over bake!).
While loaf is cooling, whisk all your glaze ingredients together in a small bowl. Once loaf is completely cool, pour glaze overtop and let set before serving.
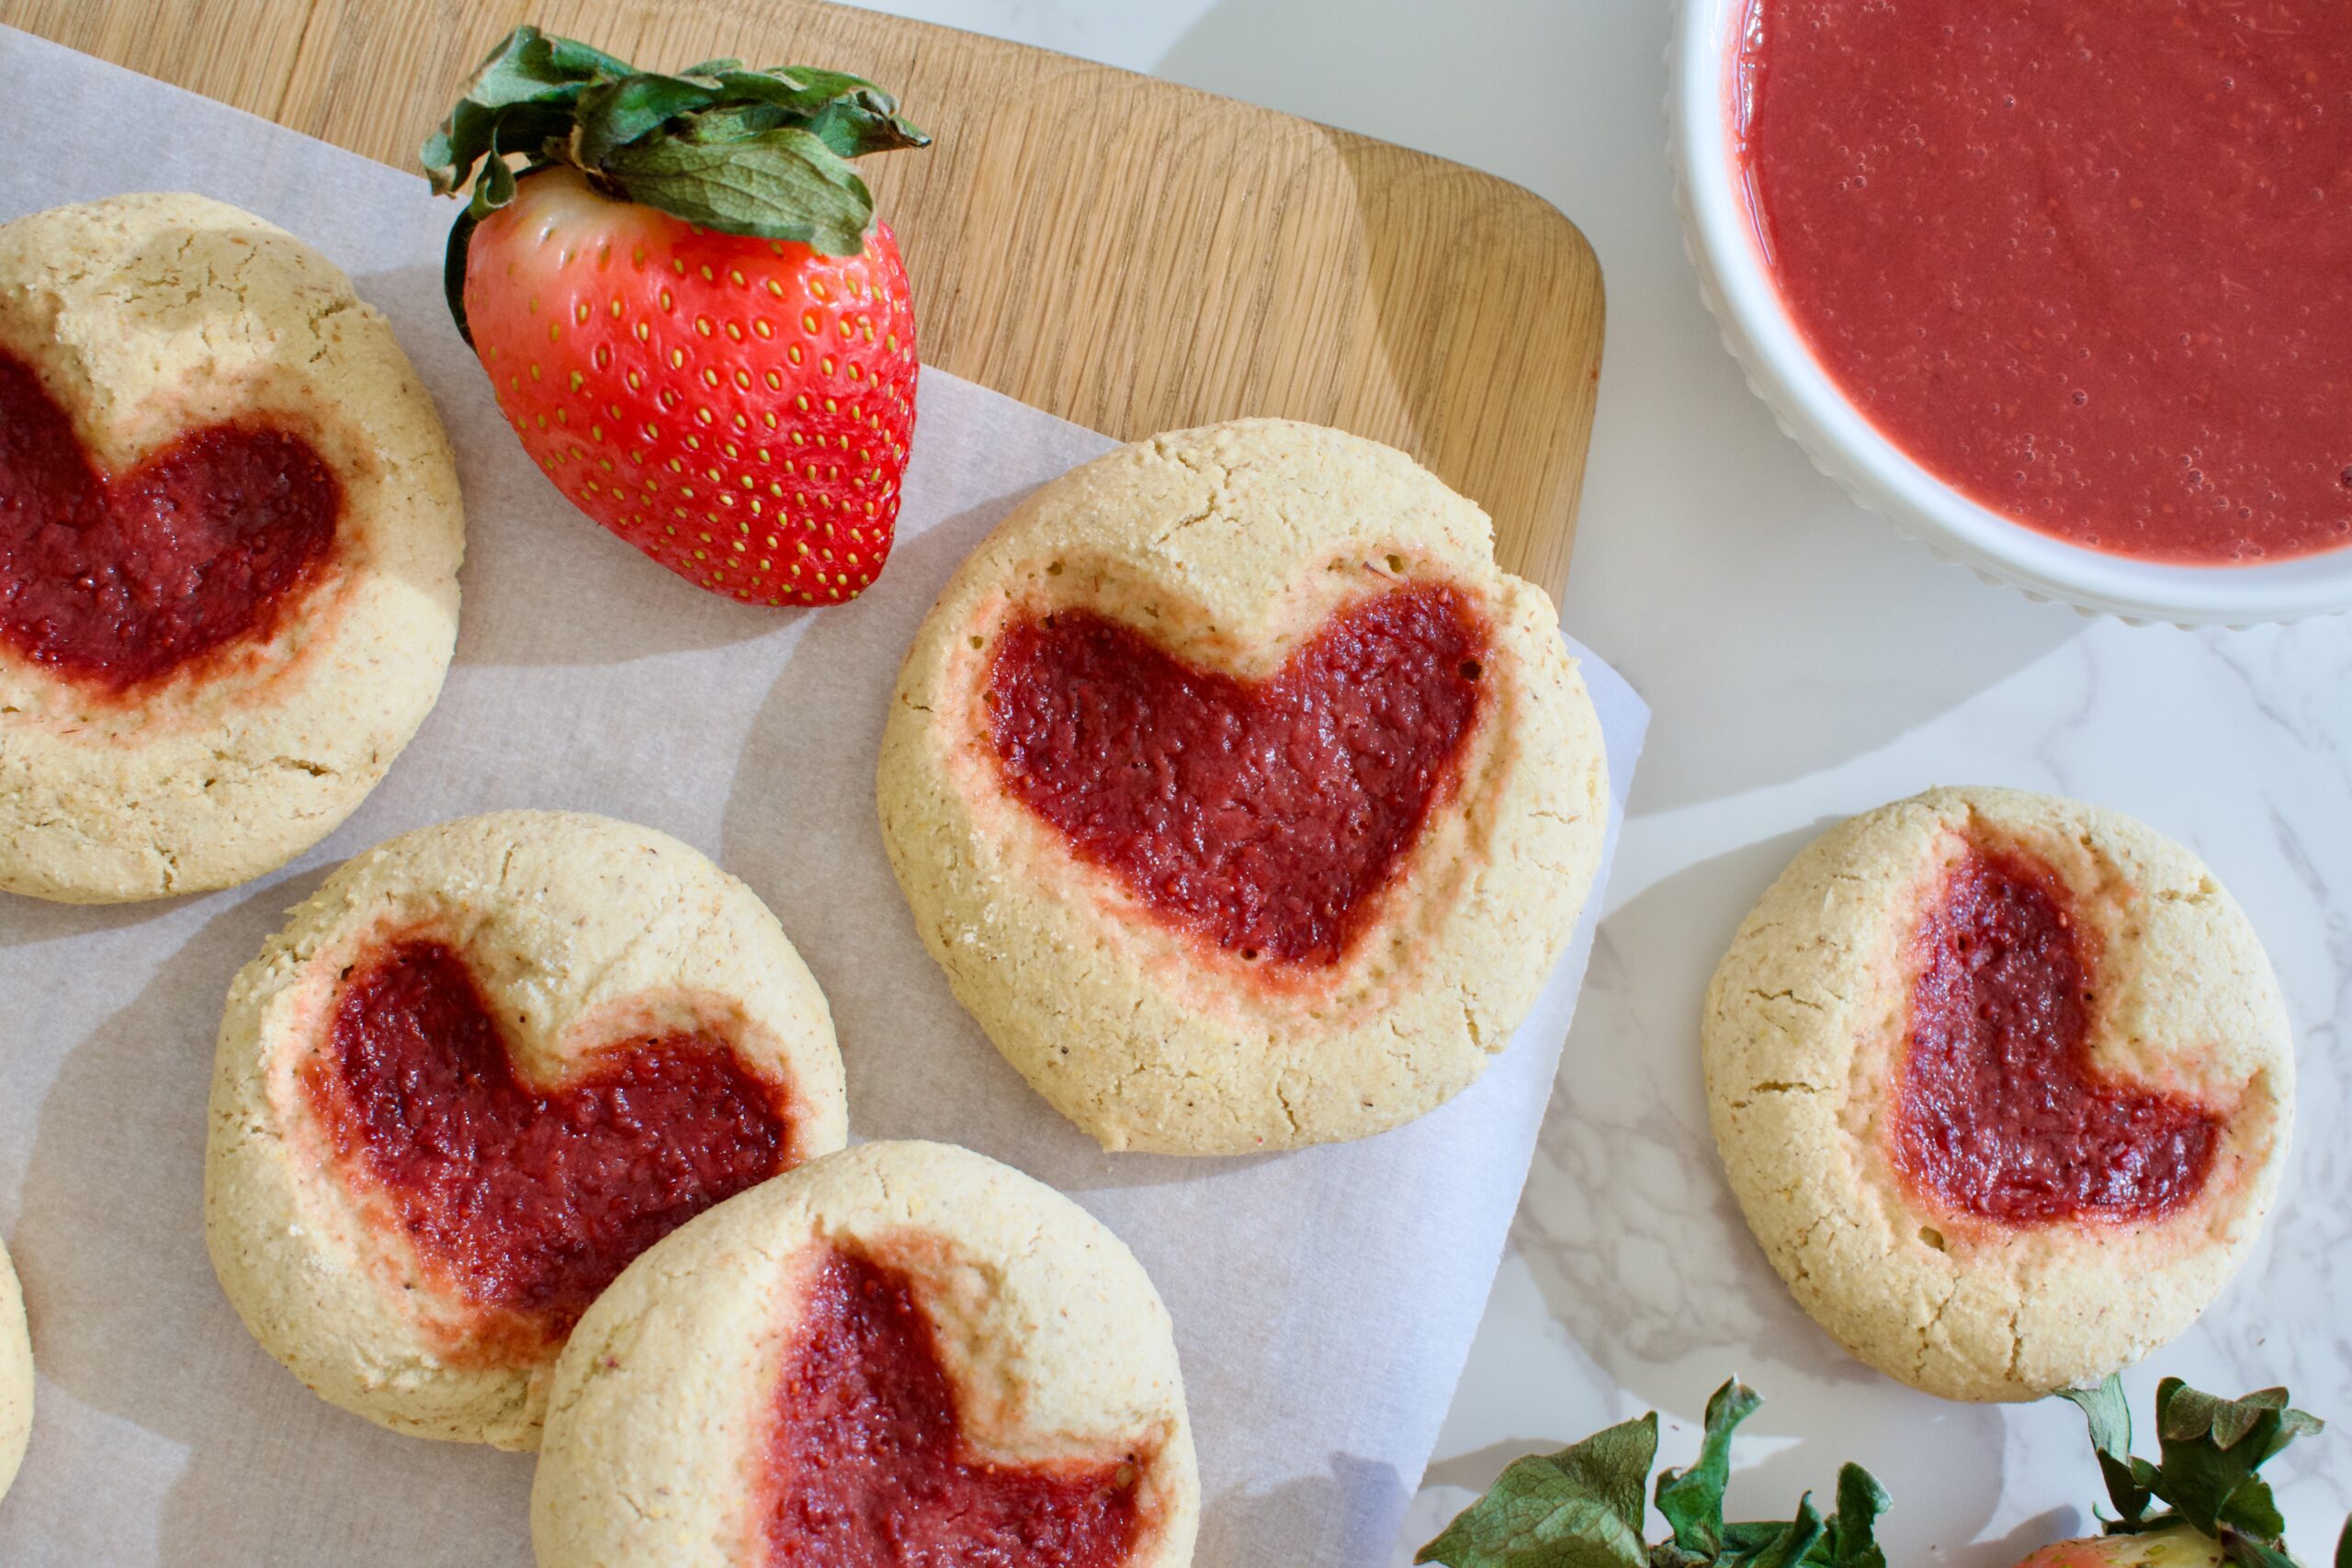
These easy and delicious Paleo Heart Thumbprint Cookies are the perfect Valentine’s day treat. They are completely gluten free, dairy free, and nut free, so whoever your Valentine is can enjoy this sweet treat.
paleo heart thumbprint cookies
You can make these cookies anytime of year, but by imprinting a heart shape, they make the cutest and easiest Valentine’s day cookies. If you’re not a huge baker, but you want to impress friends, family, or loved ones this Valentine’s day, then these gluten free thumbprint cookies are what you should make.
A delicious and grain free shortbread cookie is filled with sweet jam, but you can also use nutella for a chocolate version of these heart thumbprint cookies. I love using raspberry or strawberry jam for a strong pink/red color to emphasize the heart shape.
If you have food allergies, are following the Paleo diet or are just overloaded from all the sugar around the holidays, then these are a great dessert option. They are completely grain free and gluten free with no refined sugar or dairy. Keep up with your health goals this year while enjoying yourself!
gluten free thumbprint cookies
Heart Thumbprint Cookie Ingredients
Tigernut flour: a nut free alternative to almond flour that is great for grain free baking. Feel free to use almond flour if you tolerate nuts though!
Tapioca starch: with paleo baking, it’s best to use a combination of flours for the best texture. We need a starch in gluten free desserts for softness.
Cassava flour: another grain free flour for texture.
Maple syrup: maple syrup is used in this recipe to keep these healthy cookies refined sugar free.
Olive oil: a healthy fat for baking!
Egg: used as a binder.
Vanilla extract
Apple cider vinegar: I’ve found this helps with the texture. I have also forgotten to add it before and the cookies came out fine, so if you don’t have any around, still make these!
Jam or Nutella: for the filling
How to Make Paleo Thumbprint Cookies
Whisk all the dry ingredients together.
Beat together the wet ingredients.
Add the dry to the wet and mix until just combined.
Take tablespoon sized balls of dough and roll flat. Use your fingers to imprint a heart shape. This works best by pressing your first finger in a diagonal across the cookie then lifting and pressing it along the other diagonal so you get a V shape that looks like a heart! If your fingers are sticking to the dough at all, just put a little flour on your finger before pressing.
Add the jam or Nutella into the imprint and bake!
Be sure not to over bake them as they can dry out quickly. I’m slightly at altitude and 12 minutes is perfect. If you are even higher, check them at 10 minutes. If you are at sea level, they may need 14 minutes. They cookie part should seem just done and JUST beginning to golden.
valentine’s day thumbprint cookies
Substitutions and Variations
Flours: You can use almond flour for the tigernut flour and you can also sub the tapioca starch+cassava flour for gluten free flour to make this cookies just gluten free and not fully paleo. If you don’t have tapioca starch, arrowroot starch should also work in a pinch!
Egg: this recipe should work just fine with your favorite egg replacer for a plant based version.
Jam: I love using raspberry or strawberry for the color, but feel free to use your favorite flavor, Nutella, or even a chocolate nut/seed/granola butter.
Feel free to dust these cookies with some powdered sugar if desired or drizzle with a vanilla icing of choice.
How to Store Paleo Thumbprint Cookies
Store these heart thumbprint cookies in an airtight container at room temperature for up to 5 days or in the fridge for up to a week.
They don’t freeze great once filled, but it is possible. The jam may be a bit runny when defrosted, but you can defrost them in the fridge when ready to eat.
Can I Make This Recipe Vegan?
Although I haven’t personally tested it, a vegan egg substitute should work just fine in this recipe. Like Bob’s Red Mill Egg Replacer or even a flax egg.
These delicious and easy gluten free thumbprint cookies are the perfect Valentine’s Day treat with their heart shape! They are also completely paleo, dairy free, and nut free so your favorite Valentine can enjoy them. Sweet jam compliments the shortbread cookie perfectly, so I know you’ll love this fun holiday treat.
1/4cupraspberry or strawberry jamor your favorite jam or Nutella
Instructions
Preheat the oven to 350 F.
Whisk the dry ingredients together in a small bowl.
Blend the all wet ingredients, except for the jam, together in a larger bowl.
Add your dry ingredients to the wet and mix well to combine.
Scoop tablespoonful amounts of dough onto a parchment lined baking sheet. Use your thumb or first finger to gently press a heart shaped indent into the dough (See my video on Instagram for a tutorial).
Fill each cookie crater with jam or Nutella.
Bake for 12-14 minutes until just beginning to golden.
Let cool for 10 minutes on cookie sheet before moving to wire rack to finish cooling.
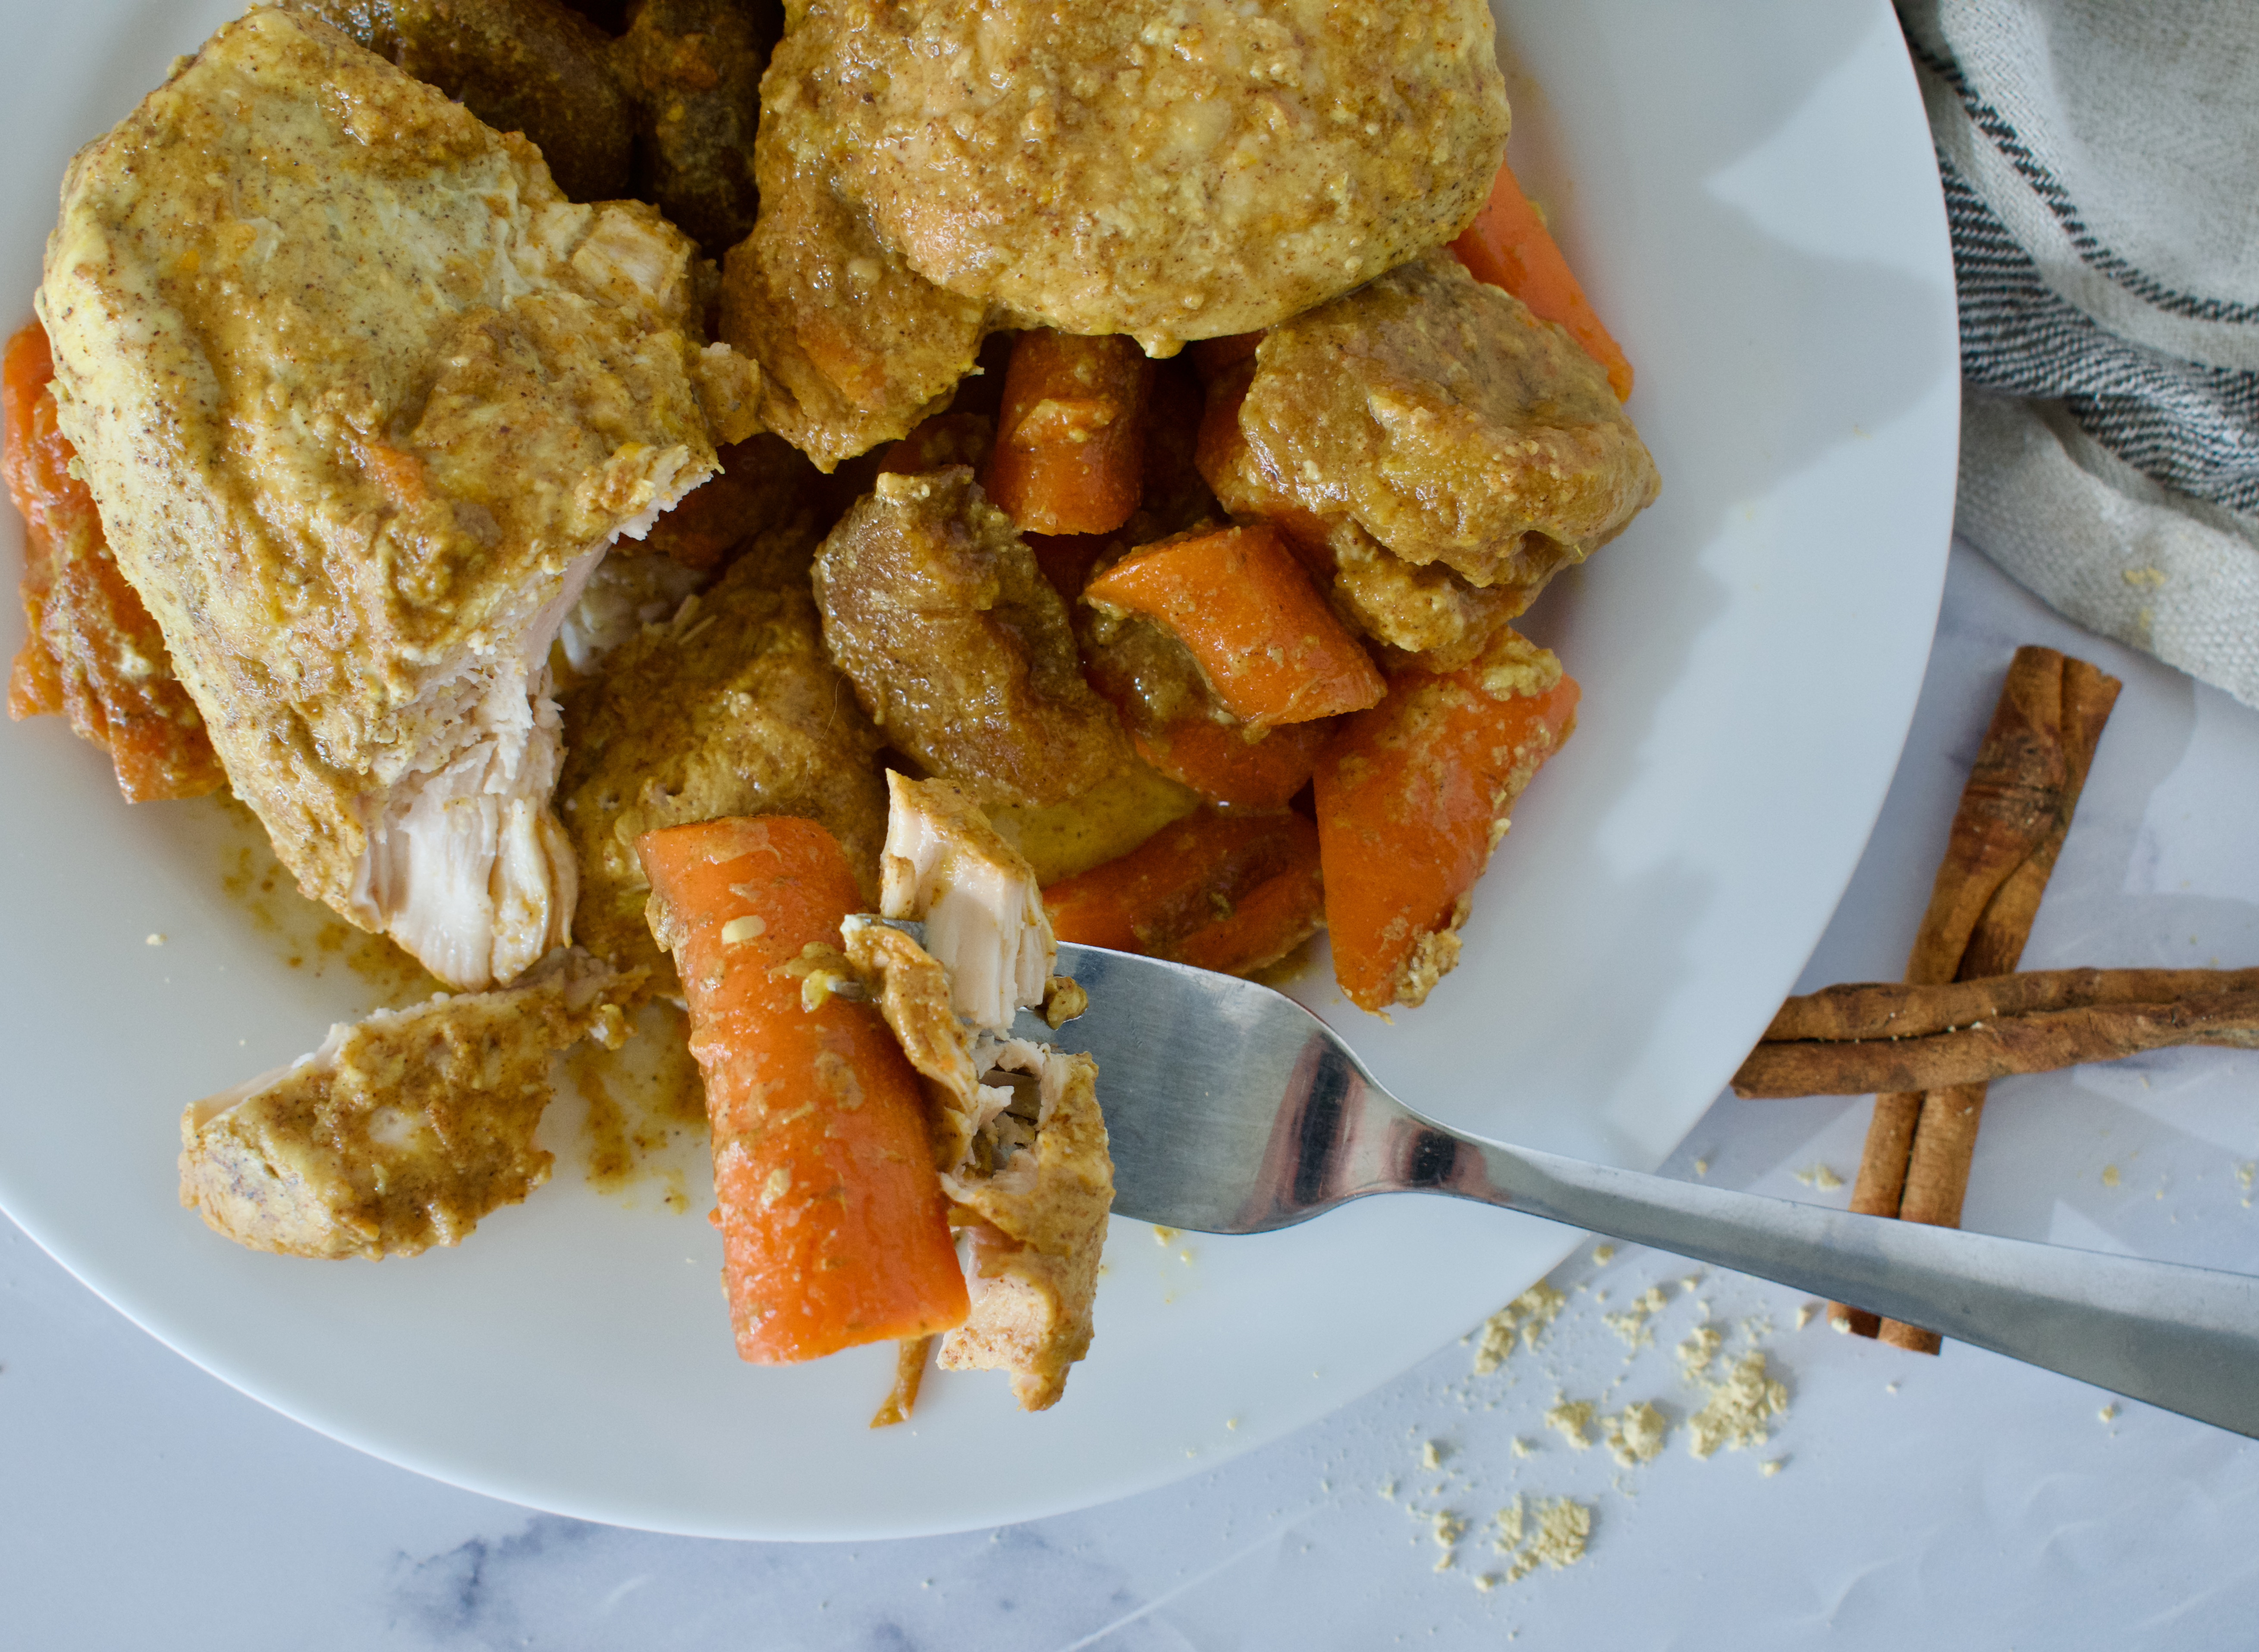
A delicious and warming slow cooker meal, this Orange & Apricot Chicken is fully Paleo with an AIP option. This allergy friendly recipe is packed with flavor!
paleo orange and apricot chicken
This slow cooker chicken recipe is one of my favorites. I used to make this weekly back in college because it’s an easy paleo recipe that is packed with protein. This flavorful orange chicken is marinated in fresh orange juice and delicious spices then paired with apricots and carrots. Trust me, it’s the perfect combination!
This gluten free chicken recipe is paleo, dairy free, and nut free. You can easily make this recipe completely AIP and nightshade free by eliminating the paprika, it’s not needed, but does add a little bit extra spice to the sweetness of the apricots.
slow cooker orange and apricot chicken with carrots
Ingredients
Chicken breast
Oranges: the juice will be used to marinate the chicken in
Ground ginger: for a little bit of kick
Ground cinnamon: delicious, warming flavor
Nutmeg: more warming flavor
Paprika: compliments the other spices for a bit more flavor
Ground turmeric: anti inflammatory
Salt: flavor!
Dried apricots: add sweetness to this recipe, but pair perfectly with all the spices
Carrots: a hearty root vegetable that compliments the apricots, chicken and spices
Substitutions
Chicken: I have not tried this recipe with chicken thighs, but I think it could be delicious!
Spices: the combination of spices is what brings this dish together, but if you are AIP, substitute the nutmeg for mace and leave out the paprika.
Dried apricots: this dish is built around the apricots, so I highly suggest using them. You could always try dried prunes or figs, but I can’t promise the outcome.
Carrots: the carrots compliment the other flavors in this recipe, but you could try another root vegetable like sweet potato which has a similar flavor profile.
slow cooker paleo orange and apricot ginger chicken with carrots
Crockpot vs. Instant Pot
Crockpot is a type of slow cooker that cooks dishes on a low heat over a prolonged period of time. This helps obtain delicate and juicy cuts of meat and soft vegetables.
The Instant Pot is a pressure cooker so it does the opposite of a slow cooker. It cooks things much quicker, but it is often a multi-cooker with other functions.
Crockpot chicken is always so tender and moist (honestly, slow cooker any meat!), but you can also use an Instant Pot on the slow cooker function. You will just pick the medium heat setting for the same amount of time. You also need to make sure there is at least 1 cup of liquid in the pot. I just add a little bit of broth or water to the leftover juice mixture that you will marinate the chicken in to reach 1 cup, then add that to the pot.
I love using either device on the slow cooker setting because you just put everything in, walk away, and then you have a delicious dinner ready to go when you get home at the end of the day! Slow cooker recipes are some of my favorites.
Storage
Keep leftovers stored in an airtight container in the fridge for up to 3 days.
This recipe tastes best fresh and I don’t advise freezing, as it doesn’t freeze great. But, if you decide to freeze leftovers, portion them into individual, freezer safe containers and freeze for up to 3 months. When ready to eat, thaw in the fridge overnight and warm in the oven at 300F for 45 minutes.
This delicious slow cooker chicken is packed with flavor and nutrients all while being allergy friendly! This gluten free chicken dish is completely paleo with an AIP option and is filled with delicious spices and a touch of sweetness. You’ll love this slow cooker meal!
Place the chicken into a large freezer bag or bowl. Mix the spices in a small bowl and sprinkle them over the chicken.
Squeeze the juice of the 2 oranges into the bag and place the squeezed up oranges in the bag too. Put in fridge and let sit for 2 hours and up to overnight.
Once the chicken has marinated, place the chicken into your crockpot and add the carrots and apricots. Mix everything so that the carrots and apricots get covered in the juices, too.
If you are using an Instant Pot, make sure there is at least 1 cup of liquid in the the pot. See notes above for details.
Set your crockpot to low for 4-6 hours, until chicken is done- moist and delicious. If using an Instant Pot, cook for 6 hours.
Hi! I'm Victoria. I was diagnosed with Lyme in 2012 and have been on a healing journey ever since. I love helping others on their road to healing through allergy friendly recipes, exercise, and overall well-being.