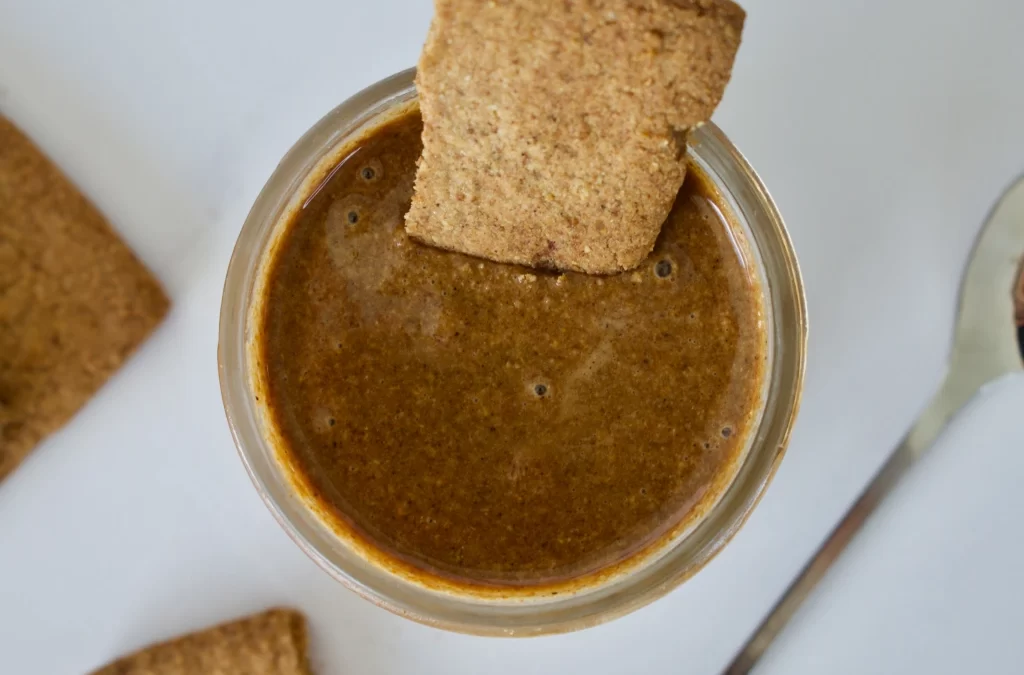
Have you always wanted to try the infamous Speculoos Cookie Butter (from Trader Joes), but can’t eat gluten? I sure have! I finally recreated the cookie butter and had my gluten eating friends test it. They said my version tasted similar all while being healthier and lower sugar! I can’t wait to for you to try this gluten free cookie butter.
This homemade cookie butter does have a few steps. You first have to make the gluten free Biscoff cookies. These are a pretty basic graham cracker like cookie. Once those have baked and cooled, you’ll blend them up with some melted coconut oil and a few other ingredients to get a smoothie cookie butter.
This homemade cookie butter tastes similar to the original all while being gluten free, nut free, and lower in sugar! We'll use homemade gluten free biscoff cookies combined with Speculoos seasoning to make this healthy version of cookie butter.
1/4cupwhite sugaror 2 tbs white sugar, 2 tbs dark coconut sugar
1/4tspsalt
1/2tspbaking soda
1Tbspspeculoos seasoningrecipe below
1/4cupcoconut oil
3Tbspmaple syrup
1tspvanilla
Speculoos Seasoning
1Tbspcinnamon
1/4tspnutmeg
1/4tspcloves
1/2tspginger
1/4tspcardamomif you have it (can leave out if don’t)
Instructions
First, make the cookies. Preheat oven to 350F.
Sift the flours together then mix with remaining dry ingredients.
Combine all the ingredients together and mix until a dough forms.
Roll the dough out on a floured surface and cut into squares or whatever shapes you want.
Place cookies 2 inches apart on a parchment lined baking sheet and bake for 12-17 minutes until golden and firming up to the touch. Remove from the oven and let cool completely.
Once cookies are done and cooled, blend them in a high speed blender or food processor into a fine powder. Add remaining dry ingredients and blend again.
With blender or food processor on low, drizzle in the melted coconut oil and let blender run until you get a smooth butter. This can take some time so be patient and clean up the kitchen while the blender runs 😉. If the butter is not coming together or smooth enough, you can add some more melted coconut oil until you get the consistency you like.
Taste the cookie butter and add more seasoning if desired.
If you want the cookie butter to harden, place it in the fridge. You’ll just have to leave out to soften when ready to eat. This keeps fine in the pantry too!
I’m kind of obsessed with these lately. They are a fun lil treat for anytime and perfect for the upcoming holiday ;). These babies are completely gluten and grain free, packed with nutrients and sneaky protein, and totally vegan. You’ll love this healthy snack/dessert alternative.
-1 1/2 cups of mini chocolate chips of choice (I love dark chocolate from Enjoy Life)
Rinse your chickpeas then shake them around a bit to try and peel off some of the skins (it’s okay if you not all get removed).
Add chickpeas, vanilla, salt, protein, flour, oil/butter, and 2 tbs. of maple syrup to a blender and blend until smooth. The dough should be soft enough to form into balls, but not too runny. You may need to add more maple syrup depending on taste preferences and protein powder thickness.
Fold in 1/3-1/2 cup of mini chocolate chips.
Take tablespoon amounts of dough and roll into balls. Place on a freezer safe dish and pop in the freezer for at least 30 minutes.
When ready, melt the rest of your chocolate then dip your cookie dough balls in the chocolate or drizzle it on top. Return to the freezer until chocolate has hardened. Store in the fridge or freezer.
Who doesn’t love an herb filled dressing to get more greens into your day?! This is an easy green goddess dressing without toooo many ingredients. It’s super fresh and creamy without any dairy! This recipe is vegan, gluten free, and paleo with no inflammatory oils, so it’s perfect for anyone. It tastes great over any of your favorite veggies or even as a dip (use less oil to make it thicker)
This makes a big batch so it will last in the fridge all week. I put it over my favorite salad of kale, sweet potato, chicken, cucumber, and a sprinkle of pumpkin seeds. You can use cilantro or parsley or a mix of both in this recipe depending on your preferences. I’m a big cilantro fan! I find parsley to have a VERY strong flavor, but I know some people are not a fan.
Green Goddess Dressing:
-1/2 an avocado
-1/4 cup plain yogurt of choice or full fat coconut milk
-1/2 cup packed cilantro or parsley
-1/2 cup fresh basil
-Juice of half a lemon
-2 tbs. garlic infused olive oil and 2 tbs. regular olive oil (OR 1/4 cup olive oil and 1-2 cloves garlic)
-2 tbs. rice wine vinegar
-Salt to taste
*Extra oil or water to thin to desired consistency.
Combine everything in a blender and blend until smooth. Easy peasy! Enjoy over your favorite salad or veggies
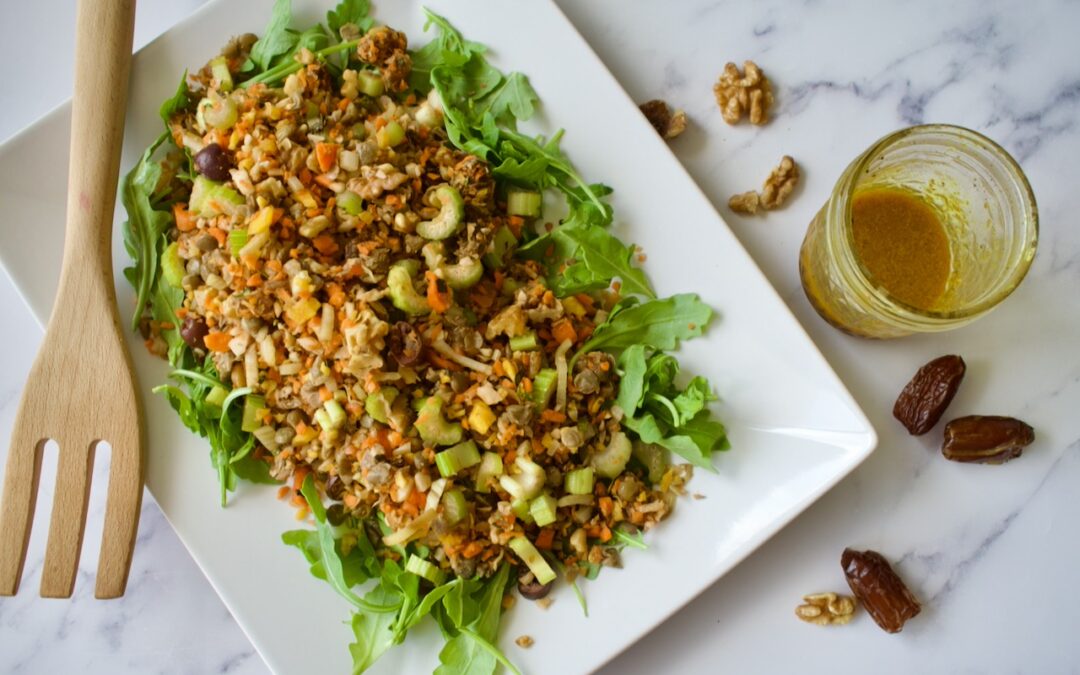
This lentil salad is packed with all the goods and topped off with a perfectly sweet and tangy dressing. I love making this salad for meal prep, as it’s an easy way to get lots of nutrients in!
gluten free and vegan lentil salad
I’ve worked on introducing more beans and legumes into my diet over the last year. I never really liked lentils, but I’ve been trying them out lately just to see. I attempted to make vegan lentil meatballs a few weeks ago (yeah, those didn’t quite work out) and had a bunch of leftover lentils. I wasn’t sure what to do with them, but luckily I figured out something…. this lentil salad! And it did not disappoint. I think lentils might be growing on me.
gluten free and vegan lentil salad
This delicious salad is so easy to make for meal prep for the week, as it stores well in the fridge for up to 5 days. It’s also a great, easy option for a potluck. All you do is chop everything up and toss it together. It really is that simple! To make salad prep even easier, use already cooked and canned lentils instead of cooking your own.
This delicious lentil salad is packed with nutrients and easy to make. It’s the perfect meal prep or potluck option. Gluten free, vegan, and can be made nut free!
Course Main Course
Keyword Easy, gluten free, nutrient dense, vegan
Prep Time 30 minutesminutes
Total Time 17 minutesminutes
Servings 4servings
Ingredients
Salad
2cupscooked brown or green lentils
6carrots, shredded(I just pulse in a food processor)
3ribs of celery, chopped
1fenneldiced
1/2cuppitted and chopped datesa must! These add a lot of flavor
1/2cupdiced olivesalso adds great flavor. I’m not an olive fan, but it’s good in this salad- do it!
1/2cuptoasted and chopped walnutspepitas or other nuts would be good too
1/4cupfresh mintchopped
Dressing
1/4cupolive oil
1/2Tbspgarlic infused olive oilor some minced garlic
1lemon, juiced
2Tbspbalsamic vinegar
1tspmustard
1tspmaple syrup
1/2tspturmeric
1/2tspcinnamon
Salt to taste
Instructions
Combine all salad ingredients together in a bowl and toss.
Mix all dressing ingredients together in a small bowl or jar, adjusting as needed. You can always add a little more of the spices or any other ingredients to get a flavor you love.
Dress the salad and enjoy! I like to serve this over some massaged kale or arugula for an extra nutrient boost.
Gluten free apple pie with a crumble topping is the perfect spin on a traditional dessert. This delicious pie is also dairy free and refined sugar free.
gluten free and allergy friendly apple crumble pie
Apple pie and fruit crumble are two of my favorite desserts, so why not combine them into one?! This delicious gluten free apple pie has the perfect crumble topping, which I guess to some is considered a Dutch apple pie. I like to call it an apple pie crumble, but either way it has a delicious crust, warm apple filling, and sweet crumble topping. All while being completely gluten free, dairy free, and with a paleo option! It’s a crowd pleaser at Thanksgiving
I know crusts can be intimidating and it’s one of the reasons I don’t make a lot of pies. This gluten free crust is relatively easy and we’ll use a food processor to make it even easier. You’ll pulse together the crust ingredients then just roll it out and fill it.
gluten free and dairy free and paleo apple pie
Gluten Free Apple Crumble Pie FAQ
What apples should I use?
My favorite apples to use in this gluten free apple pie are a combination of granny smith and hooneycrisp! Both hold up well with baking
Pie crust tips
The key with pie crust is that you want to keep it cold and work it as little as possible. Be sure to pulse the food processor when making the dough, don’t just blend into oblivion. When you transfer the dough to a bowl, be sure to use cold water and work quickly to bring the dough together. Your hands are warm, so you don’t want to be handling the dough a ton or for an extended period.
When adding the rolled pie crust to the pie dish, it’s okay if it breaks. Just dip your fingers in a little bit of cold water and patch the dough back together!
Can I make this pie paleo?
Yes, you can make this apple crumble pie completely paleo! For the crust, use 1/2 cup of tapioca flour and 1/4 cup of coconut flour instead of the gluten free flour.
For the crumble topping, just use cassava flour instead of the gluten free flour.
This dessert is a combination of two of my favorites! You can make this apple pie gluten free, completely paleo, and vegan. Everyone will love this during the holiday season!
You will make the apples first and they can be made ahead of time!
Peel, core, and thinly slice apples to about 1/4 inch thick. Combine all filling ingredients in a non-stick pan and cook over medium heat for about 5-10 minutes, until apples have softened. Set aside to cool. If making day(s) ahead, keep stored in an airtight container in the fridge until ready to use.
When ready to make the crust, combine the dry ingredients for the crust in a food processor. Add the coconut oil and pulse until it starts to come together. Add the egg process until it’s just starting to come together. Transfer dough to a bowl and add 2 Tbsp of cold water. Use your hands to bring the dough together. If the dough is falling apart or not holding well, add water 1 tablespoon at a time.
Form dough into a ball. Wrap in plastic wrap and set in the fridge while you prep the topping.
Whisk all dry ingredients for the topping together. Cut in the coconut oil with a fork or pastry cutter then add the maple syrup and vanilla. I like to use my hands to bring everything together until you have a sticky “dough” that isn’t too crumbly. Place in the fridge.
Preheat your oven to 400F.
Spread a piece of parchment paper on your work surface and dust with flour (I like to use cassava or gluten free). Unwrap your crust dough and place it on the parchment paper. Dust the top of the dough lightly with more flour then place a piece of parchment paper over it. Roll out your dough between these two pieces of parchment paper until it is about 1/4 inch thick and about 10-12 inches in diameter.
Transfer your crust to a 8-9inch pie dish. The easiest way to do this is to remove the top layer of parchment, place your pie dish upside down over the dough then flip everything. The crust may break, that’s okay, you can piece it back together. Just make sure to seal any cracks or holes. Fit your curst to the pie dish. Optionally, you can flute the edges or create a design you like.
Pour your apple filling into the crust, leaving any remaining juices behind in the bowl.
Evenly top your pie with the crumble mixture. Cover the top of the pie/crumble with tinfoil and bake for 20 minutes.
Reduce the oven temperature to 375F and remove the tinfoil. Bake for another 20-30 minutes until the top is golden.
Apple pie always tastes best with a big scoop of vanilla ice cream on top!
Notes
*For a paleo version, use 1/2 cup tapioca flour +1/4 cup coconut flour
This Paleo Coffee Cake has the perfect texture, a sweet cinnamon sugar filling, and a delicious crumb topping. Gluten free, dairy free, and nut free, everyone will enjoy this coffee cake!
pale coffee cake
I had never eaten coffee cake in my life before making this. I always thought coffee cake had actual coffee in it (which it doesn’t). I didn’t realize the name was just a reflection of the fact that it is supposed to be eaten WITH coffee. As a tea drinker, I should just call it a tea cake.
Anyway, I finally realized what coffee cake really is and it sounded delicious so I had to try and make my own version! I love a good crumble, so I love that coffee cake has a crumble on top. This coffee cake is completely grain free, refined sugar free, and delicious with coffee, tea, or ice cream ;).
To make this gluten free coffee cake fully vegan or AIP, you would need to find a substitute for the eggs. I have not tested any egg substitutes in this recipe, so I can’t vouch for if that works. If you try it, leave a comment letting us know how it went.
This Paleo Coffee Cake is the perfect grain version of the classic. Filled with a delicious cinnamon swirl and topped off with a coconut filled crumble, this gluten free and dairy free coffee cake is perfect with breakfast, snack, or dessert!
Preheat oven to 350F. Line a loaf pan with parchment paper and set aside.
In a small bowl mix your filling ingredients and set aside.
In another small bowl, mix together your topping ingredients with a fork until they hold together, but are slightly crumbly.
Whisk all dry ingredients for the loaf in a medium bowl.
Beat all wet ingredients together in a large bowl. Add your dry to wet and beat until just combined.
Pour half your batter into the loaf pan, spreading evenly along the bottom. Sprinkle your filling evenly over the batter and then top with the other half of the batter. Crumble topping on top.
Bake for 32-35 minutes or until a toothpick comes out clean (I have had this bake as quickly as 25-27 minutes in a different oven and altitude, so check it!). Remove from the oven and let cool 10 minutes in the pan before lifting the loaf out with the parchment paper and setting on a wire rack to completely cool.
Hi! I'm Victoria. I was diagnosed with Lyme in 2012 and have been on a healing journey ever since. I love helping others on their road to healing through allergy friendly recipes, exercise, and overall well-being.