Last week I posted a this buckwheat bread recipe. Well, I have another variation of that one for you this week. In this recipe, I used Nuzest pea protein instead of almond flour to make it nut-free and higher in protein. I really enjoy both versions but if you can’t eat nuts, then this variation is for you!
Be sure to try both and let me know which one is your favorite 🙂
Buckwheat Bread
Ingredients:
1 cup buckwheat flour
1/2 cup Nuzest plain pea protein
1/2 tsp. baking soda
1/4 tsp. pink himalayan sea salt
1 tsp. apple cider vinegar
1/4 cup melted coconut oil
1 1/4 cup dairy-free milk of choice (if you want your bread sweeter, use 3/4 cup milk and 1/2 cup coconut water or the liquid underneath the cream in a can of coconut milk)
1 tbs. maple syrup
Preheat your oven to 350 F
Mix the dry ingredients in a medium bowl.
Add the apple cider vinegar and mix slightly.
Add the remaining wet ingredients and mix until combined, do not over mix. Let sit while you line a loaf pan with parchment paper. This mixture will be very thick.
Scoop the mixture into your loaf pan and bake for 30 minutes or until a toothpick comes out clean.
Let cool for 5 minutes before transferring to a wire rack to cool completely before cutting into it.
Stores well in the fridge for up to 5 days or sliced and stored in the freezer for up to 6 months.
I start grad school in just 5 days! I don’t know how much time I’ll have for recipe development or posting yet, but I promise not to leave you all behind. Make sure you are following me on Instagram for updates as I’m most active there. And I’ll be sure to get a full update (life and Lyme) post up by the time school begins.
Okay okay, buckwheat, is it paleo or not? Maybe. I know I’ve talked about this before. Buckwheat is technically a seed, not a grain. In the paleo world, it’s considered a pseudo-grain. I handle buckwheat fine on occasion and really enjoy it’s mild, earthy taste.
Lately, I’ve been missing bread dearly from my pre-paleo days. I had to figure out some way to make an egg-free, not packed with almond flour bread. HELLO BUCKWHEAT FLOUR! So versatile and easy to bake with. This bread has been hitting the spot for me, slathered with some almond butter or even just coconut oil. I’ve made two versions of this so stay tuned for next week’s part 2 that adds a protein punch and is nut free!
This bread doesn’t rise like normal bread since there is no yeast and it is a little denser. I consider breads like this more of a snack bread then a sandwich bread but it certainly can work for open faced sandwiches.
Also, ps, I moved and I’m about to start grad school (cue the shock). It’s terrifying and new and I’m still sick. If you all would like a complete update on what is going on and where I am health/treatment wise, let me know!
Buckwheat Bread
Ingredients:
1 cup buckwheat flour
1/2 cup almond flour
1/2 tsp. baking soda
1/4 tsp. pink himalayan sea salt
1 tsp. apple cider vinegar
1/4 cup olive oil
1 cup dairy-free milk of choice (if you want your bread sweeter, use 1/2 cup milk and 1/2 cup coconut water or the liquid underneath the cream in a can of coconut milk)
1 tbs. honey or maple syrup
Preheat your oven to 350 F
Mix the dry ingredients in a medium bowl.
Add the apple cider vinegar and mix slightly.
Add the remaining wet ingredients and mix until combined, do not over mix. Let sit while you line a loaf pan with parchment paper.
Scoop the mixture into your loaf pan, it should be pretty thick and not pourable, and bake for 30 minutes or until a toothpick comes out clean.
Let cool for 5 minutes before transferring to a wire rack to cool completely before cutting into it.
Stores well in the fridge for up to 5 days or sliced and stored in the freezer for up to 6 months.
What’s your favorite bread recipe? Remember to stay tuned for a second version of this next week.
This AIP Beef Stir Fry is easy and delicious. Loaded with delicious veggies and tender beef, this beef and veggie stir fry is healthier than takeout!
AIP beef stir fry
A couple of weeks ago my chiropractor (who is also my applied kinesiologist) said I was clear of mold, heavy metals, and SIBO. For now, anyway. I’ve been sticking to a paleo low-fodmap diet and it was getting boring, so I was excited to hear no SIBO because it meant I could start slowly trying to reintroduce higher FODMAP foods.
I started to crave a beef and broccoli stir fry but I didn’t want to eat just a bunch of broccoli given it’s FODMAP level, so I incorporated it into a stir fry with lots of other veggies. This way I would be satisfied while only starting out with a little broccoli to test the waters. This recipe also has mushrooms which are considered medium FODMAP but I’ve handled them fine in the past, in moderation, and on occasion. Just something to be aware of if you are following a low FODMAP diet.
Of course, if FODMAPs are a no go for you right now, you can feel free to leave out the broccoli or substitute it with another vegetable that you handle.
AIP Beef Stir Fry Ingredients
Olive or avocado oil: if not AIP, feel free to use sesame oil
Stir-fry beef: you can use sliced stew meat, sirloin, or flank steak works
Broccoli
Green beans
Water chestnuts: these add a crunchy and slightly sweet hit to the stir-fry that is so delicious! Don’t skip these
Baby bella mushrooms
Coconut aminos: this is a gluten free alternative to soy sauce
Ginger root: plenty of ginger goes into this recipe for flavor and it’s anti-inflammatory benefits
Apple cider vinegar: this adds depth of flavor to the sauce
Salt
This gluten free stir fry is easy to whip up. Once your veggies and meat are prepped, you’ll brown the beef on both sides and set aside. Then you’ll sauté the veggies in a delicious coconut aminos and ginger sauce, before adding the beef back in to finish cooking. It is that simple!
Paleo Beef Stir Fry Substitutions and Variations
Veggies: I love stir-fry because you can really use whatever vegetables you have on hand. Got some carrot you want to use up? Toss those in! Hate mushrooms? Leave them out! Feel free to use a combination of vegetables you love. I’ve kept this beef stir fry nightshade free by not adding peppers, but you can certainly add bell peppers if you tolerate them.
Beef:This is a beef stir-fry, but you can also use thinly cut slices of chicken breast if you prefer a chicken stir-fry!
Coconut aminos: Coconut aminos are a gluten free and soy free alternative to soy sauce, but if you tolerate either of those you can feel free to use tamari or soy sauce. Coconut aminos are a little sweeter though, so I suggest adding a tablespoon of coconut or brown sugar to the mix.
Leftovers and Storage
I love making this at the beginning of the week and then having leftovers for lunches/dinners. This AIP beef stir fry is a great meal prep option! Just keep leftovers stored in the fridge for up to 3 days. Reheat on low in the oven at about 300F for 30-40 minutes. I like to add a little extra coconut aminos to keep the meat and veggies moist.
This delicious paleo beef stir fry is packed with nutrients and flavor! You can’t go wrong with this easy weeknight meal that can be made completely AIP friendly. Add this to your list of healthy and nutrient dinner options that are gluten free and allergy friendly!
2Tbsptoasted sesame oil, divideduse olive or avocado oil for AIP
1lbsstir-fry beefsliced stew meat, sirloin, or flank steak works
1head of broccolichopped
3cupsgreen beanstrimmed and cut in half
18 ounce can of water chestnuts
1cupsliced baby bella mushrooms
White sesame seedsoptional- omit if AIP
Sauce
1/3cupcoconut aminos
1Tbspheaping fresh grated ginger root
1tspapple cider vinegar
salt to taste
Instructions
Make sure your veggies are chopped and prepared before starting.
Heat 1 Tbsp of oil in a large pan over medium heat. Add the beef strips and brown on both sides, about 3 minutes each. Remove from the pan and set aside.
Add the other Tbsp of oil and add the broccoli and green beans. Let cook for 5-7 min, until they become more colorful and slightly softer.
While the broccoli and green beans are cooking, mix the coconut aminos, ginger, and apple cider vinegar together.
Add the aminos mixture to the pan then add in the water chestnuts. Stir to combine and cook for 5 min. Next, add the mushrooms and cook for another 3 minutes, stirring occasionally.
Add the beef back in and mix well. Cook for about another 10 minutes, mixing occasionally, until beef is done.
Let rest for 5 minutes before serving. Serve and sprinkle with sesame seeds if desired.
Here is a super simple side dish for any night of the week. You can sub this celeriac rice out for normal grain-filled rice in any of your favorite Mexican dishes (tacos, taco bowls, fragrant rice w/ fajitas anyone?) or any meal you love having with rice!
Cilantro Celeriac “Rice”
Serves 2-4
Ingredients
1 large celeriac
1/4 cup chopped fresh cilantro
1 tbs. Extra virgin olive oil
salt to taste
Peel and chop the celeriac into large chunks. Place in the food processor and pulse until you get a rice-like consistency.
Heat the olive oil in a large saucepan over medium heat. Add the “rice” and cook 10-15 minutes, stirring occasionally until it begins to brown. Turn off the heat, stir in the cilantro and salt to taste.
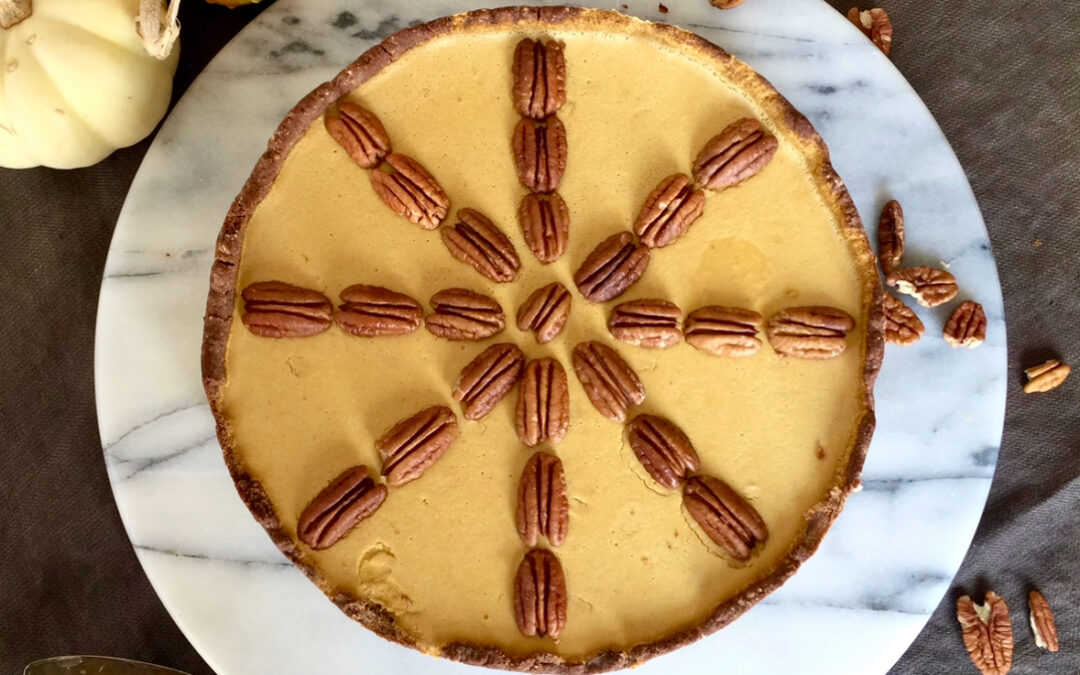
Dessert is my favorite part of Thanksgiving. Always has been, always will be. And it’s always my responsibility. We (as in I) were going to make paleo pecan pie since we live in New Mexico after all (if you didn’t know, they grow pecans here, so it’s kind of a thing) and we’ve also never made pecan pie for Thanksgiving before, but last minute I decided on a pumpkin cheesecake because it’s just not T-day without something pumpkin!
We’ve been making variations of cheesecakes and pumpkin desserts for years now and something just felt off about making pecan pie instead. Perhaps we will save that one for Christmas ;). But, I couldn’t let the idea of pecans slide from my mind, so I decorated this beautiful and delicious cheesecake with some!
My recipe is based off of these two recipes: Grazed and Enthused’s AIP Pumpkin Pie & Whole Life, Full Soul’s AIP Pumpkin Cheesecake. My recipe is lower FODMAP and nightshade free. This recipe is not super sweet, which is what I love about it. It is quite earthy tasting. I suggest using a high quality pumpkin puree (perhaps even making your own) to get great flavor out of this dessert. You can add extra maple syrup to the filling (or drizzled on top) if you like things on the sweeter side. And it is excellent served with coconut whipped cream or coconut milk ice cream!
This allergy friendly pumpkin cheesecake is completely gluten-free, dairy-free, and paleo. You can keep it completely AIP by leaving off the pecans and it can easily be made vegan, as well. This dessert is sure to please the whole table!
This recipe requires extended chilling time, so please read the directions before beginning and allow at least 6 hours of chill time, preferably overnight. This delicious pumpkin cheesecake fits almost every diet, making it the perfect holiday recipe to please the entire table! Not only is this cheesecake gluten and dairy free, it is also completely AIP (leave off the pecans) and can easily be made vegan.
Course Dessert
Cuisine American
Keyword dairy free, fall, holiday, thanksgiving
Prep Time 30 minutesminutes
Cook Time 30 minutesminutes
Total Time 7 hourshours
Servings 8people
Author Victoria Faling
Ingredients
Crust
1cupcoconut flouror 1/2 cup coconut flour + 1/2 cup almond flour if not AIP
1.5TbspGelatinI use Great Lakes red can (use agar agar for vegan version)
2Tbspboiling water
optional-pecans*leave pecans off the top to make autoimmune paleo protocol friendly
Instructions
Preheat oven to 325 F.
Line a springform pan with parchment paper. I usually cut a circle for the bottom and then strips to line the sides.
Mix all dry crust ingredients together to remove any lumps. Add wet ingredients and mix until you have a sandy texture. The dough should hold together and be slightly crumbly, but not be super wet. If for any reason it is not holding together, add some hot water slowly.
Press the dough into the springform pan, spreading evenly along the bottom and up the sides about 1.5-2 inches. Pierce bottom of crust with a fork a couple of times.
Bake in the oven for 25-30 minutes, until deep golden brown and feels almost hard (it will harden once taken out of the oven).
While the crust is cooling, make the filling. Combine all the ingredients except for the gelatin and water in a food processor.
Add your gelatin and boiling water together in a small bowl and immediately whisk vigorously to combine. You need to be quick about this so that the gelatin doesn’t harden and become chunky in the water. As soon as you’ve whisked it well, add it to the food processor and make sure everything is combined well. This mixture will be very runny/watery/soupy, do not fear!
Once your crust as cooled, rub your fingers over the areas you pierced with a fork (so that your filling doesn’t run through). Then pour your filling into the crust and set in the fridge for a minimum of 6 hours but I suggest overnight. The gelatin will allow the filling to harden and set.
If you want to add pecans to the top: about 2 hours into chilling, take the pie out and press the pecans into the top of the cheesecake in your desired design. Return cheesecake to the fridge to finish setting.
Mashed potatoes are a classic Thanksgiving dish. If you eat paleo you may still eat them on Thanksgiving, but if you are on any type of strict paleo diet or version of it, they are probably out of the question. They are for me with being on a low-fodmap, nightshade free paleo diet.
My favorite mashed potato substitute is mashed cauliflower. That’s a pretty classic trade in the paleo world, but it can get a little old. I decided to spice this dish up and just in time for Thanksgiving dinner ;). So this week I’m bringing you another super simple side dish that everyone will love.
Rosemary Faux-tatoes
Serves 4
Ingredients:
1 medium celeriac (celery root), peeled and cubed
1 small head of cauliflower, chopped into florets
1 tbs. coconut oil
1 tbs. coconut cream from the top of a can of full fat coconut milk (you can replace this with milk or more coconut oil)
1/2 tsp. sea salt
1 tsp. dried, crushed rosemary
Steam celeriac and cauliflower until soft and easily pierced with a fork. The cauliflower may finish cooking first, which is fine, just keep checking and pour out the cauliflower when it’s done to let the celeriac cook a little longer.
Once cooked, put the veggies into a bowl or food processor and add all the remaining ingredients except the rosemary. If using a food processor, pulse/blend until desired consistency is reached. If in a bowl, use an immersion blender or handheld mixer to mash everything together. I like my “faux-tatoes” well blended and fluffy but some like them on the chunkier side, so blend/process until you reach the consistency you love! Mix in the rosemary at the end and sprinkle extra on top for presentation, if desired.
Hi! I'm Victoria. I was diagnosed with Lyme in 2012 and have been on a healing journey ever since. I love helping others on their road to healing through allergy friendly recipes, exercise, and overall well-being.