I finally took the plunge and ordered some tiger nut flour. This is the first time I’ve ever baked with it! It’s nice because it has a natural sweetness and that nutty flavor I miss. I also am forever craving foods out of season. It’s not quite fall (okay, kind of far from it), but I was craving apple pie, one of my favorite desserts ever! I love making bars for the ease of snacking and being different from a full on pie, but you certainly could use this recipe as a sort of apple crumble pie (just make it in a pie dish instead).
I love these bars for a dessert with some coconut whipped cream or vanilla ice cream. I hope you enjoy them as much as I do!
AIP Apple Pie Bars
Makes 9 squares
Ingredients:
Crust-
1/2 cup tiger nut flour
1/4 cup coconut flour
2 tbs. tapioca flour
1 tbs. maple syrup
1 tsp. vanilla extract
1/4 cup coconut oil
3 tbs. of water
Filling-
4 apples, cored and chopped
1 tbs. coconut oil
1 tbs. lemon juice
1 tbs. honey (use maple syrup for vegan)
1/4 tsp. cinnamon
Topping-
1/4 cup tiger nut flour
1/2 cup coconut flakes
2 tbs. coconut flour
1/4 tsp. cinnamon
2 tbs. maple syrup
1/2 tsp. vanilla extract
4 tbs. coconut oil (may need more)
Preheat the oven to 35oF
Mix all dry crust ingredients in a bowl then add the wet and combine. You should have a wet but easy to handle dough. If dough is too dry, add water 1 tbs. at a time
Press the dough into the bottom of a 9×9 inch baking dish.
Bake crust for about 10-15 minutes, until just beginning to golden.
While crust is baking, start your filling. Melt the coconut oil over medium heat in a deep saucepan. Add the apples and lemon juice, cook for about 3 minutes. Add all the remaining filling ingredients, stir well. Turn heat down to medium low and simmer for about 7-10 minutes, stirring occasionally, until apples are soft but not mush.
When the apples are done, work on the topping. Combine all the wet ingredients in a bowl then ad the remaining ingredients and combine until you have a nice crumble that holds together.
Once the crust is done, pour the apple filling evenly over the crust. Then pour the crumble on top, gently pressing it together.
Bake for another 20-25 minutes until topping is golden brown.
Let cool completely before cutting. I suggest also letting it set in the fridge to become cool before cutting.
I’m pretty sure I’m never going to buy ice cream from the store again, now that I’ve figured out how to make delicious, creamy ice cream at home. I love making my own because there are no weird additives or flavorings, I can make whatever flavor I like and adjust it to my preferences, and I am able to use less sweetener. I have to be honest, store bought ice cream is usually just slightly too sweet for me. They add so much unnecessary sugar (in my opinion), that my mouth starts to hurt when eating it.
Actually, that is the case with almost anything store bought. Why do we feel this need to add SO MUCH extra and/or unnecessary sugar to everything?! I don’t understand. That is why I love making everything myself at home, because I can use less junk and really enhance the true flavors of a dish.
I don’t have an ice cream maker, so this is a no-churn version that still turned out delicious. The key is using only the milk-fat from the coconut milk cans. I’m sure this would be even more divine if you are able to get your hands on an ice cream maker.
No-Churn AIP Strawberry Ice cream
Makes about 1.5-2 pints
Ingredients:
2 cans full fat coconut milk, refrigerated overnight
3 cups frozen strawberries
2 dates, pitted
1/8-1/4 cup maple syrup (depending on how sweet you like your ice cream. 1/8 cup provides a very mild hint of sweetness to match the dates and strawberries, but it’s not super sweet like your typical ice cream)
1 tsp. vanilla extract
Pinch of pink himalayan salt
Directions:
Scoop out the thick coconut cream from the coconut milk cans and place in a blender. Save the liquid (coconut water) at the bottom of the cans for a later use.
Add the remaining ingredients to the blender and blend until combined. If you like to have some chunks of strawberries in your ice cream, use only 2 cups of strawberries initially. Then add the remaining cup and pulse until you reach your chunky desire.
IF you have an ice cream maker, you can pour the mixture into at this point and follow manufacturers directions.
IF you do not have an ice cream maker, pour the mixture into a freeze safe container and cover. Freeze for 6-8 hours, whisking the mixture every 30 minutes for at least the first 4 hours to help keep it creamy and prevent it from getting super icy.
Serve immediately or if using once ice cream is completely hardened, let sit out for about 5 minutes to soften slightly before scooping.
I posted the recipe for these cookies on my Instagram a couple weeks ago, but I decided to get the recipe up on the blog for those of you who aren’t on IG and to properly archive it.
These cookies utilize tiger nut butter which isn’t actually a nut, but a tuber, so it’s perfect if you follow the AIP diet. The tiger nut butter can be subbed for any nut or seed butter of your choice, though! I’ve had tons of people remake this recipe using almond and peanut butter and they love it.
I use Roots Tiger Nut butter which is a new company specializing in AIP “nut” butters. They are a great, family run business and make the delicious butter I used in this recipe.
Tiger Nut Butter Cookies
Makes 6-8 cookies
Ingredients:
1/2 cup tiger nut butter (if using other nut butter, may need to add 2 tbs applesauce or oil if batter is too crumbly)
1/4 cup maple syrup
1/2 tsp. baking soda
3 tbs. coconut flour
pinch of Himalayan pink salt
Preheat oven to 350F.
Combine butter and maple syrup in a bowl, mix well.
Add remaining ingredients and mix to combine. You should have a wet but mailable dough.
Divide dough into 6-8 balls on a parchment lined baking sheet, then press down gently (use a fork if you want the fancy lines on top).
Bake for 8 minutes until edges are just beginning to turn golden brown. They may seem underdone, they aren’t.
Let cool for a couple minutes before transferring to a wire rack to finish cooling completely.
These are DELICIOUS for ice cream sandwiches. So go make one and enjoy your life 😉
This cross between a curry and stir fry is the ultimate comfort meal. Warming spices, hearty chicken and veggies, and creamy coconut milk make this paleo and AIP dish the perfect dinner option.
paleo chicken curry stir fry
A curried stir fry, that’s quite the name, isn’t it? I’m aware that is a bit confusing, but this recipe is most definitely a cross between a stir-fry and a curry! This chicken and vegetable dish contains coconut milk and curry spices, but everything is stir-fried before adding the creamy sauce. This chicken stir fry situation is completely autoimmune paleo friendly, nightshade free, and low FODMAP. It is the perfect example of how allergy friendly food can still be flavorful and delicious!
aip and dairy free chicken and vegetable curry
How to Make Curried Chicken and Veggie Stir Fry
To make this delicious paleo dinner, you’ll stir fry a host of vibrant vegetables (this dish is very veggie heavy to pack in the nutrients and fiber!). Then you’ll add some chopped chicken breast, along with plenty of ginger and turmeric. The sauce comes together with a mix of coconut milk and coconut aminos. And just like that, you have curried stir fry!
autoimmune paleo chicken and veggie stir fry curry
This cross between a curry and stir fry is the ultimate comfort meal. Warming spices, hearty chicken and veggies, and creamy coconut milk make this paleo and AIP dish the perfect dinner option.
1-2tspturmeric powderdepending how much you like it
1/2tspcinnamon
1tspground ginger
Instructions
Heat your oil and grated ginger in a large, heavy bottom frying pan over medium high heat for about 1-2 minutes, until ginger becomes fragrant.
Add broccoli and water chestnuts, sautéing for about 10 minutes until broccoli becomes darker in color and softens slightly. Add 1/2 cup of broth as veggies start to stick to the pan.
Add the yellow squash and cook for 5 more minutes before adding the chicken, coconut aminos, and salt.
Cook for 7-10 minutes, until chicken is almost cooked through (outside is white). Then, add the bok choy, coconut milk, remaining broth, turmeric, cinnamon, and ginger. Mix everything together and bring to slow boil, then reduce to simmer and cover. Simmer for 10 minutes until the chicken is cooked through and veggies have softened/cooked completely.
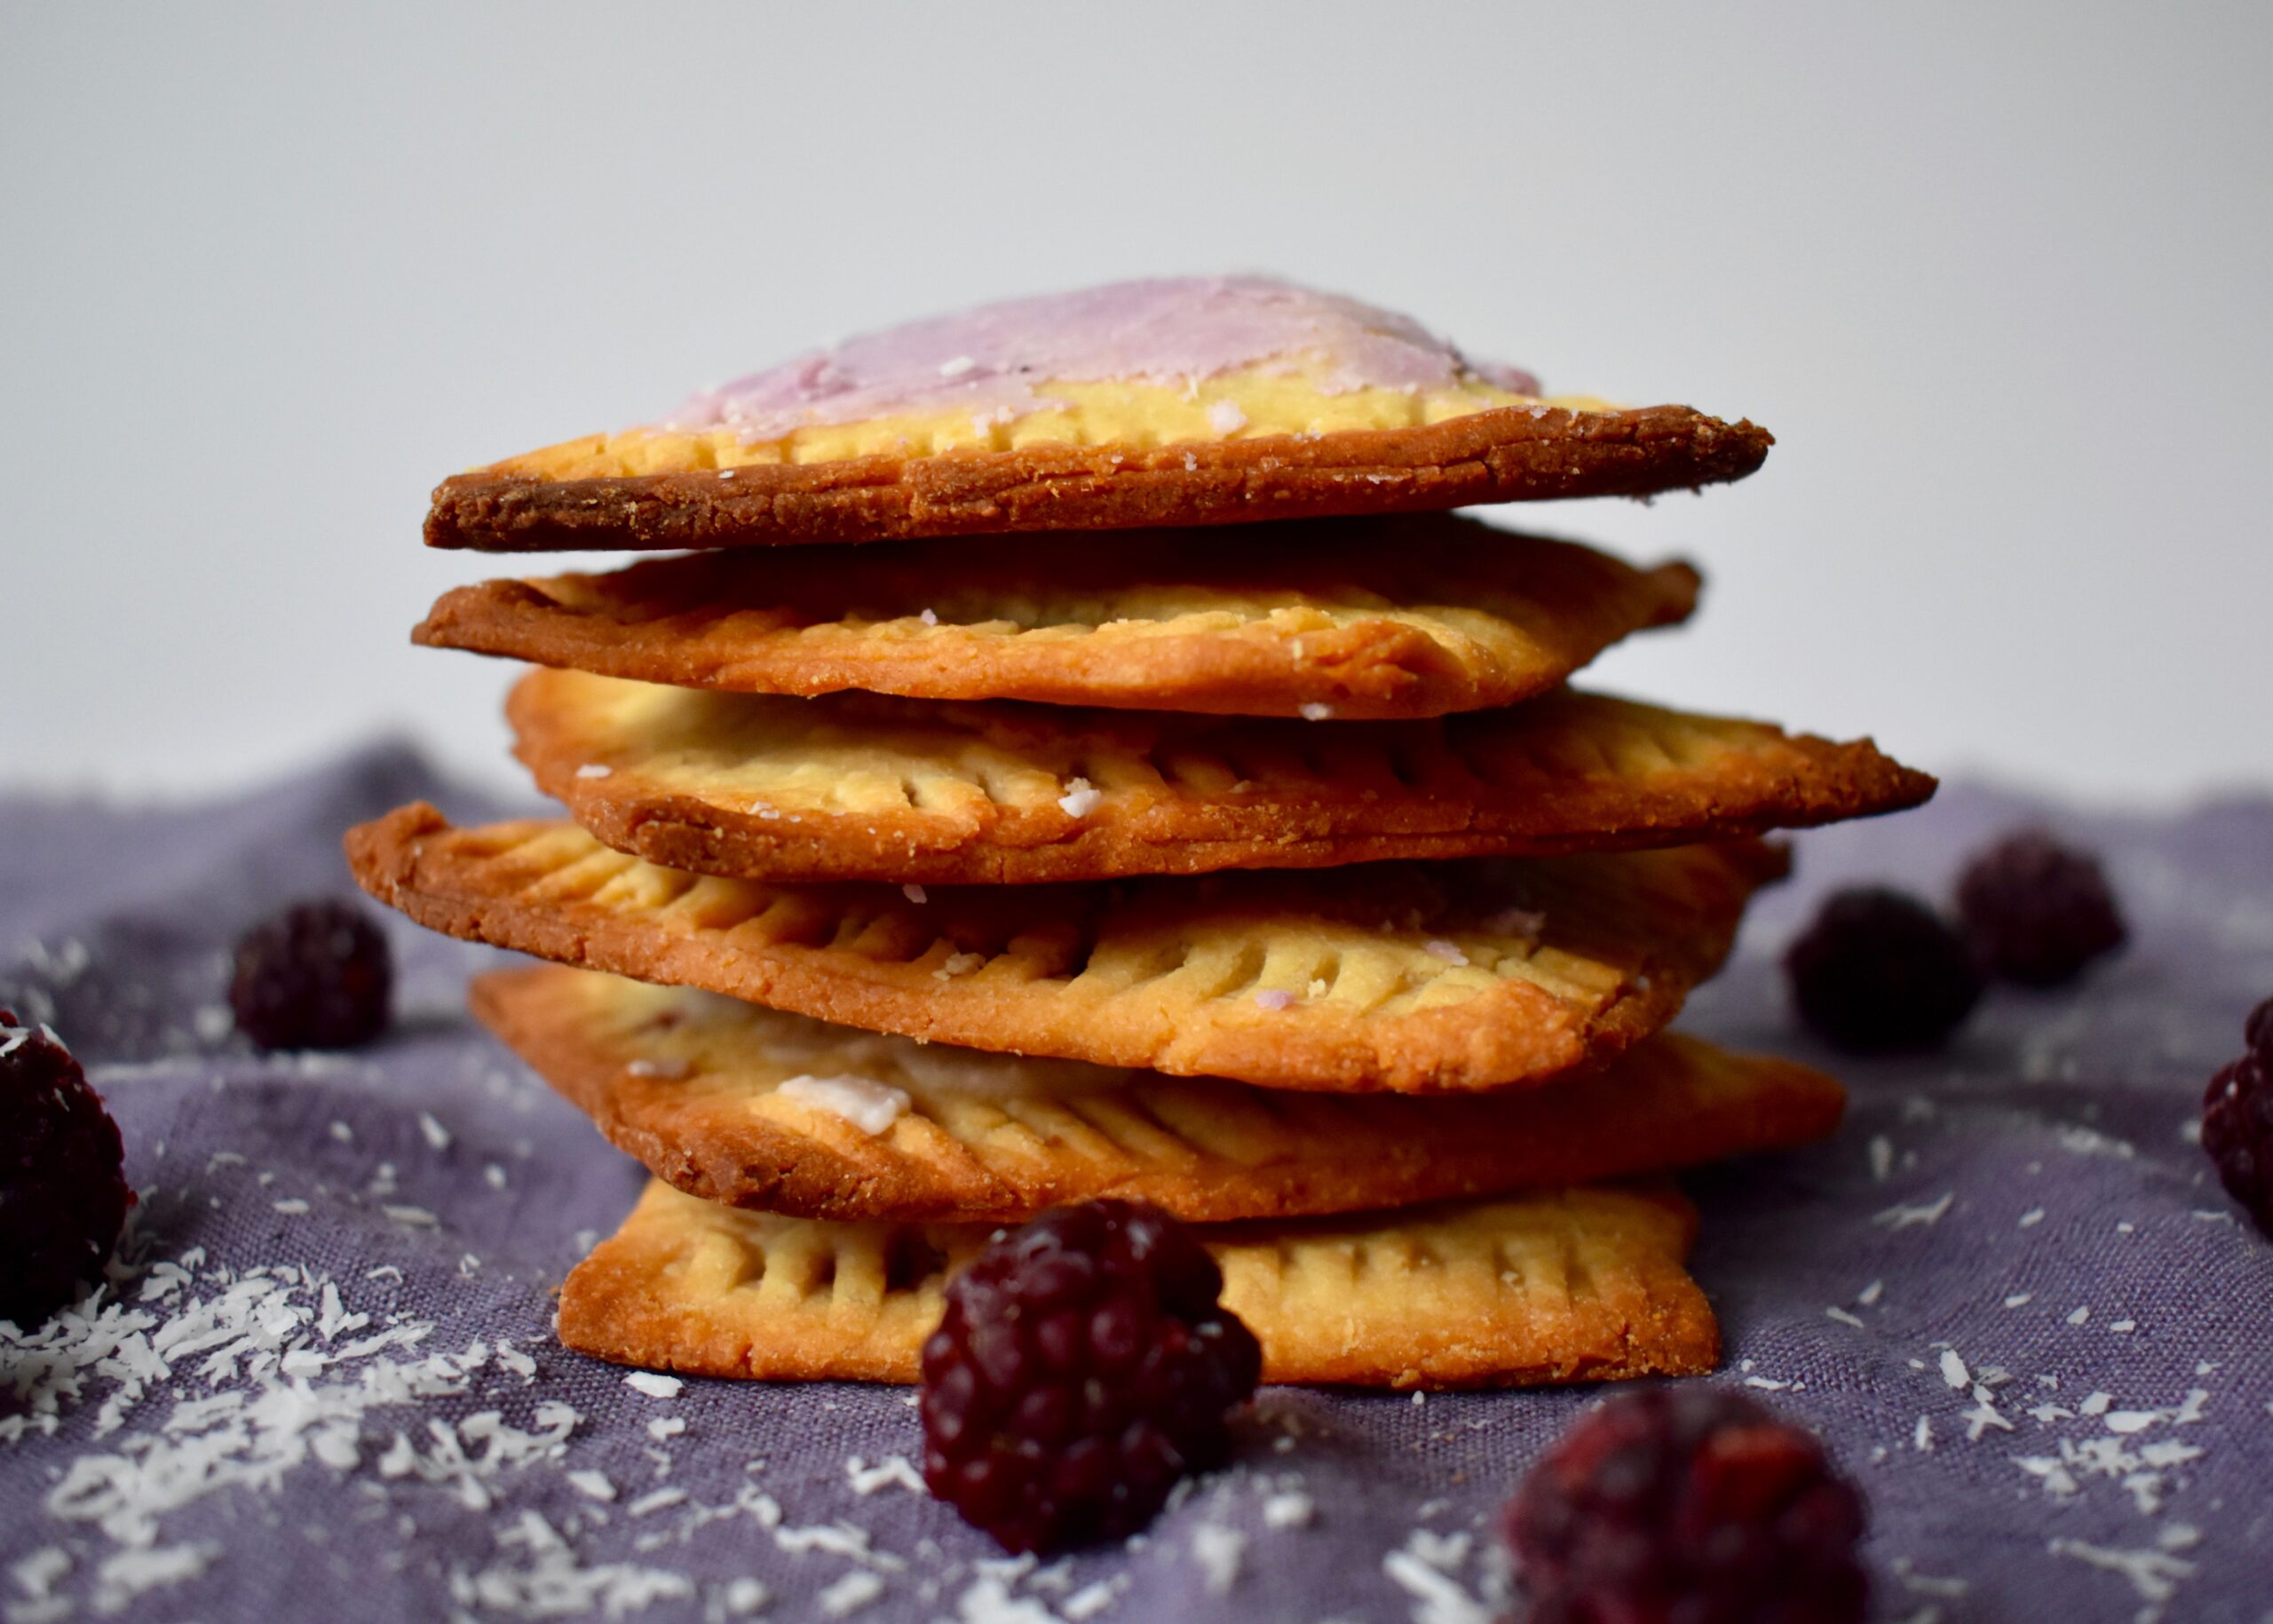
Yes, you read that right! Pop tarts weren’t a household staple in my family, I was a much bigger fan of toaster strudels. To be honest, these may resemble more of a toaster strudel since they aren’t quite as crispy as a pop tart… they are somewhere in between. Anyway, not only did my mom never really let me eat pop tarts (I’m pretty sure that’s right, she’s probably going to yell at me about this post), but I also remember not loving them. All my friends loved them so I thought I was supposed to, but they always tasted too sweet, too much like artificial sugar (ha!), and just tasted off to me. I much prefer this homemade version!
This recipe came about totally by accident. I wasn’t even trying to make an AIP version of pop tarts. Then I turned a failed bar recipe into dough and they were pretty good. I posted a picture of the botched original-recipe-turned-sort-of-pop tart on my Instagram and people said they wanted the recipe. So, of course, I had to try and make a legit recipe to post! This recipe is great because it is completely AIP and vegan, so it fits many different diets. These paleo, gluten free, and dairy free pop tarts will be a crowd pleaser.
These pop tarts have a secret ingredient in the crust: sweet potato! Yes, get your veggies in with your dessert (or breakfast, whenever you want to eat pop tarts, I’m not judging!). These are a much healthier version than the original and utilize a real fruit for the filling. They are extremely versatile, though, and you can fill them with whatever you want. I used blackberries in mine but you can use other fruit, nut/seed butters, chocolate, and more!
A healthier take on an American classic. This recipe is completely gluten-free, dairy-free, paleo, and AIP. Fill your pop tarts with whatever your heart desires!
Course Breakfast, Dessert, Snack
Cuisine American
Keyword classic, comfort food
Servings 6-8 pop tarts
Ingredients
Dough
1cupsteamed and mashed Japanese sweet potatowhite fleshed sweet potato will also work
First, chop and steam your sweet potato. Let cool before mashing with a fork so that you have 1 cup of mashed sweet potato.
Blend the sweet potato, flours, coconut butter, maple syrup, and milk in a blender until smooth.
Transfer batter to a bowl and cut in the coconut oil until it is combined in the dough (don’t over mix). You should have a pretty soft dough at this point, almost too soft to really work with.
Place dough in the fridge for an hour so that the dough can harden up some. It should be like sugar cookie dough- hard but malleable. If you leave it in the fridge longer or it becomes too hard, just leave it on the counter for a little until it begins to soften and become easier to work with.
Preheat oven to 350F.
Take half of the dough and form it into a ball with your hands, then roll it out between 2 sheets of parchment paper to be about 1/4 inch thick. Cut rolled dough into the shapes you want for the pop tarts (mine were about 3×3 inch squares). Make sure when you cut a shape, you cut two matching ones so you have the top and bottom of the pop tart.
Repeat with the other half of the dough. You should have a total of 12-16 squares, depending on how big/small you make them.
Using a spatula, gently transfer one cut shape (bottom of the pop tart) to a parchment lined baking sheet and transfer the other shape (top of the pop tart) to a holding tray (I used a cutting board to keep the top layer of the pop tarts separate).
Scoop up the scraps of dough from cutting and repeat the same process. If the dough becomes too soft to work with, just place it back in the fridge for a few minutes. This may apply to the cut shapes, as well. If dough begins to soften too much on the baking sheet, just throw it in the fridge for a couple of minutes (you don't want it to get too hard that it crumbles when working with it though).
Repeat this rolling and cutting process until you’ve used all the dough to cut your pop tarts.
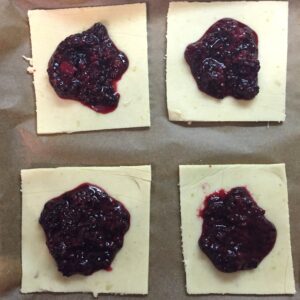
Take about one tablespoon of the filling and place it in the middle of the pop tart dough that is on the baking sheet. Spread the filling slightly on the dough, leaving about a 1/2 inch around the edges. [See image]
Dip your finger in water and run it along the edges of the bottom crust, place the top crust piece overtop so edges line up and gently press the two pieces of crust together with your fingers. Repeat with all the pop tarts.
Use a fork dipped in water to crimp the edges of the pop tarts.
Bake for about 35-40 minutes until golden brown. I’ve found that flipping them half way gets them crispier but if you want softer and more visually appealing pop tarts, don’t flip.
Ice with coconut butter, if desired. You can also mix some berry juice with coconut butter for a colored icing.
Notes
*I used frozen since it is winter, just thaw and pour off excess juice. You can also use fresh. Alternatively, you can use whatever filling you want like nutella!
Salmon is basically the only seafood I like. I try and get some in every week because those omega’s, right? I love my plain baked salmon, I really do, but sometimes you want to spice it up a bit. So, I decided to make some sort of “topping” for salmon and see how it turned out. I have to say, pretty good.
This dish is a mix of flavors from sweet to salty with a little bit of tang, which is what makes it so interesting. At first I wasn’t sure how the combo would work out, but I really like all the different flavors you get with this dish!
Fig & Bacon Salmon
Serves 2
Ingredients:
4 dried figs
3 slices of bacon
Scant 1/4 cup chopped cilantro
1/2 tsp. lemon zest
Juice of 1/2 a lemon
Scant 1/4 tsp. himalayan salt
1/2 lbs. of wild salmon
Preheat oven to 350 F.
Soak the figs in hot water for 10 minutes. While the figs soak, cook your bacon.
When bacon is done cooking, lay on paper towels to absorb the extra fat. Drain your figs and thinly slice them.
Combine all ingredients except the bacon and salmon in a bowl and let marinate for 10 minutes.
While marinating, lay your salmon on a parchment lined baking sheet.
Chop or crumble the bacon and add it to the fig mixture. Spoon this mixture over the salmon and gently press the topping into the salmon.
Bake for about 15-20 minutes, depending on how well done you like your salmon.
Serve immediately.
What your salmon should look like before putting it in the oven
Would you have ever thought about adding figs or bacon to a fish dish?
Hi! I'm Victoria. I was diagnosed with Lyme in 2012 and have been on a healing journey ever since. I love helping others on their road to healing through allergy friendly recipes, exercise, and overall well-being.