These cookies are for all my fellow ginger loving folx out there! I am OBSESSED with ginger. Anything ginger, I will consume it, so these cookies are some of my fav. I think they’ve got just the right amount of spicy kick while still being sweet and chewy.
These cookies are gluten free with a paleo option for my grain free friends. They are also dairy and nut free. Ginger is a year round flavor to me, but as a warming spice, these are perfect for winter.
Gluten Free Triple Ginger Cookies with Paleo option
-1 cup tigernut flour (almond probably works too)
-1/2 cup 1:1 gluten free flour blend OR tapioca starch if grain free
-3/4 tsp. baking soda
-1-2 tsp. ground ginger (I like a major ginger flavor and kick, so I used 2)
-1/2 tsp. salt
-1/4 cup melted oil or butter of choice
-1/4 cup brown sugar
-2 tbs. molasses
-1 egg
-1 tbs. grated fresh ginger
-1/4 cup chopped candied ginger
-1/4 cup sugar for rolling cookies in
Sift flours together and mix in baking soda, ground ginger, and salt.
In a separate bowl, beat the oil and sugar together for about a minute or two then add in the egg, molasses, and fresh grated ginger. Beat to combine.
Add the dry ingredients and mix on low until just combined.
Fold in the chopped ginger then cover the dough with plastic wrap and refrigerate for at least 30 minutes.
While dough is in the fridge, preheat oven to 350F and line a baking sheet with parchment paper.
Scoop tablespoon size dollops of cookie dough and roll into a ball. Roll each ball in sugar to coat the cookies then place 2 inches apart on the cookie sheet and bake for 10-12 minutes, until golden and edges have hardened. Let cool on cookies sheet for 5 minutes before transferring to a wire wrack to finish cooling.
This is the perfect holiday dessert. We’ve got warming winter spices, delicious winter fruits, and creamy caramel all rolled into one scrumptious cake! This cake is, of course, gluten and dairy free, along with being nut and corn free.
Sometimes upside down cakes can feel overwhelming or like you need a lot of skill, but trust me when I say that this cake is very easy to make! It’s simple and fairly quick to make, so you won’t have to waste extra time in kitchen if you are making this for a special occasion.
-1 cup 1:1 gluten free flour (I use King Arthur’s)
-1 tsp cinnamon
-1/2 tsp ginger
-1/4 tsp salt
-3/4 tsp baking powder
-1/4 cup maple syrup
-1/4 cup oil
-2 eggs
-1/4 cup milk of choice (I used oat milk)
-1/4 cup yogurt of choice (I use Oatly)
-1 tsp vanilla
Caramel: You can feel free to use whatever caramel sauce you desire, but I usually make a date-based caramel and here is that recipe
-6 LARGE dates (double if using small ones)
-3/4 up full fat coconut milk, can shaken
-1/4 tsp. salt
-Hot water
Preheat oven to 350F.
Line the bottom of a spring form pan with parchment paper. This will work with a pie dish too. You can line the sides of the pan, as well, or just grease them.
Thinly slice your pears. I only had one on hand, but if you are big pear lover, chop 2. Line the bottom of your pan with the pears in whatever shape you want. If using multiple pears, you’ll overlap them for a thick pear topping!
Sift all dry ingredients together in a bowl and set aside.
Beat all wet ingredients together in a large bowl. If using a stand mixer, use the whisk attachment.
Add dry to wet and mix until just incorporated. If using stand mixer, use the paddle attachment on lowest setting.
The batter is on the thicker side, so pour or scoop it into your pan and spread evenly. Bake for 25-30 minutes until a toothpick just comes out clean. Let cool before releasing the springform and flipping the cake.
While the cake is cooling, you can make the caramel sauce. Boil some hot water and soak the dates in it for 10 minutes. Reserve the hot water the dates soaked in.
Blend dates, milk, 1/4 cup of the hot water, and salt in a blender until smooth. If it is too thick, you can add more of the reserved water or milk until you reach the desired consistency.
Once cake is cooled and flipped, drizzle with caramel and enjoy!
This easy and delicious Instant Pot soup is the perfect comforting meal. Full of protein, fiber, and gut healthy ingredients, your body and soul will thank you!
Chicken and white bean soup
I’m not a huge Instant Pot fan, but I do love it for soups! It’s so much easier to dump and go than have to watch the stove while a soup cooks. I also love that you can add the raw chicken and just shred it at the end, no need to cook it separately.
This gut healthy soup is packed with ingredients to support your gut microbiome without triggering a major IBS flare. I love using soaked and cooked white beans to not trigger digestive issues. This soup is simple, but delicious and it’s become on of my favorite meals!
instant pot soup
Chicken and White Bean Soup Ingredients
This Instant Pot soup is gluten free, diary free, and lower FODMAP.
Veggies: To keep this recipe more GI friendly, I use fennel instead of white onion. Fennel is low FODMAP compared to onion which can be quite triggering if you have IBS issues, like SIBO. There is a little bit of celery for flavor, but you can cut down on that as needed.
Oil: I love using garlic-infused olive oil to add flavor without the digestive distress that garlic can cause. You can find infused oils like this at your local olive oil store or even online!
Protein:This soup calls for chicken and white beans to bump up the protein and nutrition factor.
Beans: Although white beans are not low FODMAP, if you buy soaked and cooked beans it does help with digestion. I love using Jovial Foods as they prepare the beans the correct way and store them in glass jars.
Liquid: We use a combination of coconut milk and broth for a creamy and delicious consistency!
Flour: There is 1 tablespoon of gluten free flour in this recipe to help the consistency. Feel free to use tapioca or arrowroot starch to keep this recipe grain free.
Substitutions and Variations
Chicken: if you prefer dark meat, feel free to use boneless, skinless chicken thighs.
Veggies: you can add chopped potatoes or sweet potatoes. Feel free to stir in some chopped kale or spinach at the end when you add the chicken back in. You can also use onion instead of the fennel if you don’t have issues with it!
Garlic olive oil: I use garlic infused olive oil for digestive reasons, but if you don’t have issues with garlic, you can use regular olive oil and sauté some chopped garlic into it before adding the vegetables to the Instant Pot.
Coconut milk: if you don’t have issues with dairy, feel free to use cream!
Beans: the mild and creamy taste of white beans is what pairs perfectly in this soup, but butter beans would also be delicious!
instant pot chicken and white bean soup
Crockpot vs. Instant Pot
Crockpot is a type of slow cooker that cooks dishes on a low heat over a prolonged period of time.
The Instant Pot is a pressure cooker so it does the opposite of a slow cooker. It cooks things much quicker, but it is often a multi-cooker with other functions.
Can I use a slow cooker or the stove for this soup recipe?
This recipe is written to use an Instant Pot. I have not cooked it any other way, but if you don’t have an Instant Pot, you can try the below:
Slow cooker: add all ingredients and cook on low for 6-8 hours until chicken is done.
On the stove: use the same method as the instant pot, but bring everything to a boil then simmer the soup for 20-30 minutes, until the chicken is done. Alternatively, you can use cooked chicken or cube the chicken before adding it to the cooking process.
Storage
Keep this soup stored in an airtight container in the fridge for up to 3 days.
This soup also freezes well. Divide soup into individual portions in freezer safe containers and freeze for up to 3 months. Thaw the soup in the fridge overnight and reheat on low on the stove.
Set instant pot to sauté function and add your olive oil and fennel (and garlic if using), stirring occasionally, until fennel has softened and just beginning to brown. Add your celery and carrots and sauté for another 5 minutes.
Once done sautéing, hit cancel. Add your beans, broth, milk, oregano, salt. Stir to combine then add the chicken.
Seal instant pot and set to pressure cook for 15 minutes. When done cooking, manually release. Take chicken out and shred it with two forks.
Add chicken back to the instant pot with the flour and lemon or lime juice. Stir to combine and serve!
These Gluten Free Gingersnaps are reminiscent of the Mi-Del gingersnaps we grew up on! Filled with ginger flavor and a solid crunch, these healthier gingersnaps are a must make.
gluten free and dairy free gingersnaps
I grew up on Mi-Del Gingersnaps and they were my freaking favorite! The specific ginger flavor and crunch they have is one I’ll never forget. They do make a gluten free version, but they contain palm oil. I haven’t been able to find any other gluten free gingersnaps that taste just right.
I finally recreated a gluten free version that almost made me cry because they taste just like my childhood! I’m generally a soft cookie fan, but when it comes to gingersnaps, they are supposed to SNAP! If you also are a fan of a crunchier gingerSNAP, then you’ll love this recipe. It’s super easy to make and completely gluten free, dairy free, and nut free.
Keep these stored in an airtight container at room temperature for up to 5 days. I find keeping them stored in the fridge results in a slightly softer cookie.
These gingersnaps taste just like the Mi-Del ones I grew up. They are the perfect amount of sweetness and snap, all while being gluten free and dairy free. You have to make this this holiday season!
Beat the sugar and oil/butter in a stand mixer with the paddle attachment on low for one minute. Or a hand mixer on low if you don’t have a stand mixer.
Add the molasses and egg to combine.
Mix all the dry ingredients in a small bowl. Add they dry in thirds to the wet mixture, mixing on the lowest setting until just combined after each addition.
Take large tablespoon sized portions of dough and roll into a ball (lumps will result in a less round looking cookie). You should get about 18 cookies. Roll the balls in the 1/4 cup of extra sugar if desired, then place on a parchment lined baking sheet 2 inches apart (they will spread!). You will need multiple sheets or to bake the cookies in batches.
Bake one cookie sheet at a time for 15 minutes on the middle rack. Remove and let cookies cool for 10 minutes on the pan before transferring to a wire rack to finish cooling.
They will be crunchy around the edges and soft in the middle at first, but if you let them sit overnight then the entire cookie becomes crunchy!
Healthy sugar cookies that still taste delicious are possible! These Healthy Gluten Free Sugar Cookies are also dairy free and a fraction of the sugar, all while still tasting amazing.
gluten free sugar cookie
I’m not usually a sugar cookie fan, I just find them way too sweet. I’m also not an icing girl, it’s always pure sugar- my teeth and tummy start to ache just thinking about it. I’m really excited about these gluten free sugar cookies, though, because they are lower in sugar and utilize sweet potato in the icing (yes, sweet potato!). They aren’t as sickeningly sweet and are still absolutely delicious. Who is ready for a healthy sugar cookie recipe?!
healthy sugar cookie
Ingredients for healthy gluten free sugar cookies
Sugar
Coconut oil
Applesauce
Egg
Vanilla
Gluten free flour
Tigernut flour or almond flour
Baking soda
Baking powder
Salt
White sweet potato
Maple syrup
Gluten free sugar cookie notes
Sugar: I have tested this recipe with multiple different sugars. I’ve found that raw turbinado or granulated white sugar works best to get the crunchy edges with softer middles. Coconut sugar results in a thinner, crunchy cookie, but if you love crunchy then feel free to use coconut sugar in these healthy sugar cookies.
Flour: These gluten free cookies call for a combination of gluten free flour and tigernut flour. You can sub the tigernut flour for almond flour, but I always use a mix of flours when baking gluten free. I find this helps with texture and taste. Baked goods can come out dry tasting or flour-y tasting when just using a gluten free flour blend. I find adding some tigernut or almond flour adds to the sweetness, taste, and texture, allowing me to use less added sugar.
Sweet potato icing
Let’s talk about the icing in this recipe. Generally, icing is combo of butter and a lot of powdered sugar. It’s overwhelming sweet, in my opinion. We’re making a healthy sugar cookie icing this time around that also has some added nutrients in it by using sweet potato. Japanese or white sweet potato is quite sweet on it’s own and, when cooked, is perfect for baking with, including making icing!
To make the icing, you use cooked and cooled Japanese or white sweet potato and blend it with some maple syrup, coconut oil, and vanilla. It pairs perfectly with these sugar cookies. I’ve had Standard American Diet friends try them and love them! They didn’t miss the added sugar at all!
You won’t believe these gluten free sugar cookies are a fraction of the sugar in a traditional sugar cookie. They are completely dairy free and nut free too! We even use a vegetable in the icing. Trust me when I tell you that everyone will love these! They are perfect for the holidays.
1cupcooked, cooled, and mashed Japanese sweet potato(about 1 large sweet potato)
1/4cupmelted coconut oil
1/4cupmaple syrup
1tspvanilla extract
1/8tspsalt
Instructions
Beat sugar and coconut oil until smooth. Add in the applesauce, egg, and vanilla and beat until combined.
Sift in the dry ingredients and mix on low until the dough comes together.
Gather the dough into a ball and refrigerate dough for at least 30 minutes, preferably an hour.
When ready bake, Preheat oven to 350 F. Roll the dough out on a lightly floured surface to about 1/4-1/3 inch thick. Use a round cookie cutter about 2 inches in diameter to cut out cookies. Place cut cookies on a parchment lined baking sheet 2 inches apart. Gather dough scraps into a ball and place back into the fridge until ready to bake another tray.
Bake for 10-12 minutes on the middle rack, until cookies are just set on the edges and just beginning to golden. Remove and let cool on baking sheet for 10 minutes before transferring to a wire rack.
Repeat the above two steps with remaining dough.
While cookies are cooling, you can make the icing. Combine all ingredients in a food processor or blender until smooth. I like to let this sit in the fridge for a couple of hours after so it’s not too runny before icing the cookies. You can feel free to add food dye to the icing, as well.
Ice, decorate, and enjoy!
Keep these cookies stored in the fridge. This keeps them soft and keeps the icing from going bad. They can be stored for up to 5 days.
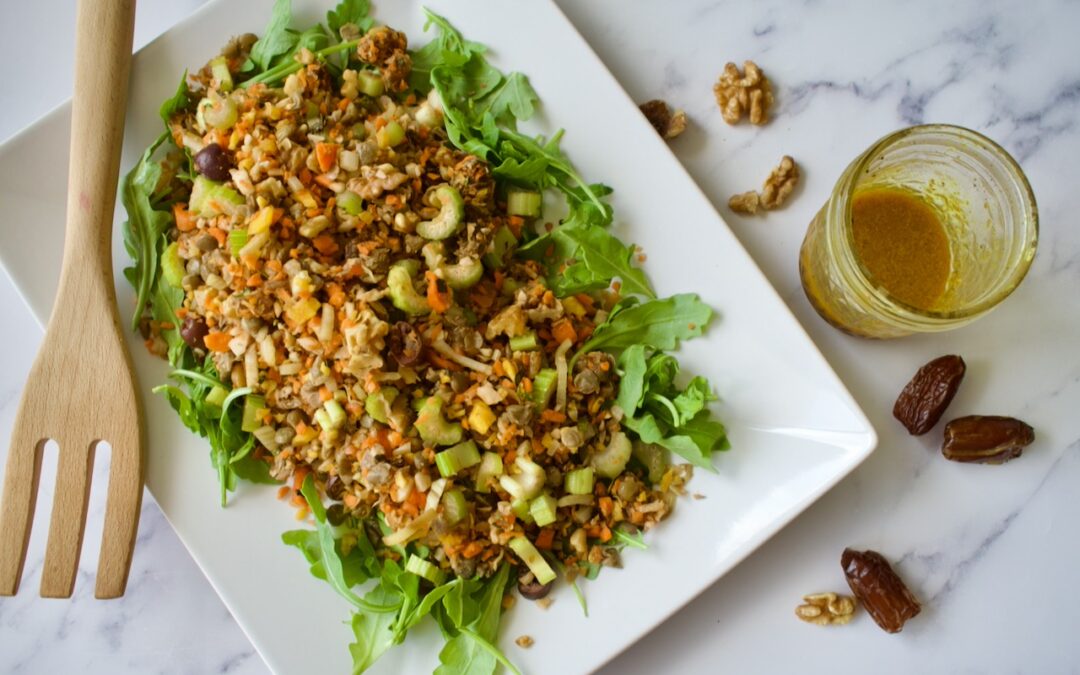
This lentil salad is packed with all the goods and topped off with a perfectly sweet and tangy dressing. I love making this salad for meal prep, as it’s an easy way to get lots of nutrients in!
gluten free and vegan lentil salad
I’ve worked on introducing more beans and legumes into my diet over the last year. I never really liked lentils, but I’ve been trying them out lately just to see. I attempted to make vegan lentil meatballs a few weeks ago (yeah, those didn’t quite work out) and had a bunch of leftover lentils. I wasn’t sure what to do with them, but luckily I figured out something…. this lentil salad! And it did not disappoint. I think lentils might be growing on me.
gluten free and vegan lentil salad
This delicious salad is so easy to make for meal prep for the week, as it stores well in the fridge for up to 5 days. It’s also a great, easy option for a potluck. All you do is chop everything up and toss it together. It really is that simple! To make salad prep even easier, use already cooked and canned lentils instead of cooking your own.
This delicious lentil salad is packed with nutrients and easy to make. It’s the perfect meal prep or potluck option. Gluten free, vegan, and can be made nut free!
Course Main Course
Keyword Easy, gluten free, nutrient dense, vegan
Prep Time 30 minutesminutes
Total Time 17 minutesminutes
Servings 4servings
Ingredients
Salad
2cupscooked brown or green lentils
6carrots, shredded(I just pulse in a food processor)
3ribs of celery, chopped
1fenneldiced
1/2cuppitted and chopped datesa must! These add a lot of flavor
1/2cupdiced olivesalso adds great flavor. I’m not an olive fan, but it’s good in this salad- do it!
1/2cuptoasted and chopped walnutspepitas or other nuts would be good too
1/4cupfresh mintchopped
Dressing
1/4cupolive oil
1/2Tbspgarlic infused olive oilor some minced garlic
1lemon, juiced
2Tbspbalsamic vinegar
1tspmustard
1tspmaple syrup
1/2tspturmeric
1/2tspcinnamon
Salt to taste
Instructions
Combine all salad ingredients together in a bowl and toss.
Mix all dressing ingredients together in a small bowl or jar, adjusting as needed. You can always add a little more of the spices or any other ingredients to get a flavor you love.
Dress the salad and enjoy! I like to serve this over some massaged kale or arugula for an extra nutrient boost.
Hi! I'm Victoria. I was diagnosed with Lyme in 2012 and have been on a healing journey ever since. I love helping others on their road to healing through allergy friendly recipes, exercise, and overall well-being.